2022 NISSAN ROGUE SPORT tire replacement
[x] Cancel search: tire replacementPage 107 of 508
Rear Door Alert:
.Horn & Alert
When selected, the alert is displayed
and the horn sounds.
. Alert Only
When selected, only the alert is dis-
played.
. OFF
When selected, no alert or horn will be
active.
For additional information, refer to “Rear
door alert” (P.2-63).
Remote start (if so equipped):
The “Remote start” feature allows user to
turn the remote engine start on or off.
When turned on, the engine can be
restarted remotely. For additional infor-
mation, refer to “Remote engine start”
(P.3-23).Maintenance
The maintenance mode allows you to set
alerts for the reminding of maintenance
intervals. To change an item:
Select “Maintenance” using the
switchand press OK.
Oil and Filter:
This indicator appears when the custo-
mer set distance comes for changing the
engine oil and filter. You can set or reset
the distance for checking or replacing
these items. For scheduled maintenance
items and intervals, refer to the “9. Main-
tenance and schedules” section.
Tire:
This indicator appears when the custo-
mer set distance comes for replacing
tires. You can set or reset the distance
for replacing tires.
WARNING
The tire replacement indicator is not
a substitute for regular tire checks,
including tire pressure checks. See
“Changing wheels and tires” (P.8-37).
Many factors including tire inflation,
alignment, driving habits and road
conditions affect tire wear and when
tires should be replaced. Setting the tire replacement indicator for a cer-
tain driving distance does not mean
your tires will last that long. Use the
tire replacement indicator as a guide
only and always perform regular tire
checks. Failure to perform regular
tire checks, including tire pressure
checks could result in tire failure.
Serious vehicle damage could occur
and may lead to a collision, which
could result in serious personal in-
jury or death.
Other:
This indicator appears when the custo-
mer set distance comes for checking or
replacing maintenance items other than
the engine oil, oil filter and tires. Other
maintenance items can include such
things as air filter or tire rotation. You
can set or reset the distance for checking
or replacing the items.
Instruments and controls2-25
Page 245 of 508
away from the exhaust system
components.
. Do not stop or park the vehicle
over flammable materials such as
dry grass, wastepaper or rags.
They may ignite and cause a fire.
CAUTION
.Do not use leaded gasoline. De-
posits from leaded gasoline will
seriously reduce the three-way
catalyst’s ability to help reduce
exhaust pollutants.
. Keep your engine tuned up. Mal-
functions in the ignition, fuel in-
jection, or electrical systems can
cause overrich fuel flow into the
three-way catalyst, causing it to
overheat. Do not keep driving if
the engine misfires, or if notice-
able loss of performance or other
unusual operating conditions are
detected. Have the vehicle in-
spected. It is recommended you
visit a NISSAN dealer for this
service.
. Avoid driving with an extremely
low fuel level. Running out of fuel
could cause the engine to misfire, damaging the three-way catalyst.
. Do not race the engine while
warming it up.
. Do not push or tow your vehicle
to start the engine.
TIRE PRESSURE MONITORING SYS-
TEM (TPMS)
Each tire, including the spare (if provided),
should be checked monthly when cold
and inflated to the inflation pressure
recommended by the vehicle manufac-
turer on the vehicle placard or tire infla-
tion pressure label. (If your vehicle has
tires of a different size than the size
indicated on the vehicle placard or tire
inflation pressure label, you should deter-
mine the proper tire inflation pressure for
those tires.)
As an added safety feature, your vehicle
has been equipped with a Tire Pressure
Monitoring System (TPMS) that illumi-
nates a low tire pressure telltale when
one or more of your tires is significantly
under-inflated. Accordingly, when the low
tire pressure telltale illuminates, you
should stop and check your tires as soon
as possible, and inflate them to the
proper pressure. Driving on a significantly
under-inflated tire causes the tire to
overheat and can lead to tire failure. Under-inflation also reduces fuel effi-
ciency and tire tread life, and may affect
the vehicle’s handling and stopping abil-
ity.
Please note that the TPMS is not a
substitute for proper tire maintenance,
and it is the driver’s responsibility to
maintain correct tire pressure, even if
under-inflation has not reached the level
to trigger illumination of the TPMS low
tire pressure telltale.
Your vehicle has also been equipped with
a TPMS malfunction indicator to indicate
when the system is not operating prop-
erly. The TPMS malfunction indicator is
combined with the low tire pressure tell-
tale. When the system detects a malfunc-
tion, the telltale will flash for
approximately one minute and then re-
main continuously illuminated. This se-
quence will continue upon subsequent
vehicle start-ups as long as the malfunc-
tion exists. When the malfunction indica-
tor is illuminated, the system may not be
able to detect or signal low tire pressure
as intended. TPMS malfunctions may
occur for a variety of reasons, including
the installation of replacement or alter-
nate tires or wheels on the vehicle that
prevent the TPMS from functioning prop-
erly. Always check the TPMS malfunction
telltale after replacing one or more tires
Starting and driving5-5
Page 246 of 508

5-6Starting and driving
or wheels on your vehicle to ensure that
the replacement or alternate tires and
wheels allow the TPMS to continue to
function properly.
Additional information
.Since the spare tire (if so equipped) is
not equipped with the TPMS, the TPMS
does not monitor the tire pressure of
the spare tire.
. The TPMS will activate only when the
vehicle is driven at speeds above 16
MPH (25 km/h). Also, this system may
not detect a sudden drop in tire
pressure (for example a flat tire while
driving).
. The low tire pressure warning light
does not automatically turn off when
the tire pressure is adjusted. After the
tire is inflated to the recommended
pressure, the vehicle must be driven at
speeds above 16 MPH (25 km/h) to
activate the TPMS and turn off the low
tire pressure warning light. Use a tire
pressure gauge to check the tire
pressure.
. The “Tire Pressure Low - Add Air”
warning appears in the vehicle infor-
mation display when the low tire
pressure warning light is illuminated
and low tire pressure is detected. The
“Tire Pressure Low - Add Air” warning
turns off when the low tire pressure warning light turns off.
The “Tire Pressure Low - Add Air”
warning does not appear if the low
tire pressure warning light illuminates
to indicate a TPMS malfunction.
. Tire pressure rises and falls depending
on the heat caused by the vehicle’s
operation and the outside tempera-
ture. Do not reduce the tire pressure
after driving because the tire pressure
rises after driving. Low outside tem-
perature can lower the temperature
of the air inside the tire which can
cause a lower tire inflation pressure.
This may cause the low tire pressure
warning light to illuminate. If the
warning light illuminates in low ambi-
ent temperature, check the tire pres-
sure for all four tires.
For additional information, see “Low tire
pressure warning light” (P.2-14) and “Tire
Pressure Monitoring System (TPMS)” (P.6-
3).
WARNING
. If the low tire pressure warning
light illuminates while driving,
avoid sudden steering maneu-
vers or abrupt braking, reduce
vehicle speed, pull off the road
to a safe location and stop the vehicle as soon as possible. Driv-
ing with under-inflated tires may
permanently damage the tires
and increase the likelihood of tire
failure. Serious vehicle damage
could occur and may lead to an
accident and could result in ser-
ious personal injury. Check the
tire pressure for all four tires.
Adjust the tire pressure to the
recommended COLD tire pressure
shown on the Tire and Loading
Information label to turn the low
tire pressure warning light OFF. If
you have a flat tire, replace it with
a spare tire (if so equipped) or
repair it using the emergency tire
puncture repair kit (if so
equipped) as soon as possible.
(See “Flat tire” (P.6-3) for chan-
ging a flat tire.)
. Since the spare tire (if so
equipped) is not equipped with
the TPMS, when a spare tire is
mounted or a wheel is replaced,
the TPMS will not function and
the low tire pressure warning
light will flash for approximately
1 minute. The light will remain on
after 1 minute. Have your tires
replaced and/or TPMS system
reset as soon as possible. It is
Page 257 of 508
JVS0404X
INTELLIGENT KEY BATTERY DIS-
CHARGE
If the battery of the Intelligent Key is
discharged, or environmental conditions
interfere with the Intelligent Key opera-
tion, start the engine according to the
following procedure:
1. Move the shift lever to the P (Park)position (for CVT models) or the shift
lever to the N (Neutral) position (for MT
models).
2. Firmly apply the foot brake.
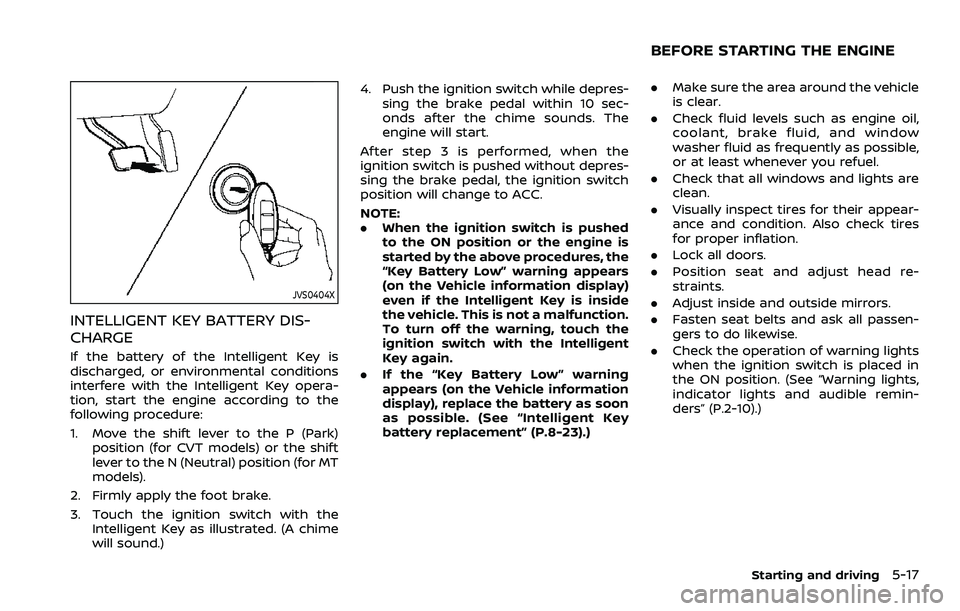
3. Touch the ignition switch with the Intelligent Key as illustrated. (A chime
will sound.) 4. Push the ignition switch while depres-
sing the brake pedal within 10 sec-
onds after the chime sounds. The
engine will start.
After step 3 is performed, when the
ignition switch is pushed without depres-
sing the brake pedal, the ignition switch
position will change to ACC.
NOTE:
. When the ignition switch is pushed
to the ON position or the engine is
started by the above procedures, the
“Key Battery Low” warning appears
(on the Vehicle information display)
even if the Intelligent Key is inside
the vehicle. This is not a malfunction.
To turn off the warning, touch the
ignition switch with the Intelligent
Key again.
. If the “Key Battery Low” warning
appears (on the Vehicle information
display), replace the battery as soon
as possible. (See “Intelligent Key
battery replacement” (P.8-23).)
.Make sure the area around the vehicle
is clear.
. Check fluid levels such as engine oil,
coolant, brake fluid, and window
washer fluid as frequently as possible,
or at least whenever you refuel.
. Check that all windows and lights are
clean.
. Visually inspect tires for their appear-
ance and condition. Also check tires
for proper inflation.
. Lock all doors.
. Position seat and adjust head re-
straints.
. Adjust inside and outside mirrors.
. Fasten seat belts and ask all passen-
gers to do likewise.
. Check the operation of warning lights
when the ignition switch is placed in
the ON position. (See “Warning lights,
indicator lights and audible remin-
ders” (P.2-10).)
Starting and driving5-17
BEFORE STARTING THE ENGINE
Page 391 of 508
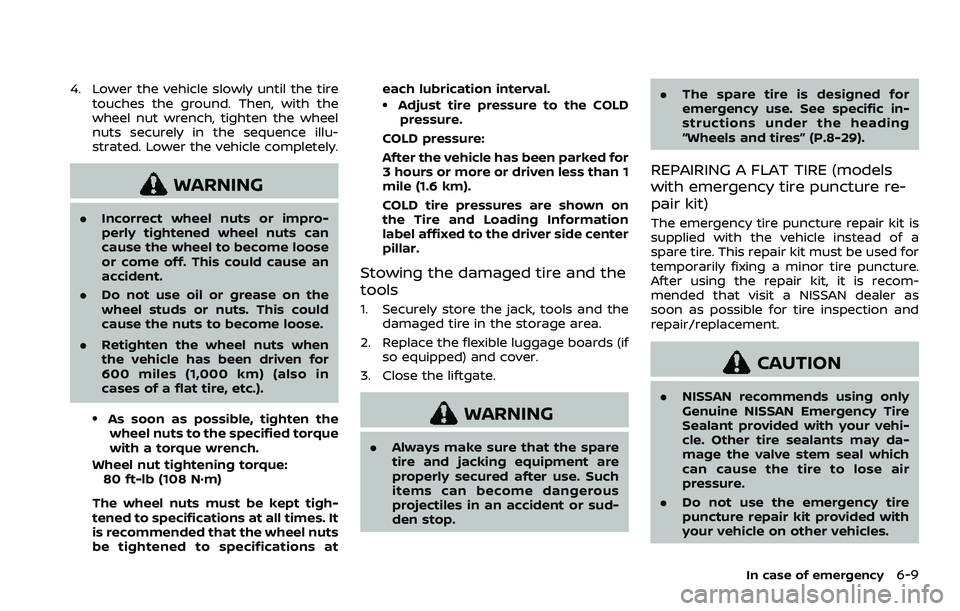
4. Lower the vehicle slowly until the tiretouches the ground. Then, with the
wheel nut wrench, tighten the wheel
nuts securely in the sequence illu-
strated. Lower the vehicle completely.
WARNING
.Incorrect wheel nuts or impro-
perly tightened wheel nuts can
cause the wheel to become loose
or come off. This could cause an
accident.
. Do not use oil or grease on the
wheel studs or nuts. This could
cause the nuts to become loose.
. Retighten the wheel nuts when
the vehicle has been driven for
600 miles (1,000 km) (also in
cases of a flat tire, etc.).
.As soon as possible, tighten the
wheel nuts to the specified torque
with a torque wrench.
Wheel nut tightening torque: 80 ft-lb (108 N·m)
The wheel nuts must be kept tigh-
tened to specifications at all times. It
is recommended that the wheel nuts
be tightened to specifications at each lubrication interval.
.Adjust tire pressure to the COLD
pressure.
COLD pressure:
After the vehicle has been parked for
3 hours or more or driven less than 1
mile (1.6 km).
COLD tire pressures are shown on
the Tire and Loading Information
label affixed to the driver side center
pillar.
Stowing the damaged tire and the
tools
1. Securely store the jack, tools and the damaged tire in the storage area.
2. Replace the flexible luggage boards (if so equipped) and cover.
3. Close the liftgate.
WARNING
. Always make sure that the spare
tire and jacking equipment are
properly secured after use. Such
items can become dangerous
projectiles in an accident or sud-
den stop. .
The spare tire is designed for
emergency use. See specific in-
structions under the heading
“Wheels and tires” (P.8-29).
REPAIRING A FLAT TIRE (models
with emergency tire puncture re-
pair kit)
The emergency tire puncture repair kit is
supplied with the vehicle instead of a
spare tire. This repair kit must be used for
temporarily fixing a minor tire puncture.
After using the repair kit, it is recom-
mended that visit a NISSAN dealer as
soon as possible for tire inspection and
repair/replacement.
CAUTION
.NISSAN recommends using only
Genuine NISSAN Emergency Tire
Sealant provided with your vehi-
cle. Other tire sealants may da-
mage the valve stem seal which
can cause the tire to lose air
pressure.
. Do not use the emergency tire
puncture repair kit provided with
your vehicle on other vehicles.
In case of emergency6-9
Page 396 of 508
6-14In case of emergency
If the tire pressure is 19 psi (130 kPa) or
more but less than the specified pres-
sure:
Turn the compressor switch to the ON (−)
position and inflate the tire up to the
specified pressure. Then repeat the steps
from 8.
If the pressure drops again,the tire
cannot be repaired with this tire punc-
ture repair kit. It is recommended that
contact a NISSAN dealer.
When the tire pressure is the specified
pressure:
The temporary repair is completed.
It is recommended that visit a NISSAN
dealer for tire repair/replacement as soon
as possible.
CAUTION
Do not reuse the tire sealant bottle
or the hose.
For a new tire sealant bottle and
hose, it is recommended that con-
tact a NISSAN dealer. To start your engine with a booster
battery, the instructions and precautions
below must be followed.
WARNING
.
If done incorrectly, jump starting
can lead to a battery explosion,
resulting in severe injury or
death. It could also damage your
vehicle.
. Explosive hydrogen gas is always
present in the vicinity of the
battery. Keep all sparks and
flames away from the battery.
. Do not allow battery fluid to come
into contact with eyes, skin,
clothing or painted surfaces. Bat-
tery fluid is a corrosive sulfuric
acid solution which can cause
severe burns. If the fluid should
come into contact with anything,
immediately flush the contacted
area with water.
. Keep the battery out of the reach
of children.
. The booster battery must be
rated at 12 volts. Use of an im-
properly rated battery can da-
mage your vehicle. .
Whenever working on or near a
battery, always wear suitable eye
protectors (for example, goggles
or industrial safety spectacles)
and remove rings, metal bands,
or any other jewelry. Do not lean
over the battery when jump start-
ing.
. Do not attempt to jump start a
frozen battery. It could explode
and cause serious injury.
. Your vehicle has an automatic
engine cooling fan. It could come
on at any time. Keep hands and
other objects away from it.
JUMP STARTING
Page 413 of 508
8 Do-it-yourself
Maintenance precautions ...................................................... 8-2
Engine compartment check locations ........................ 8-3MR20DD engine model ..................................................... 8-4
Engine cooling system ............................................................. 8-4 Checking engine coolant level .................................... 8-5
Changing engine coolant ................................................ 8-6
Engine oil ........................................................................\
..................... 8-6 Checking engine oil level ................................................. 8-6
Changing engine oil and filter ..................................... 8-6
Continuously Variable Transmission
(CVT) fluid ........................................................................\
.................... 8-9
Brake and clutch (if so equipped) fluid ....................... 8-9
Window washer fluid .............................................................. 8-10
Battery ........................................................................\
........................ 8-11 Jump starting ........................................................................\
. 8-12
Variable voltage control system ................................... 8-13
Drive belt ........................................................................\
.................. 8-13
Spark plugs ........................................................................\
............. 8-14 Replacing spark plugs ..................................................... 8-14
Air cleaner ........................................................................\
............... 8-15
Air duct removal .................................................................. 8-15
Air cleaner filter replacement ................................... 8-15 Windshield wiper blades ..................................................... 8-16
Cleaning ........................................................................\
........... 8-16
Replacing ........................................................................\
........ 8-16
Rear window wiper blade .................................................. 8-17
Brakes ........................................................................\
........................ 8-17 Self-adjusting brakes ..................................................... 8-17
Brake pad wear warning ............................................ 8-17
Fuses ........................................................................\
........................... 8-18 Engine compartment .................................................... 8-18
Passenger compartment ........................................... 8-20
Key fob battery replacement .......................................... 8-21
Intelligent Key battery replacement .......................... 8-23
Lights ........................................................................\
.......................... 8-25 Headlights ........................................................................\
...... 8-25
Exterior and interior lights ........................................ 8-27
Wheels and tires ........................................................................\
8-29
Tire pressure ........................................................................\
8-29
Tire labeling ........................................................................\
.. 8-33
Types of tires ....................................................................... 8-35
Tire chains ........................................................................\
...... 8-36
Changing wheels and tires ...................................... 8-37
Page 447 of 508
4. Three-digit code: Tire type code(Optional)
5. Four numbers represent the week and year the tire was built.
For example, the numbers 3103
means the 31st week of 2003. If
these numbers are missing, then
look on the other sidewall of the
tire.
Tire ply composition and materi-
al
The number of layers or plies of
rubber-coated fabric in the tire.
Tire manufacturers also must in-
dicate the materials in the tire,
which include steel, nylon, polye-
ster, and others.
Maximum permissible inflation
pressure
This number is the greatest
amount of air pressure that should
be put in the tire. Do not exceed the
maximum permissible inflation
pressure.
Maximum load rating
This number indicates the maxi- mum load in kilograms and pounds
that can be carried by the tire.
When replacing the tires on the
vehicle, always use a tire that has
the same load rating as the factory
installed tire.
Term of “tubeless” or “tube type”
Indicates whether the tire requires
an inner tube (“tube type”) or not
(“tubeless”).
The word “radial”
The word “radial” is shown, if the
tire has radial structure.
Manufacturer or brand name
Manufacturer or brand name is
shown.
Other tire-related terminology:
In addition to the many terms that
are defined throughout this sec-
tion, Intended Outboard Sidewall is
(1) the sidewall that contains a
whitewall, bears white lettering or
bears manufacturer, brand and/or
model name molding that is higher
or deeper than the same molding
on the other sidewall of the tire, or (2) the outward facing sidewall of
an asymmetrical tire that has a
particular side that must always
face outward when mounted on a
vehicle.
TYPES OF TIRES
WARNING
.
When changing or replacing tires,
be sure all four tires are of the
same type (Example: Summer, All
Season or Snow) and construc-
tion. A NISSAN dealer may be able
to help you with information
about tire type, size, speed rating
and availability.
. Replacement tires may have a
lower speed rating than the fac-
tory equipped tires, and may not
match the potential maximum
vehicle speed. Never exceed the
maximum speed rating of the
tire.
. Replacing tires with those not
originally specified by NISSAN
could affect the proper operation
of the TPMS.
Do-it-yourself8-35