Page 18 of 647
18. Electronic parking brake (P. 5-23)Automatic brake hold switch (P. 5-25)
19. Power outlet (P. 2-96)
20. Driver heated seat switch
(if so equipped) (P. 2-86)
Driver climate-controlled seat switch
(if so equipped) (P. 2-85)
21. Push-button ignition switch (P. 5-13)
22. Driver supplemental knee air bag
(P. 1-78)
23. Tilt and telescopic steering wheel
control (P. 3-30)
24. Hood release (P. 3-21)
25. Control panel and vehicle information
display switches (P. 2-46)
26. Lif tgate instrument panel switch
(if so equipped) (P. 3-21)
Steering Assist switch (if so equipped)
(P. 2-90)
Instrument brightness control switch
(P. 2-83)
Head Up Display (HUD) switch
(if so equipped) (P. 2-90)
*: Refer to the separate NissanConnect®
Owner's Manual.
Refer to the page number indicated in
parenthesis for operating details.
Illustrated table of contents0-7
Page 20 of 647
Warning/Indicator
light (red) Name Page
or
Brake warning
light 2-13
Charge warning
light 2-14
Electric shif t con-
trol system warn- ing light (if soequipped) 2-14
or
Electronic parking
brake indicator light (if so
equipped) 2-14
Warning/
Indicator
light (red) Name Page
Engine oil pres-
sure warning light (if so equipped) 2-15
Master warning
light (if so
equipped) 2-15
Seat belt warning
light and chime(if so equipped) 2-15
Steering Assist
Hands Off warn- ing light (if soequipped) 2-15
Supplemental air
bag warning light 2-16
Warning/
Indicator light
(yellow) Name Page
or
Anti-lock Braking
System (ABS)warning light 2-16
Automatic Emer-
gency Braking
(AEB) with Pedes- trian Detection
system warning light (if so
equipped) 2-16
Electric power
steering warning light 2-17
WARNING AND INDICATOR LIGHTS
Illustrated table of contents0-9
Page 21 of 647
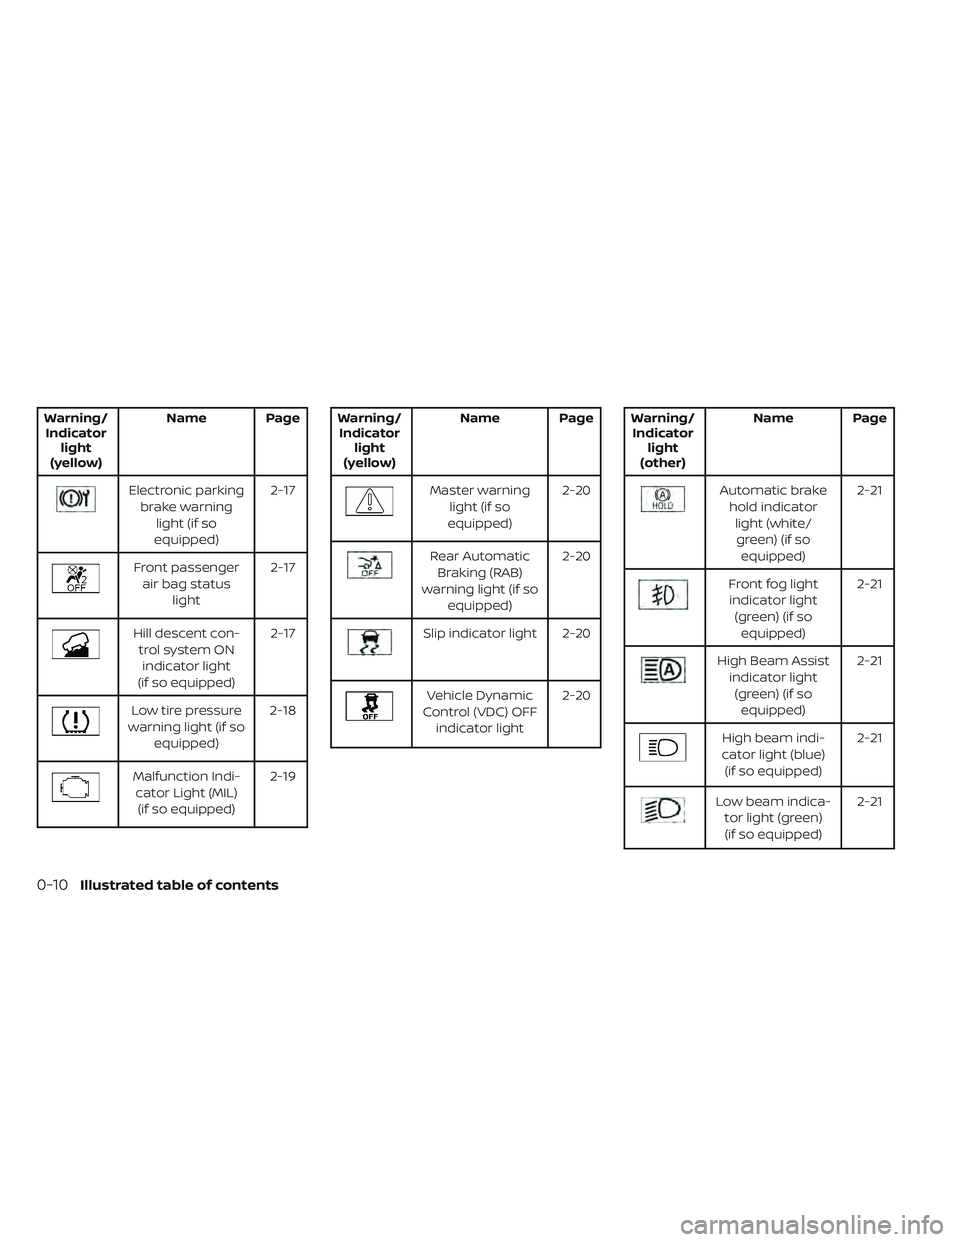
Warning/Indicator light
(yellow) Name Page
Electronic parking
brake warning light (if so
equipped) 2-17
Front passenger
air bag status light 2-17
Hill descent con-
trol system ONindicator light
(if so equipped) 2-17
Low tire pressure
warning light (if so equipped) 2-18
Malfunction Indi-
cator Light (MIL)(if so equipped) 2-19
Warning/
Indicator light
(yellow) Name Page
Master warning
light (if so
equipped) 2-20
Rear Automatic
Braking (RAB)
warning light (if so equipped) 2-20
Slip indicator light 2-20
Vehicle Dynamic
Control (VDC) OFF indicator light 2-20
Warning/
Indicator light
(other) Name Page
Automatic brake
hold indicatorlight (white/green) (if so equipped) 2-21
Front fog light
indicator light (green) (if so equipped) 2-21
High Beam Assist
indicator light(green) (if so equipped) 2-21
High beam indi-
cator light (blue) (if so equipped) 2-21
Low beam indica-
tor light (green)(if so equipped) 2-21
0-10Illustrated table of contents
Page 26 of 647

CAUTION
When adjusting the seat positions, be
sure not to contact any moving parts to
avoid possible injuries and/or damage.
FRONT MANUAL SEAT
ADJUSTMENT (if so equipped)
Your vehicle seats can be adjusted manu-
ally. For additional information about ad-
justing the seats, refer to the steps outlined
in this section.
Forward and backward
Pull the center of the bar up and hold it
while you slide the seat forward or back-
ward to the desired position. Release the
bar to lock the seat in position.
Reclining
To recline the seatback, pull the lever up
and lean back. To bring the seatback for-
ward, pull the lever up and lean your body
forward. Release the lever to lock the seat-
back in position.
The reclining feature allows adjustment of
the seatback for occupants of different
sizes for added comfort and to help obtain
proper seat belt fit. For additional informa-
tion, see “Precautions on seat belt usage”
(P. 1-20). Also, the seatback can be reclined
to allow occupants to rest when the vehicle
is stopped and the shif t lever is in the P
(Park) position.
LRS3352LRS3353
Safety-Seats, seat belts and supplemental restraint system1-3
Page 28 of 647
The reclining feature allows adjustment of
the seatback for occupants of different
sizes for added comfort and to help obtain
proper seat belt fit. For additional informa-
tion, see “Precautions on seat belt usage”
(P. 1-20). Also, the seatback can be reclined
to allow occupants to rest when the vehicle
is stopped and the shif t lever is in P (Park).
Seat lif ter (driver's seat)
Move the switch as shown to adjust the
angle and height of the seat cushion.Lumbar support (driver's seat)
The lumbar support feature provides ad-
justable lower back support to the driver.
Move the lever as shown (manual) or push
the switch as shown (power) to adjust the
seat lumbar area.
LRS3356LRS3387
Power (Type A) (if so equipped)
Safety-Seats, seat belts and supplemental restraint system1-5
Page 29 of 647
2ND ROW SEAT ADJUSTMENT
Forward and backward
Pull the center of the barO1up and hold it
while you slide the seat forward or back-
ward to the desired position. Release the
bar to lock the seat in position.
Reclining
To recline the seatback, pull up on the lever
O2and lean back. To bring the seatback
forward, pull the lever
O2up and lean your
body forward. Release the lever to lock the
seatback in position.
The recline feature allows adjustment of
the seatback for occupants of different
sizes for added comfort and to help obtain
proper seat belt fit. For additional informa-
tion, see “Precautions on seat belt usage”
(P. 1-20). Also, the seatback can be reclined
to allow occupants to rest when the vehicle
is stopped and the shif t lever is in P (Park).
LRS3357
Power (Type B) (if so equipped)
LRS3380
2nd row captain’s seats (if so equipped)
LRS3381
2nd row bench seats (if so equipped)
1-6Safety-Seats, seat belts and supplemental restraint system
Page 32 of 647

3RD ROW BENCH SEAT
ADJUSTMENT
Reclining
To recline the seatback, pull up on the latch
located on the outside corner of each seat-
back. Lean back until the desired angle is
obtained.
To bring the seatback forward again, pull
up on the latch and pull the seatback up-
right until the desired angle is obtained.The recline feature allows adjustment of
the seatback for occupants of different
sizes for added comfort and to help obtain
proper seat belt fit. For additional informa-
tion, see “Precautions on seat belt usage”
(P. 1-20). Also, the seatback can be reclined
to allow occupants to rest when the vehicle
is stopped and the shif t lever is in P (Park).
WARNING
• Af ter adjustment, gently rock in the
seat to make sure it is securely
locked.
• Do not ride in a moving vehicle when
the seatback is reclined. This can be
dangerous. The shoulder belt will not
be against your body. In an accident,
you could be thrown into it and re-
ceive neck or other serious injuries.
You could also slide under the lap belt
and receive serious internal injuries.
• For the most effective protection
when the vehicle is in motion, the
seat should be upright. Always sit
well back and upright in the seat and
adjust the seat belt properly. For ad-
ditional information, see “Precau-
tions on seat belt usage” (P. 1-20).
ARMRESTS
The 2nd row bench seat or the 2nd row
captain’s chairs come equipped with arm-
rest(s). Pull the armrest down as shown.
LRS3358LRS3383
2nd row captain’s seats (if so equipped)
Safety-Seats, seat belts and supplemental restraint system1-9
Page 47 of 647
•Do not allow children to play with the
seat belts. Most seating positions are
equipped with Automatic Locking
Retractor (ALR) mode seat belts. If
the seat belt becomes wrapped
around a child’s neck with the ALR
mode activated, the child can be se-
riously injured or killed if the seat belt
retracts and becomes tight. This can
occur even if the vehicle is parked.
Unbuckle the seat belt to release the
child. If the seat belt cannot be un-
buckled or is already unbuckled, re-
lease the child by cutting the seat
belt with a suitable tool (such as a
knife or scissors) to release the seat
belt.
Fastening the seat belts
1. Adjust the seat. For additional informa- tion, see “Seats” (P. 1-2).
LRS3352
Manual front seat shown (if so equipped)
1-24Safety-Seats, seat belts and supplemental restraint system