Page 98 of 346
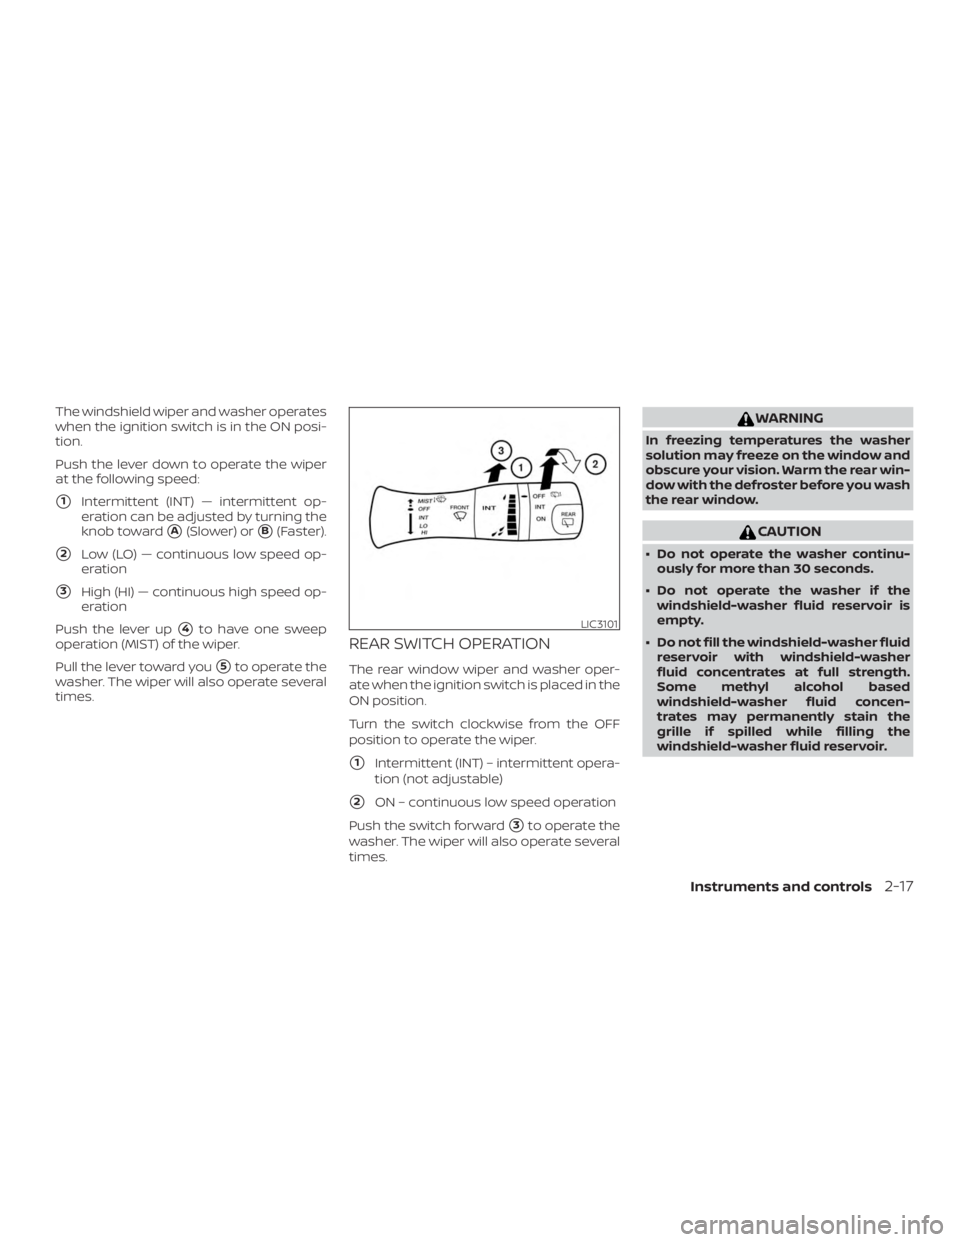
The windshield wiper and washer operates
when the ignition switch is in the ON posi-
tion.
Push the lever down to operate the wiper
at the following speed:
�1Intermittent (INT) — intermittent op-
eration can be adjusted by turning the
knob toward
�A(Slower) or�B(Faster).
�2Low (LO) — continuous low speed op-
eration
�3High (HI) — continuous high speed op-
eration
Push the lever up
�4to have one sweep
operation (MIST) of the wiper.
Pull the lever toward you
�5to operate the
washer. The wiper will also operate several
times.
REAR SWITCH OPERATION
The rear window wiper and washer oper-
ate when the ignition switch is placed in the
ON position.
Turn the switch clockwise from the OFF
position to operate the wiper.
�1Intermittent (INT) – intermittent opera-
tion (not adjustable)
�2ON – continuous low speed operation
Push the switch forward
�3to operate the
washer. The wiper will also operate several
times.
Page 122 of 346
OPENER OPERATION
The fuel-filler door release is located below
the instrument panel. To open the fuel-filler
door, pull the release. To lock, close the fuel-
filler door securely.
FUEL-FILLER CAP
The fuel-filler cap is a detachable type. Turn
the cap counterclockwise
�1to remove. To
tighten, turn the cap clockwise
�2until a
single click is heard.
Put the fuel-filler cap on the cap holder
while refueling.
Page 177 of 346
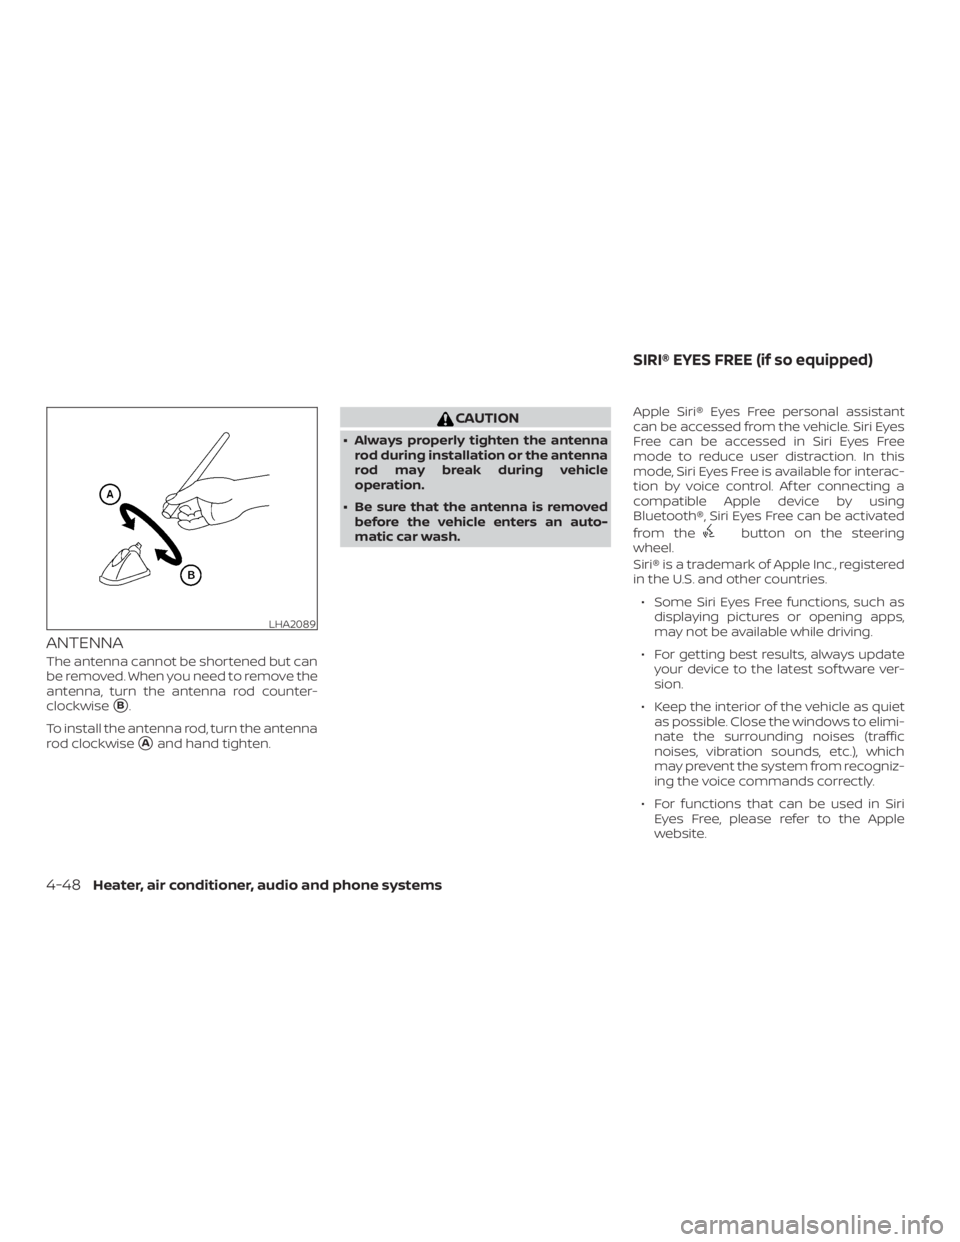
ANTENNA
The antenna cannot be shortened but can
be removed. When you need to remove the
antenna, turn the antenna rod counter-
clockwise
�B.
To install the antenna rod, turn the antenna
rod clockwise
�Aand hand tighten.
Page 235 of 346

∙ Use the correct jack-up points. Neveruse any other part of the vehicle for
jack support.
∙ Never jack up the vehicle more than necessary.
∙ Never use blocks on or under the jack.
∙ Do not start or run the engine while vehicle is on the jack. It may cause the
vehicle to move. This is especially true
for vehicles with limited slip
differentials.
∙ Do not allow passengers to stay in the vehicle while it is on the jack.
∙ Never run the engine with a wheel(s) off the ground. It may cause the ve-
hicle to move. Always refer to the proper illustrations for
the correct placement and jack-up points
for your specific vehicle model and jack
type.
Carefully read the caution label attached
to the jack body and the following in-
structions.
1. Loosen each wheel nut 1 or 2 turns by turning counterclockwise with the
wheel nut wrench. Do not remove the
wheel nuts until the tire is off the
ground. 2. Place the jack directly under the
jack-up point as illustrated so the top
of the jack contacts the vehicle at the
jack-up point. Align the jack head be-
tween the 2 notches in the front or the
rear. Also fit the groove of the jack head
between the notches.
The jack should be used on firm and
level ground.
3. To lif t the vehicle, securely hold the jack lever and rod with both hands. Carefully
raise the vehicle until the tire clears the
ground. Remove the wheel nuts, and
then remove the tire.
Page 238 of 346
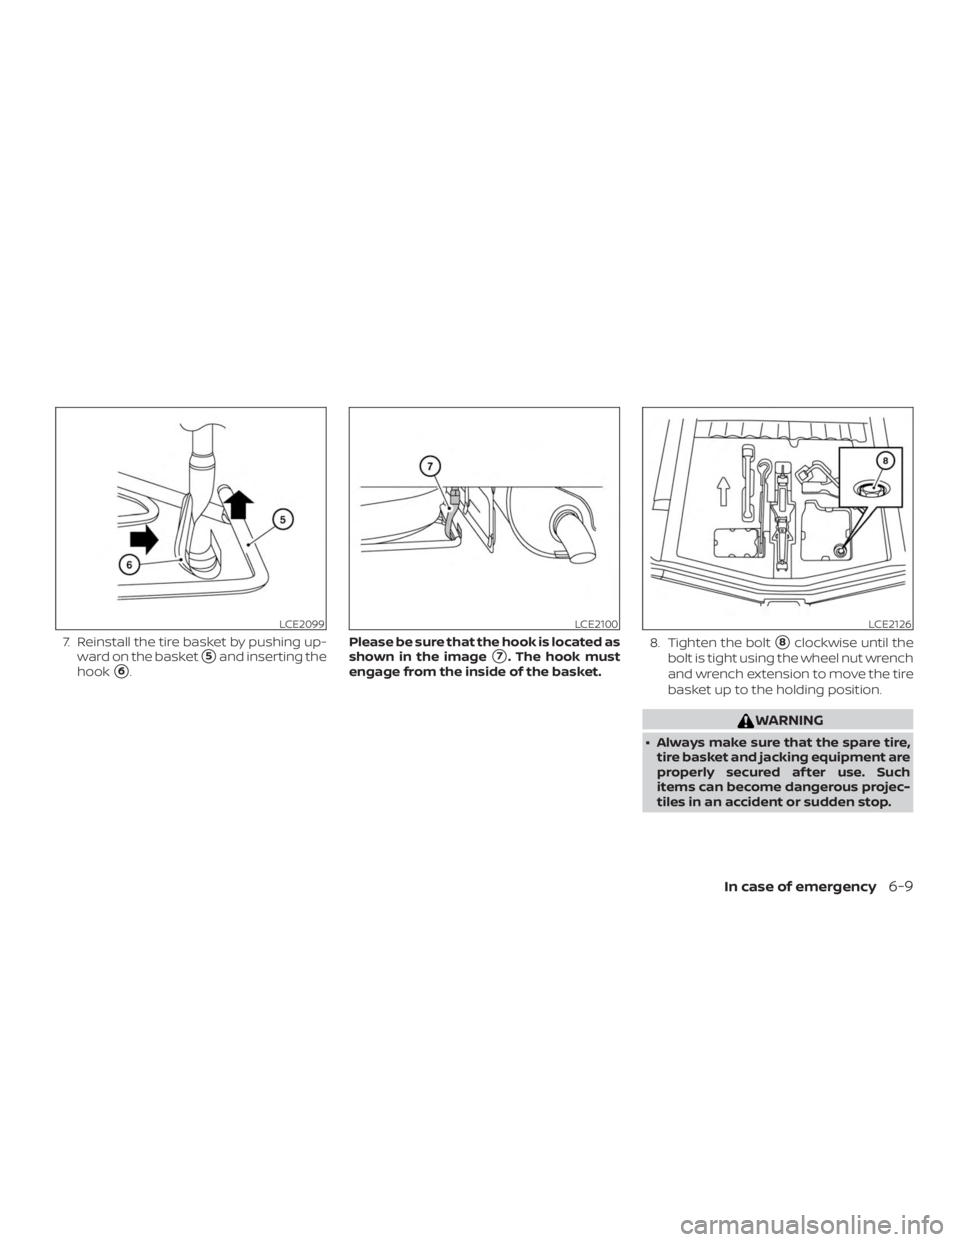
7. Reinstall the tire basket by pushing up-ward on the basket
�5and inserting the
hook
�6. Please be sure that the hook is located as
shown in the image�7. The hook must
engage from the inside of the basket. 8. Tighten the bolt�8clockwise until the
bolt is tight using the wheel nut wrench
and wrench extension to move the tire
basket up to the holding position.
Page 262 of 346
CHANGING ENGINE OIL
1. Park the vehicle on a level surface andapply the parking brake. 2. Start the engine and let it idle until it
reaches operating temperature, then
turn it off.
3. Remove the oil filler cap
�Aby turning it
counterclockwise.
4. Place a large drain pan under the drain plug
�B.
5. Remove the drain plug
�Bwith a
wrench by turning it counterclockwise
and completely drain the oil.
If the oil filter is to be changed, remove
and replace it at this time. For addi-
tional information, refer to “Changing
engine oil filter” in this section.
Page 263 of 346
8. Start the engine. Check for leakagearound the drain plug
�Band oil filter.
Correct as required.
9. Turn the engine off and wait more than 10 minutes. Check the oil level with the
dipstick. Add engine oil if necessary.
CHANGING ENGINE OIL FILTER
1. Park the vehicle on a level surface and
apply the parking brake.
2. Turn the engine off. 3. Place a large drain pan under the oil
filter
�B.
4. Loosen the oil filter with an oil filter wrench by turning it counterclockwise.
Then remove the oil filter by turning it
by hand.
Page 337 of 346
 .....10-14
Car phone or CB radio ............4-51
Childr")
C
Capacities and recommended fuel/
lubricants....................10-2
Cargocover...................2-25
Cargo
(See vehicle loading information) .....10-14
Car phone or CB radio ............4-51
Childrestraints........1-20, 1-21, 1-23, 1-25 LATCH (Lower Anchors and Tethers for
CHildren)System..............1-25
Precautions on child
restraints .........1-23, 1-30, 1-36, 1-41
Top tether strap anchor point
locations.................. .1-28
Child safety rear door lock ..........3-6
Chimes, audible reminders .........2-14
Cleaningexteriorandinterior......7-2,7-4
Clockset.....................4-4
Clutch Clutchfluid.................8-10
C.M.V.S.S. certification label .........10-12
Coldweatherdriving.............5-27
Control panel buttons .............4-2
Brightness/contrast button .......4-6
Controls Audio controls (steering wheel) .....4-47
Heater and air conditioner controls . .4-20
Coolant Capacities and recommended
fuel/lubricants...............10-2
Changing engine coolant .........8-5
Checking engine coolant level ......8-5
Corrosionprotection..............7-7
Cruisecontrol..................5-17 Cupholders...............2-24,2-25
Curtain side-impact and rollover air
bag.......................
.1-60
D
Daytime Running Lights (DRL) system. . .2-19
Defroster switch Rear window and outside mirror
defrosterswitch..............2-18
Dimensions and weights ..........10-10
Dimmer switch for instrument panel . . .2-20
Display controls
(see control panel buttons) ..........4-2
Door locks ..................3-3,3-4
Door open warning light ...........2-10
Drivebelt ....................8-14
Driving Cold weather driving ...........5-27
Driving with automatic transmission . .5-9
Driving with manual
transmission ..............5-7,5-14
Precautions when starting and
driving.....................5-2
Drivingthevehicle ...............5-9
E
Economy - fuel .................5-20
Emission control information label . . . .10-12
Emission control system warranty . . . .10-19
Engine Before starting the engine ........5-8
Blockheater................5-29 Capacities and recommended
fuel/lubricants...............10-2
Changing engine coolant
.........8-5
Changing engine oil ............8-7
Changing engine oil filter .........8-8
Checking engine coolant level ......8-5
Checking engine oil level .........8-6
Engine compartment check
locations...................8-3
Engine cooling system ..........8-4
Engine oil ...................8-6
Engine oil and oil filter
recommendation .............10-7
Engine oil pressure warning light . . . .2-10
Engine oil viscosity .............10-7
Engine serial number ..........10-12
Engine specifications ...........10-9
Starting the engine .............5-8
EventDatarecorders ............10-21
Exhaust gas (Carbon monoxide) .......5-2
Explanation of maintenance items .....9-2
Explanation
of scheduled maintenance
items .......................9-5
Extended storage switch ..........8-20
F
Flashers
(Seehazardwarningflasherswitch)....6-2
Flattire......................6-2
Floormatpositioningaid...........7-6
Fluid Automatic transmission fluid (ATF) . . .8-9
Brakefluid..................8-9
11-2