2022 NISSAN KICKS transmission
[x] Cancel search: transmissionPage 103 of 500
WARNING
If the supplemental air bag warning
light is on, it could mean that the front
air bag, side air bag, curtain air bag
and/or pretensioner systems will not
operate in an accident. To help avoid
injury to yourself or others, have your
vehicle checked as soon as possible. It
is recommended that you visit a
NISSAN dealer for this service.
INDICATOR LIGHTS
For additional information, refer to “Vehicle
information display” in this section.
Blind Spot Warning (BSW)
indicator light (if so equipped)
This indicator light will illuminate when the
BSW system is operating. If the light illumi-
nates yellow while the system is on, it may
indicate a malfunction. Have the system
checked. It is recommended that you visit a
NISSAN dealer for this service.
For additional information, refer to “Blind
Spot Warning (BSW)” and “Rear Cross Traffic
Alert (RCTA)” in the “Starting and driving”
section of this manual.
CRUISE indicator light (if so
equipped)
The light comes on when the cruise control
switch is pushed. The light goes out when
the switch is pushed again. When the
cruise indicator light comes on, the cruise
control system is operational. For addi-
tional information, refer to “Cruise control”
in the “Starting and driving” section of this
manual.
DRIVE SPORT mode
indicator light (if so equipped)
This light illuminates and then turns off
when the ignition switch is placed in the ON
position, and when the DRIVE SPORT mode
is selected.
For additional information, refer to “Con-
tinuously Variable Transmission (CVT)” in
the “Starting and driving” section of this
manual.
Engine start operation
indicator light (if so equipped)
For vehicles equipped with push-button ig-
nition this indicator illuminates when the
ignition switch is in the LOCK, OFF or ON
position with the shif t lever in the P (Park)
position. This indicator means that the engine will
start by pushing the push-button ignition
switch with the brake pedal depressed.
Front fog light indicator
light (green) (if so
equipped)
The front fog light indicator light illumi-
nates when the front fog lights are on. For
additional information, refer to “Fog light
switch” in this section.
Front passenger air bag
status light
The front passenger air bag status light will
be lit and the passenger front air bag will be
off depending on how the front passenger
seat is being used.
For additional information, refer to “Front
passenger air bag and status light” in the
“Safety — Seats, seat belts and supplemen-
tal restraint system” section of this manual.
High Beam Assist indicator
light (green) (if so equipped)
This indicator light illuminates when the
headlights come on while the headlight
switch is in the AUTO position with the high
Instruments and controls2-19
Page 116 of 500
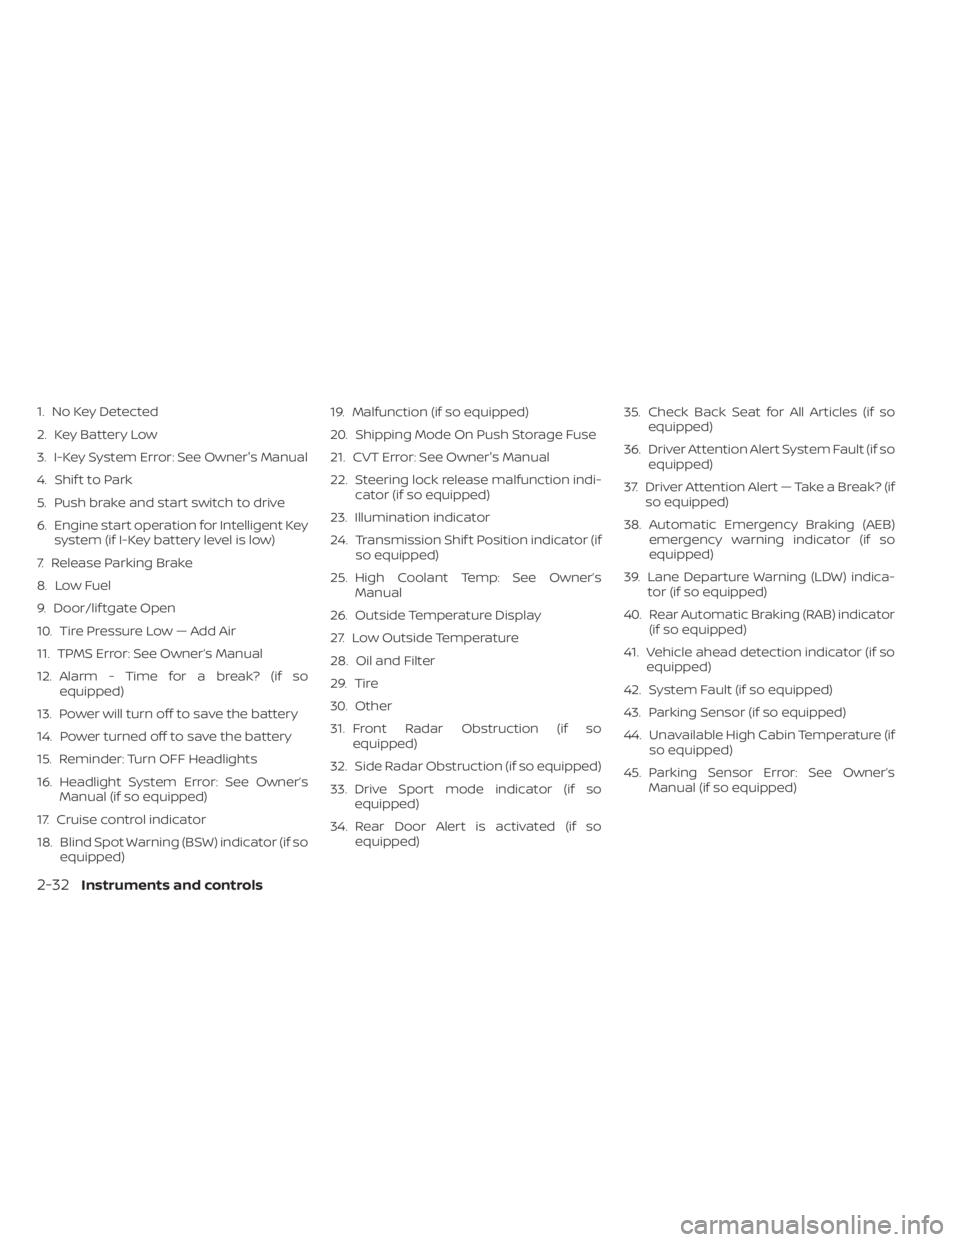
1. No Key Detected
2. Key Battery Low
3. I-Key System Error: See Owner's Manual
4. Shif t to Park
5. Push brake and start switch to drive
6. Engine start operation for Intelligent Keysystem (if I-Key battery level is low)
7. Release Parking Brake
8. Low Fuel
9. Door/lif tgate Open
10. Tire Pressure Low — Add Air
11. TPMS Error: See Owner’s Manual
12. Alarm - Time for a break? (if so equipped)
13. Power will turn off to save the battery
14. Power turned off to save the battery
15. Reminder: Turn OFF Headlights
16. Headlight System Error: See Owner’s Manual (if so equipped)
17. Cruise control indicator
18. Blind Spot Warning (BSW) indicator (if so equipped) 19. Malfunction (if so equipped)
20. Shipping Mode On Push Storage Fuse
21. CVT Error: See Owner's Manual
22. Steering lock release malfunction indi-
cator (if so equipped)
23. Illumination indicator
24. Transmission Shif t Position indicator (if so equipped)
25. High Coolant Temp: See Owner’s Manual
26. Outside Temperature Display
27. Low Outside Temperature
28. Oil and Filter
29. Tire
30. Other
31. Front Radar Obstruction (if so equipped)
32. Side Radar Obstruction (if so equipped)
33. Drive Sport mode indicator (if so equipped)
34. Rear Door Alert is activated (if so equipped) 35. Check Back Seat for All Articles (if so
equipped)
36. Driver Attention Alert System Fault (if so equipped)
37. Driver Attention Alert — Take a Break? (if so equipped)
38. Automatic Emergency Braking (AEB) emergency warning indicator (if so
equipped)
39. Lane Departure Warning (LDW) indica- tor (if so equipped)
40. Rear Automatic Braking (RAB) indicator (if so equipped)
41. Vehicle ahead detection indicator (if so equipped)
42. System Fault (if so equipped)
43. Parking Sensor (if so equipped)
44. Unavailable High Cabin Temperature (if so equipped)
45. Parking Sensor Error: See Owner’s Manual (if so equipped)
2-32Instruments and controls
Page 119 of 500
• Blind Spot Warning (BSW)
• Rear Cross Traffic Alert (RCTA)
If one or more of these warning appears,
have the system checked. It is recom-
mended that you visit a NISSAN dealer for
this service.
Shipping Mode On Push Storage Fuse
This warning may appear if the extended
storage switch is not pushed in. When this
warning appears, push in the extended
storage switch to turn off the warning. For
additional information, refer to “Extended
storage switch” in this section.
CVT Error: See Owner's Manual
This warning illuminates when there is a
problem with the CVT system. If this warn-
ing comes on, have the system checked. It
is recommended that you visit a NISSAN
dealer for this service.
Steering lock release malfunction
indicator (if so equipped)
This indicator appears when the steering
lock cannot be released.
If this indicator appears, push the ignition
switch while lightly turning the steering
wheel right and lef t.
Illumination indicator
This indicator shows the illumination ad-
justment of the instrument panel. For addi-
tional information, refer to “Instrument
brightness control” in this section.
Transmission Shif t Position indicator
(if so equipped)
This indicator shows the transmission shif t
position.
High Coolant Temp: See Owner’s
Manual
This warning appears when the tempera-
ture of the engine coolant is too high. Stop
the vehicle in a safe location as soon as
possible. Avoid quick starting or abrupt ac-
celeration. When the warning turns off, the
vehicle can be driven.
If the warning appears again soon af ter it
turns off, have the vehicle checked. It is rec-
ommended that you visit a NISSAN dealer
for this service.
Outside Temperature Display
The outside temperature display appears
in the center region of the vehicle informa-
tion display.
Low Outside Temperature
This warning appears if the outside tem-
perature is below 37°F (3°C). The tempera-
ture can be changed to display in Celsius or
Fahrenheit. For additional information, re-
fer to “Settings” in this section.
Oil and Filter
This indicator appears when the customer
set distance comes for changing the en-
gine oil and filter. You can set or reset the
distance for checking or replacing these
items. For scheduled maintenance items
and intervals, refer to the “Maintenance and
schedules” section of this manual.
Tire
This indicator appears when the customer
set distance is reached for replacing tires.
You can set or reset the distance for replac-
ing tires.
Instruments and controls2-35
Page 164 of 500
LOCKING WITH POWER DOOR
LOCK SWITCH
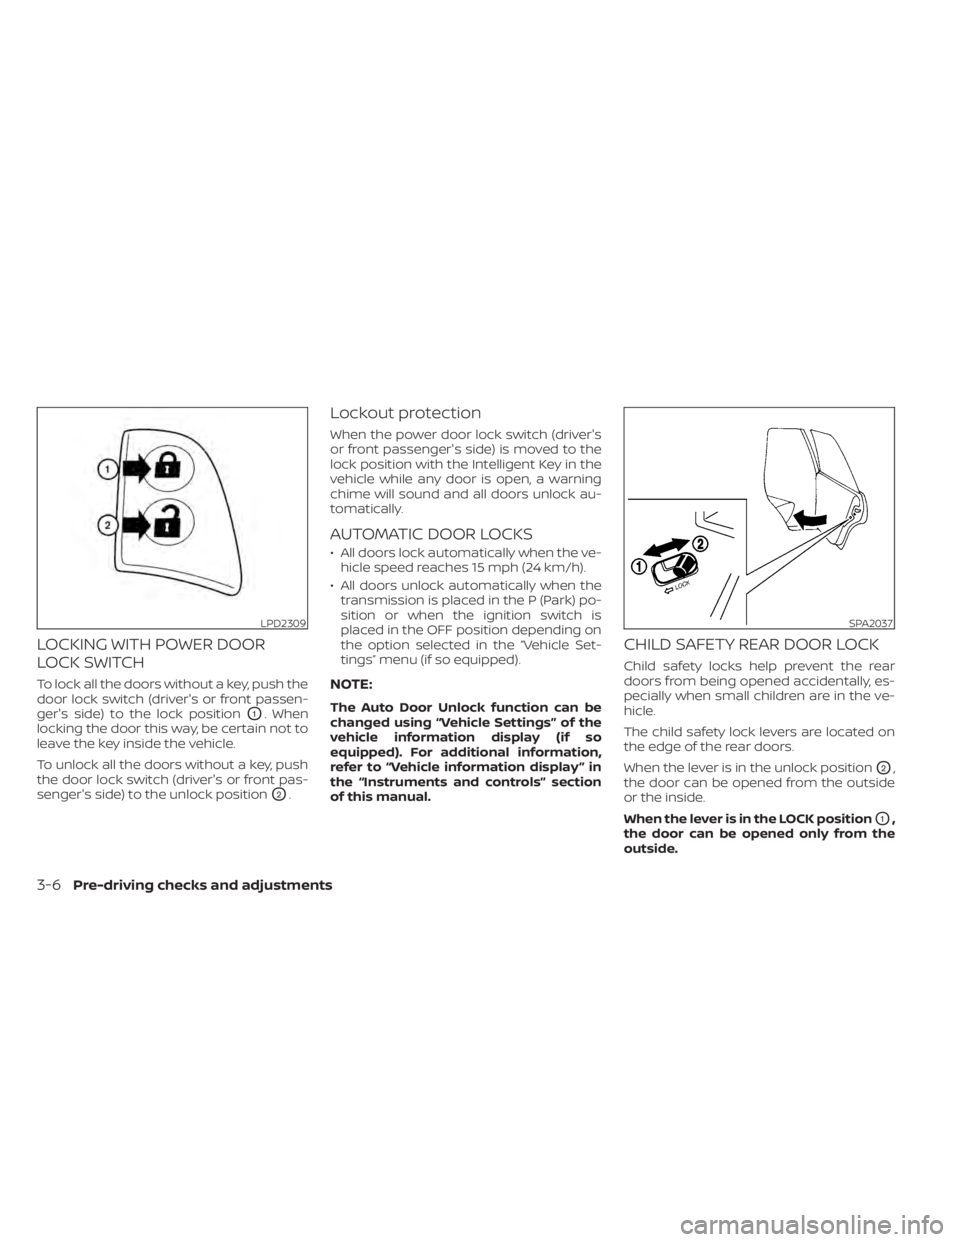
To lock all the doors without a key, push the
door lock switch (driver's or front passen-
ger's side) to the lock position
O1. When
locking the door this way, be certain not to
leave the key inside the vehicle.
To unlock all the doors without a key, push
the door lock switch (driver's or front pas-
senger's side) to the unlock position
O2.
Lockout protection
When the power door lock switch (driver's
or front passenger's side) is moved to the
lock position with the Intelligent Key in the
vehicle while any door is open, a warning
chime will sound and all doors unlock au-
tomatically.
AUTOMATIC DOOR LOCKS
• All doors lock automatically when the ve- hicle speed reaches 15 mph (24 km/h).
• All doors unlock automatically when the transmission is placed in the P (Park) po-
sition or when the ignition switch is
placed in the OFF position depending on
the option selected in the “Vehicle Set-
tings” menu (if so equipped).
NOTE:
The Auto Door Unlock function can be
changed using “Vehicle Settings” of the
vehicle information display (if so
equipped). For additional information,
refer to “Vehicle information display ” in
the “Instruments and controls” section
of this manual.
CHILD SAFETY REAR DOOR LOCK
Child safety locks help prevent the rear
doors from being opened accidentally, es-
pecially when small children are in the ve-
hicle.
The child safety lock levers are located on
the edge of the rear doors.
When the lever is in the unlock position
O2,
the door can be opened from the outside
or the inside.
When the lever is in the LOCK position
O1,
the door can be opened only from the
outside.
SPA2037
3-6Pre-driving checks and adjustments
Page 289 of 500
CONTINUOUSLY VARIABLE
TRANSMISSION (CVT)CAUTION
• Except in an emergency, do not shif t
to the N (Neutral) position while driv-
ing. Coasting with the transmission
in the N (Neutral) position may cause
serious damage to the transmission.
• To avoid possible damage to your ve-
hicle, when stopping the vehicle on
an uphill grade, do not hold the ve-
hicle by depressing the accelerator
pedal. The foot brake should be used
for this purpose.
The CVT in your vehicle is electronically
controlled to produce maximum power
and smooth operation.
The recommended operating procedures
for this transmission are shown on the fol-
lowing pages. Follow these procedures for
maximum vehicle performance and driv-
ing enjoyment.
NOTE:
Engine power may be automatically re-
duced to protect the CVT if the engine
speed increases quickly when driving on
slippery roads or while being tested on
some dynamometers.
Starting the vehicle
1. Af ter starting the engine, fully depress the foot brake pedal before moving the
shif t lever out of the P (Park) position.
This Continuously Variable Transmis-
sion is designed so that the foot brake
pedal must be depressed before shif t-
ing from P (Park) to any driving posi-
tion while the ignition switch is in the
ON position.
The shif t lever cannot be moved out of
the P (Park) position and into any of
the other positions if the ignition
switch is placed in the LOCK or OFF
position.
2. Keep the foot brake pedal depressed and move the shif t lever to a driving
position.
3. Release the parking brake and foot brake pedal, and then gradually start the
vehicle in motion.
DRIVING THE VEHICLE
Starting and driving5-17
Page 290 of 500
WARNING
• Do not depress the accelerator pedal
while shif ting from P (Park) or N (Neu-
tral) to R (Reverse), D (Drive) or L (Low)
position. Always depress the brake
pedal until shif ting is completed.
Failure to do so could cause you to
lose control and have an accident.
• Cold engine idle speed is high, so use
caution when shif ting into a forward
or reverse gear before the engine has
warmed up.
• Do not downshif t abruptly on slip-
pery roads. This may cause a loss of
control.
• Never shif t to either the P (Park) or R
(Reverse) position while the vehicle is
moving forward and P (Park) or D
(Drive) position while the vehicle is
reversing. This could cause an acci-
dent or damage the transmission.CAUTION
• To avoid possible damage to your ve-
hicle, when stopping the vehicle on
an uphill grade, do not hold the ve-
hicle by depressing the accelerator
pedal. The foot brake should be used
for this purpose.
• Except in an emergency, do not shif t
to the N (Neutral) position while driv-
ing. Coasting with the transmission
in the N (Neutral) position may cause
serious damage to the transmission.
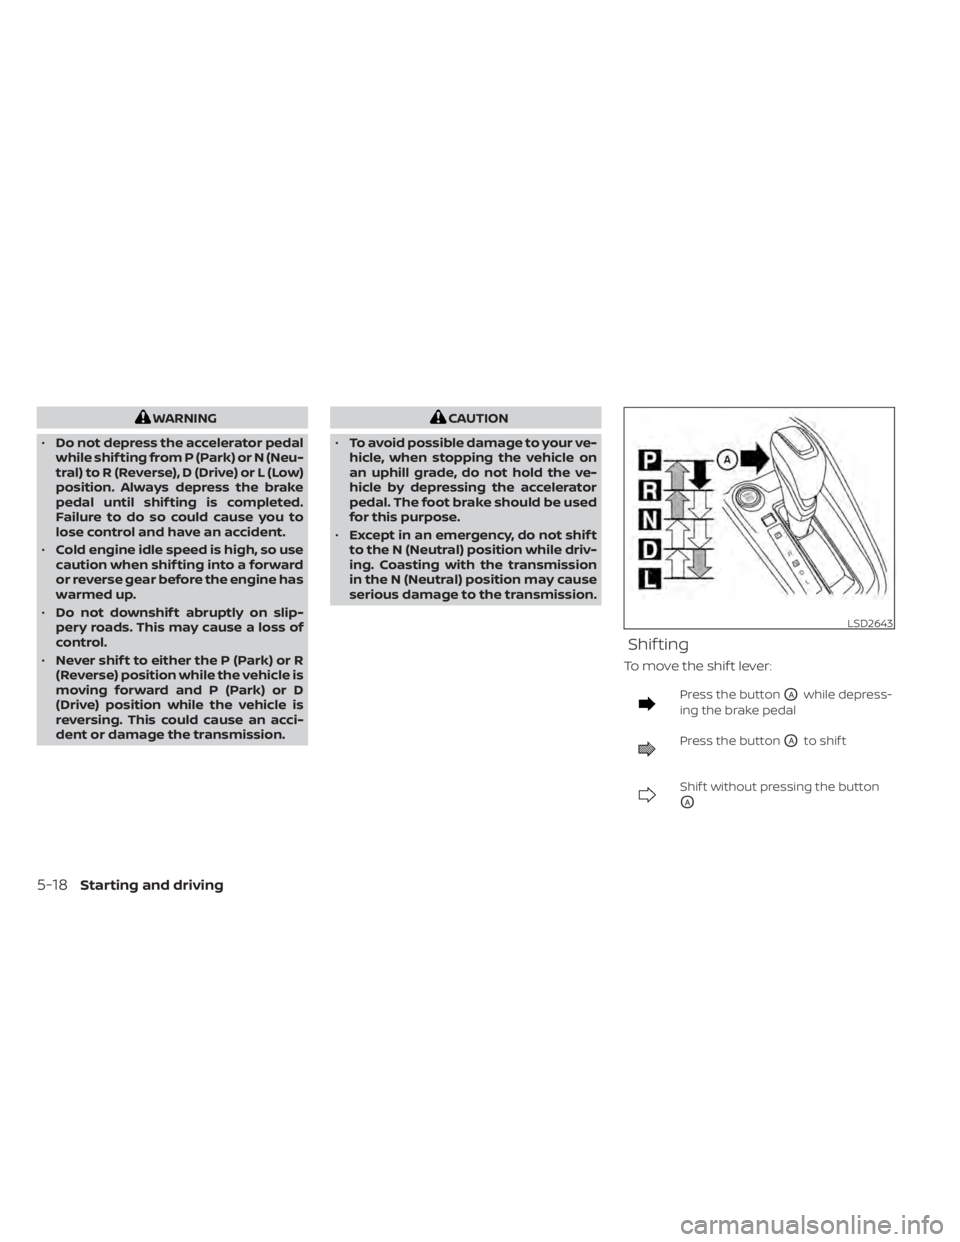
Shif ting
To move the shif t lever:
Press the buttonOAwhile depress-
ing the brake pedal
Press the buttonOAto shif t
Shif t without pressing the button
OA
5-18Starting and driving
Page 291 of 500
Af ter starting the engine, fully depress the
brake pedal and move the shif t lever from P
(Park) to any of the desired shif t positions.
CAUTION
To prevent transmission damage, use
the P (Park) position only when the ve-
hicle is completely stopped.
Use the P (Park) shif t lever position when
the vehicle is parked or when starting the
engine. Make sure the vehicle is completely
stopped.
The brake pedal should be depressed to
move the shif t lever from N (Neutral) or
any drive position to P (Park).
Apply the parking brake. When parking on a
hill, apply the parking brake first, then move
the shif t lever into the P (Park) position.
R (Reverse)
CAUTION
To prevent transmission damage, use
the R (Reverse) position only when the
vehicle is completely stopped.
Use the R (Reverse) position to back up.
Make sure the vehicle is completely
stopped before selecting the R (Reverse)
position. The brake pedal must be de-
pressed in to move the shif t lever from P
(Park) or the shif t lever button pressed in
from N (Neutral) or any drive position to R
(Reverse).
N (Neutral)
Neither forward nor reverse gear is en-
gaged. The engine can be started in this
position. You may shif t to N (Neutral) and
restart a stalled engine while the vehicle is
moving.
D (Drive)
Use this position for all normal forward
driving.
L(Low)
Use this position for engine braking on
steep downhill gradients/climbing steep
slopes and whenever approaching sharp
bends. Do not use the L (Low) position in
any other circumstances.
Starting and driving5-19
Page 292 of 500
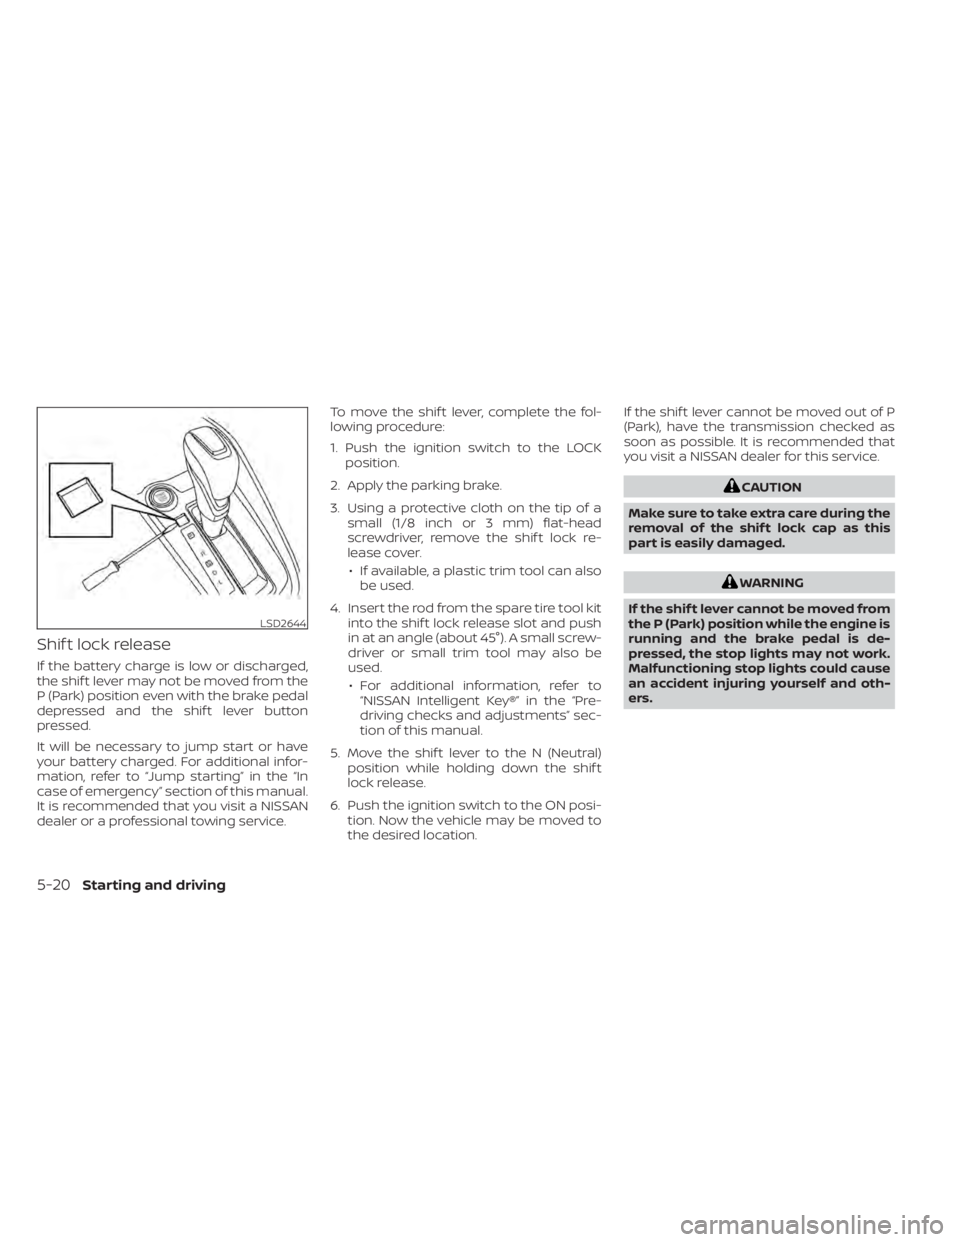
Shif t lock release
If the battery charge is low or discharged,
the shif t lever may not be moved from the
P (Park) position even with the brake pedal
depressed and the shif t lever button
pressed.
It will be necessary to jump start or have
your battery charged. For additional infor-
mation, refer to “Jump starting” in the “In
case of emergency” section of this manual.
It is recommended that you visit a NISSAN
dealer or a professional towing service.To move the shif t lever, complete the fol-
lowing procedure:
1. Push the ignition switch to the LOCK
position.
2. Apply the parking brake.
3. Using a protective cloth on the tip of a small (1/8 inch or 3 mm) flat-head
screwdriver, remove the shif t lock re-
lease cover.
• If available, a plastic trim tool can also be used.
4. Insert the rod from the spare tire tool kit into the shif t lock release slot and push
in at an angle (about 45°). A small screw-
driver or small trim tool may also be
used.
• For additional information, refer to “NISSAN Intelligent Key®” in the “Pre-
driving checks and adjustments” sec-
tion of this manual.
5. Move the shif t lever to the N (Neutral) position while holding down the shif t
lock release.
6. Push the ignition switch to the ON posi- tion. Now the vehicle may be moved to
the desired location. If the shif t lever cannot be moved out of P
(Park), have the transmission checked as
soon as possible. It is recommended that
you visit a NISSAN dealer for this service.
WARNING
If the shif t lever cannot be moved from
the P (Park) position while the engine is
running and the brake pedal is de-
pressed, the stop lights may not work.
Malfunctioning stop lights could cause
an accident injuring yourself and oth-
ers.
5-20Starting and driving