2022 NISSAN KICKS rail
[x] Cancel search: railPage 66 of 500
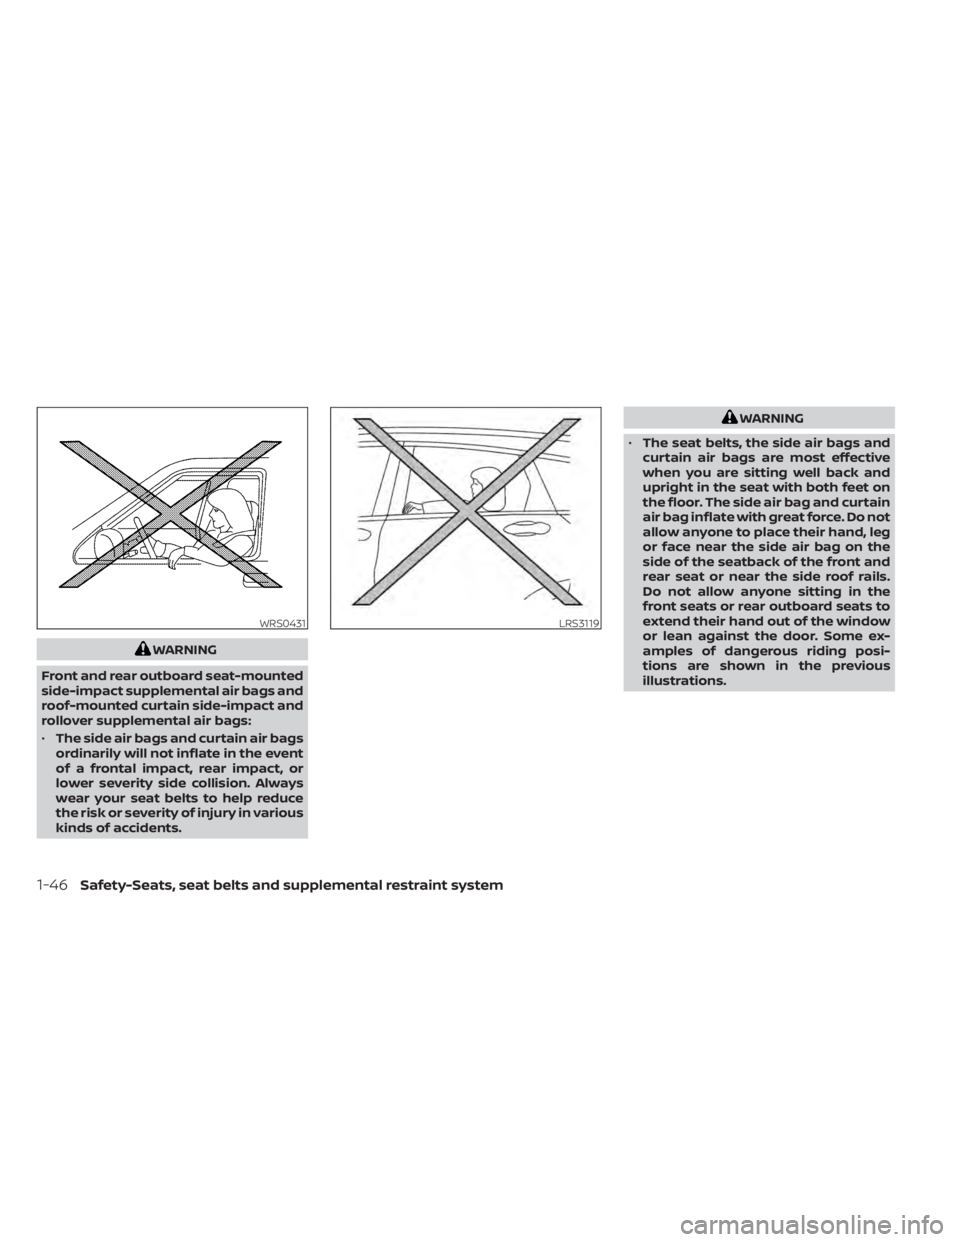
WARNING
Front and rear outboard seat-mounted
side-impact supplemental air bags and
roof-mounted curtain side-impact and
rollover supplemental air bags:
• The side air bags and curtain air bags
ordinarily will not inflate in the event
of a frontal impact, rear impact, or
lower severity side collision. Always
wear your seat belts to help reduce
the risk or severity of injury in various
kinds of accidents.
WARNING
• The seat belts, the side air bags and
curtain air bags are most effective
when you are sitting well back and
upright in the seat with both feet on
the floor. The side air bag and curtain
air bag inflate with great force. Do not
allow anyone to place their hand, leg
or face near the side air bag on the
side of the seatback of the front and
rear seat or near the side roof rails.
Do not allow anyone sitting in the
front seats or rear outboard seats to
extend their hand out of the window
or lean against the door. Some ex-
amples of dangerous riding posi-
tions are shown in the previous
illustrations.
LRS3119
1-46Safety-Seats, seat belts and supplemental restraint system
Page 76 of 500
•Modif ying or tampering with the
front passenger seat may result in
serious personal injury. For example,
do not change the front seats by
placing material on the seat cushion
or by installing additional trim mate-
rial, such as seat covers, on the seat
that are not specifically designed to
assure proper air bag operation. Ad-
ditionally, do not stow any objects
under the front passenger seat or the
seat cushion and seatback. Such ob-
jects may interfere with the proper
operation of the occupant classifica-
tion sensor (weight sensor).
• No unauthorized changes should be
made to any components or wiring
of the seat belt system. This may af-
fect the front air bag system. Tam-
pering with the seat belt system may
result in serious personal injury. •
It is recommended that you visit a
NISSAN dealer for work on and
around the front air bag. It is also rec-
ommended that you visit a NISSAN
dealer for installation of electrical
equipment. The Supplemental Re-
straint System (SRS) wiring har-
nesses* should not be modified or
disconnected. Unauthorized electri-
cal test equipment and probing de-
vices should not be used on the air
bag system.
• A cracked windshield should be re-
placed immediately by a qualified re-
pair facility. A cracked windshield
could affect the function of the
supplemental air bag system.
*The SRS wiring harness connectors are
yellow and orange for easy identifica-
tion.
When selling your vehicle, we request that
you inform the buyer about the front air
bag system and guide the buyer to the
appropriate sections in this Owner's
Manual.
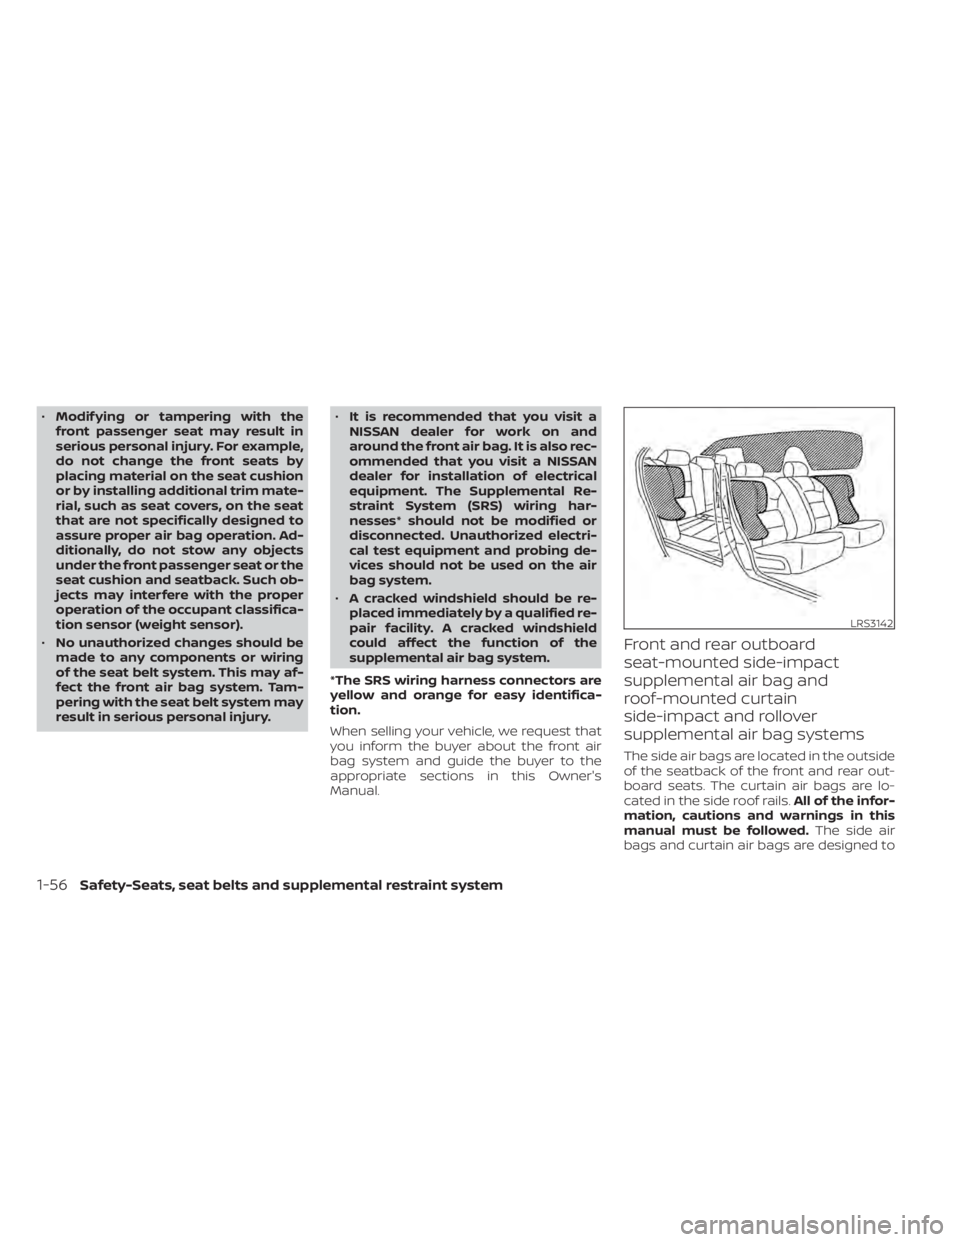
Front and rear outboard
seat-mounted side-impact
supplemental air bag and
roof-mounted curtain
side-impact and rollover
supplemental air bag systems
The side air bags are located in the outside
of the seatback of the front and rear out-
board seats. The curtain air bags are lo-
cated in the side roof rails. All of the infor-
mation, cautions and warnings in this
manual must be followed. The side air
bags and curtain air bags are designed to
LRS3142
1-56Safety-Seats, seat belts and supplemental restraint system
Page 77 of 500
inflate in higher severity side collisions, al-
though they may inflate if the forces in an-
other type of collision are similar to those of
a higher severity impact. They are de-
signed to inflate on the side where the ve-
hicle is impacted. They may not inflate in
certain side collisions.
Curtain air bags are also designed to inflate
in certain types of rollover collisions or near
rollovers. As a result, certain vehicle move-
ments (for example, during severe off-
roading) may cause the curtain air bags to
inflate.
Vehicle damage (or lack of it) is not always
an indication of proper side air bag and
curtain air bag operation.
When the side air bags and curtain air bags
inflate, a fairly loud noise may be heard,
followed by the release of smoke. This
smoke is not harmful and does not indi-
cate a fire. Care should be taken not to
inhale it, as it may cause irritation and
choking. Those with a history of a breath-
ing condition should get fresh air promptly.
Side air bags, along with the use of seat
belts, help to cushion the impact force on
the chest and pelvic area of the front and
rear outboard occupants. Curtain air bags
help to cushion the impact force to thehead of occupants in the front and rear
outboard seating positions. They can help
save lives and reduce serious injuries. How-
ever, an inflating side air bag and curtain air
bag may cause abrasions or other injuries.
Side air bags and curtain air bags do not
provide restraint to the lower body.
The seat belts should be correctly worn
and the driver, front passenger and rear
outboard occupants seated upright as far
as practical away from the side air bag.
Rear seat passengers should be seated as
far away as practical from the door finish-
ers and side roof rails. The side air bags and
curtain air bags inflate quickly in order to
help protect the occupants. Because of
this, the force of the side air bag and curtain
air bag inflating can increase the risk of
injury if the occupant is too close to, or is
against, these air bag modules during in-
flation. The side air bag will deflate quickly
af ter the collision is over.
The curtain air bag will remain inflated for a
short time.
The side air bags and curtain air bags
operate only when the ignition switch is
placed in the ON position.
Af ter placing the ignition switch in the
ON position, the supplemental air bagwarning light illuminates. The supple-
mental air bag warning light will turn off
af ter about 7 seconds if the system is
operational.
WARNING
• Do not place any objects near the
seatback of the front and rear seats.
Also, do not place any objects (an
umbrella, bag, etc.) between the front
and rear door finisher and the front
and rear seat. Such objects may be-
come dangerous projectiles and
cause injury if a side air bag inflate.
• Right af ter inflation, several side air
bag and curtain air bag system com-
ponents will be hot. Do not touch
them; you may severely burn
yourself.
• No unauthorized changes should be
made to any components or wiring
of the side air bag and curtain air bag
systems. This is to prevent damage
to or accidental inflation of the side
air bag and curtain air bag or dam-
age to the side air bag and curtain air
bag systems.
Safety-Seats, seat belts and supplemental restraint system1-57
Page 149 of 500
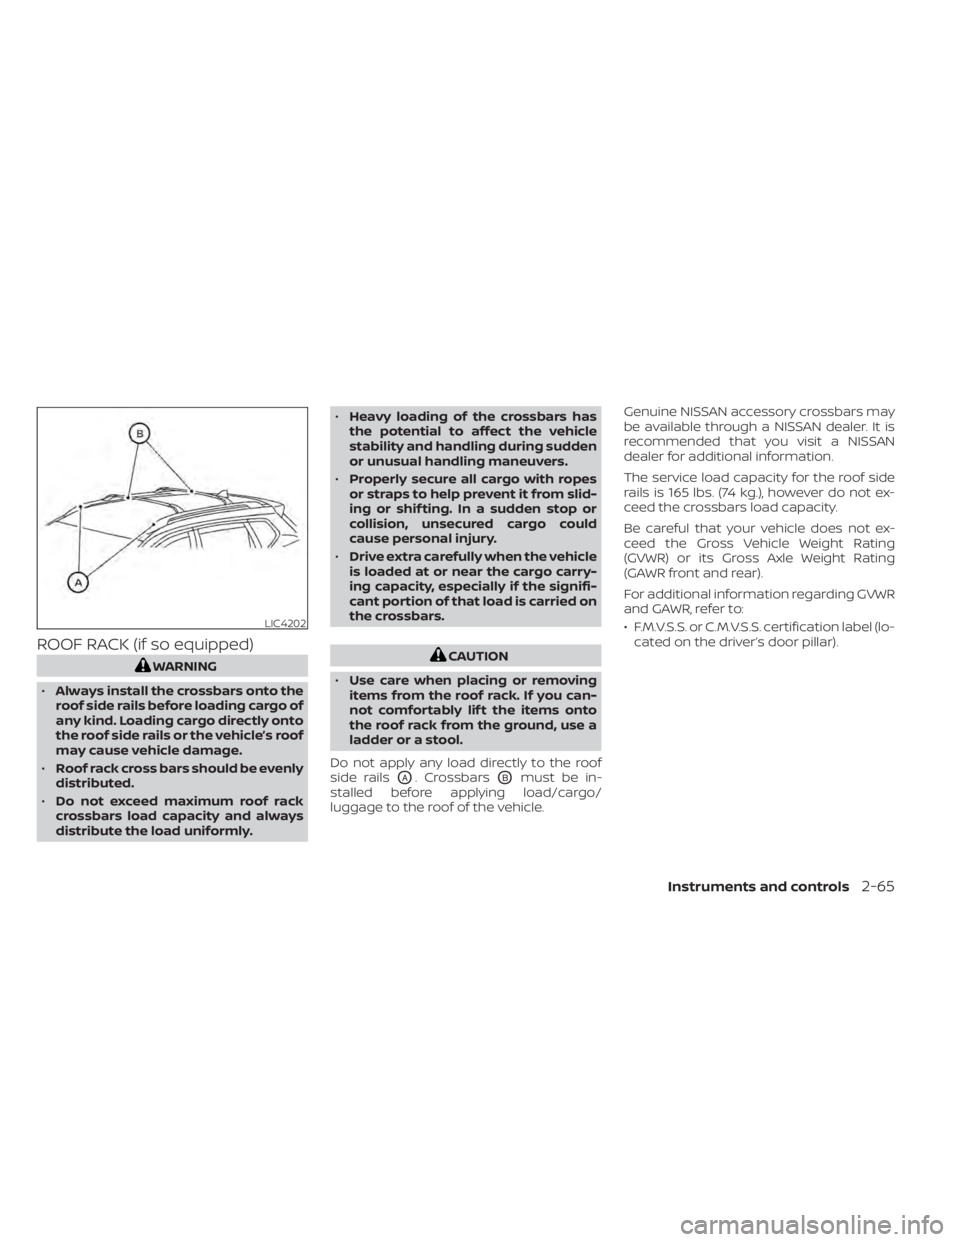
ROOF RACK (if so equipped)CAUTION
• Use care when placing or removing
items from the roof rack. If you can-
not comfortably lif t the items onto
the roof rack from the ground, use a
ladder or a stool.
Do not apply any load directly to the roof
side rails
OA. CrossbarsOBmust be in-
stalled before applying load/cargo/
luggage to the roof of the vehicle. Genuine NISSAN accessory crossbars may
be available through a NISSAN dealer. It is
recommended that you visit a NISSAN
dealer for additional information.
The service load capacity for the roof side
rails is 165 lbs. (74 kg.), however do not ex-
ceed the crossbars load capacity.
Be careful that your vehicle does not ex-
ceed the Gross Vehicle Weight Rating
(GVWR) or its Gross Axle Weight Rating
(GAWR front and rear).
For additional information regarding GVWR
and GAWR, refer to:
• F.M.V.S.S. or C.M.V.S.S. certification label (lo-
cated on the driver’s door pillar).
LIC4202
Page 151 of 500
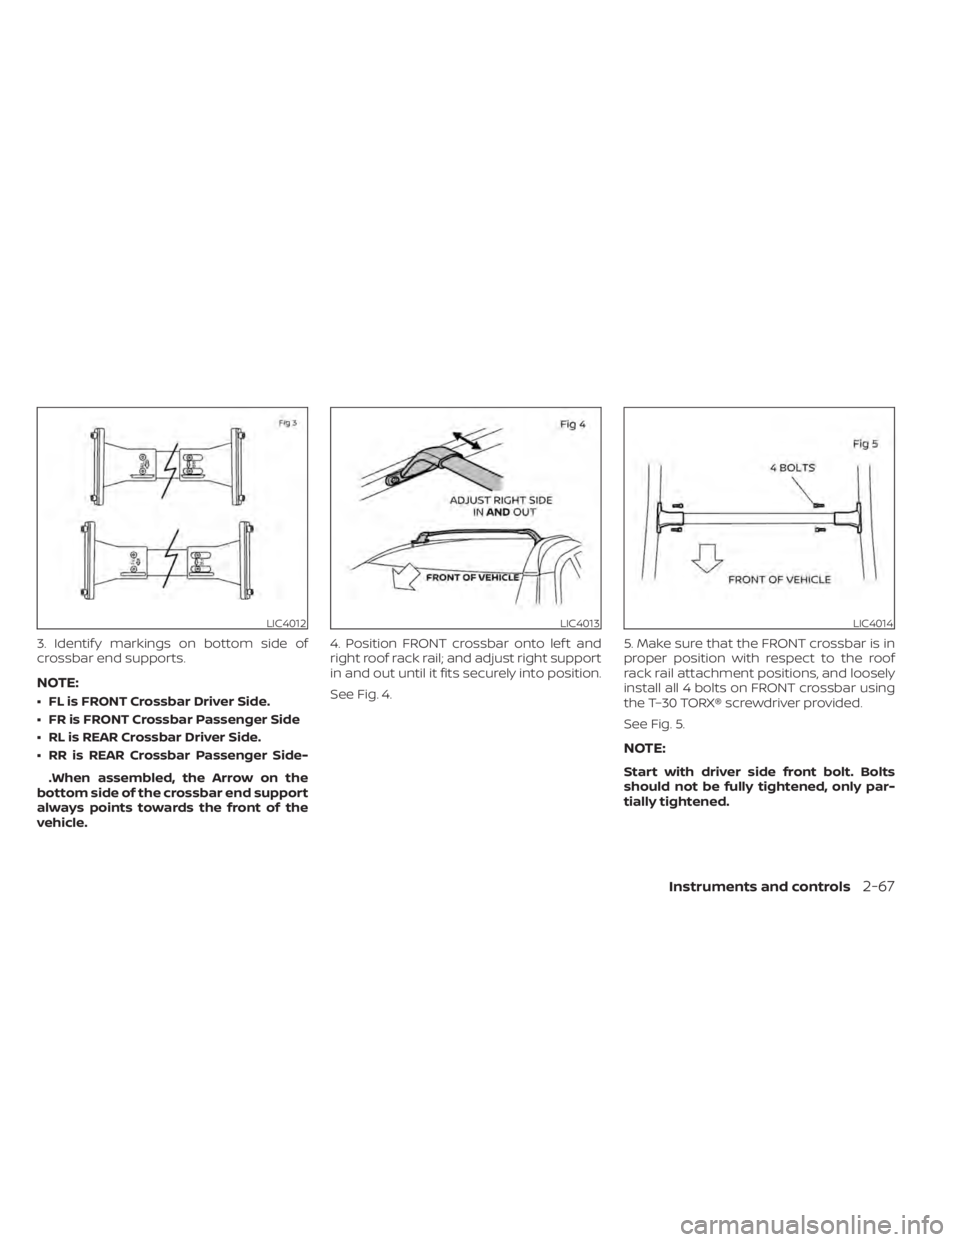
3. Identif y markings on bottom side of
crossbar end supports.
NOTE:
• FL is FRONT Crossbar Driver Side.
• FR is FRONT Crossbar Passenger Side
• RL is REAR Crossbar Driver Side.
• RR is REAR Crossbar Passenger Side-.When assembled, the Arrow on the
bottom side of the crossbar end support
always points towards the front of the
vehicle. 4. Position FRONT crossbar onto lef t and
right roof rack rail; and adjust right support
in and out until it fits securely into position.
See Fig. 4.
5. Make sure that the FRONT crossbar is in
proper position with respect to the roof
rack rail attachment positions, and loosely
install all 4 bolts on FRONT crossbar using
the T–30 TORX® screwdriver provided.
See Fig. 5.
NOTE:
Start with driver side front bolt. Bolts
should not be fully tightened, only par-
tially tightened.
LIC4013LIC4014
Page 276 of 500
WARNING
• Do not leave children or adults who
would normally require the assis-
tance of others alone in your vehicle.
Pets should also not be lef t alone.
They could accidentally injure them-
selves or others through inadvertent
operation of the vehicle. Also, on hot,
sunny days, temperatures in a closed
vehicle could quickly become high
enough to cause severe or possibly
fatal injuries to people or animals.
• Properly secure all cargo with ropes
or straps to help prevent it from slid-
ing or shif ting. Do not place cargo
higher than the seatbacks. In a sud-
den stop or collision, unsecured
cargo could cause personal injury.
• To avoid raising the center of gravity
excessively, do not exceed the rated
capacity of the roof rack (if so
equipped) and evenly distribute the
load.EXHAUST GAS (carbon monoxide)
air recirculation but-
ton to off and the fan control dial
to high to circulate the air. •
If electrical wiring or other cable con-
nections must pass to a trailer
through the seal on the trunk lid or
the body, follow the manufacturer's
recommendation to prevent carbon
monoxide entry into the vehicle.
• The exhaust system and body should
be inspected by a qualified mechanic
whenever:
a. The vehicle is raised for service.
b. You suspect that exhaust fumes are entering into the passenger
compartment.
c. You notice a change in the sound of the exhaust system.
d. You have had an accident involv- ing damage to the exhaust sys-
tem, underbody, or rear of the
vehicle.
THREE-WAY CATALYST
The three-way catalyst is an emission con-
trol device installed in the exhaust system.
Exhaust gases in the three-way catalyst
are burned at high temperatures to help
reduce pollutants.
PRECAUTIONS WHEN STARTING AND
DRIVING
5-4Starting and driving
Page 294 of 500
OFF position:
For normal driving and fuel economy, use
the OFF position.
ON position:
For driving up or down long slopes where
engine braking is necessary, or for powerful
acceleration, use the ON position. The
transmission will automatically select a dif-
ferent gear ratio, allowing the engine to
provide high output.
Remember not to drive at high speeds for
extended periods of time with the over-
drive OFF mode in the ON position. This
reduces fuel economy.
Accelerator downshif t
— in D (Drive) position —
For passing or hill climbing, depress the
accelerator pedal to the floor. This shif ts
the transmission down into a lower gear,
depending on the vehicle speed.
High fluid temperature protection
mode
This transmission has a high fluid tem-
perature protection mode. If the fluid tem-
perature becomes too high (for example,
when climbing steep grades in high tem-peratures with heavy loads, such as when
towing a trailer), engine power and, under
some conditions, vehicle speed will be de-
creased automatically to reduce the
chance of transmission damage. Vehicle
speed can be controlled with the accelera-
tor pedal, but the engine and vehicle speed
may be limited.
Fail-safe
If the vehicle is driven under extreme
conditions, such as excessive wheel
spinning and subsequent hard braking,
the fail-safe system may be activated.
The Malfunction Indicator Light (MIL)
may come on to indicate the fail-safe
mode is activated. For additional infor-
mation, refer to “Malfunction Indicator
Light (MIL)” in the “Instruments and con-
trols” section of this manual. This will oc-
cur even if all electrical circuits are func-
tioning properly. In this case, place the
ignition switch in the OFF position and
wait for 10 seconds. Then push the
switch back to the ON position. The ve-
hicle should return to its normal operat-
ing condition. If it does not return to its
normal operating condition, have the
transmission checked and repaired, if
necessary. It is recommended that you
visit a NISSAN dealer for this service.
WARNING
When the high fluid temperature pro-
tection mode or fail-safe operation oc-
curs, vehicle speed may be gradually
reduced. The reduced speed may be
lower than other traffic, which could in-
crease the chance of a collision. Be es-
pecially careful when driving. If neces-
sary, pull to the side of the road at a safe
place and allow the transmission to re-
turn to normal operation, or have it re-
paired if necessary.
5-22Starting and driving
Page 308 of 500
–Vehicles remaining in the detec-
tion zone when you accelerate
from a stop.
– A vehicle merging into an adjacent
lane at a speed approximately the
same as your vehicle.
– A vehicle approaching rapidly
from behind.
– A vehicle which your vehicle over-
takes rapidly.
– A vehicle that passes through the
detection zone quickly.
– When overtaking several vehicles
in a row, the vehicles af ter the first
vehicle may not be detected if
they are traveling close together.
• The radar sensors’ detection zone is
designed based on a standard lane
width. When driving in a wider lane,
the radar sensors may not detect ve-
hicles in an adjacent lane. When driv-
ing in a narrow lane, the radar sen-
sors may detect vehicles driving two
lanes away. •
The radar sensors are designed to ig-
nore most stationary objects, how-
ever objects such as guardrails, walls,
foliage and parked vehicles may oc-
casionally be detected. This is a nor-
mal operation condition.
• The following conditions may reduce
the ability of the radar to detect other
vehicles:
– Severe weather
– Road spray
– Ice/frost/snow/dirt build-up on
the vehicle
• Do not attach stickers (including
transparent material), install acces-
sories or apply additional paint near
the radar sensors. These conditions
may reduce the ability of the radar to
detect other vehicles.
• Excessive noise (for example, audio
system volume, open vehicle win-
dow) will interfere with the chime
sound, and it may not be heard.
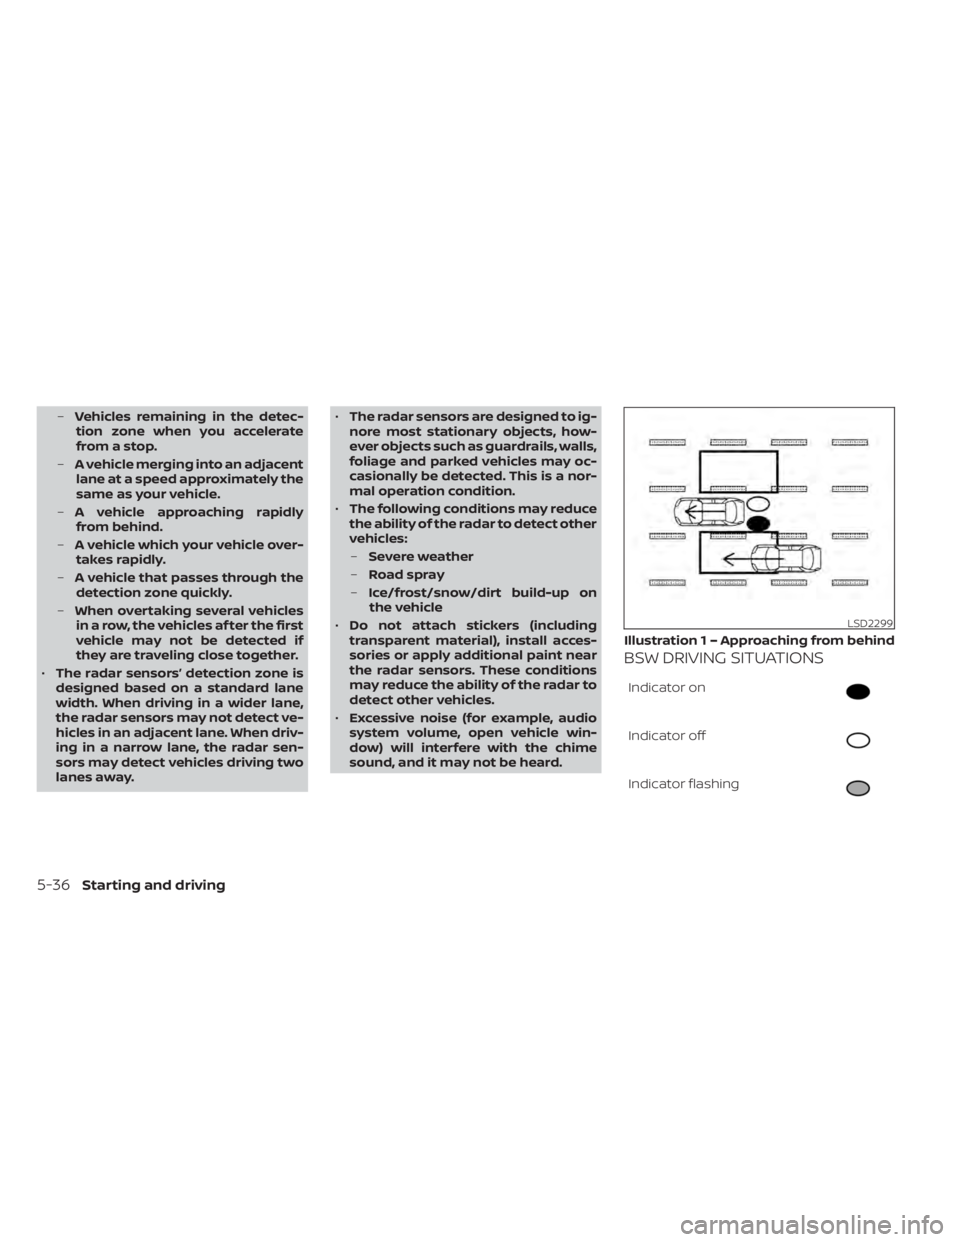
BSW DRIVING SITUATIONS
Indicator on
Indicator off
Indicator flashing
LSD2299
Illustration 1 – Approaching from behind