2022 NISSAN ARMADA dipstick
[x] Cancel search: dipstickPage 17 of 604

JVC0965X
VK56VD ENGINE
1. Window washer fluid reservoir (P.8-10)
2. Fuse/fusible link holder (P.8-18)
3. Engine oil dipstick (P.8-6)
4. Power steering fluid reservoir (P.8-8)
5. Engine oil filler cap (P.8-6)
6. Brake fluid reservoir (P.8-9)7. Fuse/fusible link holder (P.8-18)
8. Battery (P.8-11)
9. Radiator filler cap (P.8-4)
10. Engine coolant reservoir (P.8-4)
11. Drive belts (P.8-13)
12. Air cleaner (P.8-15)
Illustrated table of contents0-9
ENGINE COMPARTMENT
Page 104 of 604
2-10Instruments and controls
the dipstick to check the oil level.
(See “Engine oil” (P.8-6).)
. If the gauge does not move with
the proper amount of engine oil,
have the vehicle checked. It is
recommended you visit a NISSAN
dealer for this service. Continued
vehicle operation in such a con-
dition could cause serious da-
mage to the engine.
WAC0220X
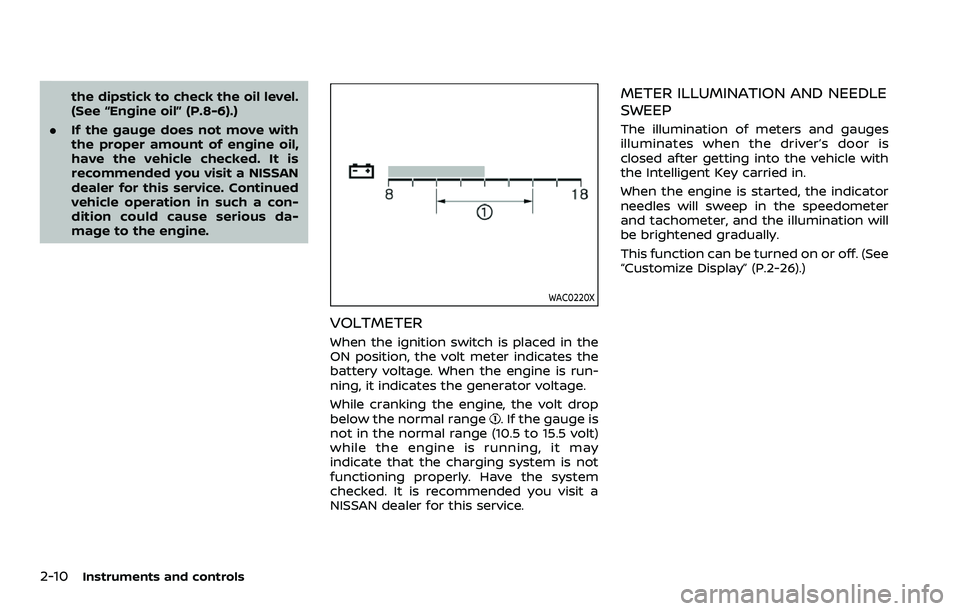
VOLTMETER
When the ignition switch is placed in the
ON position, the volt meter indicates the
battery voltage. When the engine is run-
ning, it indicates the generator voltage.
While cranking the engine, the volt drop
below the normal range
. If the gauge is
not in the normal range (10.5 to 15.5 volt)
while the engine is running, it may
indicate that the charging system is not
functioning properly. Have the system
checked. It is recommended you visit a
NISSAN dealer for this service.
METER ILLUMINATION AND NEEDLE
SWEEP
The illumination of meters and gauges
illuminates when the driver’s door is
closed after getting into the vehicle with
the Intelligent Key carried in.
When the engine is started, the indicator
needles will sweep in the speedometer
and tachometer, and the illumination will
be brightened gradually.
This function can be turned on or off. (See
“Customize Display” (P.2-26).)
Page 107 of 604
Low hydraulic pressure warning indica-
tor:
If the brake warning light illuminates
when the engine is running, or while
driving with the parking brake is released,
check the brake fluid level. If the brake
fluid level is sufficient, it may indicate low
hydraulic pressure in the brake booster. It
is recommended that you have the brake
system checked by a NISSAN dealer
promptly.
Anti-lock Braking System (ABS) warning
indicator:
When the parking brake is released and
the brake fluid level is sufficient, if both
the brake warning light and the Anti-lock
Braking System (ABS) warning light illu-
minate, it may indicate the ABS is not
functioning properly. Have the brake
system checked, and if necessary re-
paired. It is recommended you visit a
NISSAN dealer for this service. (See “Anti-
lock Braking System (ABS) warning light”
(P.2-15).)
WARNING
.Your brake system may not be
working properly if the warning
light is on. Driving could be dan-
gerous. If you judge it to be safe, drive carefully to the nearest
service station for repairs. Other-
wise, have your vehicle towed
because driving it could be dan-
gerous.
. Pressing the brake pedal with the
engine stopped and/or low brake
fluid level may increase your
stopping distance and braking
will require greater pedal effort
as well as pedal travel.
. If the brake fluid level is below the
minimum or MIN mark on the
brake fluid reservoir, do not drive
until the brake system has been
checked. It is recommended you
visit a NISSAN dealer for this
service.
Charge warning light
When the ignition switch is in the ON
position, the charge warning light illumi-
nates and then turns off.
If the light comes on while the engine is
running, it may indicate the charging
system is not functioning properly. Turn
the engine off and check the alternator
belt. If the belt is loose, broken, missing or
if the light remains on, have your vehicle
serviced immediately. It is recommended you visit a NISSAN dealer for this service.
CAUTION
Do not continue driving if the alter-
nator belt is loose, broken or miss-
ing.
Engine oil pressure warning
light
This light warns of low engine oil pres-
sure. If the light flickers or comes on
during normal driving, pull off the road in
a safe area, stop the engine immediately
and call a NISSAN dealer or other author-
ized repair shop.
The engine oil pressure warning light is
not designed to indicate a low oil level.
Use the dipstick to check the oil level.
(See “Engine oil” (P.8-6).)
CAUTION
Running the engine with the engine
oil pressure warning light on could
cause serious damage to the engine
almost immediately. Such damage is
not covered by warranty. Turn off the
engine as soon as it is safe to do so.
Instruments and controls2-13
Page 495 of 604
could affect your warranty coverage.If in
doubt about any servicing, it is recom-
mended you have it done by a NISSAN
dealer.
JVC0965X
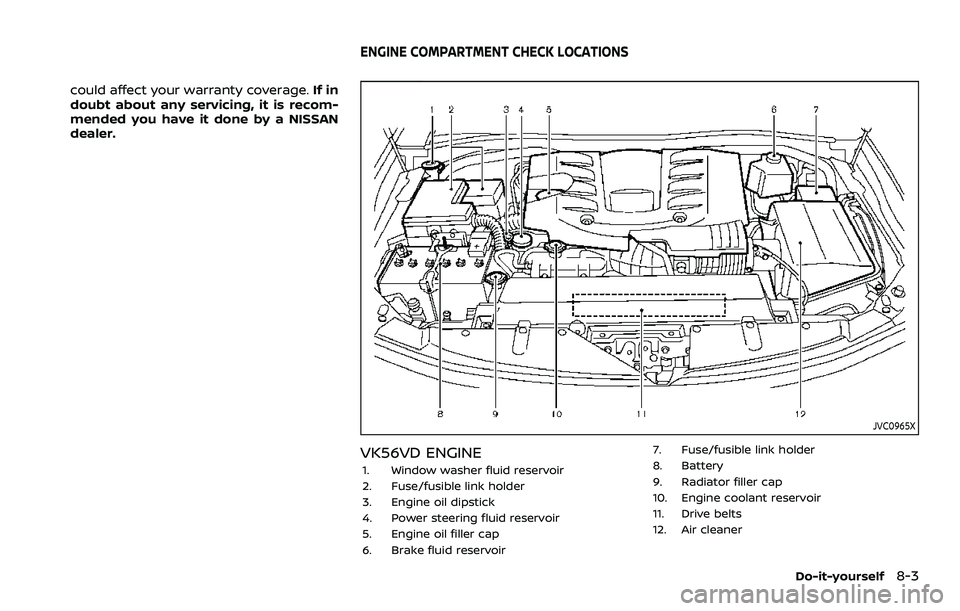
VK56VD ENGINE
1. Window washer fluid reservoir
2. Fuse/fusible link holder
3. Engine oil dipstick
4. Power steering fluid reservoir
5. Engine oil filler cap
6. Brake fluid reservoir 7. Fuse/fusible link holder
8. Battery
9. Radiator filler cap
10. Engine coolant reservoir
11. Drive belts
12. Air cleaner
Do-it-yourself8-3
ENGINE COMPARTMENT CHECK LOCATIONS
Page 498 of 604
8-6Do-it-yourself
JVM0728X
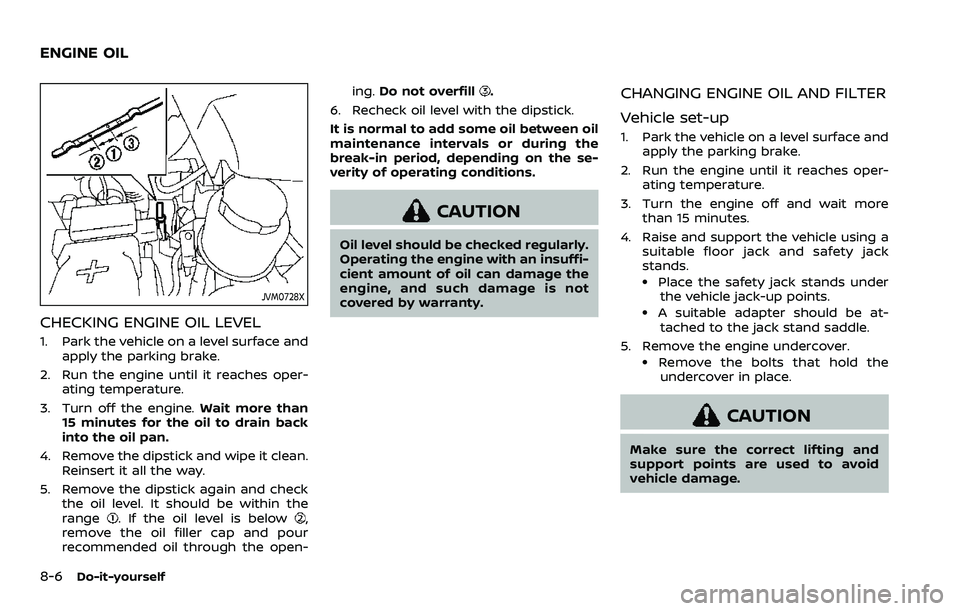
CHECKING ENGINE OIL LEVEL
1. Park the vehicle on a level surface andapply the parking brake.
2. Run the engine until it reaches oper- ating temperature.
3. Turn off the engine. Wait more than
15 minutes for the oil to drain back
into the oil pan.
4. Remove the dipstick and wipe it clean. Reinsert it all the way.
5. Remove the dipstick again and check the oil level. It should be within the
range
. If the oil level is below,
remove the oil filler cap and pour
recommended oil through the open- ing.
Do not overfill
.
6. Recheck oil level with the dipstick.
It is normal to add some oil between oil
maintenance intervals or during the
break-in period, depending on the se-
verity of operating conditions.
CAUTION
Oil level should be checked regularly.
Operating the engine with an insuffi-
cient amount of oil can damage the
engine, and such damage is not
covered by warranty.
CHANGING ENGINE OIL AND FILTER
Vehicle set-up
1. Park the vehicle on a level surface and apply the parking brake.
2. Run the engine until it reaches oper- ating temperature.
3. Turn the engine off and wait more than 15 minutes.
4. Raise and support the vehicle using a suitable floor jack and safety jack
stands.
.Place the safety jack stands underthe vehicle jack-up points.
.A suitable adapter should be at-
tached to the jack stand saddle.
5. Remove the engine undercover.
.Remove the bolts that hold the undercover in place.
CAUTION
Make sure the correct lifting and
support points are used to avoid
vehicle damage.
ENGINE OIL
Page 499 of 604
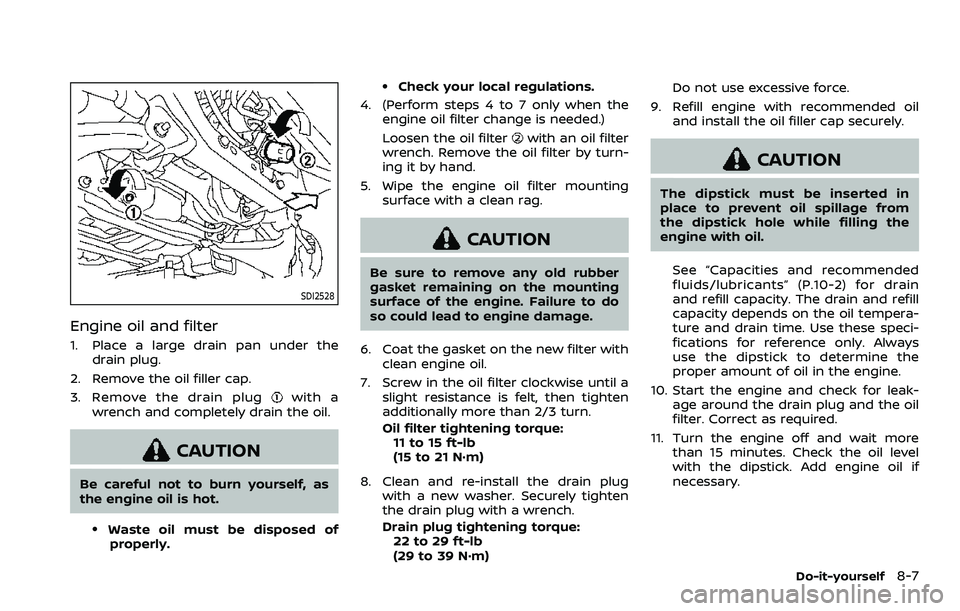
SDI2528
Engine oil and filter
1. Place a large drain pan under thedrain plug.
2. Remove the oil filler cap.
3. Remove the drain plug
with a
wrench and completely drain the oil.
CAUTION
Be careful not to burn yourself, as
the engine oil is hot.
.Waste oil must be disposed of properly.
.Check your local regulations.
4. (Perform steps 4 to 7 only when the engine oil filter change is needed.)
Loosen the oil filter
with an oil filter
wrench. Remove the oil filter by turn-
ing it by hand.
5. Wipe the engine oil filter mounting surface with a clean rag.
CAUTION
Be sure to remove any old rubber
gasket remaining on the mounting
surface of the engine. Failure to do
so could lead to engine damage.
6. Coat the gasket on the new filter with clean engine oil.
7. Screw in the oil filter clockwise until a slight resistance is felt, then tighten
additionally more than 2/3 turn.
Oil filter tightening torque:11 to 15 ft-lb
(15 to 21 N·m)
8. Clean and re-install the drain plug with a new washer. Securely tighten
the drain plug with a wrench.
Drain plug tightening torque:22 to 29 ft-lb
(29 to 39 N·m) Do not use excessive force.
9. Refill engine with recommended oil and install the oil filler cap securely.
CAUTION
The dipstick must be inserted in
place to prevent oil spillage from
the dipstick hole while filling the
engine with oil.
See “Capacities and recommended
fluids/lubricants” (P.10-2) for drain
and refill capacity. The drain and refill
capacity depends on the oil tempera-
ture and drain time. Use these speci-
fications for reference only. Always
use the dipstick to determine the
proper amount of oil in the engine.
10. Start the engine and check for leak- age around the drain plug and the oil
filter. Correct as required.
11. Turn the engine off and wait more than 15 minutes. Check the oil level
with the dipstick. Add engine oil if
necessary.
Do-it-yourself8-7