2022 NISSAN ARMADA battery
[x] Cancel search: batteryPage 249 of 604
WAE0288X
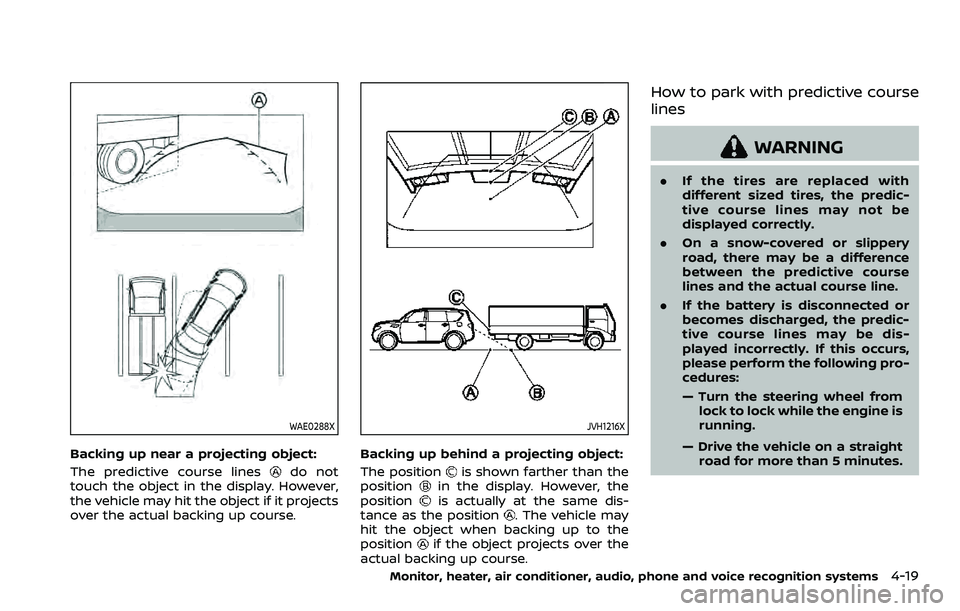
Backing up near a projecting object:
The predictive course lines
do not
touch the object in the display. However,
the vehicle may hit the object if it projects
over the actual backing up course.
JVH1216X
Backing up behind a projecting object:
The position
is shown farther than the
positionin the display. However, the
positionis actually at the same dis-
tance as the position. The vehicle may
hit the object when backing up to the
position
if the object projects over the
actual backing up course.
How to park with predictive course
lines
WARNING
. If the tires are replaced with
different sized tires, the predic-
tive course lines may not be
displayed correctly.
. On a snow-covered or slippery
road, there may be a difference
between the predictive course
lines and the actual course line.
. If the battery is disconnected or
becomes discharged, the predic-
tive course lines may be dis-
played incorrectly. If this occurs,
please perform the following pro-
cedures:
— Turn the steering wheel from
lock to lock while the engine is
running.
— Drive the vehicle on a straight road for more than 5 minutes.
Monitor, heater, air conditioner, audio, phone and voice recognition systems4-19
Page 275 of 604

WARNING
.It is unlawful in most jurisdictions
for a person to drive a motor
vehicle which is equipped with a
television monitor or screen that
is visible, directly or indirectly, to
the driver while operating the
vehicle. In the interest of safety,
the unit should never be installed
where it will be directly or indir-
ectly visible, by the operator of
the motor vehicle.
. For safety reasons when chan-
ging discs, it is recommended
that the vehicle is not in motion,
and that you do not allow chil-
dren to unfasten safety belts to
change discs or make any adjust-
ments to the system. System
adjustments can be accom-
plished using the remote control,
while safety belts remain fas-
tened.
. Enjoy your RSI system but re-
member that safety of all pas-
sengers remains the number one
priority. Devices installed in the
USB, HDMI, or headphone jack
may protrude and create a po-
tential eye impact hazard for un- belted passengers during a vehi-
cle accident. To reduce the risk of
injury, use only SD cards (hidden
on left side of driver side monitor)
or low-profile USB storage de-
vices.
CAUTION
.
If your vehicle is equipped with a
wireless rear seat audio system
or any other wireless infrared
device, make sure it is powered
off when operating the RSI sys-
tem. If both systems are powered
on at the same time, the two
systems may obstruct each other,
possibly creating undesirable
audio interference through the
wireless headphones.
. Do not touch the inner pins of the
jacks on the front panel. Electro-
static discharge may cause per-
manent damage to the device.
. The LCD display screen is not
touchscreen. Do not put pressure
or add suction cups on the
screen. .
Caution children to avoid touch-
ing or scratching the screen, as it
may become dirty or damaged.
. Be sure to run the vehicle engine
while using the system. Using this
system without running the en-
gine can result in battery drain.
To avoid the risk of battery drain,
please remember to turn off the
system when the vehicle is not in
use.
WELCOME
This Rear Seat Infotainment (RSI) system,
with built-in Wi-Fi, has some advanced
features. Before operating this system,
read this section thoroughly and retain it
for future reference.
System features
.Twin 8-inch Color TFT-LCD Panels
with 1024 x 600 Resolution
. Internal Wi-Fi Network
. Bluetooth® 4.1 Audio Streaming
. Miracast®/Smart View Capability
. SmartStream Content Sharing
. USB 2.0 Port, SDXC Card Input
. HDMI 1.4 Input with MHL 2.0 Support
. Exclusive Slingplayer® Application
Monitor, heater, air conditioner, audio, phone and voice recognition systems4-45
REAR SEAT INFOTAINMENT (RSI) (if
so equipped)
Page 281 of 604
6.HDMI port
Connect an external audio/video
source using a full-size HDMI connec-
tor. Supports MHL 2.0 playback and
charging.
7. USB 2.0 port
Play videos, music, and images stored
on most USB devices. Provides up to 2
amps of output to charge most mo-
bile devices.
8. Headphone output jack
Connect wired headphones using a
1/8 in (3.5 mm) stereo connector.
CAUTION
.Do not use any harsh solvents or
chemicals when cleaning the
monitor.
. Do not use any abrasive cleaners
that may scratch the screen. Use
only a lightly dampened lint free
cloth to wipe the screen if it is
dirty.
. The LCD display screen is not
touchscreen. Do not put pressure
or add suction cups on the
screen. .
Caution children to avoid touch-
ing or scratching the screen, as it
may become dirty or damaged.
. Place the monitor in the fully
closed position when not in use.
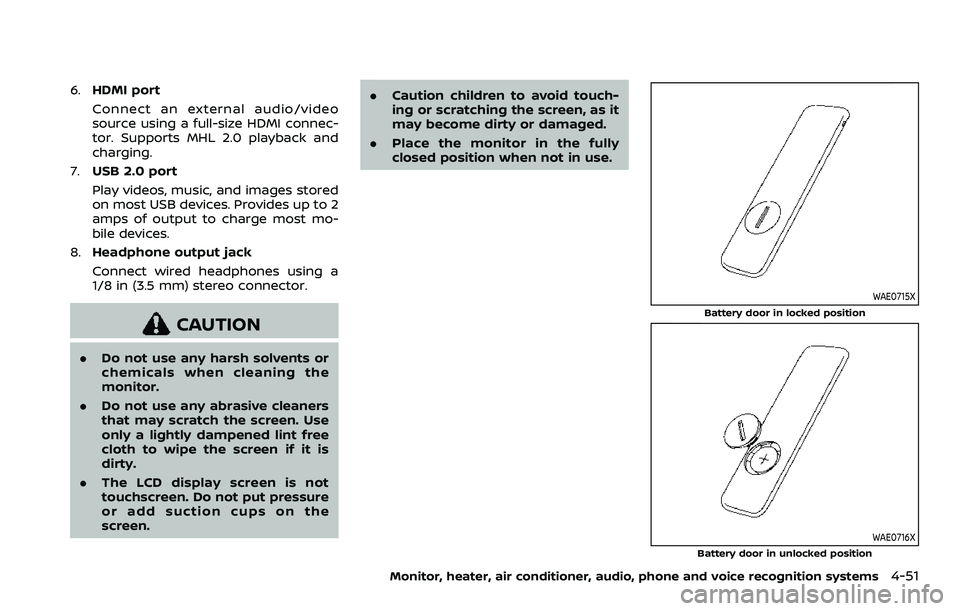
WAE0715X
Battery door in locked position
WAE0716X
Battery door in unlocked position
Monitor, heater, air conditioner, audio, phone and voice recognition systems4-51
Page 282 of 604
4-52Monitor, heater, air conditioner, audio, phone and voice recognition systems
REMOTE CONTROL OPERATION
Before use
Before attempting to operate your re-
mote control, turn the remote control
face down and remove the battery in-
sulator by pulling the clear plastic tab
away from the remote control.
Replacing the battery
1. Turn the remote control face down.Use a coin to turn the battery cover
counter-clockwise and remove it.
2. Replace the battery with a CR2032 or equivalent. Make sure that proper
polarity is observed. The positive (+)
side of the battery should face up-
wards.
3. Place the cover back into position and turn it clockwise until it locks into
place.
The remote control will only operate this
device. It is not a universal remote control
and will not control other equipment.
WARNING
Keep the battery out of the reach of
children. In case the battery is acci-
dentally swallowed, immediately
consult a doctor. Also, when dispos-
ing of used batteries, please comply with governmental regulations or
environmental public institution
rules that apply in your country/
area.
CAUTION
.
Always ensure that the battery is
inserted in the correct direction
as shown in the battery compart-
ment.
. When the battery fails to function,
replace it immediately.
. Remove the battery if the remote
control is not used for a month or
longer.
. Storage in extreme cold can
weaken the battery. Keep the
remote control stored in a cool,
dry place.
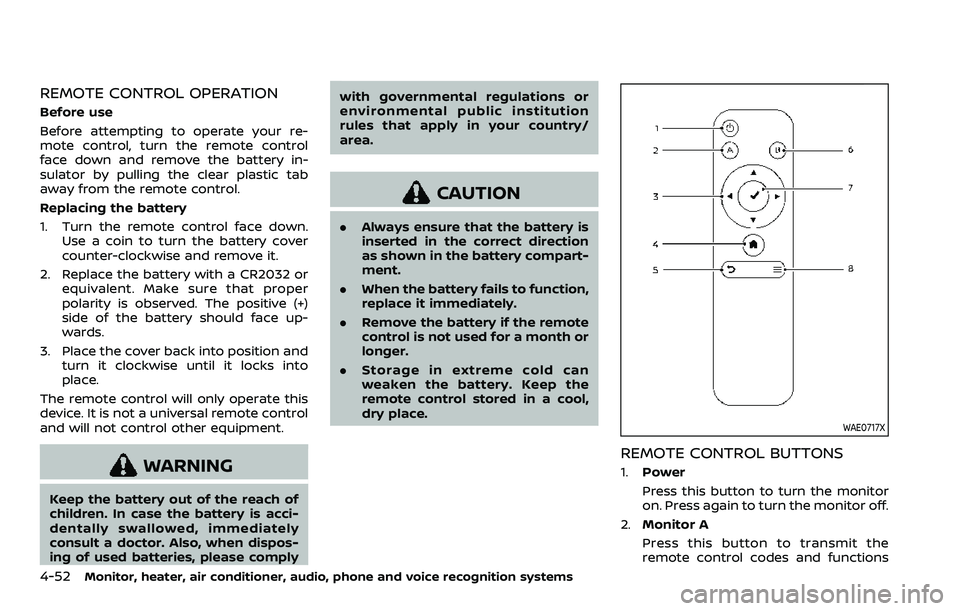
WAE0717X
REMOTE CONTROL BUTTONS
1.Power
Press this button to turn the monitor
on. Press again to turn the monitor off.
2. Monitor A
Press this button to transmit the
remote control codes and functions
Page 284 of 604
4-54Monitor, heater, air conditioner, audio, phone and voice recognition systems
WIRELESS HEADPHONE OPERATION
Installing the batteries
Before attempting to operate the head-
phones, install the batteries as described
below:
1. Remove the headphone battery coverby using a screwdriver.
2. Install two “AAA” batteries into the headphones. Make sure that proper
polarity (+ or -) is observed.
3. Reinstall headphone battery cover.
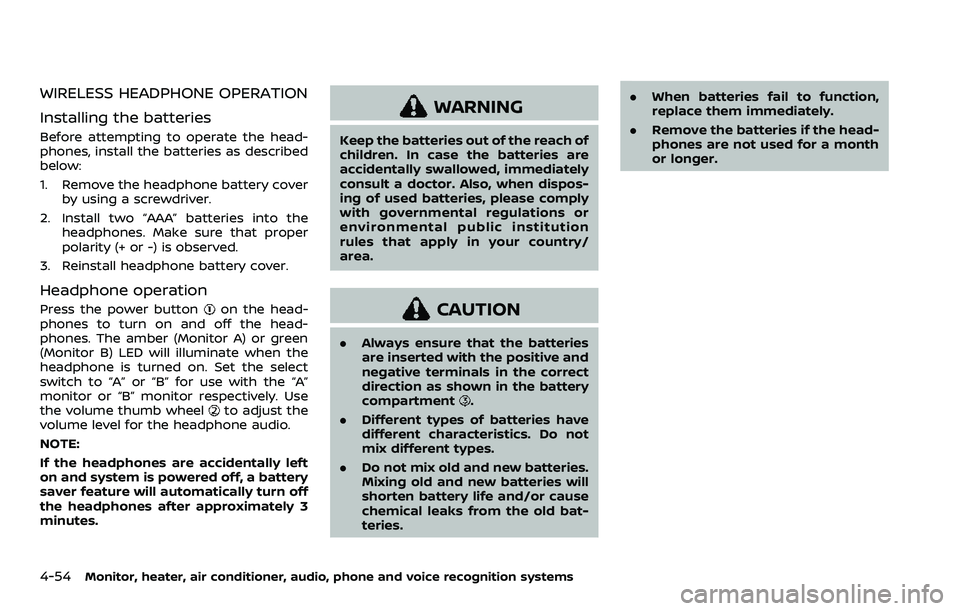
Headphone operation
Press the power buttonon the head-
phones to turn on and off the head-
phones. The amber (Monitor A) or green
(Monitor B) LED will illuminate when the
headphone is turned on. Set the select
switch to “A” or “B” for use with the “A”
monitor or “B” monitor respectively. Use
the volume thumb wheel
to adjust the
volume level for the headphone audio.
NOTE:
If the headphones are accidentally left
on and system is powered off, a battery
saver feature will automatically turn off
the headphones after approximately 3
minutes.
WARNING
Keep the batteries out of the reach of
children. In case the batteries are
accidentally swallowed, immediately
consult a doctor. Also, when dispos-
ing of used batteries, please comply
with governmental regulations or
environmental public institution
rules that apply in your country/
area.
CAUTION
. Always ensure that the batteries
are inserted with the positive and
negative terminals in the correct
direction as shown in the battery
compartment
.
. Different types of batteries have
different characteristics. Do not
mix different types.
. Do not mix old and new batteries.
Mixing old and new batteries will
shorten battery life and/or cause
chemical leaks from the old bat-
teries. .
When batteries fail to function,
replace them immediately.
. Remove the batteries if the head-
phones are not used for a month
or longer.
Page 297 of 604
WAE0737X
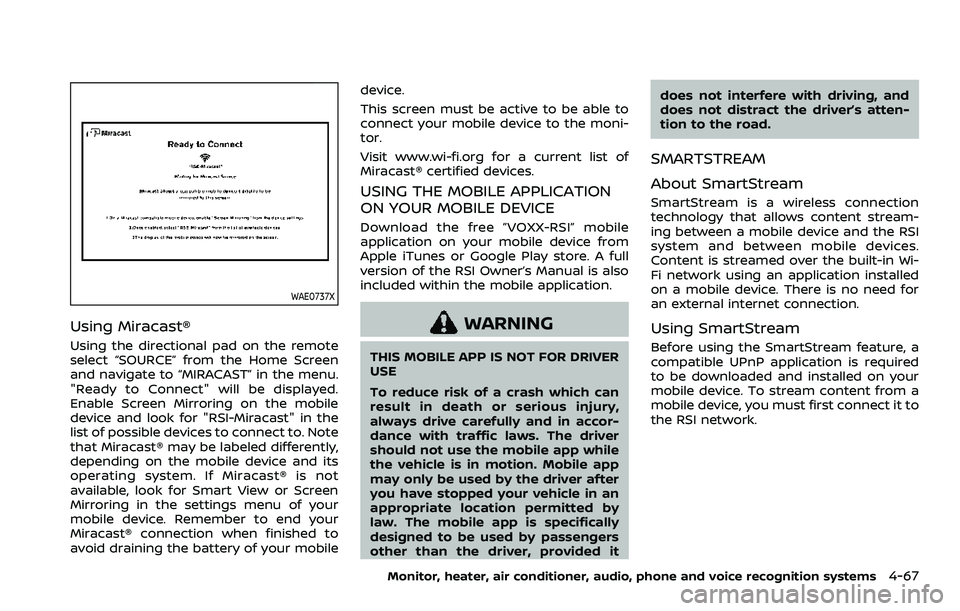
Using Miracast®
Using the directional pad on the remote
select “SOURCE” from the Home Screen
and navigate to “MIRACAST” in the menu.
"Ready to Connect" will be displayed.
Enable Screen Mirroring on the mobile
device and look for "RSI-Miracast" in the
list of possible devices to connect to. Note
that Miracast® may be labeled differently,
depending on the mobile device and its
operating system. If Miracast® is not
available, look for Smart View or Screen
Mirroring in the settings menu of your
mobile device. Remember to end your
Miracast® connection when finished to
avoid draining the battery of your mobiledevice.
This screen must be active to be able to
connect your mobile device to the moni-
tor.
Visit www.wi-fi.org for a current list of
Miracast® certified devices.
USING THE MOBILE APPLICATION
ON YOUR MOBILE DEVICE
Download the free ”VOXX-RSI” mobile
application on your mobile device from
Apple iTunes or Google Play store. A full
version of the RSI Owner’s Manual is also
included within the mobile application.
WARNING
THIS MOBILE APP IS NOT FOR DRIVER
USE
To reduce risk of a crash which can
result in death or serious injury,
always drive carefully and in accor-
dance with traffic laws. The driver
should not use the mobile app while
the vehicle is in motion. Mobile app
may only be used by the driver after
you have stopped your vehicle in an
appropriate location permitted by
law. The mobile app is specifically
designed to be used by passengers
other than the driver, provided it
does not interfere with driving, and
does not distract the driver’s atten-
tion to the road.
SMARTSTREAM
About SmartStream
SmartStream is a wireless connection
technology that allows content stream-
ing between a mobile device and the RSI
system and between mobile devices.
Content is streamed over the built-in Wi-
Fi network using an application installed
on a mobile device. There is no need for
an external internet connection.
Using SmartStream
Before using the SmartStream feature, a
compatible UPnP application is required
to be downloaded and installed on your
mobile device. To stream content from a
mobile device, you must first connect it to
the RSI network.
Monitor, heater, air conditioner, audio, phone and voice recognition systems4-67
Page 306 of 604

4-76Monitor, heater, air conditioner, audio, phone and voice recognition systems
TROUBLESHOOTING
SymptomRemedy
Monitor does not power on Verify the vehicle is in the ON or ACC position.
Verify the battery is installed correctly in the remote control.
Verify the in-line fuse protection is good. Refer to the RSI system installation instructions for vehicle-
specific fuse location.
Monitor front panel controls flash red For further diagnosis, it is recommended that you visit a NISSAN dealer.
System frozen - will not respond Soft reset the system by pressing and holding the power button on the top of the driver side monitor
for 5 seconds.
Hard reset the system by turning the ignition off, then back on.
No picture Check that the signal source is connected.
Check the menu source setting. Match your monitor mode with the source correctly.
No sound or distorted sound Make sure that the external media device is connected properly, and all cables are securely inserted
into the appropriate jacks.
Verify that the batteries in the headphones are fresh.
If you are using the wireless headphones, make sure you turn on the power and select the correct
monitor (A or B).
Verify the volume is turned up on headphones and the system.
Verify nothing is blocking the path between the monitor IR sensor and headphones.
When placing the headphones on your head, make sure to observe the Left and Right orientation. The
headphones must be oriented correctly (facing forward) to receive the audio signal.
Monitor feels warm When the monitor is in use for a long period of time, the surface will be warm. This is normal.
Cannot connect mobile device to the
internal RSI Wi-Fi network Check to make sure Wi-Fi is enabled on the mobile device.
Check to make sure RSI is set to Access Point mode.
Check to make sure the correct password is used. For additional information, see “Using Wi-Fi” (P.4-70).
Cannot connect RSI system to an external
Wi-Fi network Check to make sure RSI is set to Client Mode. Check to make sure the correct password is used. For
additional information, see “Using Wi-Fi” (P.4-70).
Cannot establish a Bluetooth
®connection Check to make sure Bluetooth®is enabled on the RSI system. For additional information, see
“Bluetooth® streaming” (P.4-74).
Page 313 of 604
5 Starting and driving
Precautions when starting and driving ...................... 5-4Exhaust gas (carbon monoxide) ................................ 5-4
Three-way catalyst ............................................................... 5-4
Tire Pressure Monitoring System (TPMS) ........... 5-5
Avoiding collision and rollover .................................... 5-8
On-pavement and off-road
driving precautions .............................................................. 5-9
Off-road recovery .................................................................. 5-9
Rapid air pressure loss ...................................................... 5-9
About lowering of the rear of the vehicle ...... 5-10
Drinking alcohol/drugs and driving ..................... 5-10
Driving safety precautions .......................................... 5-10
Push-button ignition switch ............................................. 5-13
Operating range for engine start function ...... 5-13
Push-button ignition switch positions .............. 5-14
Emergency engine shut off ........................................ 5-15
Intelligent Key battery discharge ........................... 5-15
Before starting the engine ................................................. 5-16
Starting the engine .................................................................. 5-16 Remote engine start (if so equipped) ................. 5-17
Driving the vehicle .................................................................... 5-17 Engine protection mode ............................................... 5-17
Automatic transmission ................................................ 5-18
Parking brake ........................................................................\
....... 5-22 Traffic Sign Recognition (TSR) (if
so equipped) ........................................................................\
......... 5-23
System operation ............................................................. 5-23
How to enable/disable the TSR system ........ 5-25
System temporarily unavailable ........................... 5-26
System malfunction ....................................................... 5-26
System maintenance .................................................... 5-26
Lane Departure Warning (LDW) ..................................... 5-26 LDW system operation ................................................. 5-27
How to enable/disable the LDW system ....... 5-28
LDW system limitations ............................................... 5-29
System temporarily unavailable ........................... 5-30
System malfunction ....................................................... 5-30
System maintenance .................................................... 5-31
Intelligent Lane Intervention (I-LI) ............................... 5-31 I-LI system operation .................................................... 5-33
How to enable/disable the I-LI system .......... 5-34
I-LI system limitations .................................................. 5-34
System temporarily unavailable ........................... 5-36
System malfunction ....................................................... 5-37
System maintenance .................................................... 5-37
Blind Spot Warning (BSW) .................................................. 5-38 BSW system operation ................................................. 5-39
How to enable/disable the BSW system ....... 5-40