2022 NISSAN ARMADA tow
[x] Cancel search: towPage 264 of 604
4-34Monitor, heater, air conditioner, audio, phone and voice recognition systems
system will turn back on.
The sonar, the Rear Automatic Braking
(RAB), and the Intelligent Back-up Inter-
vention (I-BI) systems will also turn back
on at the same time.
To enable or disable the MOD system, use
the camera settings menu. See “MOD
function settings” (P.4-34).
MOD FUNCTION SETTINGS
The MOD function settings can be chan-
ged using the following procedures.
1. Push the MENU button on the DisplayCommander.
2. Touch the “Settings” key on the touch screen display.
3. Touch the “Camera” key.
4. Touch the “Camera” key.
Available setting items:
Moving Object Detection:
When this item is turned on, the MOD
system is activated. When this item is
turned off (indicator turns off), the MOD
system is deactivated.
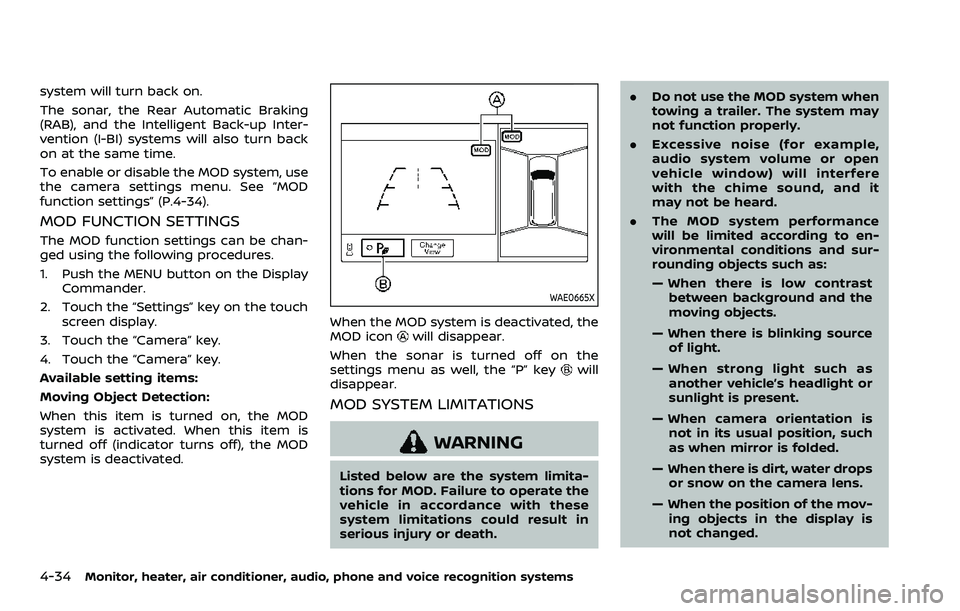
WAE0665X
When the MOD system is deactivated, the
MOD iconwill disappear.
When the sonar is turned off on the
settings menu as well, the “P” key
will
disappear.
MOD SYSTEM LIMITATIONS
WARNING
Listed below are the system limita-
tions for MOD. Failure to operate the
vehicle in accordance with these
system limitations could result in
serious injury or death. .
Do not use the MOD system when
towing a trailer. The system may
not function properly.
. Excessive noise (for example,
audio system volume or open
vehicle window) will interfere
with the chime sound, and it
may not be heard.
. The MOD system performance
will be limited according to en-
vironmental conditions and sur-
rounding objects such as:
— When there is low contrast
between background and the
moving objects.
— When there is blinking source of light.
— When strong light such as another vehicle’s headlight or
sunlight is present.
— When camera orientation is not in its usual position, such
as when mirror is folded.
— When there is dirt, water drops or snow on the camera lens.
— When the position of the mov- ing objects in the display is
not changed.
Page 315 of 604
Rear Automatic Braking (RAB) .................................... 5-116RAB system operation ................................................ 5-118
Turning the RAB system ON/OFF ...................... 5-119
RAB system limitations .............................................. 5-119
System malfunction ...................................................... 5-121
System maintenance ................................................... 5-122
Break-in schedule ................................................................. 5-122
Fuel efficient driving tips ................................................. 5-123
Increasing fuel economy ................................................. 5-124
NISSAN all-mode 4WD® (if so equipped) ............. 5-124 NISSAN all-mode 4WD® system ........................... 5-125
4WD shift switch .............................................................. 5-129
4WD shift indicator ........................................................ 5-130
4WD warning light ......................................................... 5-130
Hill Start Assist system ...................................................... 5-132
Parking/parking on hills ................................................... 5-133
TOW mode ........................................................................\
.......... 5-134
SNOW mode ........................................................................\
....... 5-135
Front and rear sonar system (if
so equipped) ........................................................................\
...... 5-136 System operation ........................................................... 5-137
Sonar function settings ............................................. 5-137
Turning on and off the sonar function ......... 5-139 Sonar limitations ........................................................... 5-140
System temporarily unavailable ....................... 5-141
System maintenance ................................................ 5-141
Power steering ........................................................................\
5-141
Brake system ........................................................................\
... 5-142 Braking precautions ................................................... 5-142
Parking brake break-in ............................................ 5-142
Brake assist ........................................................................\
....... 5-143
Brake assist ....................................................................... 5-143
Anti-lock Braking System (ABS) ........................ 5-143
Vehicle Dynamic Control (VDC) system .............. 5-144
Vehicle Dynamic Control (VDC)
OFF switch ........................................................................\
. 5-146
Cold weather driving ......................................................... 5-146
Freeing a frozen door lock ................................... 5-146
Antifreeze ........................................................................\
.... 5-146
Battery ........................................................................\
........... 5-146
Draining of coolant water ..................................... 5-146
Tire equipment ............................................................... 5-147
Special winter equipment ..................................... 5-147
Driving on snow or ice ............................................. 5-147
Engine block heater (if so equipped) ........... 5-148
Page 317 of 604

dry grass, waste paper or rags.
They may ignite and cause a fire.
CAUTION
.Do not use leaded gasoline. De-
posits from leaded gasoline ser-
iously reduce the three-way
catalyst’s ability to help reduce
exhaust pollutants.
. Keep your engine tuned up. Mal-
functions in the ignition, fuel in-
jection, or electrical systems can
cause overrich fuel flow into the
three-way catalyst, causing it to
overheat. Do not keep driving if
the engine misfires, or if notice-
able loss of performance or other
unusual operating conditions are
detected. Have the vehicle in-
spected. It is recommended you
visit a NISSAN dealer for this
service.
. Avoid driving with an extremely
low fuel level. Running out of fuel
could cause the engine to misfire,
damaging the three-way catalyst.
. Do not race the engine while
warming it up. .
Do not push or tow your vehicle
to start the engine.
TIRE PRESSURE MONITORING SYS-
TEM (TPMS)
Each tire, including the spare (if provided),
should be checked monthly when cold
and inflated to the inflation pressure
recommended by the vehicle manufac-
turer on the vehicle placard or tire infla-
tion pressure label. (If your vehicle has
tires of a different size than the size
indicated on the vehicle placard or tire
inflation pressure label, you should deter-
mine the proper tire inflation pressure for
those tires.)
As an added safety feature, your vehicle
has been equipped with a Tire Pressure
Monitoring System (TPMS) that illumi-
nates a low tire pressure telltale when
one or more of your tires is significantly
under-inflated. Accordingly, when the low
tire pressure telltale illuminates, you
should stop and check your tires as soon
as possible, and inflate them to the
proper pressure. Driving on a significantly
under-inflated tire causes the tire to
overheat and can lead to tire failure.
Under-inflation also reduces fuel effi-
ciency and tire tread life, and may affect
the vehicle’s handling and stopping abil-
ity. Please note that the TPMS is not a
substitute for proper tire maintenance,
and it is the driver’s responsibility to
maintain correct tire pressure, even if
under-inflation has not reached the level
to trigger illumination of the TPMS low
tire pressure telltale.
Your vehicle has also been equipped with
a TPMS malfunction indicator to indicate
when the system is not operating prop-
erly. The TPMS malfunction indicator is
combined with the low tire pressure tell-
tale. When the system detects a malfunc-
tion, the telltale will flash for
approximately one minute and then re-
main continuously illuminated. This se-
quence will continue upon subsequent
vehicle start-ups as long as the malfunc-
tion exists. When the malfunction indica-
tor is illuminated, the system may not be
able to detect or signal low tire pressure
as intended. TPMS malfunctions may
occur for a variety of reasons, including
the installation of replacement or alter-
nate tires or wheels on the vehicle that
prevent the TPMS from functioning prop-
erly. Always check the TPMS malfunction
telltale after replacing one or more tires
or wheels on your vehicle to ensure that
the replacement or alternate tires and
wheels allow the TPMS to continue to
function properly.
Starting and driving5-5
Page 324 of 604

5-12Starting and driving
result in serious vehicle damage
or personal injury.
. Do not attempt to test a 4WD
equipped vehicle on a 2-wheel
dynamometer (such as the dy-
namometers used by some
states for emissions testing), or
similar equipment even if the
other two wheels are raised off
the ground. Make sure you inform
test facility personnel that your
vehicle is equipped with 4WD
before it is placed on a dynam-
ometer. Using the wrong test
equipment may result in drive-
train damage or unexpected ve-
hicle movement which could
result in serious vehicle damage
or personal injury (4WD models).
. When a wheel is off the ground
due to an unlevel surface, do not
spin the wheel excessively.
. Accelerating quickly, sharp steer-
ing maneuvers or sudden braking
may cause loss of control.
. If at all possible, avoid sharp
turning maneuvers, particularly
at high speeds. Your vehicle has
a higher center of gravity than a
conventional passenger car. The
vehicle is not designed for cor- nering at the same speeds as
conventional passenger cars.
Failure to operate this vehicle
correctly could result in loss of
control and/or a rollover acci-
dent.
. Always use tires of the same type,
size, brand, construction (bias,
bias-belted or radial), and tread
pattern on all four wheels. Install
tire chains on the rear wheels
when driving on slippery roads
and drive carefully.
. Be sure to check the brakes im-
mediately after driving in mud or
water. See “Brake system” (P.5-
142) for wet brakes.
. Avoid parking your vehicle on
steep hills. If you get out of the
vehicle and it rolls forward, back-
ward or sideways, you could be
injured.
. Whenever you drive off-road
through sand, mud or water as
deep as the wheel hub, more
frequent maintenance may be
required. See the maintenance
schedule shown in the "9. Main-
tenance and schedules" section.
. Spinning the rear wheels on slip-
pery surfaces may cause the 4WD warning light to flash. The 4WD
system may also automatically
switch from the 4WD mode to
the 2WD mode. This could reduce
traction. Be especially careful
when towing a trailer (4WD mod-
els).
Page 326 of 604
5-14Starting and driving
moved to the P (Park) position.
When the ignition switch cannot be
pushed toward the LOCK position, pro-
ceed as follows:
1. Move the shift lever into the P (Park)position.
2. Push the ignition switch to the OFF position. The ignition switch position
indicator will not illuminate.
3. Open the door. The ignition switch will change to the LOCK position.
The shift lever can be moved from the P
(Park) position if the ignition switch is in
the ON position and the brake pedal is
depressed.
If the battery of the vehicle is dis-
charged, the push-button ignition
switch cannot be turned from the LOCK
position.
Some indicators and warnings for opera-
tion are displayed on the vehicle informa-
tion display between the speedometer
and tachometer. (See “Vehicle informa-
tion display” (P.2-20).)PUSH-BUTTON IGNITION SWITCH
POSITIONS
LOCK (Normal parking position)
The ignition switch can only be locked in
this position.
The ignition switch will be unlocked when
it is pushed to the ACC position while
carrying the Intelligent Key.
ACC (Accessories)
This position activates electrical acces-
sories such as the radio, when the engine
is not running.
ACC has a battery saver feature that will
turn the ignition switch to the OFF posi-
tion after a period of time under the
following conditions:
. all doors are closed.
. shift lever is in P (Park).
. turn signal/hazard indicator lights are
not flashing.
The battery saver feature will be can-
celled if any of the following occur:
. any door is opened.
. shift lever is moved out of P (Park).
. ignition switch changes position.
ON (Normal operating position)
This position turns on the ignition system
and electrical accessories.
ON has a battery saver feature that will
turn the ignition switch to the OFF posi-
tion, if the vehicle is not running, after
some time under the following condi-
tions:
. all doors are closed.
. shift lever is in P (Park).
. turn signal/hazard indicator lights are
not flashing.
The battery saver feature will be can-
celled if any of the following occur:
. any door is opened.
. shift lever is moved out of P (Park).
. ignition switch changes position.
OFF
The engine can be turned off in the
position.
The ignition lock is designed so that the
ignition switch cannot be switched to the
LOCK position until the shift lever is
moved to the P (Park) position.
Page 329 of 604
fuel cut mode.
5. To stop the engine, shift the shift lever to the P (Park) position and push the
ignition switch to the OFF position.
In preparation for the next engine start,
the engine may have a slightly delayed
shutoff after placing the ignition switch in
the OFF position, depending on the driv-
ing conditions.
NOTE:
Care should be taken to avoid situations
that can lead to potential battery dis-
charge and potential no-start condi-
tions such as:
1. Installation or extended use of elec-
tronic accessories that consume
battery power when the engine is
not running (Phone chargers, GPS,
DVD players, etc.)
2. Vehicle is not driven regularly and/
or only driven short distances.
In these cases, the battery may need to
be charged to maintain battery health.
REMOTE ENGINE START (if so
equipped)
Vehicles started with the remote engine
start function require the ignition switch
to be placed in the ON position before the
shift lever can be moved from the P (Park)
position. To place the ignition switch in the ON position, perform the following
steps:
1. Make sure that the Intelligent Key is
on you.
2. Firmly depress the brake pedal.
3. Push the ignition switch once to the ON position.
For additional information about the
remote engine start function, see “Re-
mote engine start” (P.3-19).
ENGINE PROTECTION MODE
The engine has an engine protection
mode to reduce the chance of damage
if the coolant temperature becomes too
high (for example, when climbing steep
grades in high temperature with heavy
loads, such as when towing a trailer).
When the engine temperature reaches a
certain level:
. The engine coolant temperature
gauge will move toward the H posi-
tion.
. Engine power may be reduced.
. The air conditioning cooling function
may be automatically turned OFF for a
short time (the blower will continue to
operate).
Engine power and, under some condi-
tions, vehicle speed will decrease. Vehicle
speed can be controlled with the accel-
erator pedal, but the vehicle may not
accelerate at the desired speed. The
transmission will downshift or upshift as
it reaches prescribed shift points. You can
also shift manually.
As driving conditions change and engine
coolant temperature is reduced, vehicle
speed can be increased using the accel-
erator pedal, and air conditioning cooling
function will automatically be turned
back ON.
Starting and driving5-17
DRIVING THE VEHICLE
Page 330 of 604
5-18Starting and driving
If:
1. The engine coolant temperature is notreduced.
2. The air conditioning cooling function does not turn back ON.
3. The engine oil pressure warning light
illuminates or engine coolant
temperature gauge does not return
to the normal range from the H
position, this may indicate a malfunc-
tion. Move the vehicle off the road to a
safe area and allow the engine to cool.
If after checking the oil and coolant,
the
remains on or engine coolant
temperature does not return to the
normal range, do not continue to
drive. It is recommended you contact
a NISSAN dealer.
The Malfunction Indicator Light (MIL)
may also come ON. You do not need to
have your vehicle towed, unless it re-
mains on, but have it inspected soon. It is
recommended you contact a NISSAN
dealer for this service. See “Warning lights,
indicator lights and audible reminders”
(P.2-11).
WARNING
Overheating can result in reduced
engine power and vehicle speed.
The reduced speed may be lower
than other traffic, which could in-
crease the chance of a collision. Be
especially careful when driving. If the
vehicle cannot maintain a safe driv-
ing speed, pull to the side of the road
in a safe area. Allow the engine to
cool and return to normal operation.
See “If your vehicle overheats” (P.6-
14).
CAUTION
Running the engine with the engine
oil pressure warning light on could
cause serious damage to the engine
almost immediately. Such damage is
not covered by warranty. Turn off the
engine as soon as it is safe to do so.
AUTOMATIC TRANSMISSION
7 speed automatic transmission
The automatic transmission in your vehi-
cle is electronically controlled by a trans-
mission control module to produce
maximum efficiency and smooth opera-
tion.
Shown on the following pages are the
recommended operating procedures for
this transmission. Follow these proce-
dures for maximum vehicle performance
and driving enjoyment.
Starting the vehicle
After starting the engine, fully depress the
foot brake pedal and push the shift lever
button before shifting the shift lever to
the R (Reverse), N (Neutral), D (Drive) or
Manual shift mode position. Be sure the
vehicle is fully stopped before attempting
to shift the shift lever.
This automatic transmission model is
designed so that the foot brake pedal
must be depressed before shifting from
P (Park) to any drive position while the
ignition switch position is ON.
The shift lever cannot be moved out of
the P (Park) position and into any of the
other gear positions if the ignition
switch is pushed to the LOCK, OFF or
ACC position.
Page 341 of 604
button. Use the OK to select “Driver
Assistance”. Then push the OK.
2. Select “Lane” and push the OK.
3. Select “Warning (LDW)” and push the OK.
The warning systems switch
is used to
turn on and off the LDW system when it is
activated on the vehicle information dis-
play. When the warning systems switch
is turned off, the warning systems ON
indicator lighton the switch is off.
The warning systems switch
will turn
on and off the LDW and BSW systems at
the same time.
NOTE:
If you disable the LDW system, the
system will remain disabled the next
time you start the vehicle’s engine.
LDW SYSTEM LIMITATIONS
WARNING
Listed below are the system limita-
tions for the LDW system. Failure to
follow the warnings and instructions
for proper use of the LDW system
could result in serious injury or
death. .
The system will not operate at
speeds below approximately 37
MPH (60 km/h) or if it cannot
detect lane markers.
. Do not use the LDW system under
the following conditions as it may
not function properly:
— During bad weather (rain, fog,
snow, etc.).
— When driving on slippery roads, such as on ice or snow.
— When driving on winding or uneven roads.
— When there is a lane closure due to road repairs.
— When driving in a makeshift or temporary lane.
— When driving on roads where the lane width is too narrow.
— When driving without normal tire conditions (for example,
tire wear, low tire pressure,
installation of spare tire, tire
chains, non-standard wheels).
— When the vehicle is equipped with non-original brake parts
or suspension parts. — When towing a trailer or other
vehicle.
. The system may not function
properly under the following con-
ditions:
— On roads where there are
multiple parallel lane markers;
lane markers that are faded or
not painted clearly; yellow
painted lane markers; non-
standard lane markers; or
lane markers covered with
water, dirt, snow, etc.
— On roads where discontinued lane markers are still detect-
able.
— On roads where there are sharp curves.
— On roads where there are sharply contrasting objects,
such as shadows, snow,
water, wheel ruts, seams or
lines remaining after road re-
pairs. (The LDW system could
detect these items as lane
markers.)
— On roads where the traveling lane merges or separates.
Starting and driving5-29