2022 NISSAN ARMADA buttons
[x] Cancel search: buttonsPage 232 of 604

Remote control operation ........................................... 4-52
Remote control buttons ................................................ 4-52
Wireless headphone operation ................................ 4-54
General operation ............................................................... 4-55
Video operation .................................................................... 4-56
HDMI/MHL connection .................................................... 4-57
USB/SD card operation .................................................. 4-57
Slingplayer® ........................................................................\
..... 4-64Miracast® ........................................................................\
......... 4-66
Using the mobile application on your
mobile device ....................................................................... 4-67
SmartStream ........................................................................\
4-67
Settings ........................................................................\
............ 4-69
Troubleshooting ................................................................ 4-76
Specifications ....................................................................... 4-78
Compliance information ............................................. 4-79
Page 256 of 604
4-26Monitor, heater, air conditioner, audio, phone and voice recognition systems
WARNING
Failure to follow the warnings and
instructions for proper use of the
sonar function as outlined in this
section could result in serious injury
or death.
.The sonar is a convenience fea-
ture. It is not a substitute for
proper parking.
. This function is designed as an
aid to the driver in detecting large
stationary objects to help avoid
damaging the vehicle.
. The driver is always responsible
for safety during parking and
other maneuvers.
. Always look around and check
that it is safe to move before
parking.
. Read and understand the limita-
tions of the sonar as contained in
this section.
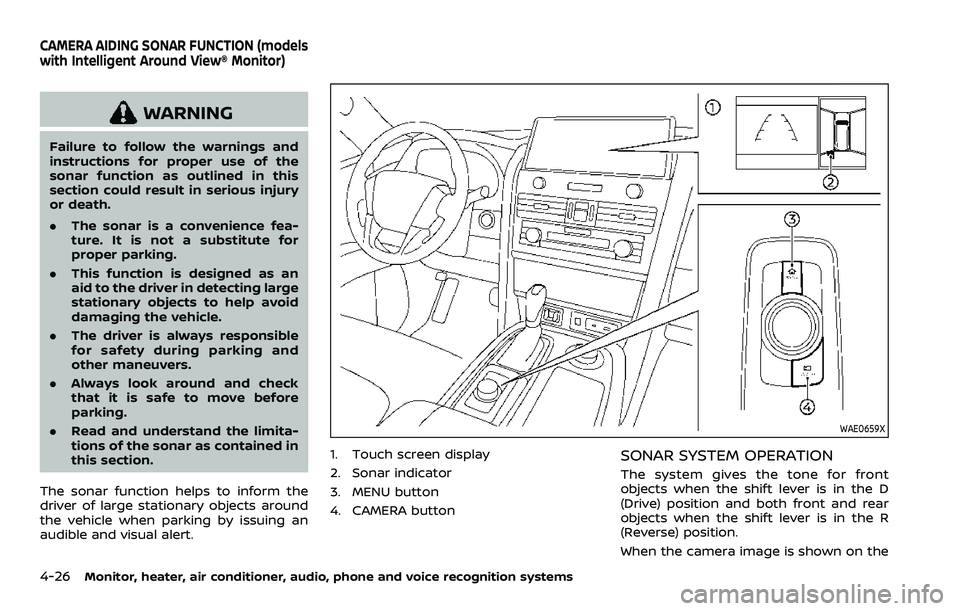
The sonar function helps to inform the
driver of large stationary objects around
the vehicle when parking by issuing an
audible and visual alert.
WAE0659X
1. Touch screen display
2. Sonar indicator
3. MENU button
4. CAMERA buttonSONAR SYSTEM OPERATION
The system gives the tone for front
objects when the shift lever is in the D
(Drive) position and both front and rear
objects when the shift lever is in the R
(Reverse) position.
When the camera image is shown on the
CAMERA AIDING SONAR FUNCTION (models
with Intelligent Around View® Monitor)
Page 268 of 604
4-38Monitor, heater, air conditioner, audio, phone and voice recognition systems
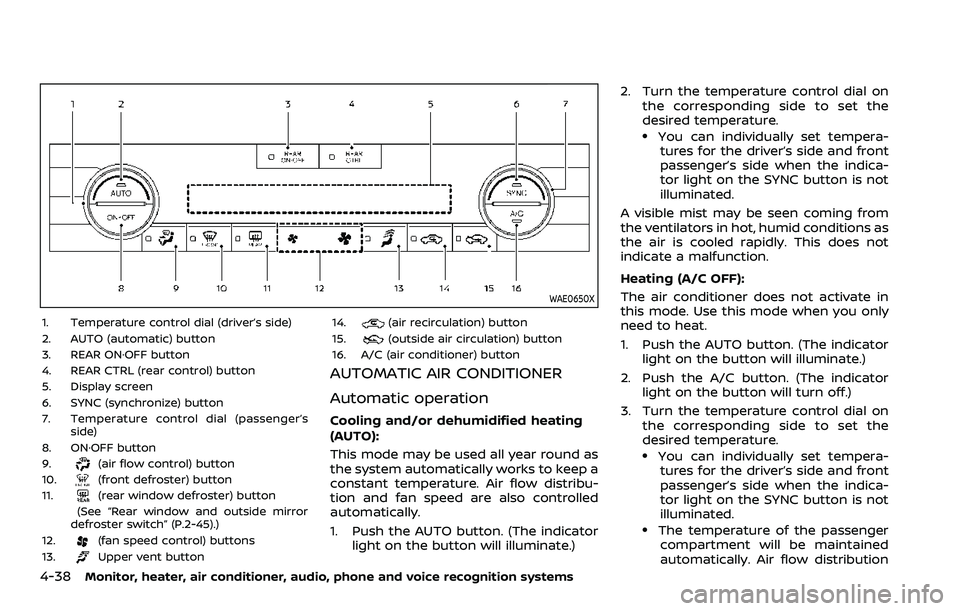
WAE0650X
1. Temperature control dial (driver’s side)
2. AUTO (automatic) button
3. REAR ON·OFF button
4. REAR CTRL (rear control) button
5. Display screen
6. SYNC (synchronize) button
7. Temperature control dial (passenger’sside)
8. ON·OFF button
9.
(air flow control) button
10.(front defroster) button
11.(rear window defroster) button
(See “Rear window and outside mirror
defroster switch” (P.2-45).)
12.
(fan speed control) buttons
13.Upper vent button 14.
(air recirculation) button
15.(outside air circulation) button
16. A/C (air conditioner) button
AUTOMATIC AIR CONDITIONER
Automatic operation
Cooling and/or dehumidified heating
(AUTO):
This mode may be used all year round as
the system automatically works to keep a
constant temperature. Air flow distribu-
tion and fan speed are also controlled
automatically.
1. Push the AUTO button. (The indicator light on the button will illuminate.) 2. Turn the temperature control dial on
the corresponding side to set the
desired temperature.
.You can individually set tempera-tures for the driver’s side and front
passenger’s side when the indica-
tor light on the SYNC button is not
illuminated.
A visible mist may be seen coming from
the ventilators in hot, humid conditions as
the air is cooled rapidly. This does not
indicate a malfunction.
Heating (A/C OFF):
The air conditioner does not activate in
this mode. Use this mode when you only
need to heat.
1. Push the AUTO button. (The indicator light on the button will illuminate.)
2. Push the A/C button. (The indicator light on the button will turn off.)
3. Turn the temperature control dial on the corresponding side to set the
desired temperature.
.You can individually set tempera-tures for the driver’s side and front
passenger’s side when the indica-
tor light on the SYNC button is not
illuminated.
.The temperature of the passengercompartment will be maintained
automatically. Air flow distribution
Page 269 of 604
and fan speed are also controlled
automatically.
NOTE:
. Do not set the temperature lower
than the outside air temperature or
the system may not work properly.
. Not recommended if windows fog
up.
Dehumidified defrosting or defogging:
1. Push the
button. (The indicator
light on the button will illuminate.)
2. Turn the temperature control dial on the corresponding side to set the
desired temperature.
.To quickly remove ice from theoutside of the windows, use the
button to set the fan speed to
maximum.
.As soon as possible after the wind- shield is cleared, push the AUTO
button to return to the automatic
mode.
Manual operation
Fan speed control:
Push the
buttons to manually control
the fan speed.
Air intake control:
. Push the
button to recirculate
interior air inside the vehicle. (The
indicator light on the button will
illuminate.)
. Push the
button to draw outside
air into the passenger compartment.
(The indicator light on the button will
illuminate.)
. To control the air intake automatically,
push and hold either the
button
or thebutton. The indicator light
will blink, and then the air intake will
switch to automatic control. When the
automatic control is set, the system
automatically alternates between the
outside air circulation and the air
recirculation modes. (The indicator
light of the active mode will illumi-
nate.) Air flow control:
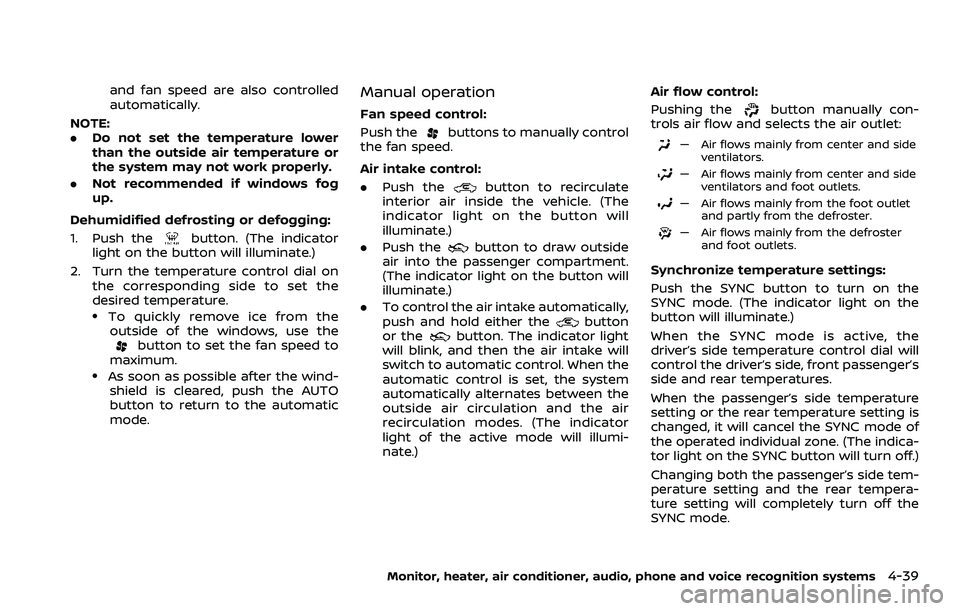
Pushing the
button manually con-
trols air flow and selects the air outlet:
— Air flows mainly from center and side
ventilators.
— Air flows mainly from center and sideventilators and foot outlets.
— Air flows mainly from the foot outletand partly from the defroster.
— Air flows mainly from the defrosterand foot outlets.
Synchronize temperature settings:
Push the SYNC button to turn on the
SYNC mode. (The indicator light on the
button will illuminate.)
When the SYNC mode is active, the
driver’s side temperature control dial will
control the driver’s side, front passenger’s
side and rear temperatures.
When the passenger’s side temperature
setting or the rear temperature setting is
changed, it will cancel the SYNC mode of
the operated individual zone. (The indica-
tor light on the SYNC button will turn off.)
Changing both the passenger’s side tem-
perature setting and the rear tempera-
ture setting will completely turn off the
SYNC mode.
Monitor, heater, air conditioner, audio, phone and voice recognition systems4-39
Page 272 of 604
4-42Monitor, heater, air conditioner, audio, phone and voice recognition systems
Rear air conditioner control panel
operation
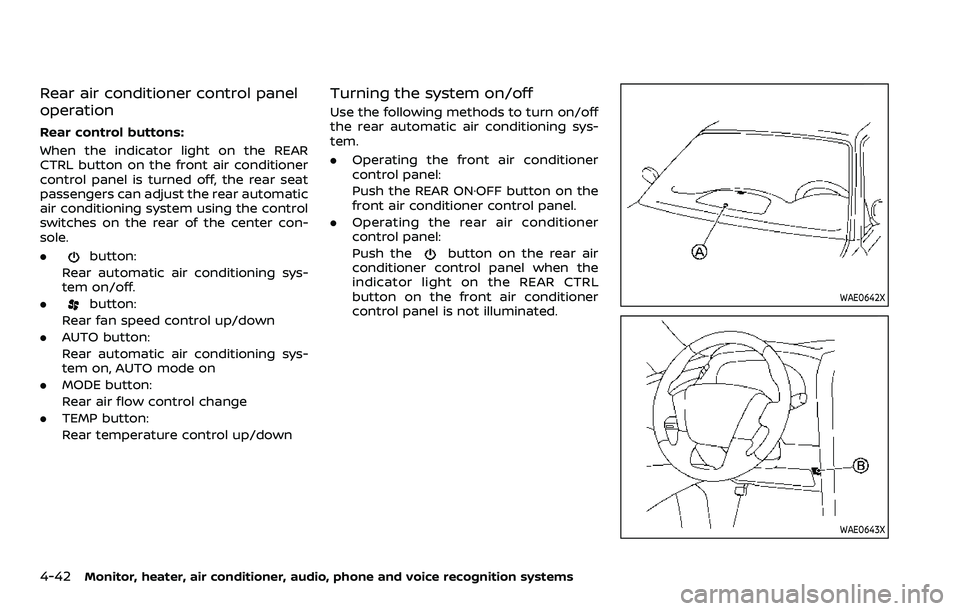
Rear control buttons:
When the indicator light on the REAR
CTRL button on the front air conditioner
control panel is turned off, the rear seat
passengers can adjust the rear automatic
air conditioning system using the control
switches on the rear of the center con-
sole.
.
button:
Rear automatic air conditioning sys-
tem on/off.
.
button:
Rear fan speed control up/down
. AUTO button:
Rear automatic air conditioning sys-
tem on, AUTO mode on
. MODE button:
Rear air flow control change
. TEMP button:
Rear temperature control up/down
Turning the system on/off
Use the following methods to turn on/off
the rear automatic air conditioning sys-
tem.
.Operating the front air conditioner
control panel:
Push the REAR ON·OFF button on the
front air conditioner control panel.
. Operating the rear air conditioner
control panel:
Push the
button on the rear air
conditioner control panel when the
indicator light on the REAR CTRL
button on the front air conditioner
control panel is not illuminated.
WAE0642X
WAE0643X
Page 280 of 604
4-50Monitor, heater, air conditioner, audio, phone and voice recognition systems
WAE0714X
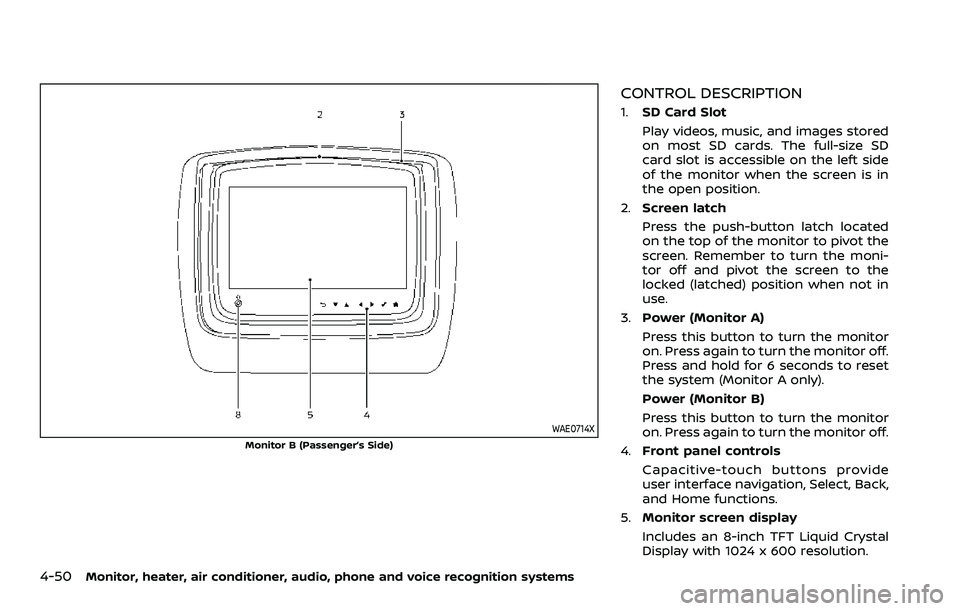
Monitor B (Passenger’s Side)
CONTROL DESCRIPTION
1.SD Card Slot
Play videos, music, and images stored
on most SD cards. The full-size SD
card slot is accessible on the left side
of the monitor when the screen is in
the open position.
2. Screen latch
Press the push-button latch located
on the top of the monitor to pivot the
screen. Remember to turn the moni-
tor off and pivot the screen to the
locked (latched) position when not in
use.
3. Power (Monitor A)
Press this button to turn the monitor
on. Press again to turn the monitor off.
Press and hold for 6 seconds to reset
the system (Monitor A only).
Power (Monitor B)
Press this button to turn the monitor
on. Press again to turn the monitor off.
4. Front panel controls
Capacitive-touch buttons provide
user interface navigation, Select, Back,
and Home functions.
5. Monitor screen display
Includes an 8-inch TFT Liquid Crystal
Display with 1024 x 600 resolution.
Page 282 of 604
4-52Monitor, heater, air conditioner, audio, phone and voice recognition systems
REMOTE CONTROL OPERATION
Before use
Before attempting to operate your re-
mote control, turn the remote control
face down and remove the battery in-
sulator by pulling the clear plastic tab
away from the remote control.
Replacing the battery
1. Turn the remote control face down.Use a coin to turn the battery cover
counter-clockwise and remove it.
2. Replace the battery with a CR2032 or equivalent. Make sure that proper
polarity is observed. The positive (+)
side of the battery should face up-
wards.
3. Place the cover back into position and turn it clockwise until it locks into
place.
The remote control will only operate this
device. It is not a universal remote control
and will not control other equipment.
WARNING
Keep the battery out of the reach of
children. In case the battery is acci-
dentally swallowed, immediately
consult a doctor. Also, when dispos-
ing of used batteries, please comply with governmental regulations or
environmental public institution
rules that apply in your country/
area.
CAUTION
.
Always ensure that the battery is
inserted in the correct direction
as shown in the battery compart-
ment.
. When the battery fails to function,
replace it immediately.
. Remove the battery if the remote
control is not used for a month or
longer.
. Storage in extreme cold can
weaken the battery. Keep the
remote control stored in a cool,
dry place.
WAE0717X
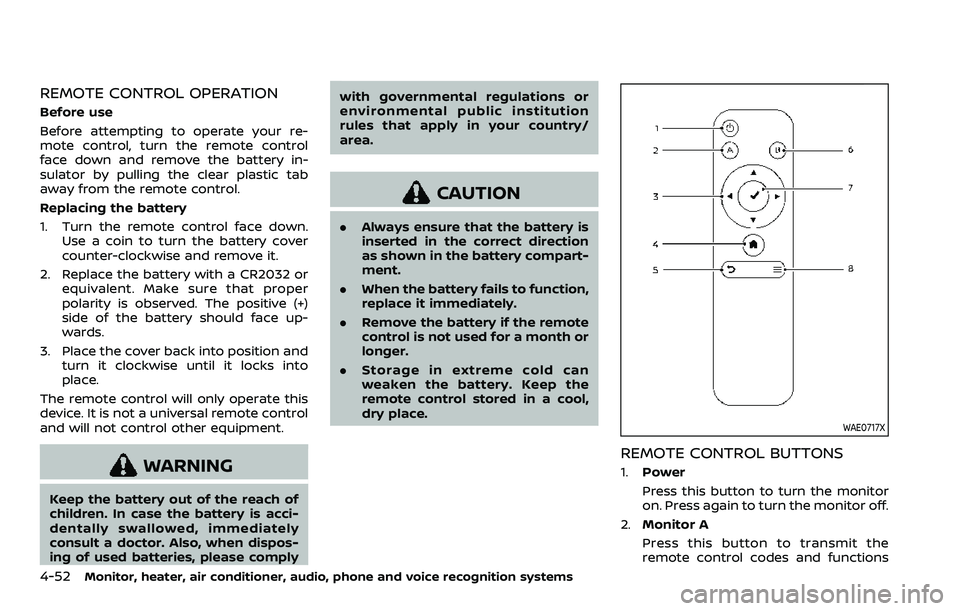
REMOTE CONTROL BUTTONS
1.Power
Press this button to turn the monitor
on. Press again to turn the monitor off.
2. Monitor A
Press this button to transmit the
remote control codes and functions
Page 283 of 604
to operate monitor A (Driver side).
3. Directional pad
Press these buttons to increase/de-
crease the volume or navigate up/
down when displaying a menu or file
list.
4. Home
Press this button to return to the
home screen.
5. Back
Press this button to go back to the
previous screen.
6. Monitor B
Press this button to transmit the
remote control codes and functions
to operate monitor B (Passenger side).
7. Select
Press this button to make a selection
when displaying a menu or file list.
8. Menu
Press this button to open the context
menu (when available).
NOTE:
You must first select the desired moni-
tor (press A or B) to control it. Example -
Press A, then press Power to turn
monitor A on/off.
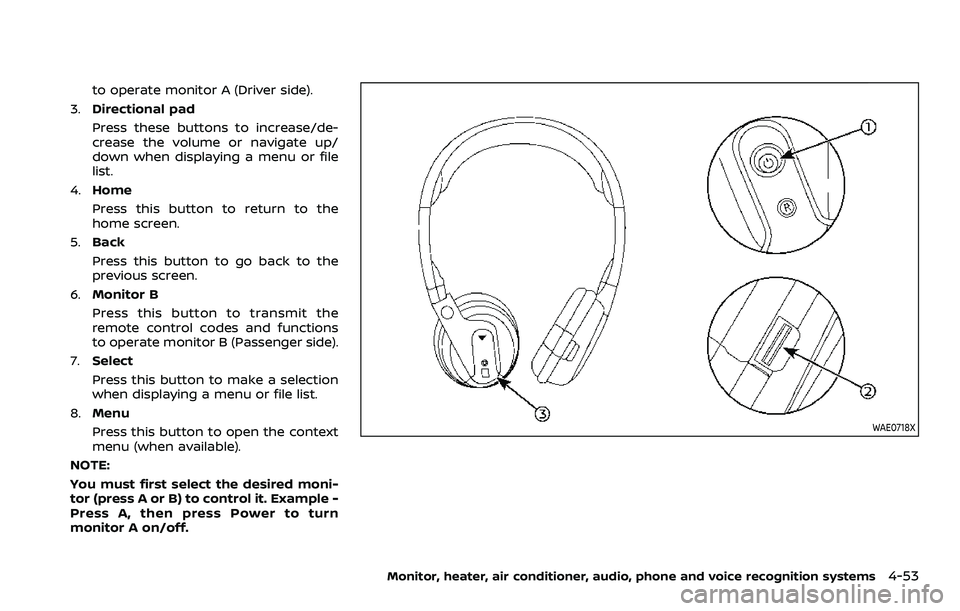
WAE0718X
Monitor, heater, air conditioner, audio, phone and voice recognition systems4-53