2022 NISSAN ARMADA display
[x] Cancel search: displayPage 448 of 604
5-136Starting and driving
SSD0622
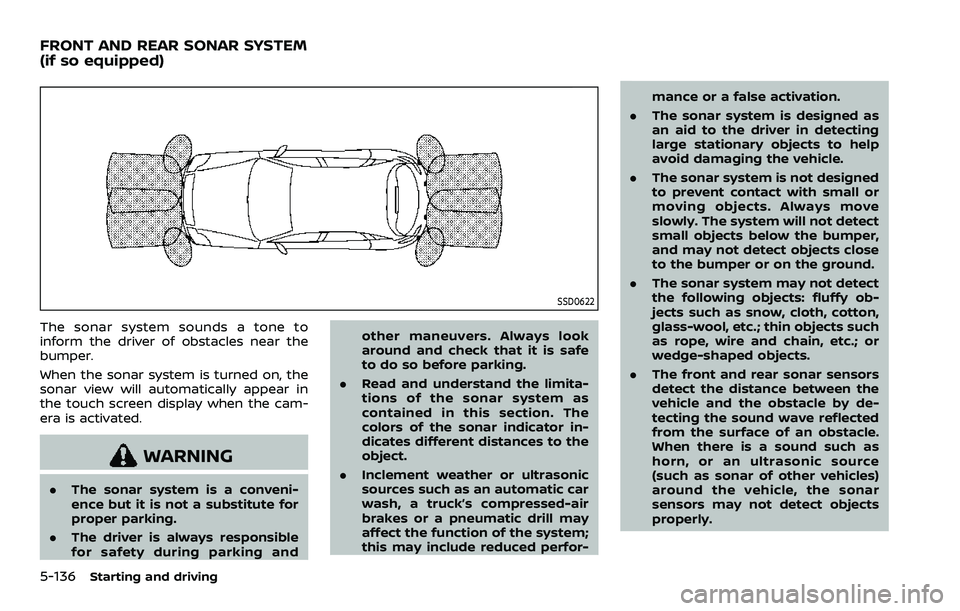
The sonar system sounds a tone to
inform the driver of obstacles near the
bumper.
When the sonar system is turned on, the
sonar view will automatically appear in
the touch screen display when the cam-
era is activated.
WARNING
.The sonar system is a conveni-
ence but it is not a substitute for
proper parking.
. The driver is always responsible
for safety during parking and other maneuvers. Always look
around and check that it is safe
to do so before parking.
. Read and understand the limita-
tions of the sonar system as
contained in this section. The
colors of the sonar indicator in-
dicates different distances to the
object.
. Inclement weather or ultrasonic
sources such as an automatic car
wash, a truck’s compressed-air
brakes or a pneumatic drill may
affect the function of the system;
this may include reduced perfor- mance or a false activation.
. The sonar system is designed as
an aid to the driver in detecting
large stationary objects to help
avoid damaging the vehicle.
. The sonar system is not designed
to prevent contact with small or
moving objects. Always move
slowly. The system will not detect
small objects below the bumper,
and may not detect objects close
to the bumper or on the ground.
. The sonar system may not detect
the following objects: fluffy ob-
jects such as snow, cloth, cotton,
glass-wool, etc.; thin objects such
as rope, wire and chain, etc.; or
wedge-shaped objects.
. The front and rear sonar sensors
detect the distance between the
vehicle and the obstacle by de-
tecting the sound wave reflected
from the surface of an obstacle.
When there is a sound such as
horn, or an ultrasonic source
(such as sonar of other vehicles)
around the vehicle, the sonar
sensors may not detect objects
properly.
FRONT AND REAR SONAR SYSTEM
(if so equipped)
Page 449 of 604
If your vehicle sustains damage to the
bumper fascia, leaving it misaligned or
bent, the sensing zone may be altered
causing inaccurate measurement of ob-
stacles or false alarms.
CAUTION
.Excessive noise (such as audio
system volume or an open vehi-
cle window) will interfere with the
tone and it may not be heard.
. Keep the sonar sensors (located
on the bumper fascia) free from
snow, ice and large accumula-
tions of dirt. Do not clean the
sonar sensors with sharp objects.
If the sensors are covered, the
accuracy of the sonar function
will be diminished.
SYSTEM OPERATION
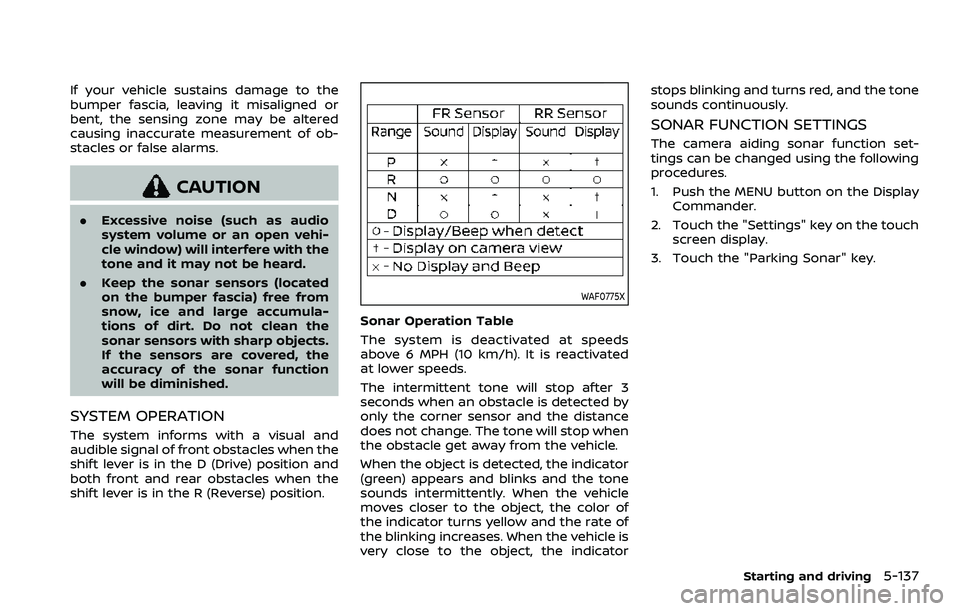
The system informs with a visual and
audible signal of front obstacles when the
shift lever is in the D (Drive) position and
both front and rear obstacles when the
shift lever is in the R (Reverse) position.
WAF0775X
Sonar Operation Table
The system is deactivated at speeds
above 6 MPH (10 km/h). It is reactivated
at lower speeds.
The intermittent tone will stop after 3
seconds when an obstacle is detected by
only the corner sensor and the distance
does not change. The tone will stop when
the obstacle get away from the vehicle.
When the object is detected, the indicator
(green) appears and blinks and the tone
sounds intermittently. When the vehicle
moves closer to the object, the color of
the indicator turns yellow and the rate of
the blinking increases. When the vehicle is
very close to the object, the indicator stops blinking and turns red, and the tone
sounds continuously.
SONAR FUNCTION SETTINGS
The camera aiding sonar function set-
tings can be changed using the following
procedures.
1. Push the MENU button on the Display
Commander.
2. Touch the "Settings" key on the touch screen display.
3. Touch the "Parking Sonar" key.
Starting and driving5-137
Page 450 of 604
5-138Starting and driving
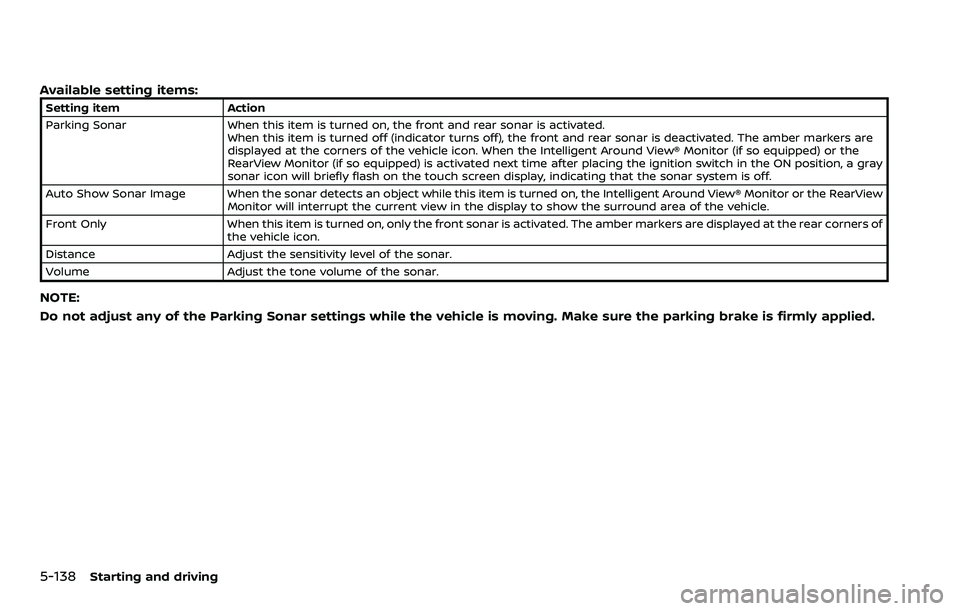
Available setting items:
Setting itemAction
Parking Sonar When this item is turned on, the front and rear sonar is activated.
When this item is turned off (indicator turns off), the front and rear sonar is deactivated. The amber markers are
displayed at the corners of the vehicle icon. When the Intelligent Around View® Monitor (if so equipped) or the
RearView Monitor (if so equipped) is activated next time after placing the ignition switch in the ON position, a gray
sonar icon will briefly flash on the touch screen display, indicating that the sonar system is off.
Auto Show Sonar Image When the sonar detects an object while this item is turned on, the Intelligent Around View® Monitor or the RearView Monitor will interrupt the current view in the display to show the surround area of the vehicle.
Front Only When this item is turned on, only the front sonar is activated. The amber markers are displayed at the rear corners of
the vehicle icon.
Distance Adjust the sensitivity level of the sonar.
Volume Adjust the tone volume of the sonar.
NOTE:
Do not adjust any of the Parking Sonar settings while the vehicle is moving. Make sure the parking brake is firmly applied.
Page 451 of 604
WAF0783X
Example
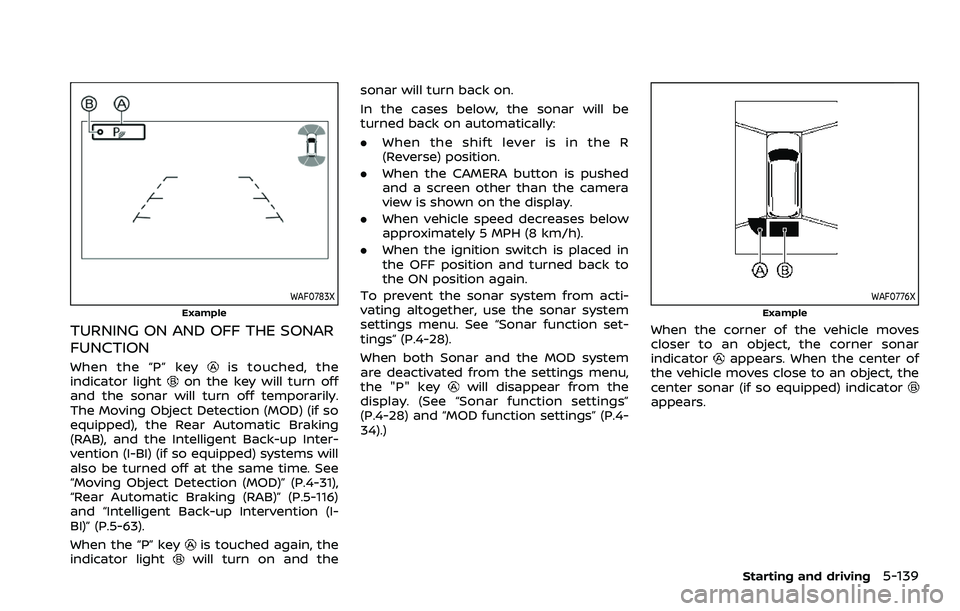
TURNING ON AND OFF THE SONAR
FUNCTION
When the “P” keyis touched, the
indicator lighton the key will turn off
and the sonar will turn off temporarily.
The Moving Object Detection (MOD) (if so
equipped), the Rear Automatic Braking
(RAB), and the Intelligent Back-up Inter-
vention (I-BI) (if so equipped) systems will
also be turned off at the same time. See
“Moving Object Detection (MOD)” (P.4-31),
“Rear Automatic Braking (RAB)” (P.5-116)
and “Intelligent Back-up Intervention (I-
BI)” (P.5-63).
When the “P” key
is touched again, the
indicator lightwill turn on and the sonar will turn back on.
In the cases below, the sonar will be
turned back on automatically:
.
When the shift lever is in the R
(Reverse) position.
. When the CAMERA button is pushed
and a screen other than the camera
view is shown on the display.
. When vehicle speed decreases below
approximately 5 MPH (8 km/h).
. When the ignition switch is placed in
the OFF position and turned back to
the ON position again.
To prevent the sonar system from acti-
vating altogether, use the sonar system
settings menu. See “Sonar function set-
tings” (P.4-28).
When both Sonar and the MOD system
are deactivated from the settings menu,
the "P" key
will disappear from the
display. (See “Sonar function settings”
(P.4-28) and “MOD function settings” (P.4-
34).)
WAF0776X
Example
When the corner of the vehicle moves
closer to an object, the corner sonar
indicator
appears. When the center of
the vehicle moves close to an object, the
center sonar (if so equipped) indicator
appears.
Starting and driving5-139
Page 463 of 604

To shut off the engine in an emergency
situation while driving, perform the fol-
lowing procedure:
.Rapidly push the push-button ignition
switch 3 consecutive times in less
than 1.5 seconds, or
. Push and hold the push-button igni-
tion switch for more than 2 seconds.TIRE PRESSURE MONITORING SYS-
TEM (TPMS)
This vehicle is equipped with the Tire
Pressure Monitoring System (TPMS). It
monitors tire pressure of all tires except
the spare. When the low tire pressure
warning light is lit and the “Tire Pressure
Low Add Air” warning appears in the
vehicle information display, one or more
of your tires is significantly under-inflated.
If the vehicle is being driven with low tire
pressure, the TPMS will activate and warn
you of it by the low tire pressure warning
light. This system will activate only when
the vehicle is driven at speeds above 16
MPH (25 km/h). For more details, see “Low
tire pressure warning light” (P.2-16) and
“Tire Pressure Monitoring System (TPMS)”
(P.5-5).
WARNING
.If the low tire pressure warning
light illuminates or Low Pressure
information is displayed on the
monitor screen while driving,
avoid sudden steering maneu-
vers or abrupt braking, reduce
vehicle speed, pull off the road
to a safe location and stop the
vehicle as soon as possible. Driv-
ing with under-inflated tires may permanently damage the tires
and increase the likelihood of tire
failure. Serious vehicle damage
could occur and may lead to an
accident and could result in ser-
ious personal injury. Check the
tire pressure for all four tires.
Adjust the tire pressure to the
recommended COLD tire pressure
shown on the Tire and Loading
Information label to turn the low
tire pressure warning light OFF. If
the light still illuminates while
driving after adjusting the tire
pressure, a tire may be flat. If
you have a flat tire, replace it with
a spare tire as soon as possible.
. Since the spare tire is not
equipped with the TPMS, when a
spare tire is mounted or a wheel
is replaced, the TPMS will not
function and the low tire pressure
warning light will flash for ap-
proximately 1 minute. The light
will remain on after 1 minute.
Have your tires replaced and/or
TPMS system reset as soon as
possible. It is recommended you
visit a NISSAN dealer for these
services.
. Replacing tires with those not
originally specified by NISSAN
In case of emergency6-3
EMERGENCY ENGINE SHUT OFF FLAT TIRE
Page 471 of 604
fications at each lubrication inter-
val.
.Adjust tire pressure to the COLDpressure.
COLD pressure:
After the vehicle has been parked
for three hours or more or driven
less than 1 mile (1.6 km).
COLD tire pressures are shown on
the Tire and Loading Information
label affixed to the driver side
center pillar.
After adjusting tire pressure to the COLD
tire pressure, the display of the tire
pressure information may show higher
pressure than the COLD tire pressure
after the vehicle has been driven more
than 1 mile (1.6 km). This is because the
tire pressurizes as the tire temperature
rises. This does not indicate a system
malfunction.
Stowing the damaged tire and
tools
1. Securely store the damaged tire, jack and tools in the storage area.
2. Close the cargo floor cover.
3. Replace the cargo floor board.
4. Close the liftgate.
WARNING
. Always make sure that the spare
tire and jacking equipment are
properly secured after use. Such
items can become dangerous
projectiles in an accident or sud-
den stop.
. The full-size temporary use only
spare tire (if so equipped) is de-
signed for emergency use. (See
specific instructions under the
heading “Wheels and tires” (P.8-
28).)
In case of emergency6-11
Page 513 of 604

SDI2704
Extended storage fuse switch (if so
equipped)
To reduce battery drain, the extended
storage fuse switch comes from the
factory switched off. Prior to delivery of
your vehicle, the switch is pushed in
(switched on) and should always remain
on.
If the extended storage fuse switch is not
pushed in (switched on), the “Shipping
Mode On, Push Storage Fuse” warning
may appear on the vehicle information
display (if so equipped). See “Vehicle
information display” (P.2-20).
If any electrical equipment does not
operate, remove the extended storagefuse switch and check for an open fuse.
NOTE:
If the extended storage fuse switch
malfunctions or if the fuse is open, it is
not necessary to replace the switch. In
this case, remove the extended storage
fuse switch and replace it with a new
fuse of the same rating.
How to remove the extended storage
fuse switch:
1. To remove the extended storage fuse
switch, be sure the ignition switch is in
the OFF or LOCK position.
2. Be sure the headlights are off. (See “Headlight switch” (P.2-47), “Intelligent
Auto Headlight system (Type A)” (P.2-
47), or “Autolight system (Type B)” (P.2-
48).)
3. Remove the fuse box cover.
4. Pinch the locking tabs
found on
each side of the storage fuse switch.
5. Pull the storage fuse switch straight out from the fuse box
.
CAUTION
Be careful not to allow children to
swallow the battery and removed
parts.
Do-it-yourself8-21
INTELLIGENT KEY BATTERY REPLACEMENT
Page 520 of 604
8-28Do-it-yourself
If you have a flat tire, see “Flat tire” (P.6-
3).
TIRE PRESSURE
Tire Pressure Monitoring System
(TPMS)
This vehicle is equipped with the Tire
Pressure Monitoring System (TPMS). It
monitors tire pressure of all tires except
the spare. When the low tire pressure
warning light is lit and the “Tire Pressure
Low Add Air” warning appears in the
vehicle information display, one or more
of your tires is significantly under-inflated.
The TPMS will activate only when the
vehicle is driven at speeds above 16 MPH
(25 km/h). Also, this system may not
detect a sudden drop in tire pressure
(for example, a flat tire while driving).
For more details, see “Low tire pressure
warning light” (P.2-16), “Tire Pressure Mon-
itoring System (TPMS)” (P.5-5) and “Tire
Pressure Monitoring System (TPMS) ” (P.6-
3).
Tire inflation pressure
Check the pressure of the tires
(including the spare) often and al-
ways prior to long distance trips.
The recommended tire pressure
specifications are shown on the
Tire and Loading Information label
under the “Cold Tire Pressure”
heading. The Tire and Loading In-
formation label is affixed to the
driver side center pillar. Tire pres-
sures should be checked regularly
because:
.Most tires naturally lose air over
time.
. Tires can lose air suddenly when
driven over potholes or other
objects or if the vehicle strikes
a curb while parking.
The tire pressures should be
checked when the tires are cold.
The tires are considered COLD after
the vehicle has been parked for 3 or
more hours, or driven less than 1
mile (1.6 km) at moderate speeds.
TPMS with Easy Fill Tire Alert pro-
vides visual and audible signals outside the vehicle for inflating the
tires to the recommended COLD
tire pressure. (See “TPMS with Easy
Fill Tire Alert” (P.5-8).)
Incorrect tire pressure, including
under inflation, may adversely
affect tire life and vehicle hand-
ling.
WARNING
.
Improperly inflated tires can
fail suddenly and cause an
accident.
. The Gross Vehicle Weight
rating (GVWR) is located on
the F.M.V.S.S./C.M.V.S.S. cer-
tification label. The vehicle
weight capacity is indicated
on the Tire and Loading In-
formation label. Do not load
your vehicle beyond this ca-
pacity. Overloading your ve-
hicle may result in reduced
tire life, unsafe operating
conditions due to premature
tire failure, or unfavorable
WHEELS AND TIRES