2022 NISSAN ARMADA tire size
[x] Cancel search: tire sizePage 412 of 604
5-100Starting and driving
serious injury or death.
.The AEB with pedestrian detec-
tion system cannot detect all
vehicles or pedestrians under all
conditions.
. The AEB with pedestrian detec-
tion system does not detect the
following:
— Pedestrians that are small (for
example, children), in a sitting
position, operating toys/ska-
teboards, on scooters or in
wheelchairs, or not in an up-
right standing or walking po-
sition.
— Animals of any size.
— Obstacles (for example, cargo or debris) on the roadway or
roadside.
— Oncoming or crossing vehi- cles.
— Vehicles where the tires are difficult to see or the shape of
the rear of the vehicle is un-
clear or obstructed.
— Parked vehicles.
. The AEB with pedestrian detec-
tion system has some perfor-
mance limitations. — If a stationary vehicle is in the
vehicle’s path, the system will
not function when the vehicle
approaches the stationary ve-
hicle at speeds over approxi-
mately 50 MPH (80 km/h).
— Pedestrian detection will not function when the vehicle is
driven at speeds over ap-
proximately 37 MPH (60
km/h) or below approxi-
mately 6 MPH (10 km/h).
. For pedestrians, the AEB with
pedestrian detection system will
not issue the first warning.
. The AEB with pedestrian detec-
tion system may not function
properly or detect a vehicle or
pedestrian ahead in the following
conditions:
— In poor visibility conditions
(such as rain, snow, fog, dust
storms, sand storms, smoke,
and road spray from other
vehicles).
— If dirt, ice, snow, fog or other material is covering the radar
sensor area or camera area of
the windshield. — If strong light (for example,
sunlight or high beams) en-
ters the front camera or a
sudden change in brightness
occurs (for example, entering
a tunnel or driving in light-
ning).
— In dark or dimly lit conditions, such as at night or in tunnels,
including cases where your
vehicle’s headlights are off or
dim, or the tail lights of the
vehicle ahead are off.
— When the direction of the camera is misaligned.
— When driving on a steep downhill slope, on roads with
sharp curves, and/or bumpy
or dirt roads.
— If there is interference by other radar sources.
— When your vehicle’s position or movement is changed
quickly or significantly (for
example, lane change, turning
vehicle, abrupt steering, sud-
den acceleration or decelera-
tion).
Page 455 of 604

BRAKE ASSIST
When the force applied to the brake pedal
exceeds a certain level, the Brake Assist is
activated generating greater braking
force than a conventional brake booster
even with light pedal force.
WARNING
The Brake Assist is only an aid to
assist braking operation and is not a
collision warning or avoidance de-
vice. It is the driver’s responsibility to
stay alert, drive safely and be in
control of the vehicle at all times.
ANTI-LOCK BRAKING SYSTEM (ABS)
WARNING
.The Anti-lock Braking System
(ABS) is a sophisticated device,
but it cannot prevent accidents
resulting from careless or dan-
gerous driving techniques. It can
help maintain vehicle control dur-
ing braking on slippery surfaces.
Remember that stopping dis-
tances on slippery surfaces will
be longer than on normal sur- faces even with ABS. Stopping
distances may also be longer on
rough, gravel or snow covered
roads, or if you are using tire
chains. Always maintain a safe
distance from the vehicle in front
of you. Ultimately, the driver is
responsible for safety.
. Tire type and condition may also
affect braking effectiveness.
— When replacing tires, install
the specified size of tires on
all four wheels.
— When installing a spare tire, make sure that it is the proper
size and type as specified on
the Tire and Loading Informa-
tion label. See “Tire and load-
ing information label” (P.10-
13).
— For detailed information, see “Wheels and tires” (P.8-28).
The Anti-lock Braking System (ABS) con-
trols the brakes so the wheels do not lock
during hard braking or when braking on
slippery surfaces. The system detects the
rotation speed at each wheel and varies
the brake fluid pressure to prevent each
wheel from locking and sliding. By pre-
venting each wheel from locking, the system helps the driver maintain steering
control and helps to minimize swerving
and spinning on slippery surfaces.
Using the system
Depress the brake pedal and hold it down.
Depress the brake pedal with firm steady
pressure, but do not pump the brakes.
The ABS will operate to prevent the
wheels from locking up. Steer the vehicle
to avoid obstacles.
WARNING
Do not pump the brake pedal. Doing
so may result in increased stopping
distances.
Self-test feature
The ABS includes electronic sensors, elec-
tric pumps, hydraulic solenoids and a
computer. The computer has a built-in
diagnostic feature that tests the system
each time you start the engine and move
the vehicle at a low speed in forward or
reverse. When the self-test occurs, you
may hear a “clunk” noise and/or feel a
pulsation in the brake pedal. This is
normal and does not indicate a malfunc-
tion. If the computer senses a malfunc-
tion, it switches the ABS off and
Starting and driving5-143
BRAKE ASSIST
Page 459 of 604

TIRE EQUIPMENT
SUMMER tires have a tread designed to
provide superior performance on dry
pavement. However, the performance of
these tires will be substantially reduced in
snowy and icy conditions. If you operate
your vehicle on snowy or icy roads,
NISSAN recommends the use of MUD &
SNOW or ALL SEASON tires on all four
wheels. It is recommended you consult a
NISSAN dealer for the tire type, size, speed
rating and availability information.
For additional traction on icy roads,
studded tires may be used. However,
some U.S. states and Canadian provinces
prohibit their use. Check local, state and
provincial laws before installing studded
tires.
Skid and traction capabilities of
studded snow tires, on wet or dry
surfaces, may be poorer than that of
non-studded snow tires.
Tire chains may be used. For details, see
“Tire chains” (P.8-35).
For four-wheel drive
If you install snow tires, they must also be
the same size, brand, construction and
tread pattern on all four wheels.
SPECIAL WINTER EQUIPMENT
It is recommended that the following
items be carried in the vehicle during
winter:
.A scraper and stiff-bristled brush to
remove ice and snow from the win-
dows and wiper blades.
. A sturdy, flat board to be placed under
the jack to give it firm support.
. A shovel to dig the vehicle out of
snowdrifts.
. Extra window washer fluid to refill the
reservoir tank.
DRIVING ON SNOW OR ICE
WARNING
. Wet ice (32°F, 0°C and freezing
rain), very cold snow or ice can be
slick and very hard to drive on.
The vehicle will have much less
traction or “grip” under these
conditions. Try to avoid driving
on wet ice until the road is salted
or sanded. .
Whatever the condition, drive
with caution. Accelerate and slow
down with care. If accelerating or
downshifting too fast, the drive
wheels will lose even more trac-
tion.
. Allow more stopping distance
under these conditions. Braking
should be started sooner than on
dry pavement.
. Allow greater following distances
on slippery roads.
. Watch for slippery spots (glare
ice). These may appear on an
otherwise clear road in shaded
areas. If a patch of ice is seen
ahead, brake before reaching it.
Try not to brake while on the ice,
and avoid any sudden steering
maneuvers.
. Do not use the cruise control on
slippery roads.
. Snow can trap dangerous ex-
haust gases under your vehicle.
Keep snow clear of the exhaust
pipe and from around your vehi-
cle.
Starting and driving5-147
Page 470 of 604
6-10In case of emergency
ignition switch ON/OFF one time.
SCE0910
Installing the spare tire
The full-size temporary use only spare
tire (if so equipped) is designed for
emergency use. (See specific instruc-
tions under the heading “Wheels and
tires” (P.8-28).)
1. Clean any mud or dirt from the sur-face between the wheel and hub.
2. Carefully put the spare tire on and tighten the wheel nuts finger tight.
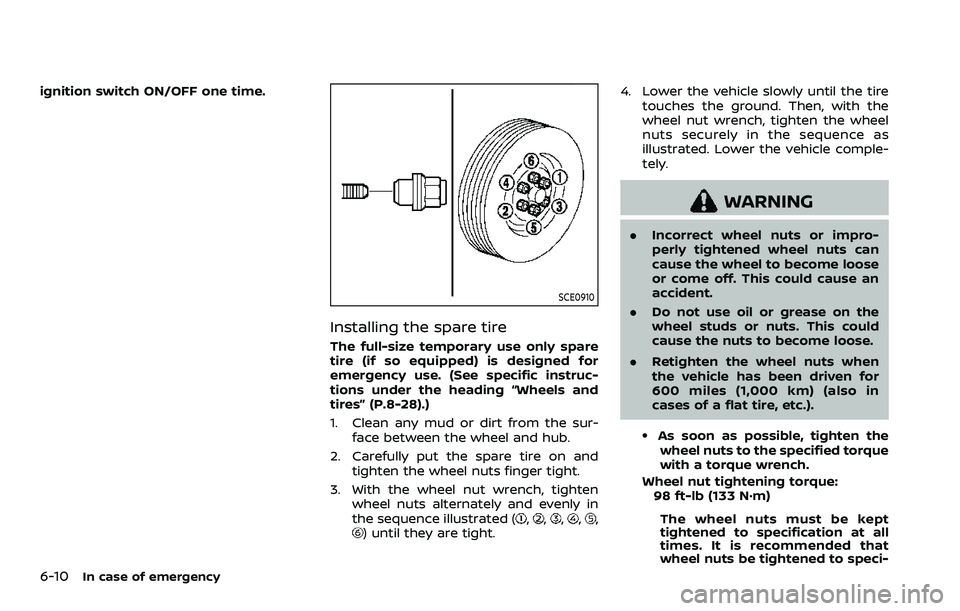
3. With the wheel nut wrench, tighten wheel nuts alternately and evenly in
the sequence illustrated (
,,,,,) until they are tight. 4. Lower the vehicle slowly until the tire
touches the ground. Then, with the
wheel nut wrench, tighten the wheel
nuts securely in the sequence as
illustrated. Lower the vehicle comple-
tely.
WARNING
.Incorrect wheel nuts or impro-
perly tightened wheel nuts can
cause the wheel to become loose
or come off. This could cause an
accident.
. Do not use oil or grease on the
wheel studs or nuts. This could
cause the nuts to become loose.
. Retighten the wheel nuts when
the vehicle has been driven for
600 miles (1,000 km) (also in
cases of a flat tire, etc.).
.As soon as possible, tighten the
wheel nuts to the specified torque
with a torque wrench.
Wheel nut tightening torque: 98 ft-lb (133 N·m)
The wheel nuts must be kept
tightened to specification at all
times. It is recommended that
wheel nuts be tightened to speci-
Page 471 of 604
fications at each lubrication inter-
val.
.Adjust tire pressure to the COLDpressure.
COLD pressure:
After the vehicle has been parked
for three hours or more or driven
less than 1 mile (1.6 km).
COLD tire pressures are shown on
the Tire and Loading Information
label affixed to the driver side
center pillar.
After adjusting tire pressure to the COLD
tire pressure, the display of the tire
pressure information may show higher
pressure than the COLD tire pressure
after the vehicle has been driven more
than 1 mile (1.6 km). This is because the
tire pressurizes as the tire temperature
rises. This does not indicate a system
malfunction.
Stowing the damaged tire and
tools
1. Securely store the damaged tire, jack and tools in the storage area.
2. Close the cargo floor cover.
3. Replace the cargo floor board.
4. Close the liftgate.
WARNING
. Always make sure that the spare
tire and jacking equipment are
properly secured after use. Such
items can become dangerous
projectiles in an accident or sud-
den stop.
. The full-size temporary use only
spare tire (if so equipped) is de-
signed for emergency use. (See
specific instructions under the
heading “Wheels and tires” (P.8-
28).)
In case of emergency6-11
Page 522 of 604
8-30Do-it-yourself
SDI2496
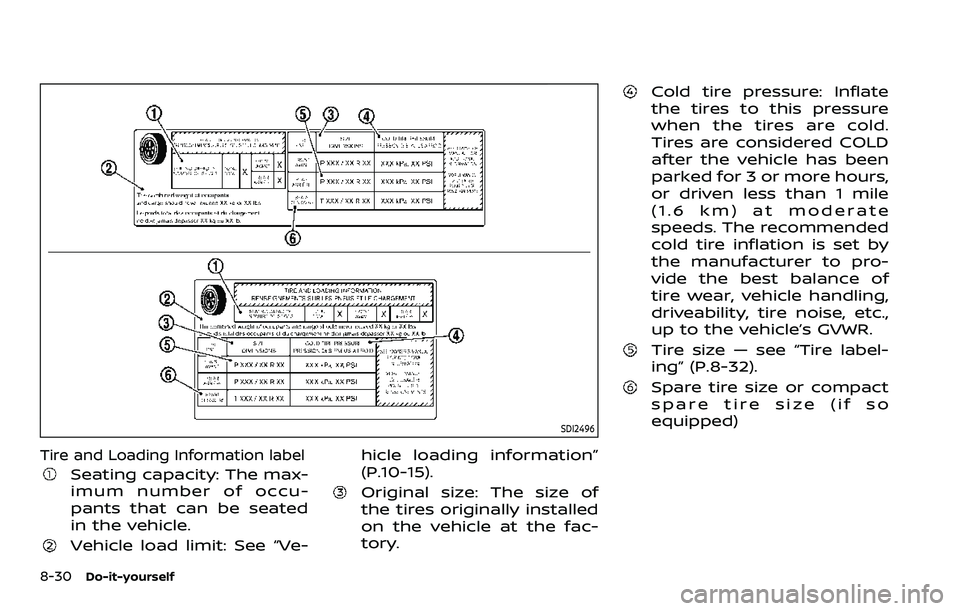
Tire and Loading Information label
Seating capacity: The max-
imum number of occu-
pants that can be seated
in the vehicle.
Vehicle load limit: See “Ve-hicle loading information”
(P.10-15).
Original size: The size of
the tires originally installed
on the vehicle at the fac-
tory.
Cold tire pressure: Inflate
the tires to this pressure
when the tires are cold.
Tires are considered COLD
after the vehicle has been
parked for 3 or more hours,
or driven less than 1 mile
(1.6 km) at moderate
speeds. The recommended
cold tire inflation is set by
the manufacturer to pro-
vide the best balance of
tire wear, vehicle handling,
driveability, tire noise, etc.,
up to the vehicle’s GVWR.
Tire size — see “Tire label-
ing” (P.8-32).
Spare tire size or compact
spare tire size (if so
equipped)
Page 524 of 604
8-32Do-it-yourself
SizeCold Tire In-
flation Pres- sure
Front Original Tire:
265/70R18 116H 35 psi, 240
kPa
Front Original Tire:
P275/60R20 114H 35 psi, 240
kPa
Front Original Tire:
P275/50R22 111H 35 psi, 240
kPa
Rear Original Tire:
265/70R18 116H 35 psi, 240
kPa
Rear Original Tire:
P275/60R20 114H 35 psi, 240
kPa
Rear Original Tire:
P275/50R22 111H 35 psi, 240
kPa
Spare Tire:
265/70R18 116H 35 psi, 240
kPa
Spare Tire:
265/70R18 116M 51 psi, 350
kPa
Recommended tire inflation pressures at
speeds of 100 MPH (160 km/h) or higher where
it is legal to do so.
Size
Cold Tire In-
flation Pres- sure
Front Original Tire:
P275/60R20 114H 36 psi, 250
kPa
Front Original Tire:
P275/50R22 111H 41 psi, 280
kPa
Rear Original Tire:
P275/60R20 114H 36 psi, 250
kPa
Rear Original Tire:
P275/50R22 111H 41 psi, 280
kPa
SDI1575
Example
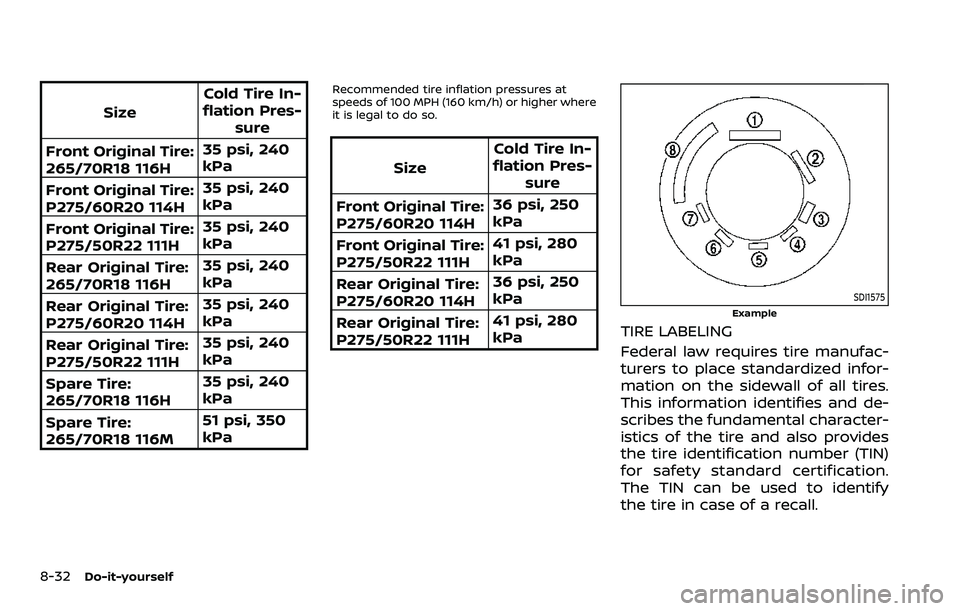
TIRE LABELING
Federal law requires tire manufac-
turers to place standardized infor-
mation on the sidewall of all tires.
This information identifies and de-
scribes the fundamental character-
istics of the tire and also provides
the tire identification number (TIN)
for safety standard certification.
The TIN can be used to identify
the tire in case of a recall.
Page 525 of 604
SDI1606
Example
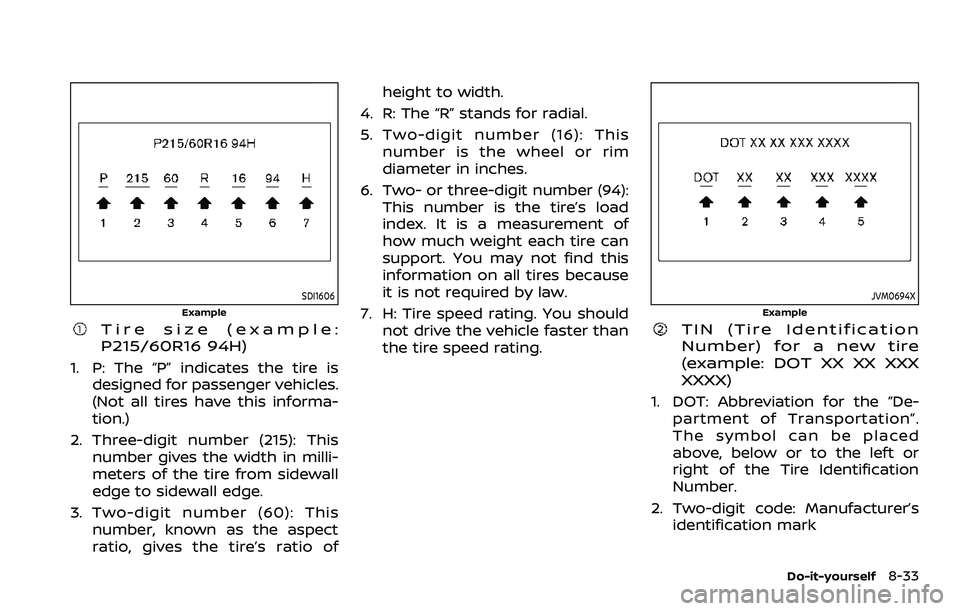
Tire size (example:
P215/60R16 94H)
1. P: The “P” indicates the tire isdesigned for passenger vehicles.
(Not all tires have this informa-
tion.)
2. Three-digit number (215): This number gives the width in milli-
meters of the tire from sidewall
edge to sidewall edge.
3. Two-digit number (60): This number, known as the aspect
ratio, gives the tire’s ratio of height to width.
4. R: The “R” stands for radial.
5. Two-digit number (16): This number is the wheel or rim
diameter in inches.
6. Two- or three-digit number (94): This number is the tire’s load
index. It is a measurement of
how much weight each tire can
support. You may not find this
information on all tires because
it is not required by law.
7. H: Tire speed rating. You should not drive the vehicle faster than
the tire speed rating.
JVM0694X
Example
TIN (Tire Identification
Number) for a new tire
(example: DOT XX XX XXX
XXXX)
1. DOT: Abbreviation for the “De-
partment of Transportation”.
The symbol can be placed
above, below or to the left or
right of the Tire Identification
Number.
2. Two-digit code: Manufacturer’s identification mark
Do-it-yourself8-33