2022 NISSAN ARMADA roof
[x] Cancel search: roofPage 79 of 604
WAB0168X
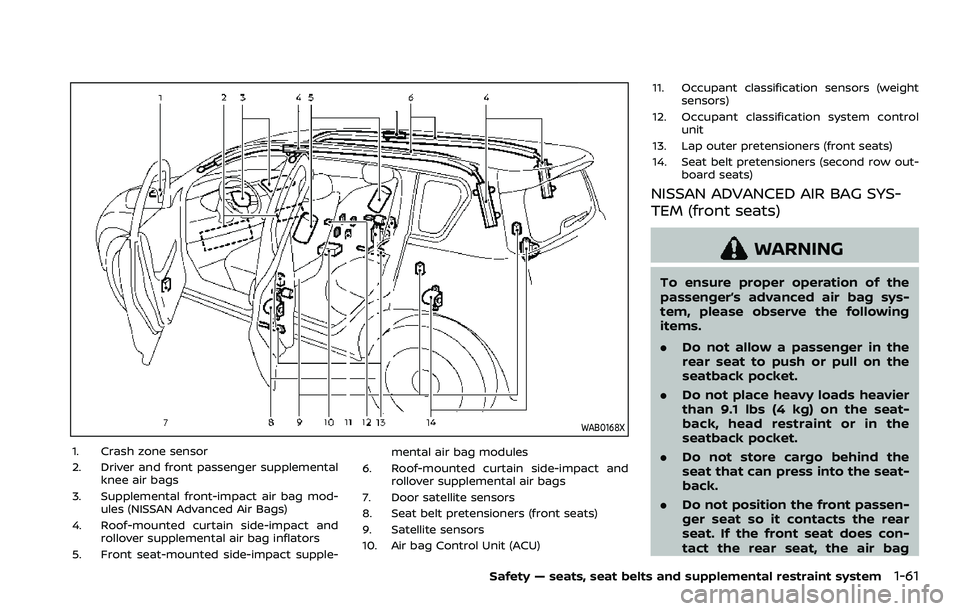
1. Crash zone sensor
2. Driver and front passenger supplementalknee air bags
3. Supplemental front-impact air bag mod- ules (NISSAN Advanced Air Bags)
4. Roof-mounted curtain side-impact and rollover supplemental air bag inflators
5. Front seat-mounted side-impact supple- mental air bag modules
6. Roof-mounted curtain side-impact and rollover supplemental air bags
7. Door satellite sensors
8. Seat belt pretensioners (front seats)
9. Satellite sensors
10. Air bag Control Unit (ACU) 11. Occupant classification sensors (weight
sensors)
12. Occupant classification system control unit
13. Lap outer pretensioners (front seats)
14. Seat belt pretensioners (second row out- board seats)
NISSAN ADVANCED AIR BAG SYS-
TEM (front seats)
WARNING
To ensure proper operation of the
passenger’s advanced air bag sys-
tem, please observe the following
items.
.Do not allow a passenger in the
rear seat to push or pull on the
seatback pocket.
. Do not place heavy loads heavier
than 9.1 lbs (4 kg) on the seat-
back, head restraint or in the
seatback pocket.
. Do not store cargo behind the
seat that can press into the seat-
back.
. Do not position the front passen-
ger seat so it contacts the rear
seat. If the front seat does con-
tact the rear seat, the air bag
Safety — seats, seat belts and supplemental restraint system1-61
Page 89 of 604
WAB0182X
FRONT SEAT-MOUNTED SIDE-IM-
PACT SUPPLEMENTAL AIR BAG AND
ROOF-MOUNTED CURTAIN SIDE-
IMPACT AND ROLLOVER SUPPLE-
MENTAL AIR BAG SYSTEMS
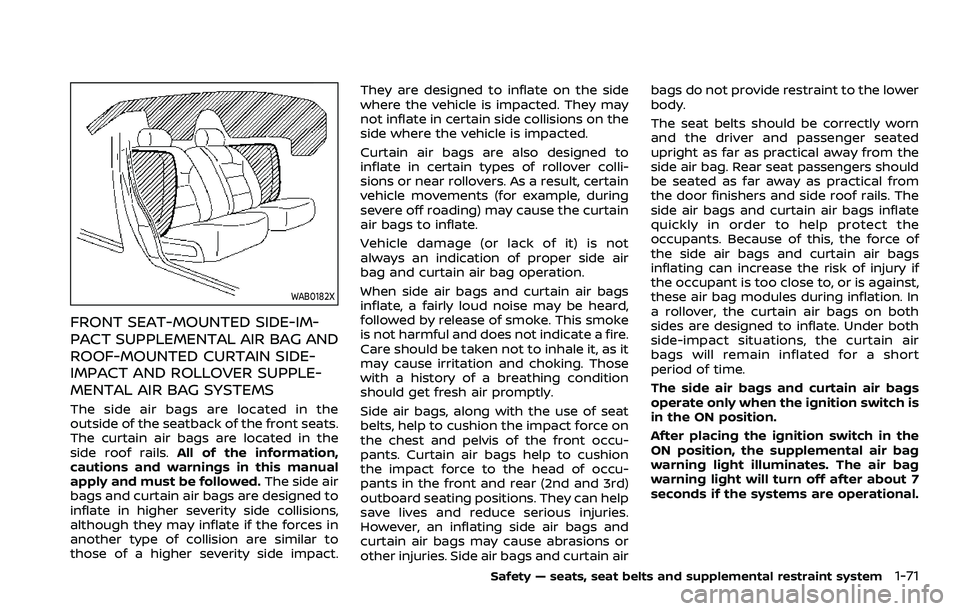
The side air bags are located in the
outside of the seatback of the front seats.
The curtain air bags are located in the
side roof rails.All of the information,
cautions and warnings in this manual
apply and must be followed. The side air
bags and curtain air bags are designed to
inflate in higher severity side collisions,
although they may inflate if the forces in
another type of collision are similar to
those of a higher severity side impact. They are designed to inflate on the side
where the vehicle is impacted. They may
not inflate in certain side collisions on the
side where the vehicle is impacted.
Curtain air bags are also designed to
inflate in certain types of rollover colli-
sions or near rollovers. As a result, certain
vehicle movements (for example, during
severe off roading) may cause the curtain
air bags to inflate.
Vehicle damage (or lack of it) is not
always an indication of proper side air
bag and curtain air bag operation.
When side air bags and curtain air bags
inflate, a fairly loud noise may be heard,
followed by release of smoke. This smoke
is not harmful and does not indicate a fire.
Care should be taken not to inhale it, as it
may cause irritation and choking. Those
with a history of a breathing condition
should get fresh air promptly.
Side air bags, along with the use of seat
belts, help to cushion the impact force on
the chest and pelvis of the front occu-
pants. Curtain air bags help to cushion
the impact force to the head of occu-
pants in the front and rear (2nd and 3rd)
outboard seating positions. They can help
save lives and reduce serious injuries.
However, an inflating side air bags and
curtain air bags may cause abrasions or
other injuries. Side air bags and curtain airbags do not provide restraint to the lower
body.
The seat belts should be correctly worn
and the driver and passenger seated
upright as far as practical away from the
side air bag. Rear seat passengers should
be seated as far away as practical from
the door finishers and side roof rails. The
side air bags and curtain air bags inflate
quickly in order to help protect the
occupants. Because of this, the force of
the side air bags and curtain air bags
inflating can increase the risk of injury if
the occupant is too close to, or is against,
these air bag modules during inflation. In
a rollover, the curtain air bags on both
sides are designed to inflate. Under both
side-impact situations, the curtain air
bags will remain inflated for a short
period of time.
The side air bags and curtain air bags
operate only when the ignition switch is
in the ON position.
After placing the ignition switch in the
ON position, the supplemental air bag
warning light illuminates. The air bag
warning light will turn off after about 7
seconds if the systems are operational.
Safety — seats, seat belts and supplemental restraint system1-71
Page 96 of 604
TOW mode switch ..................................................................... 2-59
Vehicle Dynamic Control (VDC) OFF switch ......... 2-60
Trailer Brake Controller Unit (TBCU) (if
so equipped) ........................................................................\
.......... 2-60
Rear door alert ........................................................................\
.... 2-61
Power outlet ........................................................................\
.......... 2-62USB (Universal Serial Bus)
charging connector .......................................................... 2-64
Wireless charger (if so equipped) ........................... 2-65
Emergency Call (SOS) button (if
so equipped) ........................................................................\
.......... 2-67
Emergency support .......................................................... 2-67
Storage ........................................................................\
...................... 2-69 Cup holders ........................................................................\
..... 2-69
Sunglasses holder .............................................................. 2-71
Glove box ........................................................................\
........... 2-71
Console box ........................................................................\
..... 2-72
Coat hooks ........................................................................\
....... 2-73
Luggage hooks ..................................................................... 2-73
Cargo floor box .................................................................... 2-74
Roof rack (if so equipped) ............................................ 2-74
Windows ........................................................................\
.................... 2-75 Power windows .................................................................... 2-75
Moonroof (if so equipped) .................................................. 2-78
Power moonroof ................................................................. 2-78
Welcome light (if so equipped) ....................................... 2-80 Battery saver system ..................................................... 2-80 Interior lights ........................................................................\
........ 2-81
Interior light switch ........................................................ 2-81
Console light ........................................................................\
2-82
Map lights ........................................................................\
....... 2-82
Rear personal lights ....................................................... 2-82
Vanity mirror lights ................................................................. 2-83
Cargo light ........................................................................\
............. 2-83
HomeLink® Universal Transceiver (Type A) (if
so equipped) ........................................................................\
......... 2-83 Programming HomeLink® ......................................... 2-84
Programming HomeLink® for Canadian
customers and gate openers ................................. 2-85
Operating the HomeLink®
Universal Transceiver .................................................... 2-86
Programming troubleshooting ............................. 2-86
Clearing the programmed information .......... 2-86
Reprogramming a single
HomeLink® button ........................................................... 2-86
If your vehicle is stolen ................................................ 2-87
HomeLink® Universal Transceiver (Type B) (if
so equipped) ........................................................................\
......... 2-87
Programming HomeLink® ......................................... 2-88
Using the garage door
two-way communication ........................................... 2-91
Programming HomeLink® for Canadian
customers and gate openers ................................. 2-91
Operating the HomeLink®
Universal Transceiver .................................................... 2-92
Page 168 of 604
2-74Instruments and controls
more likely to be seriously injured
or killed.
. Do not allow people to ride in any
area of your vehicle that is not
equipped with seats and seat
belts.
. The child restraint top tether
strap may be damaged by con-
tact with items in the cargo area.
Secure any items in the cargo
area. Your child could be seriously
injured or killed in a collision if the
top tether strap is damaged.
. Be sure everyone in your vehicle
is in a seat and using a seat belt
properly.
CAUTION
Do not apply a total load of more
than 22 lb (10 kg)or 7 lb (3 kg)to
the hook.
JVI1204X
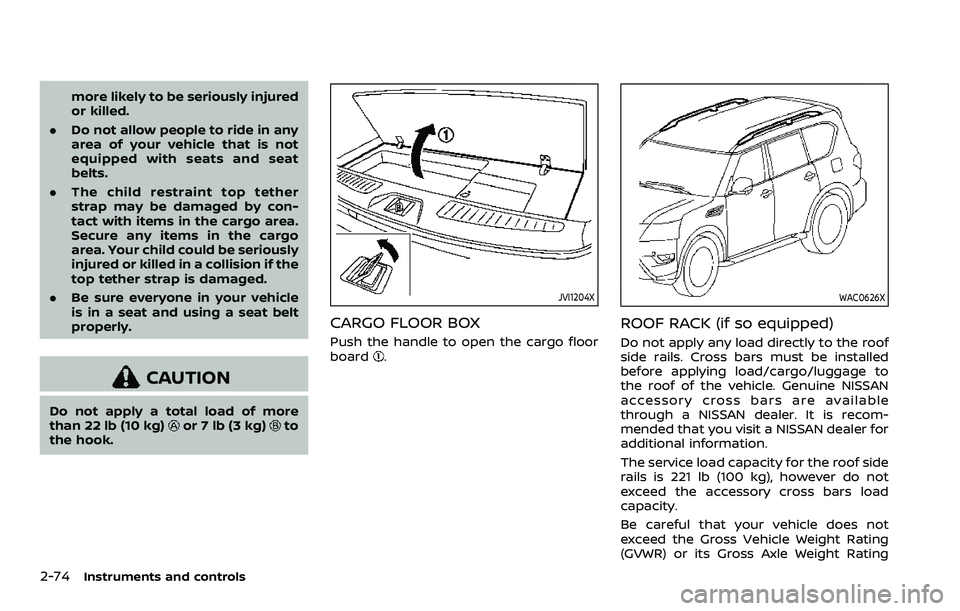
CARGO FLOOR BOX
Push the handle to open the cargo floor
board.
WAC0626X
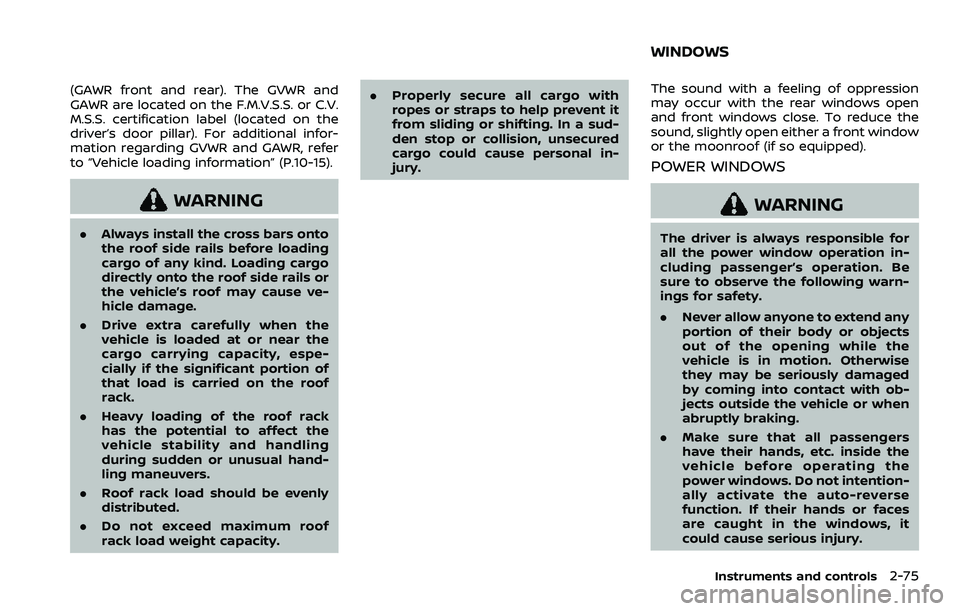
ROOF RACK (if so equipped)
Do not apply any load directly to the roof
side rails. Cross bars must be installed
before applying load/cargo/luggage to
the roof of the vehicle. Genuine NISSAN
accessory cross bars are available
through a NISSAN dealer. It is recom-
mended that you visit a NISSAN dealer for
additional information.
The service load capacity for the roof side
rails is 221 lb (100 kg), however do not
exceed the accessory cross bars load
capacity.
Be careful that your vehicle does not
exceed the Gross Vehicle Weight Rating
(GVWR) or its Gross Axle Weight Rating
Page 169 of 604
(GAWR front and rear). The GVWR and
GAWR are located on the F.M.V.S.S. or C.V.
M.S.S. certification label (located on the
driver’s door pillar). For additional infor-
mation regarding GVWR and GAWR, refer
to “Vehicle loading information” (P.10-15).
WARNING
.Always install the cross bars onto
the roof side rails before loading
cargo of any kind. Loading cargo
directly onto the roof side rails or
the vehicle’s roof may cause ve-
hicle damage.
. Drive extra carefully when the
vehicle is loaded at or near the
cargo carrying capacity, espe-
cially if the significant portion of
that load is carried on the roof
rack.
. Heavy loading of the roof rack
has the potential to affect the
vehicle stability and handling
during sudden or unusual hand-
ling maneuvers.
. Roof rack load should be evenly
distributed.
. Do not exceed maximum roof
rack load weight capacity. .
Properly secure all cargo with
ropes or straps to help prevent it
from sliding or shifting. In a sud-
den stop or collision, unsecured
cargo could cause personal in-
jury.
The sound with a feeling of oppression
may occur with the rear windows open
and front windows close. To reduce the
sound, slightly open either a front window
or the moonroof (if so equipped).
POWER WINDOWS
WARNING
The driver is always responsible for
all the power window operation in-
cluding passenger’s operation. Be
sure to observe the following warn-
ings for safety.
.Never allow anyone to extend any
portion of their body or objects
out of the opening while the
vehicle is in motion. Otherwise
they may be seriously damaged
by coming into contact with ob-
jects outside the vehicle or when
abruptly braking.
. Make sure that all passengers
have their hands, etc. inside the
vehicle before operating the
power windows. Do not intention-
ally activate the auto-reverse
function. If their hands or faces
are caught in the windows, it
could cause serious injury.
Instruments and controls2-75
WINDOWS
Page 172 of 604
2-78Instruments and controls
Auto reverse function
WARNING
There are some small distances im-
mediately before the closed position
which cannot be detected. Make sure
that all passengers have their hands,
etc., inside the vehicle before closing
the window.
If the control unit detects something
caught in the window as it is closing, the
window will be immediately lowered.
The auto reverse function can be acti-
vated when the window is closed by
automatic operation when the ignition
switch is in the ON position or for 45
seconds after the ignition switch is
pushed to the OFF position.
Depending on the environment or driv-
ing conditions, the auto reverse func-
tion may be activated if an impact or
load similar to something being caught
in the window occurs.
If the windows do not close auto-
matically
If the power window automatic function
(closing only) does not operate properly,
perform the following procedure to initi-
alize the power window system.
1. Push the ignition switch to start the engine.
2. Close the door.
3. After starting the engine, open the window completely by operating the
power window switch.
4. Pull the power window switch and hold it to close the window, and then
hold the switch more than 3 seconds
after the window is closed completely.
5. Release the power window switch. Operate the window by the automatic
function to confirm the initialization is
complete.
6. Perform steps 2 through 5 above for other windows.
If the power window automatic function
does not operate properly after perform-
ing the procedure above, have your
vehicle checked. It is recommended you
visit a NISSAN dealer for this service.
WARNING
. In an accident you could be
thrown from the vehicle through
an open moonroof. Always use
seat belts and child restraints.
. Do not allow anyone to stand up
or extend any portion of their
body out of the moonroof open-
ing while the vehicle is in motion
or while the moonroof is closing.
CAUTION
.Remove water drops, snow, ice or
sand from the moonroof before
opening.
. Do not place any heavy object on
the moonroof or surrounding
area.
POWER MOONROOF
The moonroof only operates when the
ignition switch is in the ON position.
The moonroof is operational for about 45
seconds, even if the ignition switch is
pushed to the OFF position. If the driver’s
door or the passenger’s door is opened
MOONROOF (if so equipped)
Page 173 of 604
during this period of about 45 seconds,
power to the moonroof is canceled.
WAC0653X
Sunshade
The sunshade will open automatically
when the moonroof is opened. However,
it must be closed manually.
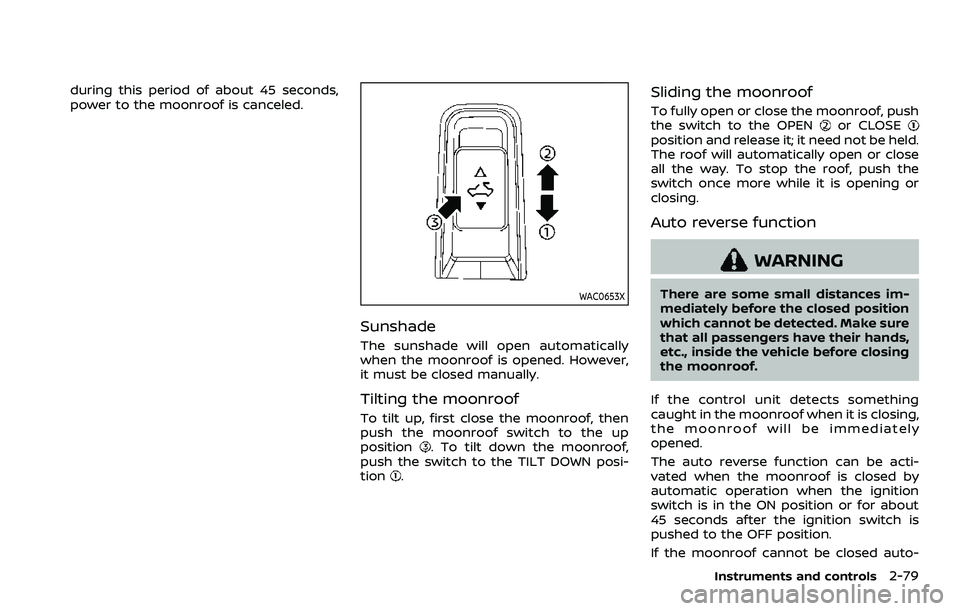
Tilting the moonroof
To tilt up, first close the moonroof, then
push the moonroof switch to the up
position
. To tilt down the moonroof,
push the switch to the TILT DOWN posi-
tion
.
Sliding the moonroof
To fully open or close the moonroof, push
the switch to the OPENor CLOSEposition and release it; it need not be held.
The roof will automatically open or close
all the way. To stop the roof, push the
switch once more while it is opening or
closing.
Auto reverse function
WARNING
There are some small distances im-
mediately before the closed position
which cannot be detected. Make sure
that all passengers have their hands,
etc., inside the vehicle before closing
the moonroof.
If the control unit detects something
caught in the moonroof when it is closing,
the moonroof will be immediately
opened.
The auto reverse function can be acti-
vated when the moonroof is closed by
automatic operation when the ignition
switch is in the ON position or for about
45 seconds after the ignition switch is
pushed to the OFF position.
If the moonroof cannot be closed auto-
Instruments and controls2-79
Page 174 of 604
2-80Instruments and controls
matically when the auto reverse function
activates due to a malfunction, push and
hold the switch to the CLOSE
position.
Depending on the environment or driv-
ing conditions, the auto reverse func-
tion may be activated if an impact or
load similar to something being caught
in the moonroof occurs.
If the moonroof does not operate
If the moonroof does not operate prop-
erly, perform the following procedure to
initialize the moonroof operation system.
1. If the moonroof is open, close it fully by repeatedly pushing the moonroof
switch to the CLOSE
position.
2. Push and hold the switch to the CLOSE
position.
3. Release the moonroof switch after the moonroof moves slightly up and
down.
4. Push and hold the switch to the OPEN
position to fully tilt the moonroof
down.
5. Check if the moonroof switch oper- ates normally.
If the moonroof does not operate prop-
erly after performing the procedure
above, have your moonroof checked and
repaired. It is recommended you visit a
NISSAN dealer for this service.
SIC3642
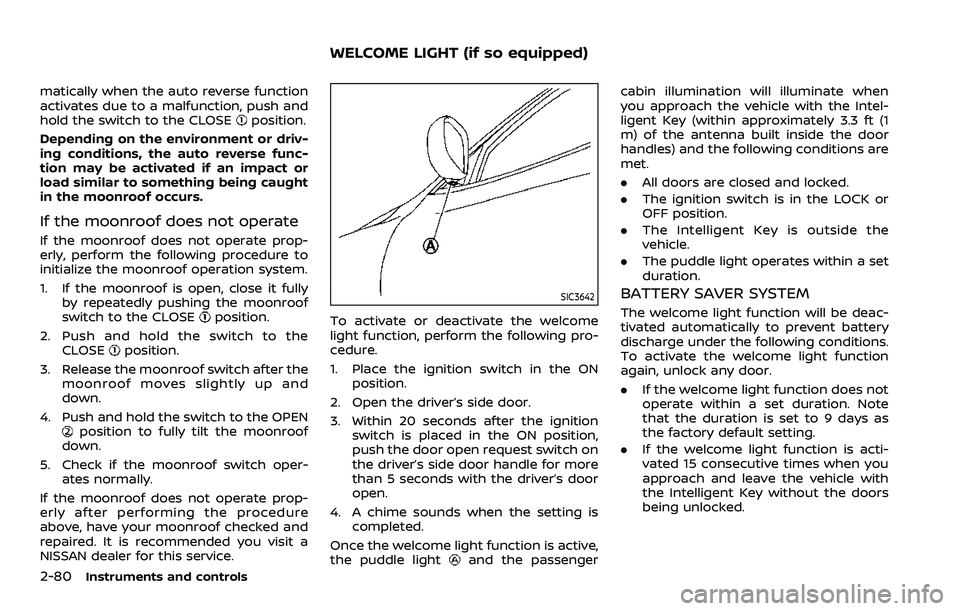
To activate or deactivate the welcome
light function, perform the following pro-
cedure.
1. Place the ignition switch in the ON position.
2. Open the driver’s side door.
3. Within 20 seconds after the ignition switch is placed in the ON position,
push the door open request switch on
the driver’s side door handle for more
than 5 seconds with the driver’s door
open.
4. A chime sounds when the setting is completed.
Once the welcome light function is active,
the puddle light
and the passenger cabin illumination will illuminate when
you approach the vehicle with the Intel-
ligent Key (within approximately 3.3 ft (1
m) of the antenna built inside the door
handles) and the following conditions are
met.
.
All doors are closed and locked.
. The ignition switch is in the LOCK or
OFF position.
. The Intelligent Key is outside the
vehicle.
. The puddle light operates within a set
duration.
BATTERY SAVER SYSTEM
The welcome light function will be deac-
tivated automatically to prevent battery
discharge under the following conditions.
To activate the welcome light function
again, unlock any door.
.If the welcome light function does not
operate within a set duration. Note
that the duration is set to 9 days as
the factory default setting.
. If the welcome light function is acti-
vated 15 consecutive times when you
approach and leave the vehicle with
the Intelligent Key without the doors
being unlocked.
WELCOME LIGHT (if so equipped)