2022 NISSAN ARMADA check oil
[x] Cancel search: check oilPage 328 of 604
5-16Starting and driving
.Make sure the area around the vehicle
is clear.
. Check fluid levels such as engine oil,
coolant, brake fluid and window
washer fluid as frequently as possible,
or at least whenever you refuel.
. Check that all windows and lights are
clean.
. Visually inspect tires for their appear-
ance and condition. Also check tires
for proper inflation.
. Lock all doors.
. Position seat and adjust head re-
straints/headrests.
. Adjust inside and outside mirrors.
. Fasten seat belts and ask all passen-
gers to do likewise.
. Check the operation of warning lights
when the ignition switch is pushed to
the ON position. (See “Warning lights,
indicator lights and audible remin-
ders” (P.2-11).) 1. Apply the parking brake.
2. Move the shift lever to the P (Park) or N
(Neutral) position. (P is recommended.)
The starter is designed not to operate
unless the shift lever is in either of the
above positions.
3. Push the ignition switch to the ON position. Firmly depress the brake
pedal and push the ignition switch to
start the engine.
To start the engine immediately, push
and release the ignition switch while
depressing the brake pedal with the
ignition switch in any position.
.If the engine is very hard to start inextremely cold weather or when
restarting, depress the accelerator
pedal a little (approximately 1/3 to
the floor) and while holding, crank
the engine. Release the accelerator
pedal when the engine starts.
.If the engine is very hard to startbecause it is flooded, depress the
accelerator pedal all the way to the
floor and hold it. Push the ignition
switch to the ON position to start
cranking the engine. After 5 or 6
seconds, stop cranking by pushing
the ignition switch to OFF. After
cranking the engine, release the
accelerator pedal. Crank the engine
with your foot off the accelerator pedal
by depressing the brake
pedal and pushing the push-button
ignition switch to start the engine.
If the engine starts, but fails to run,
repeat the above procedure.
CAUTION
Do not operate the starter for more
than 15 seconds at a time. If the
engine does not start, push the
ignition switch to OFF and wait 10
seconds before cranking again,
otherwise the starter could be da-
maged.
4. Warm-up
Allow the engine to idle for at least 30
seconds after starting. Do not race the
engine while warming it up. Drive at
moderate speed for a short distance
first, especially in cold weather. In cold
weather, keep the engine running for
a minimum of 2 - 3 minutes before
shutting it off. Starting and stopping
the engine over a short period of time
may make the vehicle more difficult to
start.
When racing the engine up to 4,000
rpm or more under the no load
condition, the engine will enter the
BEFORE STARTING THE ENGINE STARTING THE ENGINE
Page 330 of 604
5-18Starting and driving
If:
1. The engine coolant temperature is notreduced.
2. The air conditioning cooling function does not turn back ON.
3. The engine oil pressure warning light
illuminates or engine coolant
temperature gauge does not return
to the normal range from the H
position, this may indicate a malfunc-
tion. Move the vehicle off the road to a
safe area and allow the engine to cool.
If after checking the oil and coolant,
the
remains on or engine coolant
temperature does not return to the
normal range, do not continue to
drive. It is recommended you contact
a NISSAN dealer.
The Malfunction Indicator Light (MIL)
may also come ON. You do not need to
have your vehicle towed, unless it re-
mains on, but have it inspected soon. It is
recommended you contact a NISSAN
dealer for this service. See “Warning lights,
indicator lights and audible reminders”
(P.2-11).
WARNING
Overheating can result in reduced
engine power and vehicle speed.
The reduced speed may be lower
than other traffic, which could in-
crease the chance of a collision. Be
especially careful when driving. If the
vehicle cannot maintain a safe driv-
ing speed, pull to the side of the road
in a safe area. Allow the engine to
cool and return to normal operation.
See “If your vehicle overheats” (P.6-
14).
CAUTION
Running the engine with the engine
oil pressure warning light on could
cause serious damage to the engine
almost immediately. Such damage is
not covered by warranty. Turn off the
engine as soon as it is safe to do so.
AUTOMATIC TRANSMISSION
7 speed automatic transmission
The automatic transmission in your vehi-
cle is electronically controlled by a trans-
mission control module to produce
maximum efficiency and smooth opera-
tion.
Shown on the following pages are the
recommended operating procedures for
this transmission. Follow these proce-
dures for maximum vehicle performance
and driving enjoyment.
Starting the vehicle
After starting the engine, fully depress the
foot brake pedal and push the shift lever
button before shifting the shift lever to
the R (Reverse), N (Neutral), D (Drive) or
Manual shift mode position. Be sure the
vehicle is fully stopped before attempting
to shift the shift lever.
This automatic transmission model is
designed so that the foot brake pedal
must be depressed before shifting from
P (Park) to any drive position while the
ignition switch position is ON.
The shift lever cannot be moved out of
the P (Park) position and into any of the
other gear positions if the ignition
switch is pushed to the LOCK, OFF or
ACC position.
Page 436 of 604
5-124Starting and driving
.Keep your engine tuned up.
. Follow the recommended scheduled
maintenance.
. Keep the tires inflated to the correct
pressure. Low tire pressure increases
tire wear and lowers fuel economy.
. Keep the wheels in correct alignment.
Improper alignment increases tire
wear and lowers fuel economy.
. Use the recommended viscosity en-
gine oil. (See “Engine oil and oil filter
recommendation” (P.10-6).)
WARNING
.Do not attempt to raise two
wheels off the ground and shift
the transmission to any drive or
reverse position with the engine
running. Doing so may result in
drivetrain damage or unexpected
vehicle movement which could
result in serious vehicle damage
or personal injury.
. Do not attempt to test a 4WD
equipped vehicle on a 2-wheel
dynamometer or similar equip-
ment even if the other two
wheels are raised off the ground.
Make sure you inform test facility
personnel that your vehicle is
equipped with 4WD before it is
placed on a dynamometer. Using
the wrong test equipment may
result in drivetrain damage or
unexpected vehicle movement
which could result in serious ve-
hicle damage or personal injury.
CAUTION
.Do not drive the vehicle in the 4HI
or 4LO position on dry hard sur-
face roads. Driving on dry, hard
surfaces in 4HI or 4LO may cause
unnecessary noise, tire wear and
increased fuel consumption.
If the Four-Wheel Drive (4WD)
warning light turns on when driv-
ing on dry hard surface roads:
— in the 4HI position, shift the
4WD shift switch to AUTO.
— in the 4LO position, stop the vehicle and shift the transmis-
sion lever to the N (Neutral)
position with the brake pedal
depressed and shift the 4WD
shift switch to AUTO.
If the 4WD warning light is still
on after the above operation,
have your vehicle checked as
soon as possible. It is recom-
mended you visit a NISSAN
dealer for this service.
. The transfer case may be da-
maged if you continue driving
with the 4WD warning light blink-
ing.
INCREASING FUEL ECONOMYNISSAN ALL-MODE 4WD® (if so equipped)
Page 443 of 604
will either remain illuminated or blink.
If the 4WD warning light comes on, the
4WD shift indicator turns off.
High-temperature transfer case oil makes
the 4WD warning light blink rapidly (about
twice per second). If the warning light
blinks rapidly during operation, stop the
vehicle in a safe place immediately. Then
if the light turns off after a while, you can
continue driving.
A large difference between the diameters
of front and rear wheels will make the
4WD warning light blink slowly (about
once per two seconds). Change the 4WD
shift switch to AUTO and do not drive fast.
CAUTION
.If the 4WD warning light comes
on or blinks slowly during opera-
tion or rapidly after stopping the
vehicle for a while, have your
vehicle checked as soon as pos-
sible. It is recommended you visit
a NISSAN dealer for this service.
. Shifting between 4HI and 4LO is
not recommended when the 4WD
warning light turns on.
. When the 4WD warning light
comes on, the 2WD mode may be engaged even if the 4WD shift
switch is in AUTO or 4H. Be
especially careful when driving. If
corresponding parts are malfunc-
tioning, the 4WD mode will not be
engaged even if the 4WD shift
switch is shifted.
. Do not drive the vehicle in the 4HI
or 4LO position on dry hard sur-
face roads. Driving on dry, hard
surfaces in 4HI or 4LO may cause
unnecessary noise, tire wear and
increased fuel consumption.
If the 4WD warning light turns on
when driving on dry hard surface
roads:
— in the AUTO or 4HI position,
shift the 4WD shift switch to
AUTO.
— in the 4LO position, stop the vehicle and shift the transmis-
sion shift lever to the N (Neu-
tral) position and shift the
4WD shift switch to AUTO.
. If the 4WD warning light is still on
after the above operation, have
your vehicle checked as soon as
possible. It is recommended you
visit a NISSAN dealer for this
service. .
The transfer case may be da-
maged if you continue driving
with the warning light blinking.
Starting and driving5-131
Page 487 of 604

ing on a base coat/clear coat paint finish
may dull the finish or leave swirl marks.
REMOVING SPOTS
Remove tar and oil spots, industrial dust,
insects, and tree sap as quickly as possi-
ble from the paint surface to avoid lasting
damage or staining. Special cleaning
products are available at a NISSAN dealer
or any automotive accessory stores.
UNDERBODY
In areas where road salt is used in winter,
the underbody must be cleaned regularly.
This will prevent dirt and salt from build-
ing up and causing the acceleration of
corrosion on the underbody and suspen-
sion. Before the winter period and again
in the spring, the underseal must be
checked and, if necessary, re-treated.
GLASS
Use glass cleaner to remove smoke and
dust film from the glass surfaces. It is
normal for glass to become coated with a
film after the vehicle is parked in the hot
sun. Glass cleaner and a soft cloth will
easily remove this film.
CAUTION
When cleaning the inside of the
windows, do not use sharp-edged
tools, abrasive cleaners or chlorine-
based disinfectant cleaners. They
could damage the electrical conduc-
tors, radio antenna elements or rear
window defroster elements.
WHEELS
Wash the wheels when washing the
vehicle to maintain their appearance.
.Clean the inner side of the wheels
when the wheel is changed or the
underside of the vehicle is washed.
. Inspect wheel rims regularly for dents
or corrosion. Such damage may cause
loss of pressure or poor seal at the tire
bead.
. NISSAN recommends that the road
wheels be waxed to protect against
road salt in areas where it is used
during winter.
CAUTION
Do not use abrasive cleaners when
washing the wheels.
Aluminum alloy wheels
Wash regularly with a sponge dampened
in a mild soap solution, especially during
winter months in areas where road salt is
used. Salt could discolor the wheels if not
removed.
CAUTION
Follow the directions below to avoid
staining or discoloring the wheels:
.Do not use a cleaner that uses
strong acid or alkali contents to
clean the wheels.
. Do not apply wheel cleaners to
the wheels when they are hot.
The wheel temperature should be
the same as ambient tempera-
ture.
. Rinse the wheel to completely
remove the cleaner within 15
minutes after the cleaner is ap-
plied.
Appearance and care7-3
Page 493 of 604

8 Do-it-yourself
Maintenance precautions ...................................................... 8-2
Engine compartment check locations ........................ 8-3VK56VD engine ....................................................................... 8-3
Engine cooling system ............................................................. 8-4 Checking engine coolant level .................................... 8-5
Changing engine coolant ................................................ 8-5
Engine oil ........................................................................\
..................... 8-6 Checking engine oil level ................................................. 8-6
Changing engine oil and filter ..................................... 8-6
Automatic Transmission Fluid (ATF) ............................. 8-8
Power steering fluid ................................................................... 8-8
Brake fluid ........................................................................\
.................. 8-9
Window washer fluid .............................................................. 8-10
Battery ........................................................................\
........................ 8-11 Jump starting ........................................................................\
. 8-13
Variable voltage control system ................................... 8-13
Drive belts ........................................................................\
................ 8-13
Spark plugs ........................................................................\
............. 8-14 Replacing spark plugs ..................................................... 8-14
Air cleaner ........................................................................\
............... 8-15 Windshield wiper blades ..................................................... 8-16
Cleaning ........................................................................\
........... 8-16
Replacing ........................................................................\
........ 8-16
Rear window wiper blades ............................................... 8-17
Brakes ........................................................................\
........................ 8-17 Self-adjusting brakes ..................................................... 8-17
Brake pad wear warning ............................................ 8-17
Brake booster ...................................................................... 8-17
Fuses ........................................................................\
........................... 8-18 Engine compartment .................................................... 8-18
Passenger compartment ........................................... 8-20
Intelligent Key battery replacement .......................... 8-21
Lights ........................................................................\
.......................... 8-24
Headlights ........................................................................\
...... 8-25
Exterior and interior lights ........................................ 8-26
Wheels and tires ........................................................................\
8-28
Tire pressure ........................................................................\
8-28
Tire labeling ........................................................................\
.. 8-32
Types of tires ....................................................................... 8-34
Tire chains ........................................................................\
...... 8-35
Changing wheels and tires ...................................... 8-36
Page 495 of 604
could affect your warranty coverage.If in
doubt about any servicing, it is recom-
mended you have it done by a NISSAN
dealer.
JVC0965X
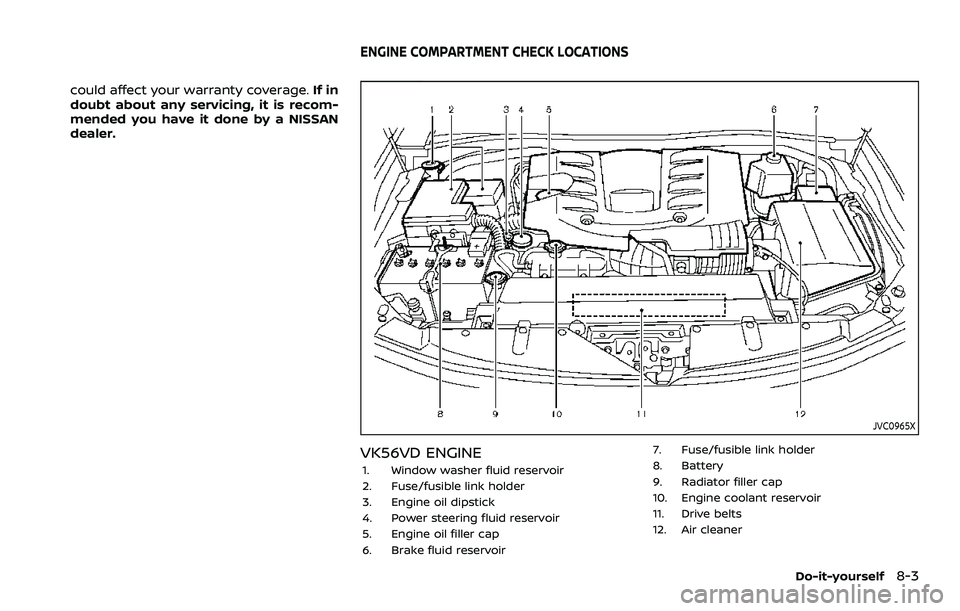
VK56VD ENGINE
1. Window washer fluid reservoir
2. Fuse/fusible link holder
3. Engine oil dipstick
4. Power steering fluid reservoir
5. Engine oil filler cap
6. Brake fluid reservoir 7. Fuse/fusible link holder
8. Battery
9. Radiator filler cap
10. Engine coolant reservoir
11. Drive belts
12. Air cleaner
Do-it-yourself8-3
ENGINE COMPARTMENT CHECK LOCATIONS
Page 498 of 604
8-6Do-it-yourself
JVM0728X
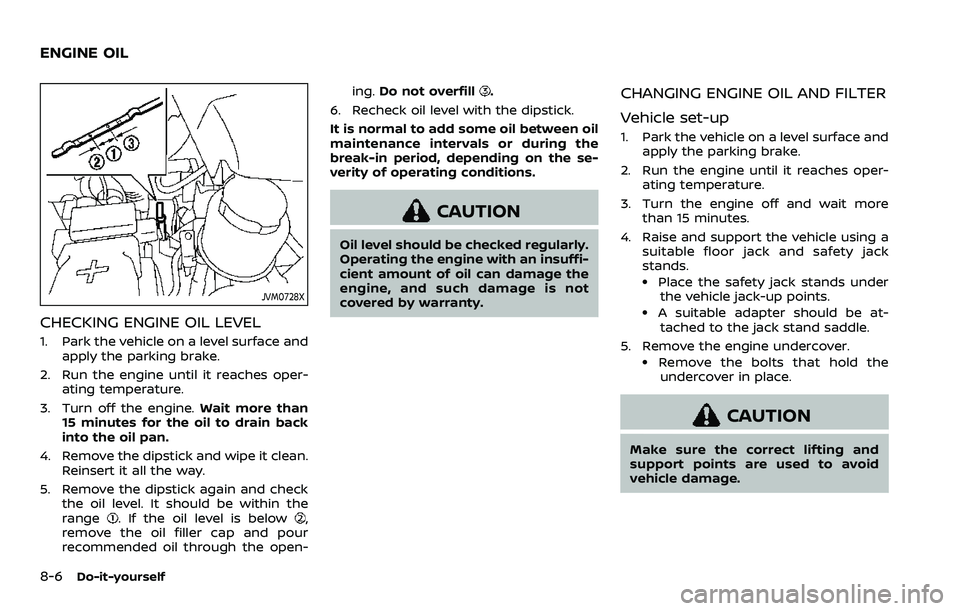
CHECKING ENGINE OIL LEVEL
1. Park the vehicle on a level surface andapply the parking brake.
2. Run the engine until it reaches oper- ating temperature.
3. Turn off the engine. Wait more than
15 minutes for the oil to drain back
into the oil pan.
4. Remove the dipstick and wipe it clean. Reinsert it all the way.
5. Remove the dipstick again and check the oil level. It should be within the
range
. If the oil level is below,
remove the oil filler cap and pour
recommended oil through the open- ing.
Do not overfill
.
6. Recheck oil level with the dipstick.
It is normal to add some oil between oil
maintenance intervals or during the
break-in period, depending on the se-
verity of operating conditions.
CAUTION
Oil level should be checked regularly.
Operating the engine with an insuffi-
cient amount of oil can damage the
engine, and such damage is not
covered by warranty.
CHANGING ENGINE OIL AND FILTER
Vehicle set-up
1. Park the vehicle on a level surface and apply the parking brake.
2. Run the engine until it reaches oper- ating temperature.
3. Turn the engine off and wait more than 15 minutes.
4. Raise and support the vehicle using a suitable floor jack and safety jack
stands.
.Place the safety jack stands underthe vehicle jack-up points.
.A suitable adapter should be at-
tached to the jack stand saddle.
5. Remove the engine undercover.
.Remove the bolts that hold the undercover in place.
CAUTION
Make sure the correct lifting and
support points are used to avoid
vehicle damage.
ENGINE OIL