2022 NISSAN ARMADA change time
[x] Cancel search: change timePage 144 of 604

2-50Instruments and controls
High beam assist
The high beam assist system will operate
when the vehicle is driven at approxi-
mately 25 MPH (40 km/h) and above.
If an oncoming vehicle or leading vehicle
appears in front of your vehicle when the
headlight high beam is on, the headlight
will be switched to the low beam auto-
matically.
Precautions on high beam assist:
WARNING
.The high beam assist system is a
convenience but it is not a sub-
stitute for safe driving operation.
The driver should remain alert at
all times, ensure safe driving
practices and switch the high
beam and low beam manually
when necessary.
. The high beam or low beam may
not switch automatically under
the following conditions. Switch
the high beam and low beam
manually.
— During bad weather (rain, fog,
snow, wind, etc.). — When a light source similar to
a headlight or tail light is in
the vicinity of the vehicle.
— When the headlights of the oncoming vehicle or the lead-
ing vehicle are turned off,
when the color of the light is
affected due to foreign mate-
rials on the lights, or when the
light beam is out of position.
— When there is a sudden, con- tinuous change in brightness.
— When driving on a road that passes over rolling hills, or a
road that has level differ-
ences.
— When driving on a road with many curves.
— When a sign or mirror-like surface is reflecting intense
light towards the front of the
vehicle.
— When the container, etc. being towed by a leading vehicle is
reflecting intense light.
— When a headlight on your vehicle is damaged or dirty.
— When the vehicle is leaning at an angle due to a punctured tire, being towed, etc.
. The timing of switching the low
beam and high beam may
change under the following situa-
tions.
— The brightness of the head-
lights of the oncoming vehicle
or leading vehicle.
— The movement and direction of the oncoming vehicle and
the leading vehicle.
— When only one light on the oncoming vehicle or the lead-
ing vehicle is illuminated.
— When the oncoming vehicle or the leading vehicle is a two-
wheeled vehicle.
— Road conditions (incline, curve, the road surface, etc.).
— The number of passengers and the amount of luggage.
Page 148 of 604

2-54Instruments and controls
lever does not latch, and release the
lever. The turn signal will automati-
cally flash three times.
Choose the appropriate method to signal
a lane change based on road and traffic
conditions.
SIC3672
Example
FOG LIGHT SWITCH (if so equipped)
To turn the fog lights on, turn the head-
light switch to theposition, then turn
the switch to theposition. To turn
them off, turn the switch to the OFF
position.
The headlights must be on with the low
beams selected for the fog lights to
operate. The fog lights automatically turn
off when the high beam headlights are
selected.
SIC4401
The heated steering wheel system is
designed to operate only when the sur-
face temperature of the steering wheel is
below 68°F (20°C).
Push the heated steering wheel switch to
warm the steering wheel after the engine
starts. The indicator light
on the switch
will illuminate.
If the surface temperature of the steering
wheel is below 68°F (20°C), the system will
heat the steering wheel and cycle off and
on to maintain a temperature above 68°F
(20°C). The indicator light will remain on
as long as the system is on.
Push the switch again to turn the heated
steering wheel system off manually. The
HEATED STEERING WHEEL (if so equipped)
Page 183 of 604

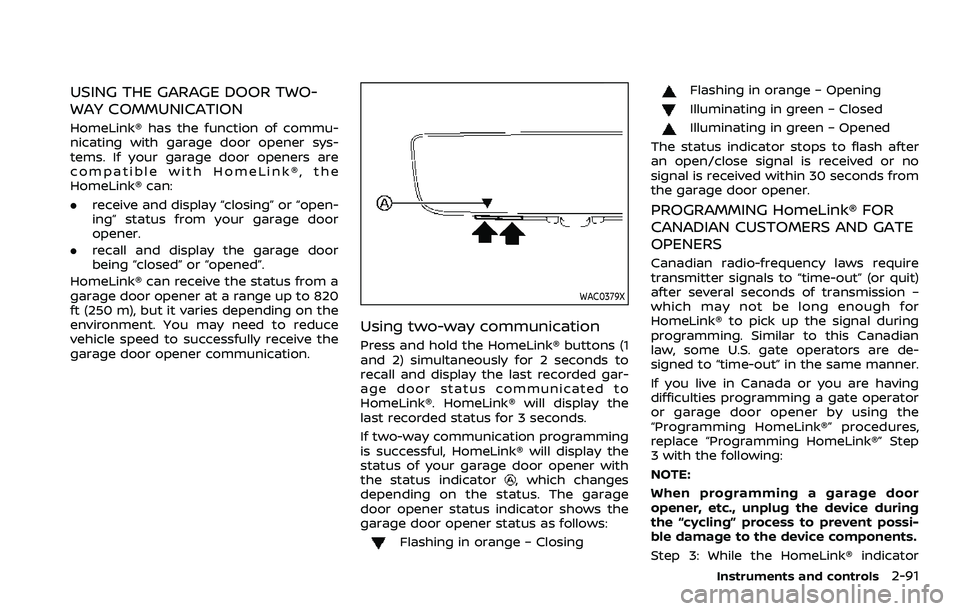
WAC0381X
1. Press and release the HomeLink®button that you would like to pro-
gram. The HomeLink® indicator light
will flash in orange slowly and “TRAIN-
ING” is displayed on the lower right of
the mirror (if not, refer to “Clearing the
programmed information” (P.2-92).).
2. Position the hand-held transmitter (garage door opener remote) 1-3
inches (2-8 cm) away from the
HomeLink® button that you would
light to program.
NOTE:
Some hand-held transmitter (gar-
age door opener remotes) may ac-
tually train better at a distance of 6- 12 inches (15-20 cm). Keep this in
mind if you have difficulty with the
programming process.
3. While the HomeLink® indicator light is flashing in orange, press and hold the
hand-held transmitter button. Con-
tinue pressing the hand-held trans-
mitter button until the HomeLink®
indicator light changes from orange
to green and “TRAINED” is displayed on
the lower right of the mirror. You may
now release the hand-held transmit-
ter button.
NOTE:
Some devices to be programmed
may require you to replace the Step
3 with the cycling procedure noted
in “Programming HomeLink® for Ca-
nadian customers and gate open-
ers” (P.2-91).
4. Wait until your garage door has
stopped moving before completing
the next steps.
5. Press the HomeLink® button and ob- serve the indicator light.
.If the indicator light remains con-stant green, your device should
operate when the HomeLink® but-
ton is pressed. At this point, if your
device operates, programming is
complete.
.If the indicator light rapidly flashesin green, firmly press, hold for two
seconds and release the
HomeLink® button up to three
times to complete the program-
ming process. Do not press the
HomeLink® button rapidly. At this
point if your device operates, pro-
gramming is complete. If the device
does not operate or operates but
no door status indicator with Two-
Way Communication
*1, continue
with the next step of the program-
ming instructions.
6. At the garage door opener motor (security gate motor, etc.), locate the
“Learn” or “Set” button. This can usual-
ly be found where the hanging anten-
na wire is attached to the motor-head
unit (see the device’s manual to iden-
tify this button.). The name and color
of the button may vary by manufac-
turer.
NOTE:
A ladder and/or second person may
simplify the following steps. Do not
stand on your vehicle to perform the
next steps.
Instruments and controls2-89
Page 185 of 604

USING THE GARAGE DOOR TWO-
WAY COMMUNICATION
HomeLink® has the function of commu-
nicating with garage door opener sys-
tems. If your garage door openers are
compatible with HomeLink®, the
HomeLink® can:
.receive and display “closing” or “open-
ing” status from your garage door
opener.
. recall and display the garage door
being “closed” or “opened”.
HomeLink® can receive the status from a
garage door opener at a range up to 820
ft (250 m), but it varies depending on the
environment. You may need to reduce
vehicle speed to successfully receive the
garage door opener communication.
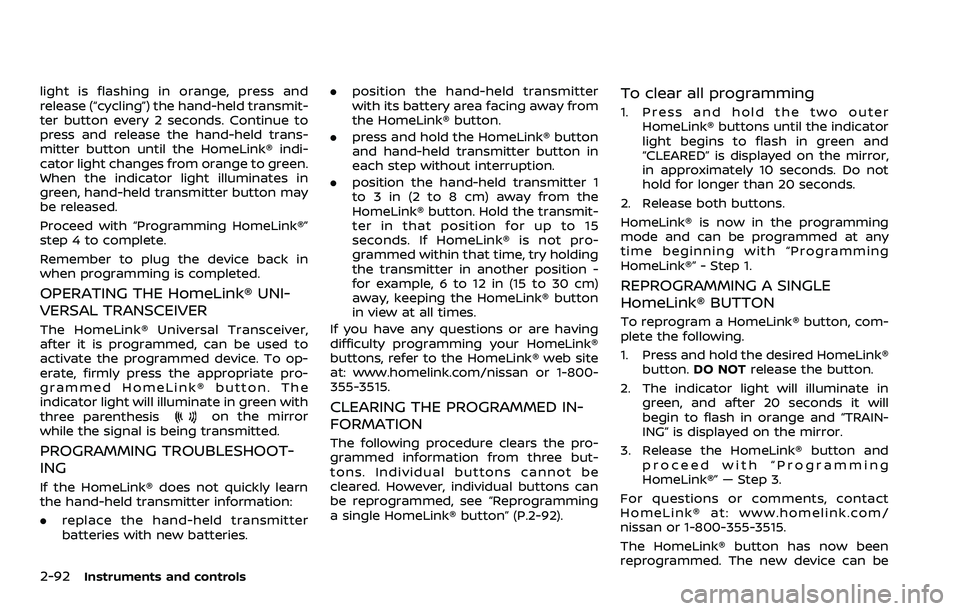
WAC0379X
Using two-way communication
Press and hold the HomeLink® buttons (1
and 2) simultaneously for 2 seconds to
recall and display the last recorded gar-
age door status communicated to
HomeLink®. HomeLink® will display the
last recorded status for 3 seconds.
If two-way communication programming
is successful, HomeLink® will display the
status of your garage door opener with
the status indicator
, which changes
depending on the status. The garage
door opener status indicator shows the
garage door opener status as follows:
Flashing in orange – Closing
Flashing in orange – Opening
Illuminating in green – Closed
Illuminating in green – Opened
The status indicator stops to flash after
an open/close signal is received or no
signal is received within 30 seconds from
the garage door opener.
PROGRAMMING HomeLink® FOR
CANADIAN CUSTOMERS AND GATE
OPENERS
Canadian radio-frequency laws require
transmitter signals to “time-out” (or quit)
after several seconds of transmission –
which may not be long enough for
HomeLink® to pick up the signal during
programming. Similar to this Canadian
law, some U.S. gate operators are de-
signed to “time-out” in the same manner.
If you live in Canada or you are having
difficulties programming a gate operator
or garage door opener by using the
“Programming HomeLink®” procedures,
replace “Programming HomeLink®” Step
3 with the following:
NOTE:
When programming a garage door
opener, etc., unplug the device during
the “cycling” process to prevent possi-
ble damage to the device components.
Step 3: While the HomeLink® indicator
Instruments and controls2-91
Page 186 of 604

2-92Instruments and controls
light is flashing in orange, press and
release (“cycling”) the hand-held transmit-
ter button every 2 seconds. Continue to
press and release the hand-held trans-
mitter button until the HomeLink® indi-
cator light changes from orange to green.
When the indicator light illuminates in
green, hand-held transmitter button may
be released.
Proceed with “Programming HomeLink®”
step 4 to complete.
Remember to plug the device back in
when programming is completed.
OPERATING THE HomeLink® UNI-
VERSAL TRANSCEIVER
The HomeLink® Universal Transceiver,
after it is programmed, can be used to
activate the programmed device. To op-
erate, firmly press the appropriate pro-
grammed HomeLink® button. The
indicator light will illuminate in green with
three parenthesis
on the mirror
while the signal is being transmitted.
PROGRAMMING TROUBLESHOOT-
ING
If the HomeLink® does not quickly learn
the hand-held transmitter information:
. replace the hand-held transmitter
batteries with new batteries. .
position the hand-held transmitter
with its battery area facing away from
the HomeLink® button.
. press and hold the HomeLink® button
and hand-held transmitter button in
each step without interruption.
. position the hand-held transmitter 1
to 3 in (2 to 8 cm) away from the
HomeLink® button. Hold the transmit-
ter in that position for up to 15
seconds. If HomeLink® is not pro-
grammed within that time, try holding
the transmitter in another position -
for example, 6 to 12 in (15 to 30 cm)
away, keeping the HomeLink® button
in view at all times.
If you have any questions or are having
difficulty programming your HomeLink®
buttons, refer to the HomeLink® web site
at: www.homelink.com/nissan or 1-800-
355-3515.
CLEARING THE PROGRAMMED IN-
FORMATION
The following procedure clears the pro-
grammed information from three but-
tons. Individual buttons cannot be
cleared. However, individual buttons can
be reprogrammed, see “Reprogramming
a single HomeLink® button” (P.2-92).
To clear all programming
1. Press and hold the two outer HomeLink® buttons until the indicator
light begins to flash in green and
“CLEARED” is displayed on the mirror,
in approximately 10 seconds. Do not
hold for longer than 20 seconds.
2. Release both buttons.
HomeLink® is now in the programming
mode and can be programmed at any
time beginning with “Programming
HomeLink®” - Step 1.
REPROGRAMMING A SINGLE
HomeLink® BUTTON
To reprogram a HomeLink® button, com-
plete the following.
1. Press and hold the desired HomeLink® button. DO NOT release the button.
2. The indicator light will illuminate in green, and after 20 seconds it will
begin to flash in orange and “TRAIN-
ING” is displayed on the mirror.
3. Release the HomeLink® button and proceed with “Programming
HomeLink®” — Step 3.
For questions or comments, contact
HomeLink® at: www.homelink.com/
nissan or 1-800-355-3515.
The HomeLink® button has now been
reprogrammed. The new device can be
Page 221 of 604

displayed.
For the operation of the HomeLink®
buttons
, see “HomeLink® Universal
Transceiver (Type B)” (P.2-87).
WAD0191X
How to change the mode:
The mode can be switched when the
ignition switch is in the ON position.
. Pull the mode select lever
to switch
to the Intelligent Rear View Mirror
mode (camera view mode).
. Push the mode select lever
to
switch to the conventional rearview
mirror mode.
WAD0192X
How to make settings of Intelligent Rear
View Mirror:
You can choose display settings of the
Intelligent Rear View Mirror such as
brightness, camera angle, textual indica-
tion ON or OFF and language.
When the Intelligent Rear View Mirror
mode is on, setting menu can be selected
by pushing the MENU button
. Each time
the MENU buttonis pushed, the setting
menu will change as follows:
MENU (initial screen) ?BRIGHTNESS ?
DOWN/UP ?LEFT/RIGHT ?ROTATION
? INDICATION ?DIMMING MIRROR ?
LANGUAGE ?MENU (initial screen)
Pre-driving checks and adjustments3-33
Page 257 of 604

touch screen display, the system shows
the sonar indicator regardless of the shift
lever position.
The system is deactivated at speeds
above 6 MPH (10 km/h). It is reactivated
at lower speeds.
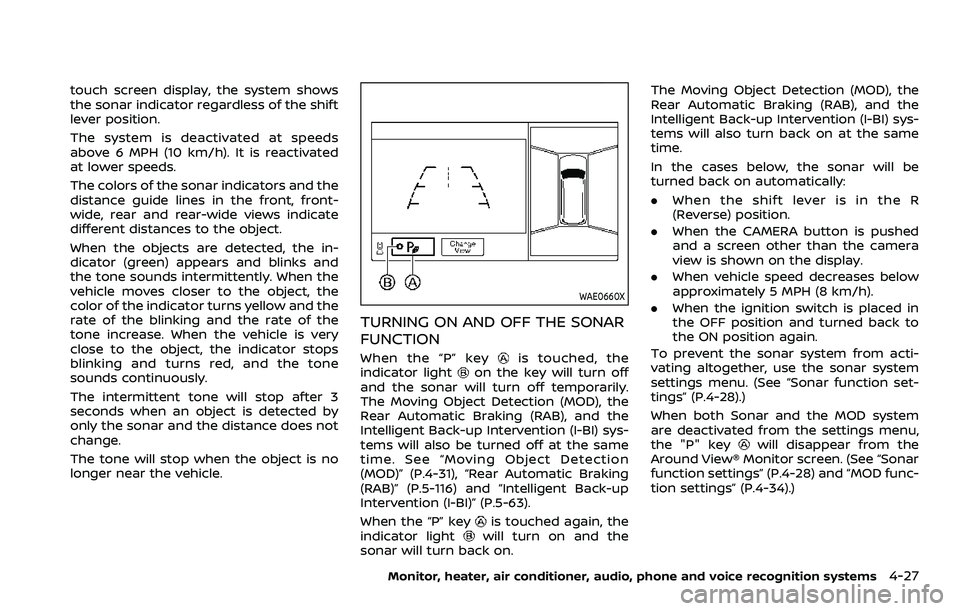
The colors of the sonar indicators and the
distance guide lines in the front, front-
wide, rear and rear-wide views indicate
different distances to the object.
When the objects are detected, the in-
dicator (green) appears and blinks and
the tone sounds intermittently. When the
vehicle moves closer to the object, the
color of the indicator turns yellow and the
rate of the blinking and the rate of the
tone increase. When the vehicle is very
close to the object, the indicator stops
blinking and turns red, and the tone
sounds continuously.
The intermittent tone will stop after 3
seconds when an object is detected by
only the sonar and the distance does not
change.
The tone will stop when the object is no
longer near the vehicle.
WAE0660X
TURNING ON AND OFF THE SONAR
FUNCTION
When the “P” keyis touched, the
indicator lighton the key will turn off
and the sonar will turn off temporarily.
The Moving Object Detection (MOD), the
Rear Automatic Braking (RAB), and the
Intelligent Back-up Intervention (I-BI) sys-
tems will also be turned off at the same
time. See “Moving Object Detection
(MOD)” (P.4-31), “Rear Automatic Braking
(RAB)” (P.5-116) and “Intelligent Back-up
Intervention (I-BI)” (P.5-63).
When the “P” key
is touched again, the
indicator lightwill turn on and the
sonar will turn back on. The Moving Object Detection (MOD), the
Rear Automatic Braking (RAB), and the
Intelligent Back-up Intervention (I-BI) sys-
tems will also turn back on at the same
time.
In the cases below, the sonar will be
turned back on automatically:
.
When the shift lever is in the R
(Reverse) position.
. When the CAMERA button is pushed
and a screen other than the camera
view is shown on the display.
. When vehicle speed decreases below
approximately 5 MPH (8 km/h).
. When the ignition switch is placed in
the OFF position and turned back to
the ON position again.
To prevent the sonar system from acti-
vating altogether, use the sonar system
settings menu. (See “Sonar function set-
tings” (P.4-28).)
When both Sonar and the MOD system
are deactivated from the settings menu,
the "P" key
will disappear from the
Around View® Monitor screen. (See “Sonar
function settings” (P.4-28) and “MOD func-
tion settings” (P.4-34).)
Monitor, heater, air conditioner, audio, phone and voice recognition systems4-27
Page 264 of 604

4-34Monitor, heater, air conditioner, audio, phone and voice recognition systems
system will turn back on.
The sonar, the Rear Automatic Braking
(RAB), and the Intelligent Back-up Inter-
vention (I-BI) systems will also turn back
on at the same time.
To enable or disable the MOD system, use
the camera settings menu. See “MOD
function settings” (P.4-34).
MOD FUNCTION SETTINGS
The MOD function settings can be chan-
ged using the following procedures.
1. Push the MENU button on the DisplayCommander.
2. Touch the “Settings” key on the touch screen display.
3. Touch the “Camera” key.
4. Touch the “Camera” key.
Available setting items:
Moving Object Detection:
When this item is turned on, the MOD
system is activated. When this item is
turned off (indicator turns off), the MOD
system is deactivated.
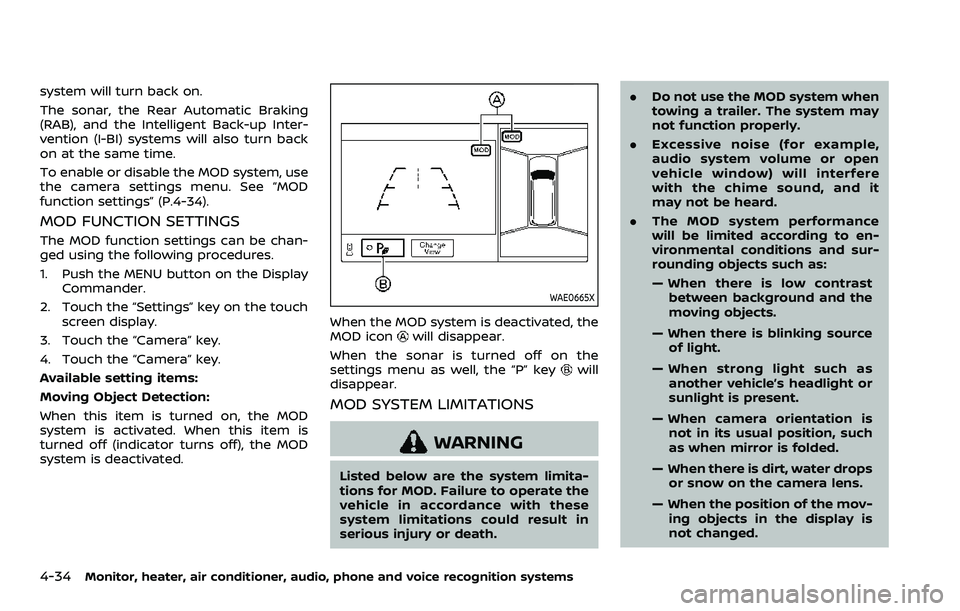
WAE0665X
When the MOD system is deactivated, the
MOD iconwill disappear.
When the sonar is turned off on the
settings menu as well, the “P” key
will
disappear.
MOD SYSTEM LIMITATIONS
WARNING
Listed below are the system limita-
tions for MOD. Failure to operate the
vehicle in accordance with these
system limitations could result in
serious injury or death. .
Do not use the MOD system when
towing a trailer. The system may
not function properly.
. Excessive noise (for example,
audio system volume or open
vehicle window) will interfere
with the chime sound, and it
may not be heard.
. The MOD system performance
will be limited according to en-
vironmental conditions and sur-
rounding objects such as:
— When there is low contrast
between background and the
moving objects.
— When there is blinking source of light.
— When strong light such as another vehicle’s headlight or
sunlight is present.
— When camera orientation is not in its usual position, such
as when mirror is folded.
— When there is dirt, water drops or snow on the camera lens.
— When the position of the mov- ing objects in the display is
not changed.