2022 NISSAN ARMADA belt
[x] Cancel search: beltPage 192 of 604

3-4Pre-driving checks and adjustments
CAUTION
Always carry the mechanical key
installed in the Intelligent Key.
VALET HAND-OFF
When you have to leave a key with a valet,
give them the Intelligent Key itself and
keep the mechanical key with you to
protect your belongings.
To prevent the glove box from being
opened during valet hand-off, follow the
procedures below.
1. Remove the mechanical key from theIntelligent Key.
2. Lock the glove box with the mechan- ical key.
3. Hand the Intelligent Key to the valet, keeping the mechanical key in your
pocket or bag for insertion into the
Intelligent Key when you retrieve your
vehicle.
See “Storage” (P.2-69).
WARNING
. Always have the doors locked
while driving. Along with the use
of seat belts, this provides great-
er safety in the event of an
accident by helping to prevent
persons from being thrown from
the vehicle. This also helps keep
children and others from unin-
tentionally opening the doors,
and will help keep out intruders.
. Before opening any door, always
look for and avoid oncoming
traffic.
. To help avoid risk of injury or
death through unintended opera-
tion of the vehicle and or its
systems, including entrapment
in windows or inadvertent door
lock activation, do not leave chil-
dren, people who require the
assistance of others or pets un-
attended in your vehicle. Addi-
tionally, the temperature inside a
closed vehicle on a warm day can
quickly become high enough to
cause a significant risk of injury
or death to people and pets.
SPA2457B
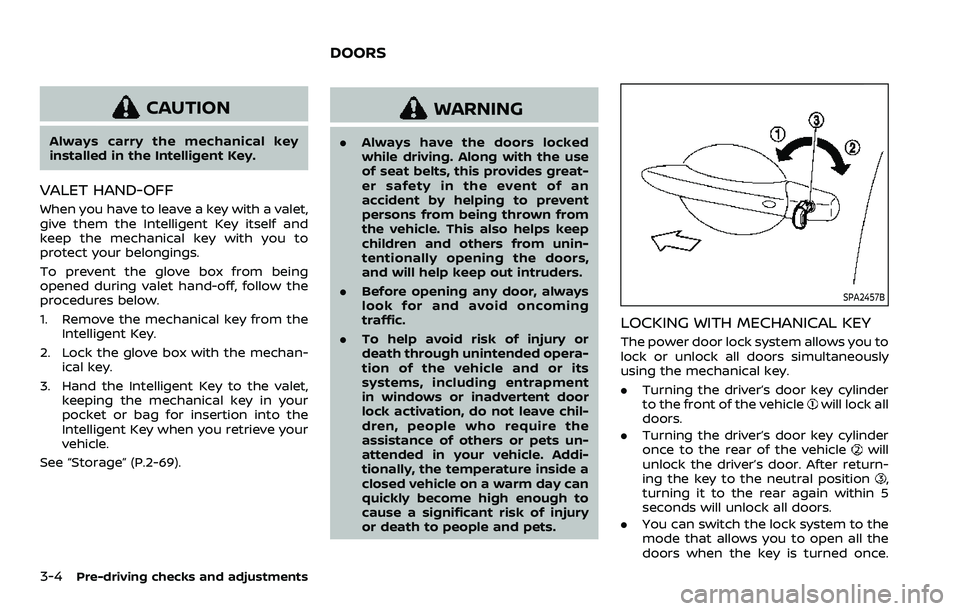
LOCKING WITH MECHANICAL KEY
The power door lock system allows you to
lock or unlock all doors simultaneously
using the mechanical key.
.Turning the driver’s door key cylinder
to the front of the vehicle
will lock all
doors.
. Turning the driver’s door key cylinder
once to the rear of the vehicle
will
unlock the driver’s door. After return-
ing the key to the neutral position
,
turning it to the rear again within 5
seconds will unlock all doors.
. You can switch the lock system to the
mode that allows you to open all the
doors when the key is turned once.
DOORS
Page 217 of 604

WARNING
.Do not adjust the steering wheel
while driving. You could lose con-
trol of your vehicle and cause an
accident.
. Do not adjust the steering wheel
any closer to you than is neces-
sary for proper steering opera-
tion and comfort. The driver’s air
bag inflates with great force. If
you are unrestrained, leaning for-
ward, sitting sideways or out of
position in any way, you are at
greater risk of injury or death in a
crash. You may also receive ser-
ious or fatal injuries from the air
bag if you are up against it when
it inflates. Always sit back against
the seatback and as far away as
practical from the steering wheel.
Always use the seat belts.
SPA2754
ELECTRIC OPERATION
Tilt or telescopic operation
Move the leverto adjust the steering
wheel up or down, forward or rearward to
the desired position.
Entry/Exit function operation (if so
equipped):
The memory seat system will make the
steering wheel move up automatically
when the driver’s door is opened with
the ignition switch in the LOCK position.
This lets the driver get into and out of the
seat more easily.
For more information, see “Memory seat”
(P.3-40).
SIC3451
Pre-driving checks and adjustments3-29
TILT/TELESCOPIC STEERING SUN VISORS
Page 275 of 604

WARNING
.It is unlawful in most jurisdictions
for a person to drive a motor
vehicle which is equipped with a
television monitor or screen that
is visible, directly or indirectly, to
the driver while operating the
vehicle. In the interest of safety,
the unit should never be installed
where it will be directly or indir-
ectly visible, by the operator of
the motor vehicle.
. For safety reasons when chan-
ging discs, it is recommended
that the vehicle is not in motion,
and that you do not allow chil-
dren to unfasten safety belts to
change discs or make any adjust-
ments to the system. System
adjustments can be accom-
plished using the remote control,
while safety belts remain fas-
tened.
. Enjoy your RSI system but re-
member that safety of all pas-
sengers remains the number one
priority. Devices installed in the
USB, HDMI, or headphone jack
may protrude and create a po-
tential eye impact hazard for un- belted passengers during a vehi-
cle accident. To reduce the risk of
injury, use only SD cards (hidden
on left side of driver side monitor)
or low-profile USB storage de-
vices.
CAUTION
.
If your vehicle is equipped with a
wireless rear seat audio system
or any other wireless infrared
device, make sure it is powered
off when operating the RSI sys-
tem. If both systems are powered
on at the same time, the two
systems may obstruct each other,
possibly creating undesirable
audio interference through the
wireless headphones.
. Do not touch the inner pins of the
jacks on the front panel. Electro-
static discharge may cause per-
manent damage to the device.
. The LCD display screen is not
touchscreen. Do not put pressure
or add suction cups on the
screen. .
Caution children to avoid touch-
ing or scratching the screen, as it
may become dirty or damaged.
. Be sure to run the vehicle engine
while using the system. Using this
system without running the en-
gine can result in battery drain.
To avoid the risk of battery drain,
please remember to turn off the
system when the vehicle is not in
use.
WELCOME
This Rear Seat Infotainment (RSI) system,
with built-in Wi-Fi, has some advanced
features. Before operating this system,
read this section thoroughly and retain it
for future reference.
System features
.Twin 8-inch Color TFT-LCD Panels
with 1024 x 600 Resolution
. Internal Wi-Fi Network
. Bluetooth® 4.1 Audio Streaming
. Miracast®/Smart View Capability
. SmartStream Content Sharing
. USB 2.0 Port, SDXC Card Input
. HDMI 1.4 Input with MHL 2.0 Support
. Exclusive Slingplayer® Application
Monitor, heater, air conditioner, audio, phone and voice recognition systems4-45
REAR SEAT INFOTAINMENT (RSI) (if
so equipped)
Page 320 of 604

5-8Starting and driving
TPMS with Easy Fill Tire Alert
When adding air to an under-inflated tire,
the TPMS with Easy Fill Tire Alert provides
visual and audible signals outside the
vehicle to help you inflate the tires to
the recommended COLD tire pressure.
Vehicle set-up:
1. Park the vehicle in a safe and levelplace.
2. Apply the parking brake and place the shift lever in the P (Park) position.
3. Place the ignition switch in the ON position. Do not start the engine.
Operation:
1. Add air to the tire.
2. After a few seconds, the hazard in- dicators will start flashing.
3. When the designated pressure is reached, the horn beeps once and
the hazard indicators stop flashing.
4. Perform the above steps for each tire.
. If the tire is over-inflated more than
approximately 4 psi (30 kPa), the horn
beeps and the hazard indicators flash
3 times. To correct the pressure, push
the core of the valve stem on the tire
briefly to release pressure. When the
pressure reaches the designated
pressure, the horn beeps once. .
If the hazard indicator does not flash
within approximately 15 seconds after
starting to inflate the tire, it indicates
that the TPMS with Easy Fill Tire Alert
is not operating.
. The TPMS will not activate the Easy Fill
Tire Alert under the following condi-
tions:
— If there is interference from an
external device or transmitter
— The air pressure from the inflation device such as those using a power
socket is not sufficient to inflate the
tire
— If an electrical equipment is being used in or near the vehicle
— There is a malfunction in the TPMS system
— There is a malfunction in the horn or hazard indicators
. If the TPMS with Easy Fill Tire Alert
does not operate due to TPMS inter-
ference, move the vehicle about 3 ft
(1m) backward or forward and try
again.
If the TPMS with Easy Fill Tire Alert is not
working, use a tire pressure gauge.
AVOIDING COLLISION AND ROLL-
OVER
WARNING
Failure to operate this vehicle in a
safe and prudent manner may result
in loss of control or an accident.
Be alert and drive defensively at all times.
Obey all traffic regulations. Avoid exces-
sive speed, high speed cornering, or
sudden steering maneuvers, because
these driving practices could cause you
to lose control of your vehicle. As with
any vehicle, a loss of control could
result in a collision with other vehicles
or objects, or cause the vehicle to roll-
over, particularly if the loss of control
causes the vehicle to slide sideways. Be
attentive at all times, and avoid driving
when tired. Never drive when under the
influence of alcohol or drugs (including
prescription or over-the-counter drugs
which may cause drowsiness). Always
wear your seat belt as outlined in the
“Seat belts” (P.1-20), and also instruct your
passengers to do so.
Seat belts help reduce the risk of injury in
collisions and rollovers. In a rollover
crash, an unbelted or improperly belted
Page 321 of 604

person is significantly more likely to be
injured or killed than a person properly
wearing a seat belt.
ON-PAVEMENT AND OFF-ROAD
DRIVING PRECAUTIONS
Utility vehicles have a significantly high-
er rollover rate than other types of
vehicles.
They have higher ground clearance than
passenger cars to make them capable of
performing in a variety of on-pavement
and off-road applications. This gives them
a higher center of gravity than ordinary
cars. An advantage of higher ground
clearance is a better view of the road,
allowing you to anticipate problems.
However, they are not designed for cor-
nering at the same speeds as conven-
tional passenger cars any more than low-
slung sports cars are designed to perform
satisfactorily under off-road conditions. If
at all possible, avoid sharp turns or abrupt
maneuvers, particularly at high speeds. As
with other vehicles of this type, failure to
operate this vehicle correctly may result
in loss of control or vehicle rollover. Seat
belts help reduce the risk of injury in
collisions and rollovers. In a rollover crash,
an unbelted or improperly belted person
is significantly more likely to be injured or
killed than a person properly wearing a
seat belt.Be sure to read “Driving safety precau-
tions” (P.5-10).
OFF-ROAD RECOVERY
While driving, the right side or left side
wheels may unintentionally leave the
road surface. If this occurs, maintain
control of the vehicle by following the
procedure below. Please note that this
procedure is only a general guide. The
vehicle must be driven as appropriate
based on the conditions of the vehicle,
road and traffic.
1. Remain calm and do not overreact.
2. Do not apply the brakes.
3. Maintain a firm grip on the steering
wheel with both hands and try to hold
a straight course.
4. When appropriate, slowly release the accelerator pedal to gradually slow
the vehicle.
5. If there is nothing in the way, steer the vehicle to follow the road while the
vehicle speed is reduced. Do not
attempt to drive the vehicle back onto
the road surface until vehicle speed is
reduced.
6. When it is safe to do so, gradually turn the steering wheel until both tires
return to the road surface. When all
tires are on the road surface, steer the vehicle to stay in the appropriate
driving lane.
.If you decide that it is not safe to
return the vehicle to the road sur-
face based on vehicle, road or
traffic conditions, gradually slow
the vehicle to a stop in a safe place
off the road.
RAPID AIR PRESSURE LOSS
Rapid air pressure loss or a “blow-out” can
occur if the tire is punctured or is
damaged due to hitting a curb or pothole.
Rapid air pressure loss can also be caused
by driving on under-inflated tires.
Rapid air pressure loss can affect the
handling and stability of the vehicle,
especially at highway speeds.
Help prevent rapid air pressure loss by
maintaining the correct air pressure and
visually inspect the tires for wear and
damage. See “Wheels and tires” (P.8-28).
If a tire rapidly loses air pressure or
“blows-out” while driving maintain control
of the vehicle by following the procedure
below. Please note that this procedure is
only a general guide. The vehicle must be
driven as appropriate based on the con-
ditions of the vehicle, road and traffic.
Starting and driving5-9
Page 323 of 604

WARNING
.Drive carefully when off the road
and avoid dangerous areas. Every
person who drives or rides in this
vehicle should be seated with
their seat belt fastened. This will
keep you and your passengers in
position when driving over rough
terrain.
. Do not drive across steep slopes.
Instead drive either straight up or
straight down the slopes. Off-
road vehicles can tip over side-
ways much more easily than they
can forward or backward.
. Many hills are too steep for any
vehicle. If you drive up them, you
may stall. If you drive down them,
you may not be able to control
your speed. If you drive across
them, you may roll over.
. Do not shift ranges while driving
on downhill grades as this could
cause loss of control of the vehi-
cle.
. Stay alert when driving to the top
of a hill. At the top there could be
a drop-off or other hazard that
could cause an accident. .
If your engine stalls or you cannot
make it to the top of a steep hill,
never attempt to turn around.
Your vehicle could tip or roll over.
Always back straight down in R
(Reverse) range. Never back down
in N (Neutral), using only the
brake, as this could cause loss of
control.
. Heavy braking going down a hill
could cause your brakes to over-
heat and fade, resulting in loss of
control and an accident. Apply
brakes lightly and use a low
range to control your speed.
. Unsecured cargo can be thrown
around when driving over rough
terrain. Properly secure all cargo
so it will not be thrown forward
and cause injury to you or your
passengers.
. To avoid raising the center of
gravity excessively, do not exceed
the rated capacity of the roof rack
(if so equipped) and evenly dis-
tribute the load. Secure heavy
loads in the cargo area as far
forward and as low as possible.
Do not equip the vehicle with tires
larger than specified in this man-
ual. This could cause your vehicle
to roll over. .
Do not grip the inside or spokes
of the steering wheel when driv-
ing off-road. The steering wheel
could move suddenly and injure
your hands. Instead drive with
your fingers and thumbs on the
outside of the rim.
. Before operating the vehicle, en-
sure that the driver and all pas-
sengers have their seat belts
fastened.
. Always drive with the floor mats
in place as the floor may became
hot.
. Lower your speed when encoun-
tering strong crosswinds. With a
higher center of gravity, your
NISSAN is more affected by
strong side winds. Slower speeds
ensure better vehicle control.
. Do not drive beyond the perfor-
mance capability of the tires,
even with 4WD engaged.
. For 4WD equipped vehicles, do
not attempt to raise two wheels
off the ground and shift the
transmission to any drive or re-
verse position with the engine
running. Doing so may result in
drivetrain damage or unexpected
vehicle movement which could
Starting and driving5-11
Page 324 of 604

5-12Starting and driving
result in serious vehicle damage
or personal injury.
. Do not attempt to test a 4WD
equipped vehicle on a 2-wheel
dynamometer (such as the dy-
namometers used by some
states for emissions testing), or
similar equipment even if the
other two wheels are raised off
the ground. Make sure you inform
test facility personnel that your
vehicle is equipped with 4WD
before it is placed on a dynam-
ometer. Using the wrong test
equipment may result in drive-
train damage or unexpected ve-
hicle movement which could
result in serious vehicle damage
or personal injury (4WD models).
. When a wheel is off the ground
due to an unlevel surface, do not
spin the wheel excessively.
. Accelerating quickly, sharp steer-
ing maneuvers or sudden braking
may cause loss of control.
. If at all possible, avoid sharp
turning maneuvers, particularly
at high speeds. Your vehicle has
a higher center of gravity than a
conventional passenger car. The
vehicle is not designed for cor- nering at the same speeds as
conventional passenger cars.
Failure to operate this vehicle
correctly could result in loss of
control and/or a rollover acci-
dent.
. Always use tires of the same type,
size, brand, construction (bias,
bias-belted or radial), and tread
pattern on all four wheels. Install
tire chains on the rear wheels
when driving on slippery roads
and drive carefully.
. Be sure to check the brakes im-
mediately after driving in mud or
water. See “Brake system” (P.5-
142) for wet brakes.
. Avoid parking your vehicle on
steep hills. If you get out of the
vehicle and it rolls forward, back-
ward or sideways, you could be
injured.
. Whenever you drive off-road
through sand, mud or water as
deep as the wheel hub, more
frequent maintenance may be
required. See the maintenance
schedule shown in the "9. Main-
tenance and schedules" section.
. Spinning the rear wheels on slip-
pery surfaces may cause the 4WD warning light to flash. The 4WD
system may also automatically
switch from the 4WD mode to
the 2WD mode. This could reduce
traction. Be especially careful
when towing a trailer (4WD mod-
els).
Page 328 of 604

5-16Starting and driving
.Make sure the area around the vehicle
is clear.
. Check fluid levels such as engine oil,
coolant, brake fluid and window
washer fluid as frequently as possible,
or at least whenever you refuel.
. Check that all windows and lights are
clean.
. Visually inspect tires for their appear-
ance and condition. Also check tires
for proper inflation.
. Lock all doors.
. Position seat and adjust head re-
straints/headrests.
. Adjust inside and outside mirrors.
. Fasten seat belts and ask all passen-
gers to do likewise.
. Check the operation of warning lights
when the ignition switch is pushed to
the ON position. (See “Warning lights,
indicator lights and audible remin-
ders” (P.2-11).) 1. Apply the parking brake.
2. Move the shift lever to the P (Park) or N
(Neutral) position. (P is recommended.)
The starter is designed not to operate
unless the shift lever is in either of the
above positions.
3. Push the ignition switch to the ON position. Firmly depress the brake
pedal and push the ignition switch to
start the engine.
To start the engine immediately, push
and release the ignition switch while
depressing the brake pedal with the
ignition switch in any position.
.If the engine is very hard to start inextremely cold weather or when
restarting, depress the accelerator
pedal a little (approximately 1/3 to
the floor) and while holding, crank
the engine. Release the accelerator
pedal when the engine starts.
.If the engine is very hard to startbecause it is flooded, depress the
accelerator pedal all the way to the
floor and hold it. Push the ignition
switch to the ON position to start
cranking the engine. After 5 or 6
seconds, stop cranking by pushing
the ignition switch to OFF. After
cranking the engine, release the
accelerator pedal. Crank the engine
with your foot off the accelerator pedal
by depressing the brake
pedal and pushing the push-button
ignition switch to start the engine.
If the engine starts, but fails to run,
repeat the above procedure.
CAUTION
Do not operate the starter for more
than 15 seconds at a time. If the
engine does not start, push the
ignition switch to OFF and wait 10
seconds before cranking again,
otherwise the starter could be da-
maged.
4. Warm-up
Allow the engine to idle for at least 30
seconds after starting. Do not race the
engine while warming it up. Drive at
moderate speed for a short distance
first, especially in cold weather. In cold
weather, keep the engine running for
a minimum of 2 - 3 minutes before
shutting it off. Starting and stopping
the engine over a short period of time
may make the vehicle more difficult to
start.
When racing the engine up to 4,000
rpm or more under the no load
condition, the engine will enter the
BEFORE STARTING THE ENGINE STARTING THE ENGINE