2022 NISSAN ARMADA heating
[x] Cancel search: heatingPage 267 of 604
WARNING
.The air conditioner cooling func-
tion operates only when the en-
gine is running.
. Do not leave children or adults
who would normally require the
support of others alone in your
vehicle. Pets should not be left
alone either. On hot, sunny days,
temperatures in a closed vehicle
could quickly become high en-
ough to cause severe or possibly
fatal injuries to people or animals.
. Do not use the recirculation mode
for long periods as it may cause
the interior air to become stale
and the windows to fog up.
. Do not adjust the heating and air
conditioning controls while driv-
ing so that full attention may be
given to vehicle operation.
Start the engine and operate the heater
and air conditioner system.
NOTE:
. Odors from inside and outside the
vehicle can build up in the air condi-
tioner unit. Odor can enter the pas-
senger compartment through the vents.
. When parking, set the heater and air
conditioner controls to turn off air
recirculation to allow fresh air into
the passenger compartment. This
should help reduce odors inside the
vehicle.
Monitor, heater, air conditioner, audio, phone and voice recognition systems4-37
HEATER AND AIR CONDITIONER
Page 268 of 604
4-38Monitor, heater, air conditioner, audio, phone and voice recognition systems
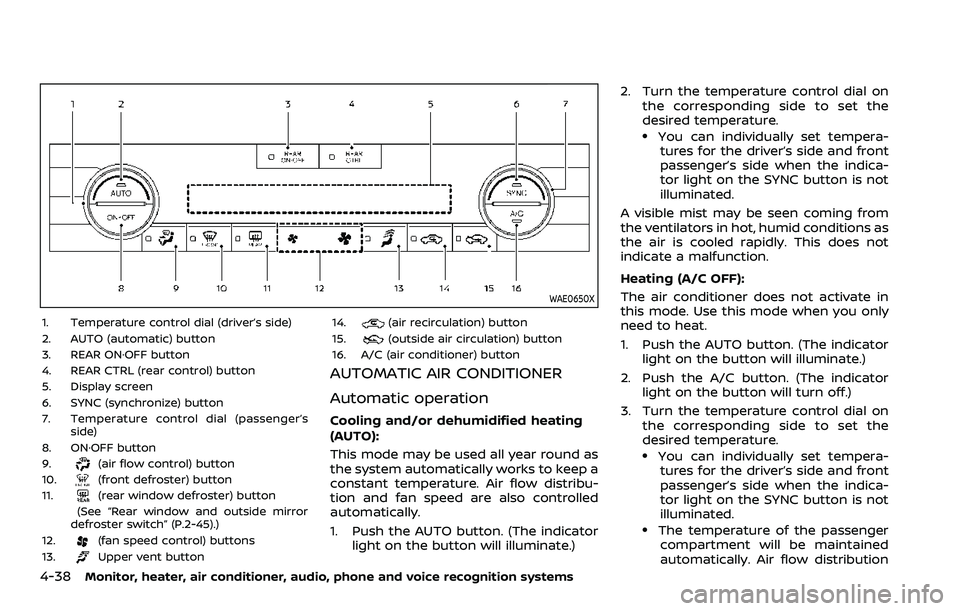
WAE0650X
1. Temperature control dial (driver’s side)
2. AUTO (automatic) button
3. REAR ON·OFF button
4. REAR CTRL (rear control) button
5. Display screen
6. SYNC (synchronize) button
7. Temperature control dial (passenger’sside)
8. ON·OFF button
9.
(air flow control) button
10.(front defroster) button
11.(rear window defroster) button
(See “Rear window and outside mirror
defroster switch” (P.2-45).)
12.
(fan speed control) buttons
13.Upper vent button 14.
(air recirculation) button
15.(outside air circulation) button
16. A/C (air conditioner) button
AUTOMATIC AIR CONDITIONER
Automatic operation
Cooling and/or dehumidified heating
(AUTO):
This mode may be used all year round as
the system automatically works to keep a
constant temperature. Air flow distribu-
tion and fan speed are also controlled
automatically.
1. Push the AUTO button. (The indicator light on the button will illuminate.) 2. Turn the temperature control dial on
the corresponding side to set the
desired temperature.
.You can individually set tempera-tures for the driver’s side and front
passenger’s side when the indica-
tor light on the SYNC button is not
illuminated.
A visible mist may be seen coming from
the ventilators in hot, humid conditions as
the air is cooled rapidly. This does not
indicate a malfunction.
Heating (A/C OFF):
The air conditioner does not activate in
this mode. Use this mode when you only
need to heat.
1. Push the AUTO button. (The indicator light on the button will illuminate.)
2. Push the A/C button. (The indicator light on the button will turn off.)
3. Turn the temperature control dial on the corresponding side to set the
desired temperature.
.You can individually set tempera-tures for the driver’s side and front
passenger’s side when the indica-
tor light on the SYNC button is not
illuminated.
.The temperature of the passengercompartment will be maintained
automatically. Air flow distribution
Page 271 of 604
Cooling and dehumidified heating:
1. Push the REAR ON·OFF button to turnon the rear automatic air conditioning
system. (The indicator light on the
button will illuminate.) Push the REAR
CTRL button to operate the rear
automatic air conditioning system.
(The indicator light on the button will
illuminate.)
2. Turn the temperature control dial (driver’s side) to set the desired tem-
perature.
3. Switch the air flow mode to
by
pushing thebutton.
4. Push the A/C button. (The indicator light on the button will illuminate.)
NOTE:
When the front air conditioner is off, the
rear automatic air conditioning system
only operates the fan. When you would
like to use the air conditioner, be sure to
push the A/C button on the front air
conditioner control panel to turn on the
A/C indicator light.
Manual operation:
Perform the following when the indicator
lights on the REAR ON·OFF button and the
REAR CTRL button are illuminated.
. Temperature control
Turn the temperature control dial (driver’s side) to set the desired tem-
perature.
. Fan speed control
Push the fan speed control
but-
tons to manually control the fan
speed.
. Air flow control
Push the
button to change the air
flow mode.
: The air outlet is fixed at foot level.
: The air outlet is fixed at both the head and foot levels.
: The air outlet is fixed at the head level.
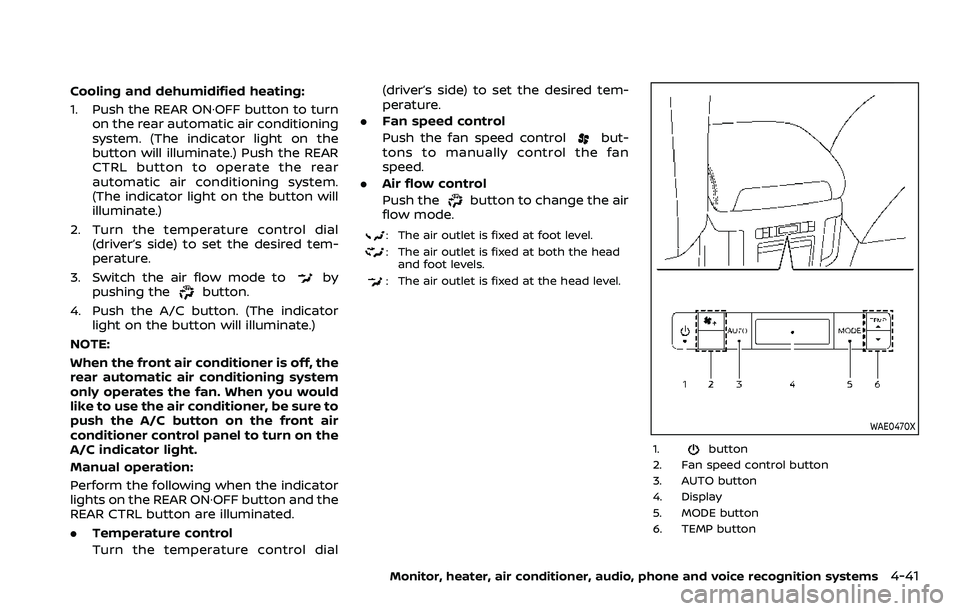
WAE0470X
1.button
2. Fan speed control button
3. AUTO button
4. Display
5. MODE button
6. TEMP button
Monitor, heater, air conditioner, audio, phone and voice recognition systems4-41
Page 330 of 604
5-18Starting and driving
If:
1. The engine coolant temperature is notreduced.
2. The air conditioning cooling function does not turn back ON.
3. The engine oil pressure warning light
illuminates or engine coolant
temperature gauge does not return
to the normal range from the H
position, this may indicate a malfunc-
tion. Move the vehicle off the road to a
safe area and allow the engine to cool.
If after checking the oil and coolant,
the
remains on or engine coolant
temperature does not return to the
normal range, do not continue to
drive. It is recommended you contact
a NISSAN dealer.
The Malfunction Indicator Light (MIL)
may also come ON. You do not need to
have your vehicle towed, unless it re-
mains on, but have it inspected soon. It is
recommended you contact a NISSAN
dealer for this service. See “Warning lights,
indicator lights and audible reminders”
(P.2-11).
WARNING
Overheating can result in reduced
engine power and vehicle speed.
The reduced speed may be lower
than other traffic, which could in-
crease the chance of a collision. Be
especially careful when driving. If the
vehicle cannot maintain a safe driv-
ing speed, pull to the side of the road
in a safe area. Allow the engine to
cool and return to normal operation.
See “If your vehicle overheats” (P.6-
14).
CAUTION
Running the engine with the engine
oil pressure warning light on could
cause serious damage to the engine
almost immediately. Such damage is
not covered by warranty. Turn off the
engine as soon as it is safe to do so.
AUTOMATIC TRANSMISSION
7 speed automatic transmission
The automatic transmission in your vehi-
cle is electronically controlled by a trans-
mission control module to produce
maximum efficiency and smooth opera-
tion.
Shown on the following pages are the
recommended operating procedures for
this transmission. Follow these proce-
dures for maximum vehicle performance
and driving enjoyment.
Starting the vehicle
After starting the engine, fully depress the
foot brake pedal and push the shift lever
button before shifting the shift lever to
the R (Reverse), N (Neutral), D (Drive) or
Manual shift mode position. Be sure the
vehicle is fully stopped before attempting
to shift the shift lever.
This automatic transmission model is
designed so that the foot brake pedal
must be depressed before shifting from
P (Park) to any drive position while the
ignition switch position is ON.
The shift lever cannot be moved out of
the P (Park) position and into any of the
other gear positions if the ignition
switch is pushed to the LOCK, OFF or
ACC position.
Page 398 of 604
5-86Starting and driving
Vehicle-to-vehicle distance control
mode limitations
WARNING
Listed below are the system limita-
tions for the ICC system. Failure to
operate the vehicle in accordance
with these system limitations could
result in serious injury or death.
.The system is primarily intended
for use on straight, dry, open
roads with light traffic. It is not
advisable to use the system in
city traffic or congested areas.
. This system will not adapt auto-
matically to road conditions. This
system should be used in evenly
flowing traffic. Do not use the
system on roads with sharp
curves, or on icy roads, in heavy
rain or in fog.
. As there is a performance limit to
the distance control function,
never rely solely on the ICC sys-
tem. This system does not correct
careless, inattentive or absent-
minded driving, or overcome
poor visibility in rain, fog, or other
bad weather. Decelerate the ve-
hicle speed by depressing the brake pedal, depending on the
distance to the vehicle ahead
and the surrounding circum-
stances in order to maintain a
safe distance between vehicles.
. If the vehicle ahead comes to a
stop, the vehicle decelerates to a
standstill within the limitations of
the system. The system will can-
cel once it judges that the vehicle
has come to a standstill and
sound a warning chime. To pre-
vent the vehicle from moving, the
driver must depress the brake
pedal.
. Always pay attention to the op-
eration of the vehicle and be
ready to manually control the
proper following distance. The
vehicle-to-vehicle distance con-
trol mode of the ICC system may
not be able to maintain the se-
lected distance between vehicles
(following distance) or selected
vehicle speed under some cir-
cumstances.
. The system may not detect the
vehicle in front of you in certain
road or weather conditions. To
avoid accidents, never use the ICC
system under the following con-
ditions: — On roads where the traffic is
heavy or there are sharp
curves
— On slippery road surfaces such as on ice or snow, etc.
— During bad weather (rain, fog, snow, etc.)
— When rain, snow or dirt adhere to the system sensor
— On steep downhill roads (the vehicle may go beyond the set
vehicle speed and frequent
braking may result in over-
heating the brakes)
— On repeated uphill and down- hill roads
— When traffic conditions make it difficult to keep a proper
distance between vehicles be-
cause of frequent accelera-
tion or deceleration
. Do not use the ICC system if you
are towing a trailer. The system
may not detect a vehicle ahead.
. In some road or traffic conditions,
a vehicle or object can unexpect-
edly come into the sensor detec-
tion zone and cause automatic
braking. You may need to control
Page 454 of 604
5-142Starting and driving
BRAKING PRECAUTIONS
The brake system has two separate
hydraulic circuits. If one circuit malfunc-
tions, you will still have braking ability at
two wheels.
You may feel a small click and hear a
sound when the brake pedal is fully
depressed slowly. This is not a malfunc-
tion and indicates that the brake assist
mechanism is operating properly.
Hydraulically-assisted brakes
The hydraulically-assisted brake system is
designed to use a hydraulic pump driven
electrically, to assist braking. If the engine
stops, you can stop the vehicle by de-
pressing the foot brake pedal. However,
greater foot pressure on the foot brake
pedal will be required to stop the vehicle.
The stopping distance will be longer.
Wet brakes
When the vehicle is washed or driven
through water, the brakes may get wet.
As a result, your braking distance will be
longer and the vehicle may pull to one
side during braking.
To dry brakes, drive the vehicle at a safe
speed while lightly tapping the brake
pedal to heat-up the brakes. Do this until
the brakes return to normal. Avoid driving
the vehicle at high speeds until the brakesfunction correctly.
PARKING BRAKE BREAK-IN
Break in the parking brake shoes when-
ever the stopping effect of the parking
brake is weakened or whenever the
parking brake shoes and/or drums/ro-
tors are replaced, in order to assure the
best braking performance.
This procedure is described in the vehicle
service manual. It is recommended you
visit a NISSAN dealer for this service.
Using the brakes
Avoid resting your foot on the brake
pedal while driving. This will cause over-
heating of the brakes, wearing out the
brake and pads faster and reduce gas
mileage.
To help save the brakes and to prevent
the brakes from overheating, reduce
speed and downshift to a lower gear
before going down a slope or long grade.
Overheated brakes may reduce braking
performance and could result in loss of
vehicle control.
WARNING
.
While driving on a slippery sur-
face, be careful when braking,
accelerating or downshifting. Abrupt braking or accelerating
could cause the wheels to skid
and result in an accident.
. If the engine is not running or is
turned off while driving, the
power assist for the brakes will
not work. Braking will be harder.
BRAKE SYSTEM
Page 474 of 604
6-14In case of emergency
8. After starting your engine, carefullydisconnect the negative cable and
then the positive cable (
???).
9. Replace the vent caps (if so equipped). Be sure to dispose of the cloth used to
cover the vent holes as it may be
contaminated with corrosive acid.
10. Put the battery cover on. Do not attempt to start the engine by
pushing.CAUTION
.
Automatic transmission models
cannot be push-started or tow-
started. Attempting to do so may
cause transmission damage.
. Three way catalyst equipped
models should not be started by
pushing since the three way cat-
alyst may be damaged.
. Never try to start the vehicle by
towing it; when the engine starts,
the forward surge could cause
the vehicle to collide with the
tow vehicle.
CAUTION
.Do not continue to drive if your
vehicle overheats. Doing so could
cause engine damage or a vehicle
fire.
. To avoid the danger of being
scalded, never remove the radia-
tor cap or coolant reservoir cap
while the engine is still hot. When
the radiator cap or coolant reser-
voir cap is removed, pressurized
hot water will spurt out, possibly
causing serious injury.
. Do not open the hood if steam is
coming out.
If your vehicle is overheating (indicated by
an extremely high temperature gauge
reading), or if you feel a lack of engine
power, detect abnormal noise, etc., take
the following steps:
1. Move the vehicle safely off the road, apply the parking brake and move the
shift lever to the P (Park) position.
Do not stop the engine.
2. Turn off the heater and air condi- tioner. Open all the windows, move
the heater or air conditioner tempera-
ture control to maximum hot and fan
PUSH STARTING IF YOUR VEHICLE OVERHEATS
Page 475 of 604
control to high speed.
3. If engine overheating is caused by climbing a long hill on a hot day, run
the engine at a fast idle (approxi-
mately 1,500 rpm) until the tempera-
ture gauge indication returns to
normal.
4. Get out of the vehicle. Look and listen for steam or coolant escaping from
the radiator before opening the hood.
(If steam or coolant is escaping, turn
off the engine.) Do not open the hood
further until no steam or coolant can
be seen.
5. Open the engine hood.
WARNING
If steam or water is coming from the
engine, stand clear to prevent get-
ting burned.
6. Visually check drive belts for damage or looseness. Also check if the cooling
fan is running. The radiator hoses and
radiator should not leak water. If cool-
ant is leaking or the cooling fan does
not run, stop the engine.
WARNING
Be careful not to allow your hands,
hair, jewelry or clothing to come into
contact with, or get caught in, engine
belts or the engine cooling fan. The
engine cooling fan can start at any
time.
7. After the engine cools down, check the coolant level in the reservoir tank
with the engine running. Add coolant
to the reservoir tank if necessary. Have
your vehicle repaired. It is recom-
mended you visit a NISSAN dealer for
this service.
In case of emergency6-15