Page 116 of 457
#
Insert seat belt tongue 1into seat belt strap
holder 2. #
V Vehicles wit ehicles wit hout a memor
hout a memor y function:
y function:movethe
driver's or front passenger seat forw ards, if
necessar y.
V
V ehicles wit
ehicles wit h a memor
h a memor y function:
y function: if necessary,
when the seat backrest in there ar is folded
fo rw ard, the cor responding front seat will mo ve
fo rw ards slightly toavo id a collision. #
If necessar y,fully insert the head restraints in
th ere ar seat backrest. #
T
To f
o f old t
old t he
hele�T
le�T and r
and r ight seat bac
ight seat bac kr
kres
es ts
ts
f
f orw
orw ar
ard:
d: pull right or le�T release handle 3. #
T
To f
o f old t
old t he centr
he centr e seat bac
e seat bac kr
kres
est f t forw
orw ar
ards:
ds: pull
re lease catch 5of seat backrest 4for-
wa rds. #
Fold seat backrest 4forw ards. Seats and st
owing
113
113
Page 117 of 457

#
If necessar y,reset the driver's or front
passenger seat.
F
F olding bac
olding bac k t
k the r
he r ear seat bac
ear seat bac kr
krest
est &
W
WARNING
ARNING Risk of becoming trapped when
adjusting the seats
When you adjust a seat, you may trap yourself
or a vehicle occupant. #
When adjusting a seat, make sure that
no one has any body parts in the sweep
of the seat. *
N
NOOTE
TE Damage caused bytrapping the
seat belt when folding back the seat bac k-
re st The seat belt could become trapped and
thus
be damaged when the seat backrest is folded
bac k. #
Make sure that the seat belt is not trap-
ped when folding back the seat backrest. #
Movethe driver's or front passenger seat for-
wa rds, if necessar y. #
Foldthe cor responding seat backrest 1back
until it engages.
Le�T Le�T and r
and r ight seat bac
ight seat bac kr
kres
es ts:
ts: ifth e seat bac k-
re st is not engaged and lo cked in place, this
will be shown on the multifunction display on
th e inst rument cluster.
A wa rning tone will also sound. Centr
Centr
e seat bac
e seat bac kr
krest:
est: ifth e seat backrest is
not engaged and loc ked in place, there d lock
ve ri�/cation indicator 2will be visible.
Loc
Loc king t
king t he r
he release catc
elease catc h of t
h of the centr
he centr e r
e rear seat
ear seat
bac
bac kr
krest
est
R
R eq
equir uir ements:
ements:
R The le�T and centre seat backrests are
engage d and joined toget her.
Yo u can lock the centre seat backrest release
catch if youwa nttosecure the load compartment
against unauthorised access. The centre seat
backrest can then be folded forw ards only
to get her with the le�T seat backrest. 114 114
Seats and st
owing
Page 118 of 457

#
Foldthe centre and le�T seat backrests for-
wa rds. #
T To loc o loc k or unloc
k or unloc k:
k:slide catch 1upwards or
down wards. Load com
Load com
par
partment cov
tment cov er
er Ext
Ext
ending/re
ending/re tr
tracting t
acting t he load com
he load com par
partment cov
tment cov er
er &
W
WARNING
ARNING Risk of injury or death due to
poor lysecured objects
The load compartment co ver alone cannot
secure or restrain he avy objects, items of lug-
ga ge or heavy loads.
Yo u could be hit byan unsecured load, partic-
ular lyin theev ent of abrupt changes in direc-
tion, sudden braking or an accident. #
Always st owobjects in such a wayth at
th ey cannot be thro wn around. #
Secure objects, lug gage or loads against
slipping or tipping over,e.g. byusing
lashing material, even if you are using
th e load compartment co ver. *
N
NO
OTE
TE Damage tothe load compartment
co ver when loading theve hicle The load compartment co
ver may be damaged
when theve hicle is being loaded. #
Do not place any objects abo vethe
lo we r edge of the side windo wsor on the
load compartment co ver. The load compartment co
ver is attached behind
th e seat backrest of there ar ben chseat. #
T
To e
o e xt
xtend:
end: pull load compartment co ver1
back bygrab handle 2and clip it into the
holders on the le�T and right. #
T
To re
o re tr
tract:
act: unhook load compartment co ver
1 from the holders on the le�T and right and
guide it forw ards bygrab handle 2until it is
fully retracted. Seats and st
owing
115
115
Page 119 of 457

Inst
Inst
alling and r
alling and r emo
emoving t
ving t he load com
he load com par
partment
tment
cov
cov er
er
R
R eq
eq uir
uir ements:
ements:
R The load compartment co ver is retracted.
R
R emo
emo ving t
ving t he load com
he load com par
partment cov
tment cov er
er #
Press in the end cap of the load compartment
co ver1 ontheright- or le�T-hand side. #
Push the load compartment co ver1 into the
re cess 2onthe opposite side. #
Take the load compartment co ver1 out by
pulling it upwards. F
F itting t
itting t he load com
he load com par
partment cov
tment cov er
er #
Place the load compartment co ver1 inthe
re cess 2onthe le�T- or right-hand side. #
Press in the end cap of the load compartment
co ver1 onthe opposite side and insert the
load compartment co ver1 into theot her
re cess 2. #
Slide the end cap outwards. A
A
tt
tt ac
ac hing/r
hing/r emo
emoving t
ving t he par
he par titioning net
titioning net &
W
WARNING
ARNING Risk of injury or death due to
poor lysecured objects
The partitioning net alone cann otsecure or
re strain he avy objects, items of lug gage or
heavy loads.
Yo u could be hit byan unsecured load, partic-
ular lyin theev ent of abrupt changes in direc-
tion, sudden braking or an accident. #
Always st owobjects in such a wayth at
th ey cannot be thro wn around. #
Secure objects, lug gage or loads against
slipping or tipping over,e.g. byusing lashing material,
even if you are using
th e partitioning net. Fo
r saf etyre asons, alw ays use a partitioning net
when transporting a load.
Damaged partitioning nets can no lon ger ful�/l
th eir pr otective functions. Replace damaged parti-
tioning nets. Visit a quali�/ed specialist workshop.
A A tt
tt ac
ac hing
hing 116
116
Seats and st
owing
Page 120 of 457
Pa
rtitioning net without load compartment enlar ge-
ment (e xample) #
Extend and unfold the partitioning net.
The joints on theto p and bottom guide rods
will audibly engage. #
Attach guide rod1 toholders 2onthero of
lining. #
Engage hooks 3in tie-down eyes 4 onthe
le�T and right. #
Pull on the loose ends of the lashing straps
until the partitioning net is tight. #
A�Ter driving a short distance, check thete n-
sion of the partitioning net and re-tension it if
necessary.
R R emo
emo ving ving #
Pull belt clamp 5upwards until the lashing
straps are loose. #
Remo vehooks 3from tie-down eyes 4 on
th e le�T and right. #
Remo veguide rod1 from holders 2.
S
S t
to
o wing
wing #
Press there d button on theto p and bottom
guide rods. #
Collapse and roll up the partition net. Ov
Ov
er
er vie
vie w of t
w of t he tie-do
he tie-do wney
wn eyes
es Obser
vethe no tes on loading theve hicle
(/ page 109). Seats and st
owing
117
117
Page 121 of 457
1
Tie-down eyes Ov
Ov
er
ervie
vie w of bag hooks
w of bag hooks &
W
WARNING
ARNING Risk of injury when using bag
hooks with heavy objects
The bag hooks cannot restrain he avy objects
or items of lug gage. Objects or items of luggage may be �0ung
around and hit vehicle occupants. #
Only hang light objects on the bag
hooks. #
Never hang hard, sharp-edged or fragile
objects on the bag hooks. Obser
vethe no tes on loading theve hicle
(/ page 109).
Subject the bag hooks toa maximum load of 3 kg
and do not attach any goods tothem. 1
Bag hook Ov
Ov
er
ervie
vie w of clot
w of clot hes hook
hes hook s on t
s on the t
he t ailg
ailgate
ate Obser
vethe no tes on loading theve hicle
(/ page 109). 118
118
Seats and st
owing
Page 122 of 457

1
Clothes hook
The clo thes hooks are not suitable for hanging
heavy objects as this can cause theta ilgate to
lo we r automaticall y.Use the clo thes hooks only
fo r light objects such as jac kets. EASY
EASY
-PAC
-P AC K load-secur
K load-secur ing kit
ing kit N
No
ot
tes on t
es on t he snap-in module f
he snap-in module f or t
or the load com-
he load com-
par
par tment (t
tment (t elescopic r
elescopic r ods)
ods)
The EAS Y-PA CK load -securing kit allo wsyouto
use your load compartment for a variet y of purpo-
ses. The components are located in the st owage
space under the load compartment �0oor. 1
Telescopic rod with mounting elements and
holders Inst
Inst
alling a t
alling a t elescopic r
elescopic r od
od &
W
WARNING
ARNING Risk of inju rydue toan open
load compartment �0oor
If yo u drive with the load compartment �0oor
open, objects could be �0ung around and hit
ve hicle occupants as a result. There is a risk
of injur y,particular lyin theev ent of sudden
braking or a sudden change in direction. #
Always close the load compartment �0oor
before a journe y. Seats and st
owing
119 119
Page 123 of 457
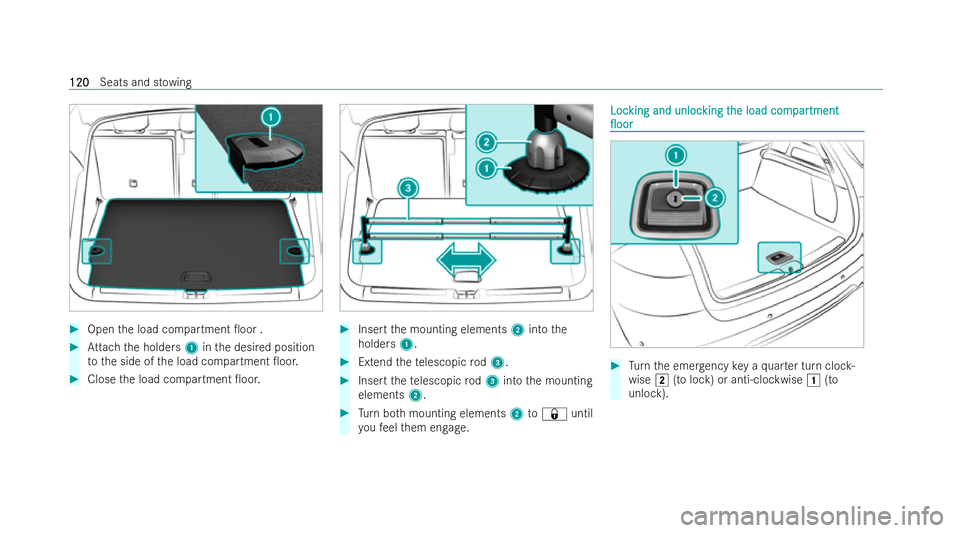
#
Open the load compartment �0oor . #
Attach the holders 1inthe desired position
to the side of the load compartment �0oor. #
Close the load compartment �0oor. #
Insert the mounting elements 2into the
holders 1. #
Extend thete lescopic rod3. #
Insert thete lescopic rod3 into the mounting
elements 2. #
Turn both mounting elements 2to& until
yo ufe el them engage. Loc
Loc
king and unloc
king and unloc king t
king the load com
he load com par
partment
tment
�0oor
�0oor #
Turn the emer gency key a quarter turn cloc k-
wise 2(to lock) or anti-clockwise 1(to
unlock). 120
120
Seats and st
owing

 #
Extend and unfold the partitioning net.
The joints on theto p and bottom guide rods
will audibly engage. #
Attach guide rod1 toho")