Page 378 of 715
Display/IconContent
(3) Vehicle front end guide lines (blue) Indicates the point about 0.25 m (9.8 in) from the front edge of the vehicle (front edge of the bumper).
NOTE
The setting can be changed so that the projected vehicle path lines are not displayed.
Refer to the Settings section in the Mazda Connect Owner's Manual.
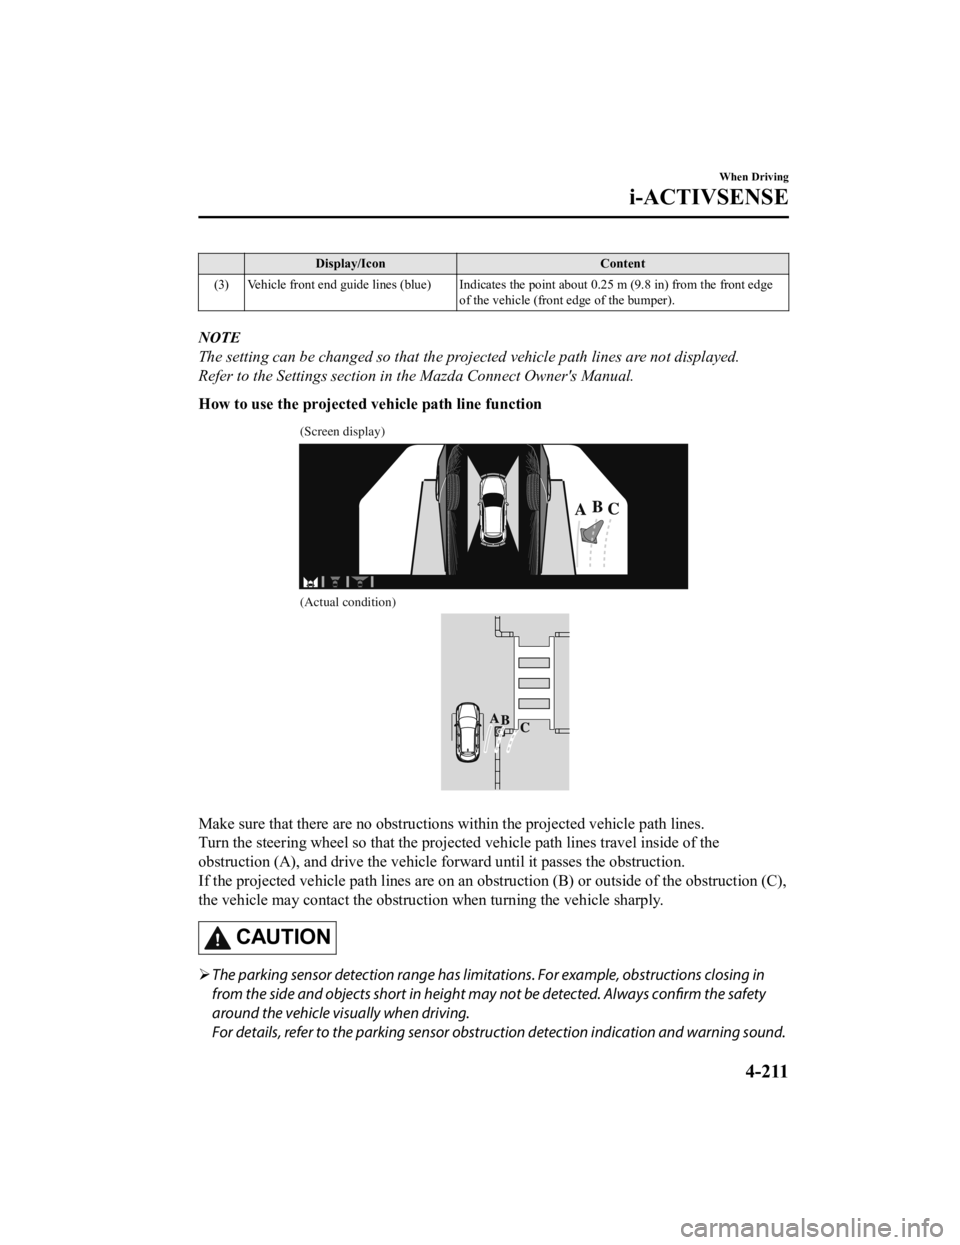
How to use the projected vehicle path line function
(Screen display)
(Actual condition)
Make sure that there are no obstructions within the projected v ehicle path lines.
Turn the steering wheel so that the projected vehicle path line s travel inside of the
obstruction (A), and drive the v ehicle forward until it passes the obstruction.
If the projected vehicle path lines are on an obstruction (B) o r outside of the obstruction (C),
the vehicle may contact the obstruction when turning the vehicl e sharply.
CAUTION
The parking sensor detection range has limita tions. For example, obstructions closing in
from the side and objects short in height may not be detected. Always confirm the safety
around the vehicle vi sually when driving.
For details, refer to the parking sensor obstruction detection indication and warning sound.
When Driving
i-ACTIVSENSE
4-211
CX-9_8KH5-EA-21K_Edition2_old 2021-9-16 14:11:22
Page 379 of 715
Refer to Parking Sensor System on page 4-270.
Do not turn the steering wheel any more until the vehicle has passed the obstruction, even
if the obstruction is not visible on the side view image. If the steering wheel is turned even
more, the vehicle may contact the obst ruction if it is turned sharply.
NOTE
Because there might be a difference between the image displayed on the screen and the
actual conditions, always check the safety of the surrounding area using the mirrors and
directly with your eyes when driving.
Even though the object displayed on the screen, such as a road curb or a division line of a
parking space, and the vehicle parallel guide lines appear parallel, they may not actually
be parallel.
▼Top View/Rear View
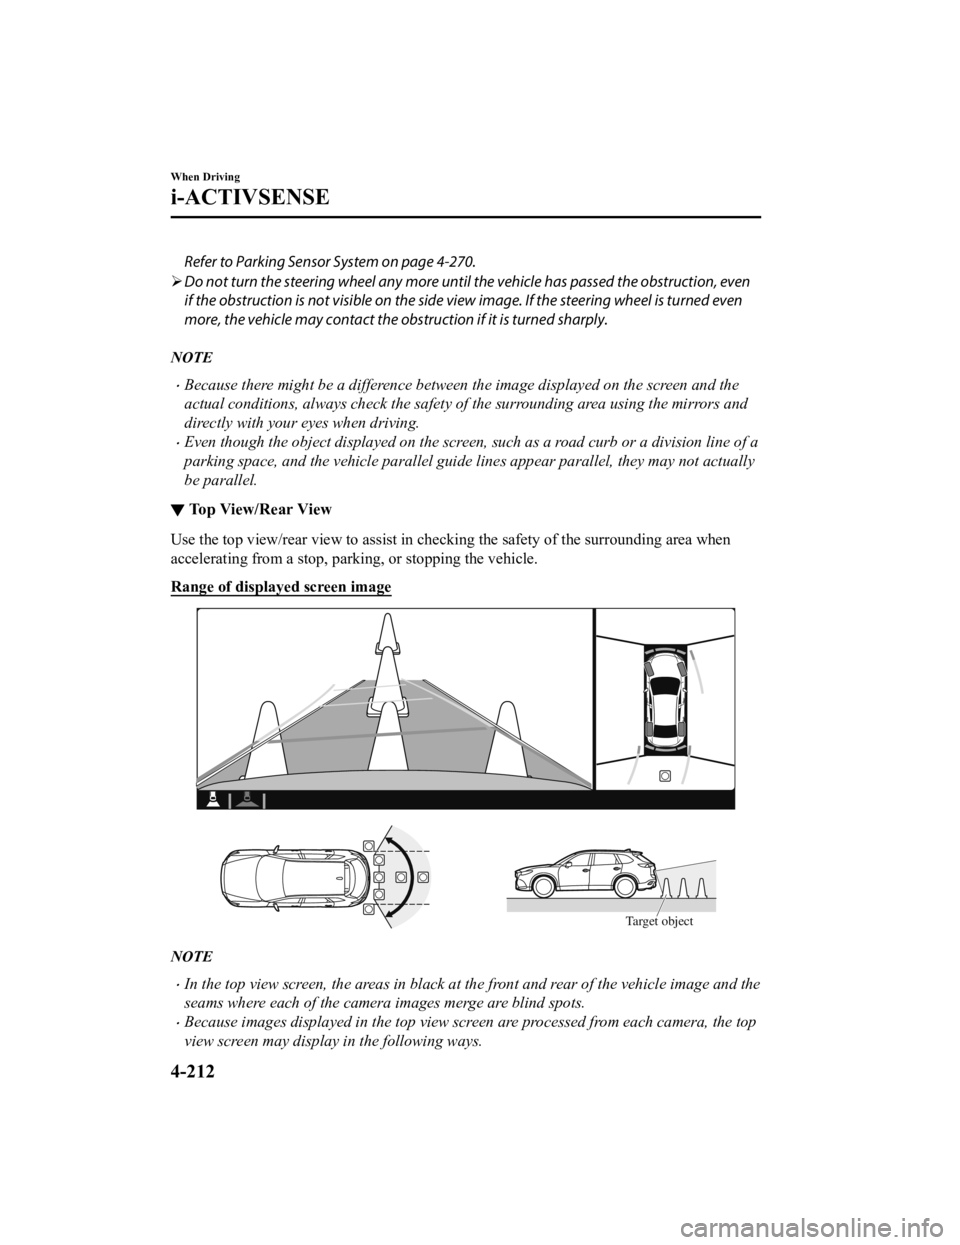
Use the top view/rear view to assist in checking the safety of
the surrounding area when
accelerating from a stop, parking, or stopping the vehicle.
Range of displayed screen image
Target object
NOTE
In the top view screen, the areas in black at the front and rear of the vehicle image and the
seams where each of the camera images merge are blind spots.
Because images displayed in the top view screen are processed from each camera, the top
view screen may display in the following ways.
When Driving
i-ACTIVSENSE
4-212
CX-9_8KH5-EA-21K_Edition2_old 2021-9-16 14:11:22
Page 380 of 715
If an image containing an object with a conspicuous color is picked up by any of the
cameras, the screen area for each camera may be affected and it may display in that
color.
Obstructions displayed in the rear view may not display on the top view screen.
If the position or angle of each camera changes due to tilting of the vehicle, the image
may appear distorted.
Lines on the road may appear distorted at the seams where each of the camera images
merge.
The screen area for each camera may appear bright/dark depending on the illumination
level around any of the cameras.
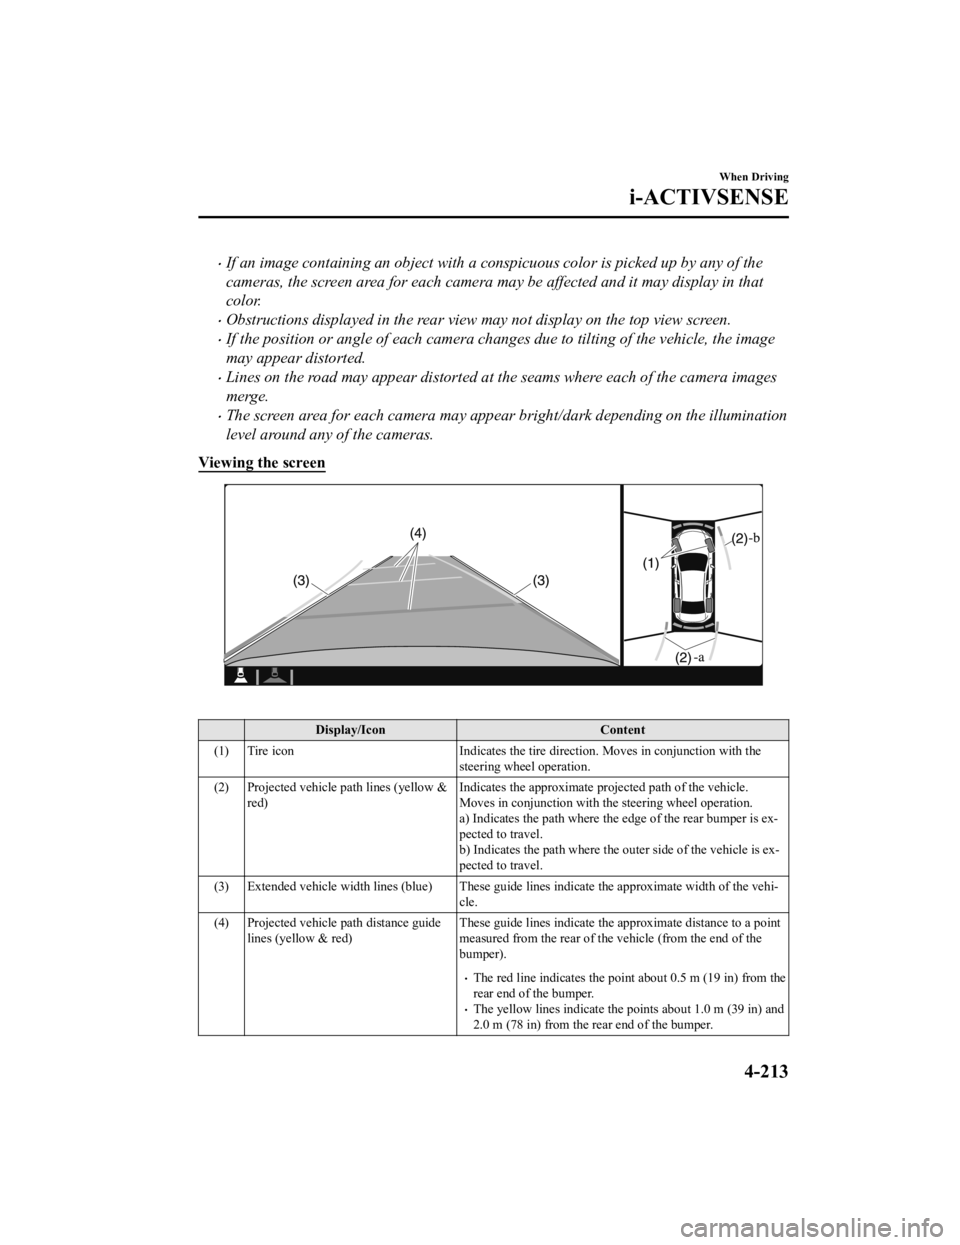
Viewing the screen
Display/Icon Content
(1) Tire icon Indicates the tire direction. Moves in conjunction with the
steering wheel operation.
(2) Projected vehicle path lines (yellow & red) Indicates the approximate projected path of the vehicle.
Moves in conjunction with the steering wheel operation.
a) Indicates the path where the edge of the rear bumper is ex‐
pected to travel.
b) Indicates the path where the
outer side of the vehicle is ex‐
pected to travel.
(3) Extended vehicle width lines (blue) These guide lines indicat e the approximate width of the vehi‐
cle.
(4) Projected vehicle path distance guide lines (yellow & red) These guide lines indicate the
approximate distance to a point
measured from the rear of the vehicle (from the end of the
bumper).
The red line indicates the point about 0.5 m (19 in) from the
rear end of the bumper.
The yellow lines indicate the poi nts about 1.0 m (39 in) and
2.0 m (78 in) from the rear end of the bumper.
When Driving
i-ACTIVSENSE
4-213
CX-9_8KH5-EA-21K_Edition2_old 2021-9-16 14:11:22
Page 381 of 715
NOTE
The setting can be changed so that the projected vehicle path lines are not displayed.
Refer to the Settings section in the Mazda Connect Owner's Manual.
How to use the projected vehicle path line function
CAUTION
The front of the vehicle swings out wide wh en turning the steering wheel while reversing.
Maintain sufficient distance between the vehicle and an obstruction.
The parking sensor detection range has limitat ions. For example, obstructions closing in
from the side and objects short in height ma y not be detected. Always confirm the safety
around the vehicle visually when driving.
For details, refer to the parking sensor obstru ction detection indication and warning sound.
Refer to Parking Sensor System on page 4-270.
NOTE
Because there might be a difference between the image displayed on the screen, such as
indicated in the following, and the actual conditions when parking, always check the
safety at the rear of the vehicle and the surrounding area directly with your eyes.
Even though the back end of the parking space (or garage) displayed on the screen and
distance guide lines appear parallel, they may not actually be parallel.
When parking in a space with a division line on only one side of the parking space, even
though the division line and the vehicle wi dth guide line appear parallel, they may not
actually be parallel.
The following shows an example of vehicle parking with the steering wheel turned to the
left while backing up the vehicle. When backing into a parking space from the opposite
direction, the steering operation is reversed.
When Driving
i-ACTIVSENSE
4-214
CX-9_8KH5-EA-21K_Edition2_old 2021-9-16 14:11:22
Page 382 of 715
1. Back the vehicle into the parking space by turning the steering wheel so that the vehicle
enters the center of the parking space.
(Screen display)
(Actual condition)
2. After the vehicle starts entering the parking space, stop and adjust the steering wheel so
that the distance between the veh icle width lines and the sides of the parking space on
the left and right are roughly equal, and then continue backing up slowly.
3. Once the vehicle width lines and the sides of the parking spa ce on the left and right are
parallel, straighten the wheels and back the vehicle slowly int o the parking space.
Continue checking the vehicle's surroundings and then stop the vehicle in the best
When Driving
i-ACTIVSENSE
4-215
CX-9_8KH5-EA-21K_Edition2_old 2021-9-16 14:11:22
Page 402 of 715
Cruise Control*
With cruise control, you can set and automatically maintain any speed of more than about
25 km/h (16 mph).
WARNING
Do not use the cruise control under the following conditions:
Using the cruise control under the following conditions is dangerous and could result in loss
of vehicle control.
Hilly terrain
Steep inclines
Heavy or unsteady traffic
Slippery or winding roads
Similar restrictions that require inconsistent speed
▼ Cruise Control Switch
ON switch
SET/- switch
OFF/CANCEL switch RES/+ switch
NOTE
If your Mazda has the following steering switch, your Mazda is equipped with the Mazda
Radar Cruise Control with Stop & Go functi
on (MRCC with Stop & Go function) system.
When Driving
Cruise Control
*Some models.4-235
CX-9_8KH5-EA-21K_Edition2_old 2021-9-16 14:11:22
Page 414 of 715
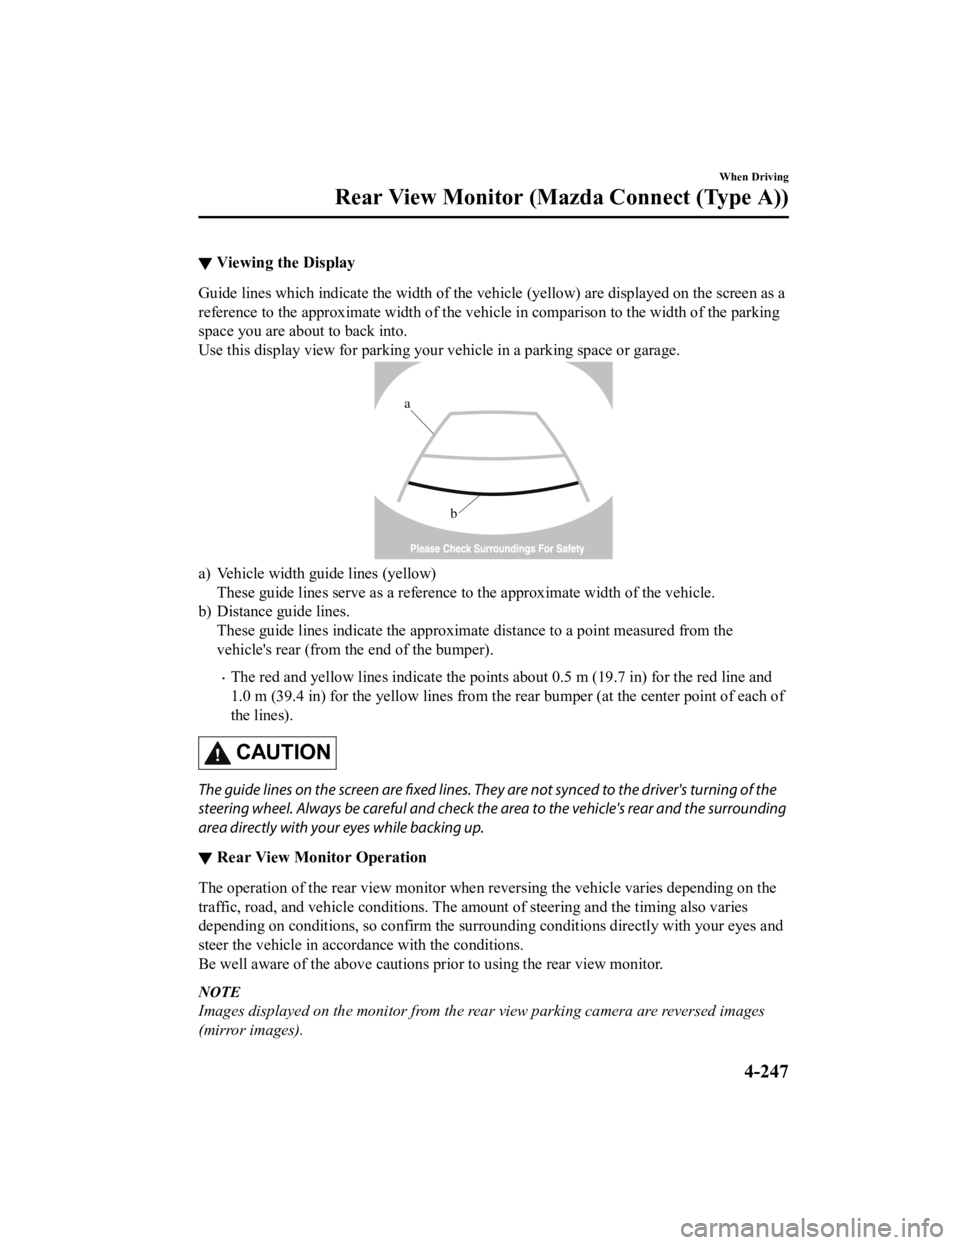
▼Viewing the Display
Guide lines which indicate the wid
th of the vehicle (yellow) are displayed on the screen as a
reference to the approximate width of the vehicle in comparison to the width of the parking
space you are about to back into.
Use this display view for parking your vehicle in a parking spa ce or garage.
b
a
a) Vehicle width guide lines (yellow)
These guide lines serve as a reference to the approximate width of the vehicle.
b) Distance guide lines. These guide lines indicate the approximate distance to a point measured from the
vehicle's rear (from the end of the bumper).
The red and yellow lines indicate the points about 0.5 m (19.7 in) for the red line and
1.0 m (39.4 in) for the yellow lines from the rear bumper (at t he center point of each of
the lines).
CAUTION
The guide lines on the screen are fixed lines. They are not synced to the driver's turning of the
steering wheel. Always be careful and check the area to the vehicle's rear and the surrounding
area directly with your eyes while backing up.
▼ Rear View Monitor Operation
The operation of the rear view monitor when reversing the vehic
le varies depending on the
traffic, road, and vehicle conditions. The amount of steering a nd the timing also varies
depending on conditions, so conf irm the surrounding conditions directly with your eyes and
steer the vehicle in accordance with the conditions.
Be well aware of the above cautions prior to using the rear vie w monitor.
NOTE
Images displayed on the monitor from the rear view parking camera are reversed images
(mirror images).
When Driving
Rear View Monitor (Mazda Connect (Type A))
4-247
CX-9_8KH5-EA-21K_Edition2_old 2021-9-16 14:11:22
Page 415 of 715
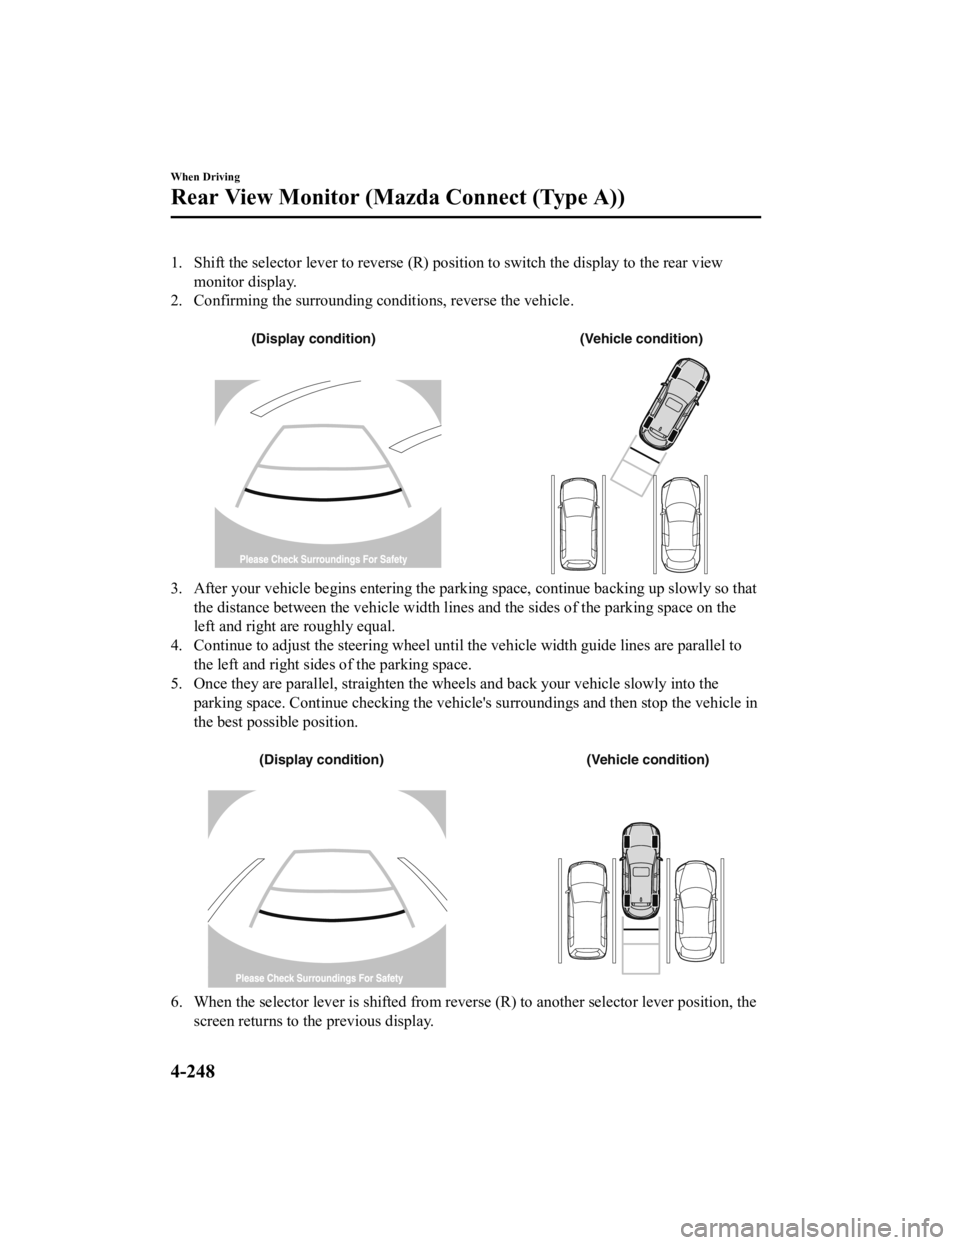
1. Shift the selector lever to reverse (R) position to switch the display to the rear view
monitor display.
2. Confirming the surrounding conditions, reverse the vehicle.
(Display condition) (Vehicle condition)
3. After your vehicle begins entering the parking space, continue backing up slowly so that
the distance between the vehicle w idth lines and the sides of the parking space on the
left and right are roughly equal.
4. Continue to adjust the steering wheel until the vehicle width guide lines are parallel to
the left and right sides of the parking space.
5. Once they are parallel, straighten the wheels and back your v ehicle slowly into the
parking space. Continue checking the vehicle's surroundings and then stop the vehicle in
the best possible position.
(Display condition) (Vehicle condition)
6. When the selector lever is shifted from reverse (R) to anothe r selector lever position, the
screen returns to the previous display.
When Driving
Rear View Monitor (Maz da Connect (Type A))
4-248
CX-9_8KH5-EA-21K_Edition2_old 2021-9-16 14:11:22