Page 383 of 627

The distance appearing in the displayed image is different from the actual distance
because the rear view parking camera is equipped with a specific lens.
Images displayed on the monitor from the rear view parking camera are reversed
images (mirror images).
Some optionally installed vehicle accessories may be picked up by the camera. Do
not install any optional parts that can interfere with the camera view, such as
illuminating parts or parts made of reflective material.
It may be difficult to see the display un der the following conditions, however, it
does not indicate a malfunction.
In darkened areas.When the temperature around the lens is high/low.When the camera is wet such as on a rainy day or during periods of high
humidity.
When foreign material such as mud is stuck around the camera.When the camera lens reflects sunlight or headlight beams.The surroundings are illuminated by vehicle lights, fluorescent lights, or LED
lights (display may flicker).
Extremely small dark or white dots appear on the screen (dots may flicker).An object is close to a camera.Image display may be delayed if the temperature around the camera is low.
▼Viewing the Display
Predicted vehicle path assist lines display type
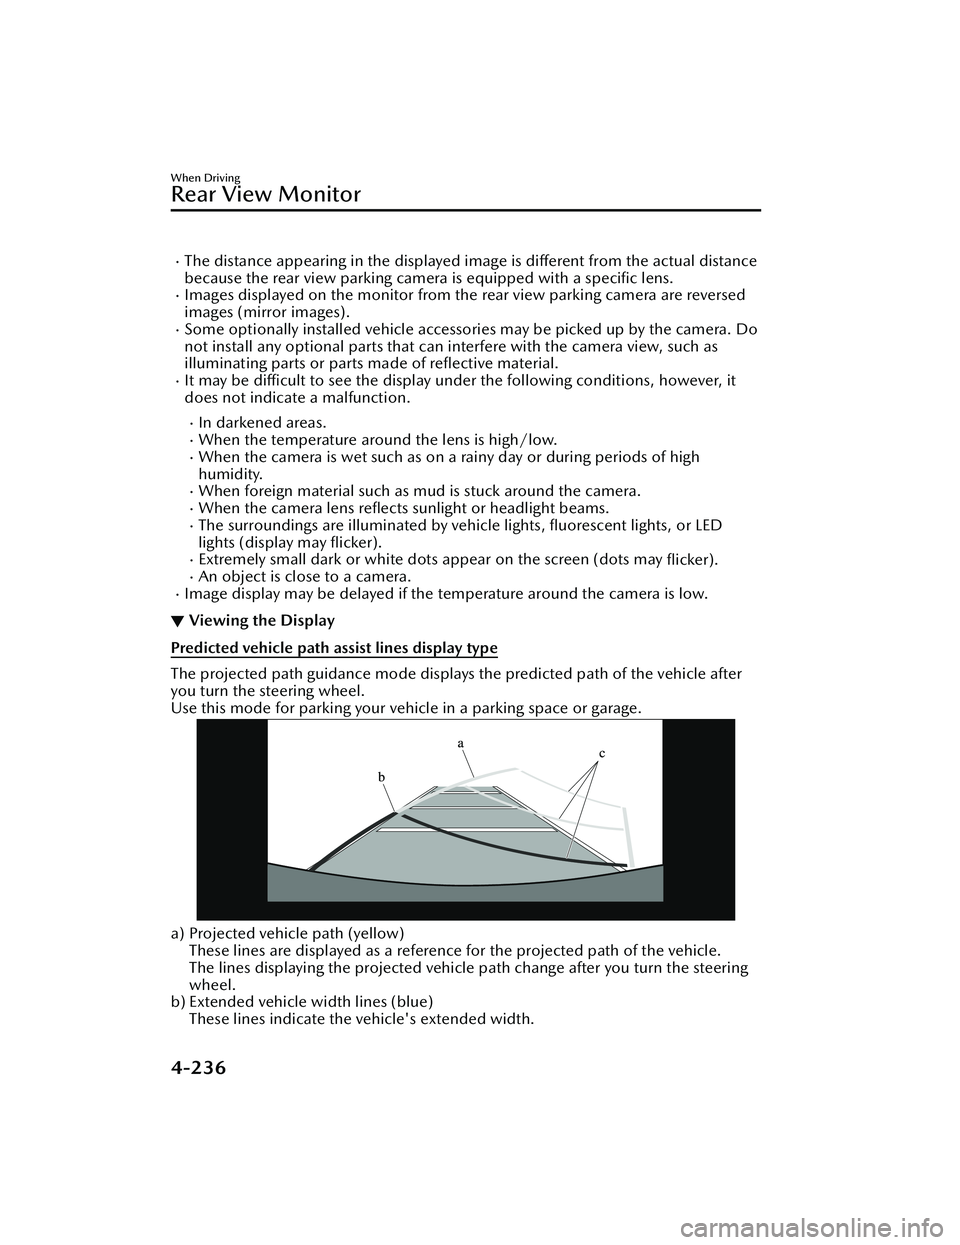
The projected path guidance mode displays the predicted path of the vehicle after
you turn the steering wheel.
Use this mode for parking your vehi
cle in a parking space or garage.
a) Projected vehicle path (yellow)
These lines are displayed as a reference for the projected path of the vehicle.
The lines displaying the projected vehicle path change after you turn the steering
wheel.
b) Extended vehicle width lines (blue)
These lines indicate the vehicle's extended width.
When Driving
Rear View Monitor
4-236
Mazda3_8KH1-EA-21K_Edition1_new 2021-7-27 16:02:22
Page 384 of 627

These lines are not displayed when the vehicle's wheels are in the straight-ahead
position.
c) Distance guide lines (red) These lines indicate the approximate distance to a point measured from the
vehicle's rear (from the end of the bumper).
The blue line indicates the point about 0.5 m (19 in) from the rear bumper.
The red and yellow lines, wh ich change position after you turn the steering wheel,
indicate the points about 0.5 m (19 in) for the red line and 1.0 m (39 in) and 2.0
m (78 in) for the yellow lines from the rear bumper (at the center point of each of
the lines).
A degree of error occurs when the wheels are not in the straight-ahead position.
In the above illustration, the right side of the vehicle is in a position closer to the
actual distance displayed by the distance guide lines (red: about 0.5 m (19 in)
point, yellow: about 1.0 m (39 in), and yellow: about 2.0 m (78 in) point behind
the rear bumper), whereas the left side is in a position farther away.
CAUTION
The indicated position of the guide lines on the display changes depending on the
vehicle conditions (such as the number of occupants/cargo load) and the road
conditions (such as a steep gradient to the rear of the vehicle).
Always check the area to the vehicle's re ar and the surrounding area directly with
your eyes while backing up.
Fixed assist lines display type
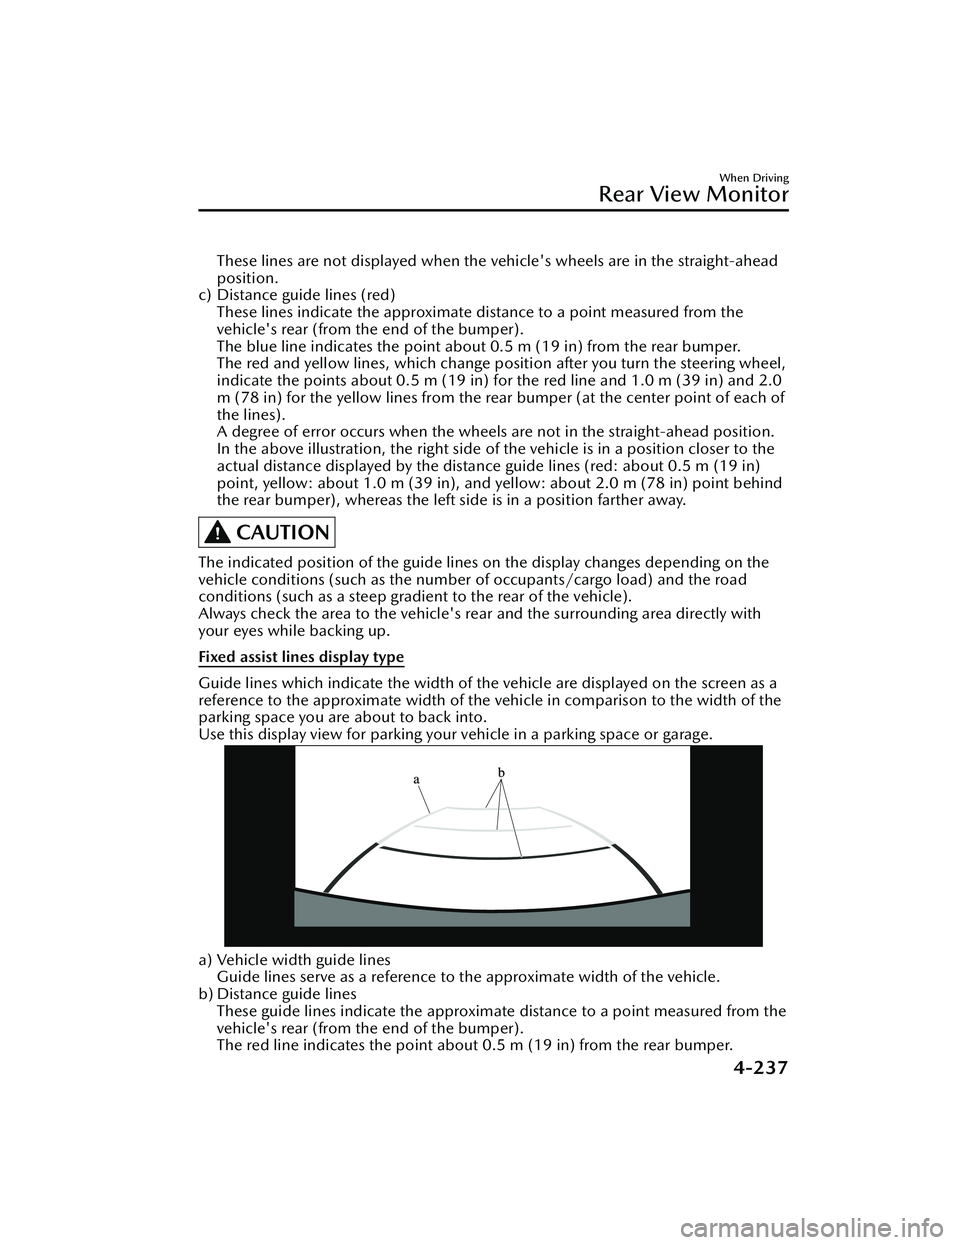
Guide lines which indicate the width of the vehicle are displayed on the screen as a
reference to the approximate width of the vehicle in comparison to the width of the
parking space you are about to back into.
Use this display view for parking your vehicle in a parking space or garage.
a) Vehicle width guide lines
Guide lines serve as a reference to the approximate width of the vehicle.
b) Distance guide lines These guide lines indicate the approximate distance to a point measured from the
vehicle's rear (from the end of the bumper).
The red line indicates the point about 0.5 m (19 in) from the rear bumper.
When Driving
Rear View Monitor
4-237
Mazda3_8KH1-EA-21K_Edition1_new 2021-7-27 16:02:22
Page 387 of 627
3. After your vehicle begins entering the parking space, continue backing up slowly
so that the distance between the vehicle width lines and the sides of the parking
space on the left and right are roughly equal.
1. (Display condition)
2. (Vehicle condition)
4. Continue to adjust the steering wheel until the vehicle width guide lines are parallel to the left and right sides of the parking space.
When Driving
Rear View Monitor
4-240
Mazda3_8KH1-EA-21K_Edition1_new 2021-7-27 16:02:22
Page 388 of 627

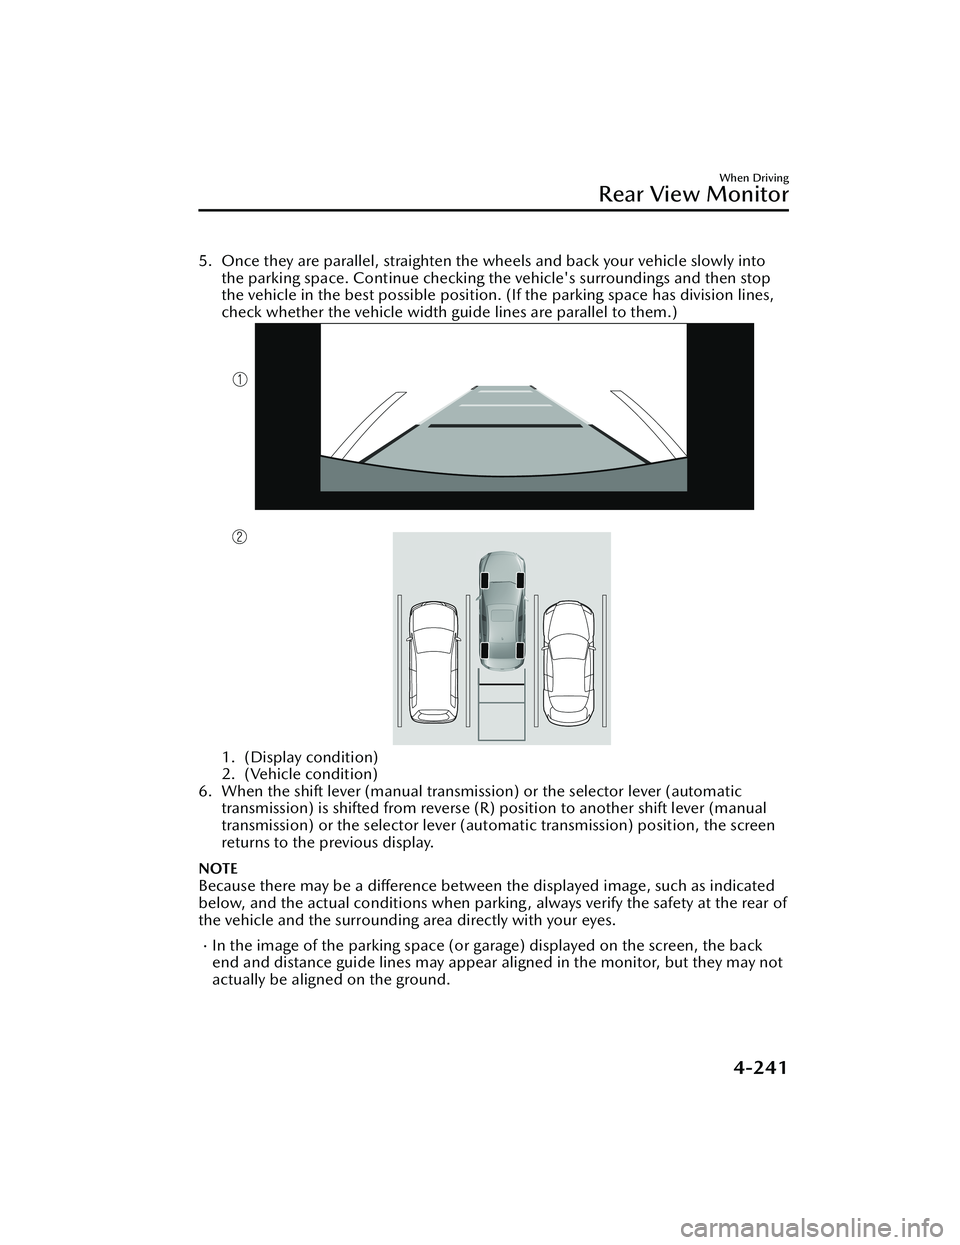
5. Once they are parallel, straighten the wheels and back your vehicle slowly intothe parking space. Continue checking the vehicle's surroundings and then stop
the vehicle in the best possible position. (If the parking space has division lines,
check whether the vehicle width guide lines are parallel to them.)
1. (Display condition)
2. (Vehicle condition)
6. When the shift lever (manual transmission) or the selector lever (automatic transmission) is shifted from reverse (R) position to another shift lever (manual
transmission) or the selector lever (aut omatic transmission) position, the screen
returns to the previous display.
NOTE
Because there may be a difference between the displayed image, such as indicated
below, and the actual conditions when parkin g , always verify the safety at the rear of
the vehicle and the surrounding area directly with your eyes.
In the image of the parking space (or garage) displayed on the screen, the back
end and distance guide lines may appear aligned in the monitor, but they may not
actually be aligned on the ground.
When Driving
Rear View Monitor
4-241
Mazda3_8KH1-EA-21K_Edition1_new 2021-7-27 16:02:22
Page 389 of 627
When parking in a space with a division line on only one side of the parking space,
the division line and the vehicle width guide line appear aligned in the monitor,
but they may not actually be aligned on the ground.
Fixed assist lines display type
NOTE
Images displayed on the monitor from the rear view parking camera are reversed
images (mirror images).
1. Shift the shift lever (manual transmission) or the selector lever (automatic transmission) to reverse (R) position to switch the display to the rear view
monitor display.
2. Confirming the surrounding conditions, reverse the vehicle.
When Driving
Rear View Monitor
4-242
Mazda3_8KH1-EA-21K_Edition1_new 2021-7-27 16:02:22
Page 390 of 627
3. After your vehicle begins entering the parking space, continue backing up slowlyso that the distance between the vehicle width lines and the sides of the parking
space on the left and right are roughly equal.
1. (Display condition)
2. (Vehicle condition)
4. Continue to adjust the steering wheel until the vehicle width guide lines are parallel to the left and right sides of the parking space.
When Driving
Rear View Monitor
4-243
Mazda3_8KH1-EA-21K_Edition1_new 2021-7-27 16:02:22
Page 391 of 627

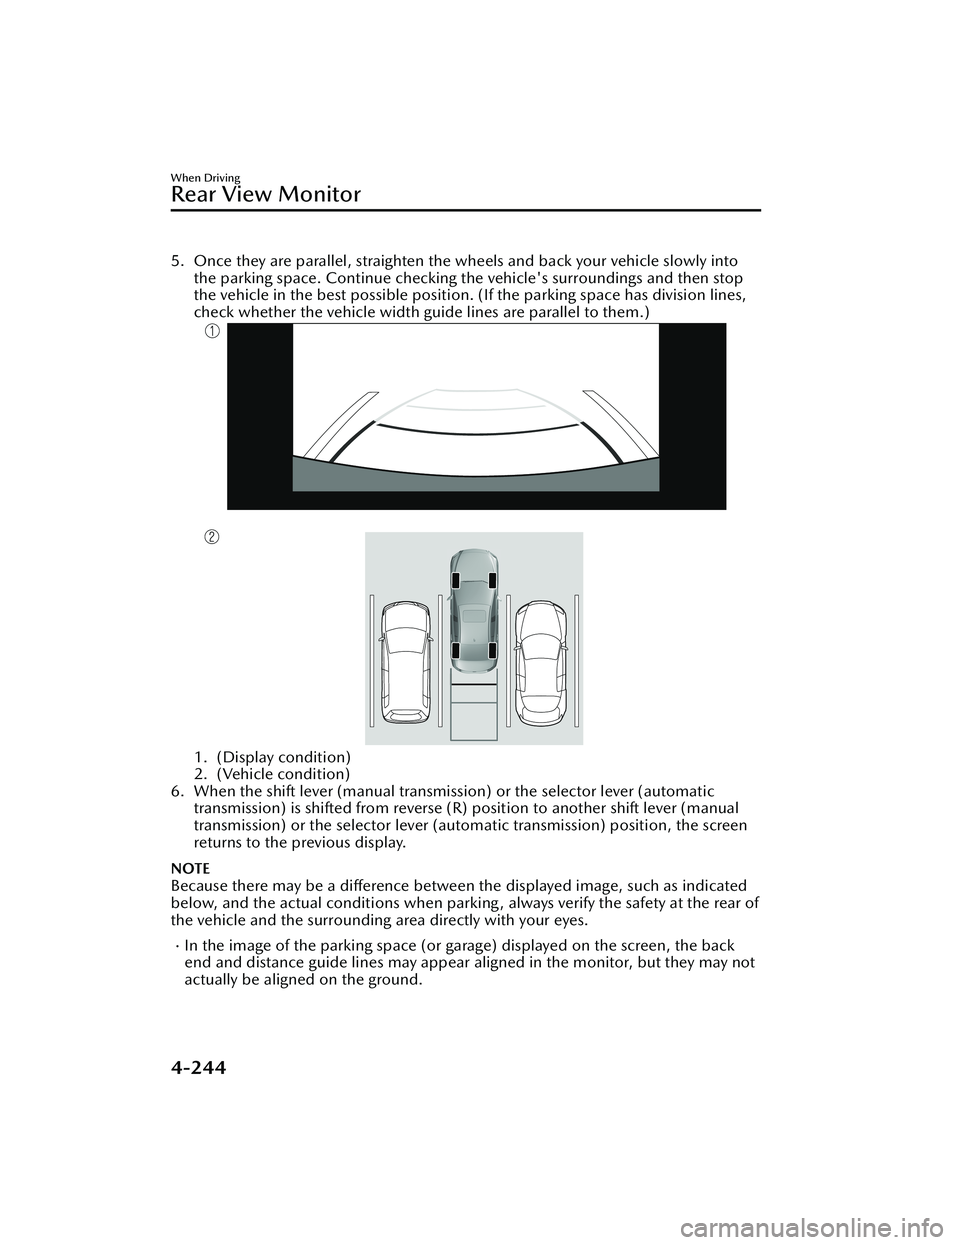
5. Once they are parallel, straighten the wheels and back your vehicle slowly intothe parking space. Continue checking the vehicle's surroundings and then stop
the vehicle in the best possible position. (If the parking space has division lines,
check whether the vehicle width guide lines are parallel to them.)
1. (Display condition)
2. (Vehicle condition)
6. When the shift lever (manual transmission) or the selector lever (automatic transmission) is shifted from reverse (R) position to another shift lever (manual
transmission) or the select or lever (automatic transmission) position, the screen
returns to the previous display.
NOTE
Because there may be a difference between the displayed image, such as indicated
below, and the actual conditions when parkin g , always verify the safety at the rear of
the vehicle and the surrounding area directly with your eyes.
In the image of the parking space (or garage) displayed on the screen, the back
end and distance guide lines may appear aligned in the monitor, but they may not
actually be aligned on the ground.
When Driving
Rear View Monitor
4-244
Mazda3_8KH1-EA-21K_Edition1_new 2021-7-27 16:02:22
Page 392 of 627
When parking in a space with a division line on only one side of the parking space,
the division line and the vehicle width guide line appear aligned in the monitor,
but they may not actually be aligned on the ground.
▼Variance Between Actual Road Conditions and Displayed Image
Some variance occurs between the actual road and the displayed road. Such
variance in distance perspective could lead to an accident. Note the following
conditions that may cause a variance in distance perspective.
When the vehicle is tilted due to the weight of passengers and load
When the vehicle rear is lowered, the object displayed on the screen appears farther
than the actual distance.
1. Object
2. Variance
3. Object on screen
When Driving
Rear View Monitor
4-245
Mazda3_8KH1-EA-21K_Edition1_new
2021-7-27 16:02:22