2022 LINCOLN NAVIGATOR jacking
[x] Cancel search: jackingPage 114 of 646

POWER RUNNING BOARD
PRECAUTIONS
WARNING: In extreme climates,
excessive ice buildup may occur, causing
the running boards not to deploy. Make
sure that the running boards have
deployed, and have finished moving before
attempting to step on them. The running
boards will resume normal function once
the blockage is cleared. WARNING:
Switch off the running
boards before jacking or placing any object
under your vehicle. Never place your hand
between the extended running board and
your vehicle. A moving running board may
cause injury.
Do not use the running boards, front and rear
hinge assemblies, running board motors, or
the running board underbody mounts to lift
your vehicle when jacking. Use proper
jacking points.
The running boards could move slower in
cold temperatures. POWER RUNNING BOARD
SETTINGS
1. Press
Features on the touchscreen.
2. Press
Running Boards.
3. Press a setting.
Running Boards (Modes)
Off
The power running boards remain stowed,
regardless of door position.
Auto
The power running boards deploy when you
approach your vehicle with a remote control,
unlock the door or open the door.
The power running boards stow:
• After a few seconds when you close the
doors.
• If you unlock the door but do not open
it.
• If you have switched Approach detection
on and do not open a door before the
Auto Timer
setting expires. Note:
When you select this mode, an option
displays that allows you to select how long
the running boards stay deployed without
opening the door.
Out
The power running boards remain deployed,
regardless of door position.
Approach detection
When you switch
Approach detection on
with Auto switched on, the running boards
deploy when you approach your vehicle with
a remote control.
DEPLOYING AND STOWING THE
POWER RUNNING BOARDS
The power running boards deploy when you
approach your vehicle with a remote control,
unlock the door or open the door.
110
2022 Navigator (TB9) Canada/United States of America, enUSA, Edition date: 202109, First-Printing Power Running Boards
Page 467 of 646

Tire Change Procedure
WARNING: Only use replacement
tires and wheels that are the same size,
load index, speed rating and type (such as
P-metric versus LT-metric or all-season
versus all-terrain) as those originally
provided by Ford. The recommended tire
and wheel size may be found on either the
Safety Compliance Certification Label
(affixed to either the door hinge pillar,
door-latch post, or the door edge that
meets the door-latch post, next to the
driver's seating position), or the Tire Label
which is located on the B-Pillar or edge of
the driver's door. If this information is not
found on these labels, then you should
contact your authorized dealer as soon as
possible. Use of any tire or wheel not
recommended by Ford can affect the
safety and performance of your vehicle,
which could result in an increased risk of
loss of vehicle control, vehicle rollover,
personal injury and death. WARNING:
To help prevent your
vehicle from moving when changing a
wheel, shift the transmission into park (P),
set the parking brake and use an
appropriate block or wheel chock to
secure the wheel diagonally opposite to
the wheel being changed. For example,
when changing the front left wheel, place
an appropriate block or wheel chock on
the right rear wheel. WARNING: Do not attempt to change
a tire on the side of the vehicle close to
moving traffic. Pull far enough off the road
to avoid the danger of being hit when
operating the jack or changing the wheel. WARNING:
Only use the jack
provided as original equipment with your
vehicle. WARNING:
Switch off the running
boards before jacking or placing any object
under your vehicle. Never place your hand
between the extended running board and
your vehicle. A moving running board may
cause injury. WARNING: Only use the spare wheel
carrier to stow wheels provided with your
vehicle. WARNING:
Ensure screwthread is
adequately lubricated before use. WARNING:
Switch the ignition off
and apply the park brake fully before lifting
vehicle. WARNING:
Use only the specified
jacking points. If you use other locations,
you could damage the body, steering,
suspension, engine, braking system or the
fuel lines.
463
2022 Navigator (TB9) Canada/United States of America, enUSA, Edition date: 202109, First-Printing Changing a Road Wheel
Page 469 of 646

3. Slide the retainer through the center of
the spare tire wheel and remove the
spare tire.
Note: If your wheel nuts are hidden, the
wheel cover or ornament must be removed
using the provided tool to access the wheel
nuts. 4. Use the lug wrench tip to remove any
wheel trim.
5. Loosen each wheel lug one-half turn counterclockwise, but do not remove
them until the wheel is off the ground. Jacking the Vehicle
WARNING: No person should place
any portion of their body under a vehicle
that is supported by a jack. WARNING:
The jack supplied with
this vehicle is only intended for changing
a flat tire in an emergency. Do not attempt
to do any other work on your vehicle when
it is supported by the jack, as your vehicle
could slip off the jack. Failure to follow this
instruction could result in personal injury
or death. 465
2022 Navigator (TB9) Canada/United States of America, enUSA, Edition date: 202109, First-Printing Changing a Road WheelE273399 E358685 E166722
Page 470 of 646

WARNING: Check that the vehicle
jack is not damaged or deformed and the
thread is lubricated and clean. WARNING:
The jack supplied with
this vehicle is only intended for changing
wheels. Do not use the vehicle jack other
than when you are changing a wheel in an
emergency. WARNING: The jack should be used
on level firm ground wherever possible. WARNING:
Never place anything
between the vehicle jack and the ground. WARNING:
Never place anything
between the vehicle jack and your vehicle. WARNING:
It is recommended that
the wheels of the vehicle be chocked, and
that no person should remain in a vehicle
that is being jacked. WARNING:
Failure to follow these
guidelines could result in an increased risk
of loss of vehicle control, injury or death.
Note: The jack does not require
maintenance or additional lubrication over
the service life of your vehicle.
Note: Both the front and rear jacking points
are on the frame rails. The correct locations
on the frame rails are marked with an arrow
punched into the frame rail. Jack at the
specified locations to avoid damaging your
vehicle.
Front jacking point Rear jacking point
466
2022 Navigator (TB9) Canada/United States of America, enUSA, Edition date: 202109, First-Printing Changing a Road WheelE360356
Page 471 of 646

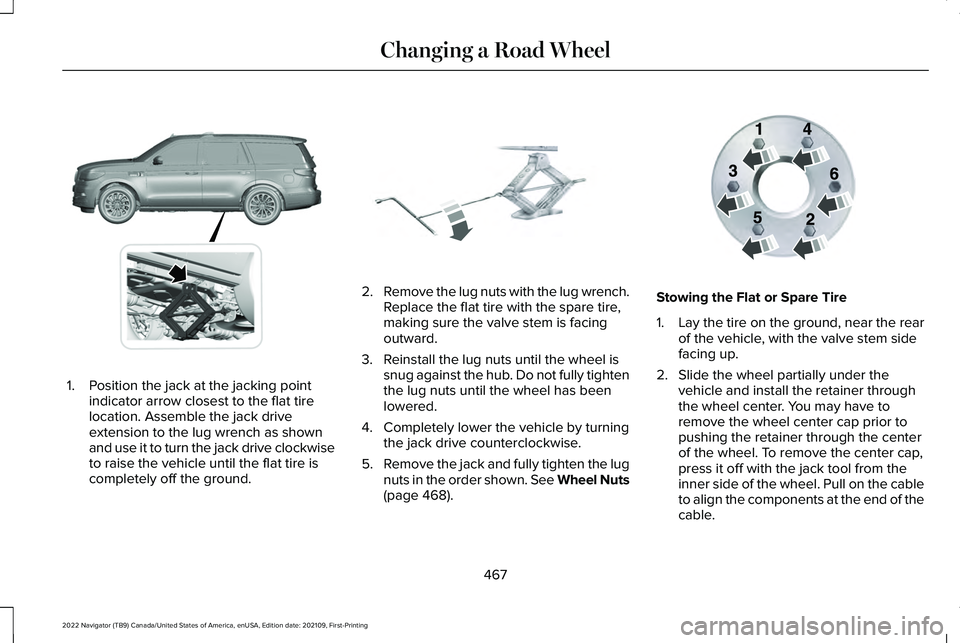
1. Position the jack at the jacking point
indicator arrow closest to the flat tire
location. Assemble the jack drive
extension to the lug wrench as shown
and use it to turn the jack drive clockwise
to raise the vehicle until the flat tire is
completely off the ground. 2.
Remove the lug nuts with the lug wrench.
Replace the flat tire with the spare tire,
making sure the valve stem is facing
outward.
3. Reinstall the lug nuts until the wheel is snug against the hub. Do not fully tighten
the lug nuts until the wheel has been
lowered.
4. Completely lower the vehicle by turning the jack drive counterclockwise.
5. Remove the jack and fully tighten the lug
nuts in the order shown. See Wheel Nuts
(page 468). Stowing the Flat or Spare Tire
1.
Lay the tire on the ground, near the rear
of the vehicle, with the valve stem side
facing up.
2. Slide the wheel partially under the vehicle and install the retainer through
the wheel center. You may have to
remove the wheel center cap prior to
pushing the retainer through the center
of the wheel. To remove the center cap,
press it off with the jack tool from the
inner side of the wheel. Pull on the cable
to align the components at the end of the
cable.
467
2022 Navigator (TB9) Canada/United States of America, enUSA, Edition date: 202109, First-Printing Changing a Road WheelE360357 E325278 E166719