Page 471 of 646

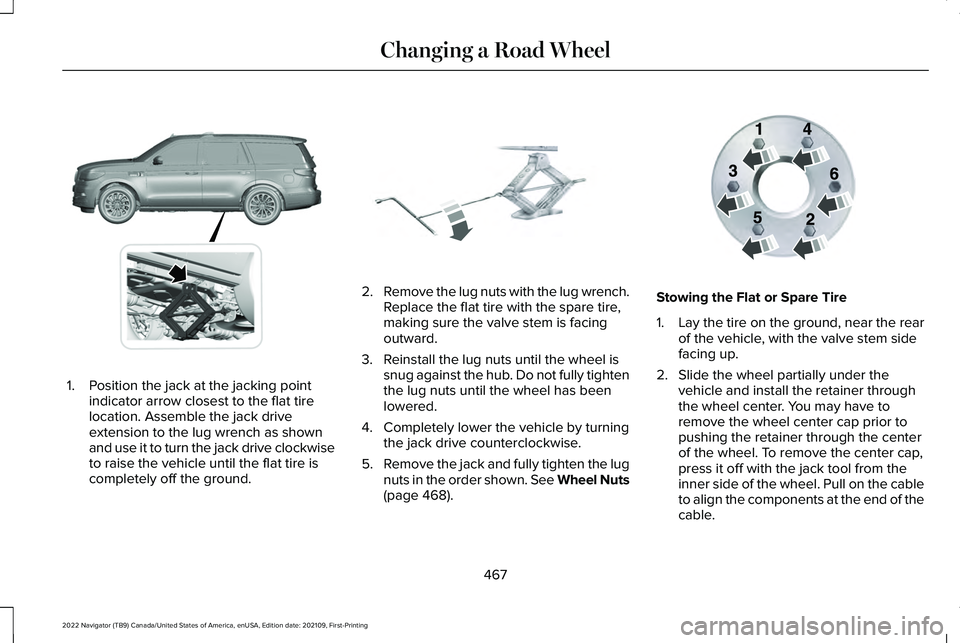
1. Position the jack at the jacking point
indicator arrow closest to the flat tire
location. Assemble the jack drive
extension to the lug wrench as shown
and use it to turn the jack drive clockwise
to raise the vehicle until the flat tire is
completely off the ground. 2.
Remove the lug nuts with the lug wrench.
Replace the flat tire with the spare tire,
making sure the valve stem is facing
outward.
3. Reinstall the lug nuts until the wheel is snug against the hub. Do not fully tighten
the lug nuts until the wheel has been
lowered.
4. Completely lower the vehicle by turning the jack drive counterclockwise.
5. Remove the jack and fully tighten the lug
nuts in the order shown. See Wheel Nuts
(page 468). Stowing the Flat or Spare Tire
1.
Lay the tire on the ground, near the rear
of the vehicle, with the valve stem side
facing up.
2. Slide the wheel partially under the vehicle and install the retainer through
the wheel center. You may have to
remove the wheel center cap prior to
pushing the retainer through the center
of the wheel. To remove the center cap,
press it off with the jack tool from the
inner side of the wheel. Pull on the cable
to align the components at the end of the
cable.
467
2022 Navigator (TB9) Canada/United States of America, enUSA, Edition date: 202109, First-Printing Changing a Road WheelE360357 E325278 E166719
Page 472 of 646

3.
Using the swivel wrench, insert it through
the access hole behind the third row seat
and engage the winch.
4. Turn the swivel wrench clockwise until the tire is raised to its stowed position
underneath the vehicle. The wrench
becomes harder to turn and the spare
tire winch ratchets or slips when the tire
is raised to maximum tightness. A clicking
sound can be heard from the winch
indicating that the tire is properly stowed.
5. Carefully place all tools back into the tool
kit bag.
6. Reinstall the tool kit bag on the jack and
tighten the straps.
7. Reinstall the jack properly on the bracket
and secure with the wing nut.
8. Close the access hole with the rubber plug.
9. If the vehicle has an access panel, reinstall.
10. Unblock the wheel. WHEEL NUTS WARNING: When you install a wheel,
always remove any corrosion, dirt or
foreign materials present on the mounting
surfaces of the wheel or the surface of the
wheel hub, brake drum or brake disc that
contacts the wheel. Make sure to secure
any fasteners that attach the rotor to the
hub so they do not interfere with the
mounting surfaces of the wheel. Installing
wheels without correct metal-to-metal
contact at the wheel mounting surfaces
can cause the wheel nuts to loosen and
the wheel to come off while your vehicle
is in motion, resulting in loss of vehicle
control, personal injury or death. lb.ft (Nm)
1
Bolt Size
150 lb.ft (204 Nm)
M14 x 1.5
1 Torque specifications are for nut and bolt
threads free of dirt and rust. Use only our
recommended replacement wheel nuts and
or wheel bolts. Retighten the wheel nuts to the specified
torque within 100 mi (160 km) after any wheel
disturbance, such as tire rotation, changing
a flat tire or wheel removal.
Hub pilot bore.
A
Inspect the wheel pilot hole and mounting
surface prior to installation. Remove any
visible corrosion or loose particles.
468
2022 Navigator (TB9) Canada/United States of America, enUSA, Edition date: 202109, First-Printing Changing a Road WheelE145950
Page 534 of 646
Check Every Month
The tires including the spare for wear and proper pressure. The windshield washer fluid level.
The fuel and water separator. Drain if necessary or if indicated by the information display. 1
The holes and slots in the tail pipe to make sure they are functional and clear of debris. 1
1 Diesel vehicles only. Check Every Six Months
The battery connections. Clean if necessary.
The body and door drain holes for obstructions. Clean if necessary. The cooling system fluid level and the coolant system strength. The door weatherstrips for wear. Lubricate if necessary.
The hinges, latches and outside locks for proper operation. Lubricate if necessary. The parking brake for proper operation.
530
2022 Navigator (TB9) Canada/United States of America, enUSA, Edition date: 202109, First-Printing Scheduled Maintenance
Page 536 of 646

Multi-Point Inspection
Steering and linkage
Exterior lamps operation
Tires including the spare for wear and proper pressure 2
Fluid levels 1
; fill if necessary
Windshield for cracks, chips or pits
For oil and fluid leaks
Washer spray and wiper operation
Half-shaft dust boots
1 Brake, coolant recovery reservoir, automatic transmission and window washer.
2 If your vehicle has a temporary mobility kit, check the tire sealant exp\
iration Use By date on the canister. Replace as needed.
Be sure to ask your dealership service
advisor or technician about the multi-point
vehicle inspection. It is a comprehensive way
to perform a thorough inspection of your
vehicle. Your checklist gives you immediate
feedback on the overall condition of your
vehicle. NORMAL SCHEDULED
MAINTENANCE
Oil Change Reminder
Your vehicle comes with an oil change
reminder that determines when you should
change the engine oil based on how you use
your vehicle.Your vehicle lets you know when an oil
change is due by displaying a message in
the information display.
The following table provides examples of
vehicle use and its impact on oil change
intervals. It is a guideline only. Actual oil
change intervals depend on several factors
and generally decrease with severity of use.
532
2022 Navigator (TB9) Canada/United States of America, enUSA, Edition date: 202109, First-Printing Scheduled Maintenance