2022 LINCOLN CORSAIR warning
[x] Cancel search: warningPage 409 of 676

Note:
If the brake fluid level is below the MIN
mark or above the MAX mark, have your
vehicle checked as soon as possible.
Note: To avoid fluid contamination, the
reservoir cap must remain in place and fully
tight, unless you are adding fluid.
Only use fluid that meets our specifications.
See
Capacities and Specifications (page
461).
Brake Fluid Service Interval
Brake fluid absorbs water over time which
degrades the effectiveness of the brake fluid.
Change the brake fluid at the specified
intervals to prevent degraded braking
performance.
For detailed interval information, see
Scheduled Maintenance in your Owner's
Manual or your local maintenance guide.
POWER STEERING FLUID CHECK
Your vehicle is equipped with an electric
power steering (EPS) system. There is no
fluid reservoir to check or fill. CHANGING THE 12V BATTERY WARNING:
Batteries normally
produce explosive gases which can cause
personal injury. Therefore, do not allow
flames, sparks or lighted substances to
come near the battery. When working near
the battery, always shield your face and
protect your eyes. Always provide correct
ventilation. WARNING:
When lifting a
plastic-cased battery, excessive pressure
on the end walls could cause acid to flow
through the vent caps, resulting in personal
injury and damage to the vehicle or battery.
Lift the battery with a battery carrier or with
your hands on opposite corners. WARNING:
Keep batteries out of
reach of children. Batteries contain sulfuric
acid. Avoid contact with skin, eyes or
clothing. Shield your eyes when working
near the battery to protect against possible
splashing of acid solution. In case of acid
contact with skin or eyes, flush immediately
with water for a minimum of 15 minutes and
get prompt medical attention. If acid is
swallowed, call a physician immediately. WARNING:
Battery posts, terminals
and related accessories contain lead and
lead compounds, chemicals known to the
State of California to cause cancer and
reproductive harm. Wash your hands after
handling
.
406
2022 Corsair (CTF) Canada/United States of America, enUSA, Edition date: 202106, First-Printing Maintenance
Page 410 of 676

WARNING: This vehicle may have
more than one battery. Removing the
battery cables from only one battery does
not disconnect your vehicle electrical
system. Make sure you disconnect the
battery cables from all batteries when
disconnecting power. Failure to do so may
cause serious personal injury or property
damage. WARNING:
For vehicles with
Auto-Start-Stop the battery requirement is
different. You must replace the battery with
one of exactly the same specification.
The battery is in the engine compartment.
See
Under Hood Overview (page 393).
Your vehicle has a maintenance-free battery.
It does not require additional water during
service.
If the vehicle battery has a cover and vent
hose, make sure you correctly install it after
cleaning or replacing the battery. For longer, trouble-free operation, keep the
top of the battery clean and dry and the
battery cables tightly fastened to the battery
terminals. If any corrosion is present on the
battery or terminals, remove the cables from
the terminals and clean with a wire brush.
You can neutralize the acid with a solution
of baking soda and water.
We recommend that you disconnect the
negative battery cable terminal from the
battery if you plan to store your vehicle for
an extended period.
Note:
If you only disconnect the negative
battery cable terminal, make sure it is
isolated or placed away from the battery
terminal to avoid unintended connection or
arcing.
If you replace the battery make sure it
matches the electrical requirements of your
vehicle. If you disconnect or replace the battery and
your vehicle has an automatic transmission,
it must relearn its adaptive strategy. Because
of this, the transmission may shift firmly when
first driven. This is normal operation while
the transmission fully updates its operation
to optimum shift feel.
Battery Sensor Reset
When you install a new battery, reset the
battery sensor by doing the following:
1. Switch the ignition on, and leave the
engine off.
Note: Complete Steps 2 and 3 within 10
seconds.
2. Flash the high beam headlamps five times, ending with the high beams off.
3. Press and release the brake pedal three
times.
The battery warning lamp flashes three times
to confirm that the reset is successful.
407
2022 Corsair (CTF) Canada/United States of America, enUSA, Edition date: 202106, First-Printing Maintenance
Page 413 of 676

4.
On the wall or screen, observe a flat zone
of high intensity light at the top of the
right-hand portion of the beam pattern.
If the top edge of the high intensity light
zone is not at the horizontal reference
line, adjust the headlamp. 5. Locate the vertical adjuster on each
headlamp. Turn the adjuster either
clockwise or counterclockwise to aim the
headlamp.
6. Close the hood and switch off the lamps.
Horizontal Aim Adjustment
Your vehicle does not require horizontal aim
as it is non-adjustable. WASHER FLUID CHECK WARNING: If you operate your
vehicle in temperatures below 41.0°F (5°C),
use washer fluid with antifreeze protection.
Failure to use washer fluid with antifreeze
protection in cold weather could result in
impaired windshield vision and increase
the risk of injury or accident.
Note: The front and rear washer systems
are supplied from the same reservoir.
Add fluid to fill the reservoir if the level is low.
Only use a washer fluid that meets our
specifications.
See Capacities and
Specifications (page 461).
State or local regulations on volatile organic
compounds may restrict the use of methanol,
a common windshield washer antifreeze
additive. Washer fluids containing
non-methanol antifreeze agents should be
used only if they provide cold weather
protection without damaging the vehicle ’s
paint finish, wiper blades or washer system. FUEL FILTER
Your vehicle is equipped with a lifetime fuel
filter that is integrated with the fuel tank.
Regular maintenance or replacement is not
needed.
CHECKING THE WIPER BLADES
Run the tip of your fingers over the edge of
the blade to check for roughness.
Clean the wiper blades with washer fluid or
water applied with a soft sponge or cloth.
410
2022 Corsair (CTF) Canada/United States of America, enUSA, Edition date: 202106, First-Printing MaintenanceE171165 E142463
Page 420 of 676

Note:
Do not use razor blades or other
sharp objects to clean or remove decals from
the inside of the heated rear window. The
vehicle warranty does not cover damage
caused to the heated rear window grid lines.
CLEANING THE INTERIOR WARNING: Do not use cleaning
solvents, bleach or dye on the vehicle's
seatbelts, as these actions may weaken
the belt webbing. WARNING:
On vehicles equipped
with seat-mounted airbags, do not use
chemical solvents or strong detergents.
Such products could contaminate the side
airbag system and affect performance of
the side airbag in a crash.
Note: Follow the same procedure for
cleaning leather seats when cleaning leather
interior.
See Cleaning Leather Seats (page
418). Note:
Do not use household cleaning
products or glass cleaners, which can stain
and discolor the fabric and affect the flame
retardant abilities of the seat materials.
For fabric, carpets, cloth seats, safety belts
and seats equipped with side airbags:
• Remove dust and loose dirt with a
vacuum cleaner.
• Remove light stains and soil with
Motorcraft® Professional Strength Carpet
& Upholstery Cleaner.
For grease or tar stains:
• Spot clean the area with Motorcraft® Spot
and Stain Remover. In Canada, use
Motorcraft® Multi-Purpose Cleaner.
• If a ring forms on the fabric after spot
cleaning, clean the entire area
immediately, but do not oversaturate or
the ring will set. CLEANING THE INSTRUMENT
PANEL AND INSTRUMENT
CLUSTER LENS WARNING:
Do not use chemical
solvents or strong detergents when
cleaning the steering wheel or instrument
panel to avoid contamination of the airbag
system.
Note: Follow the same procedure as
cleaning leather seats for cleaning leather
instrument panels and leather interior trim
surfaces. See Cleaning Leather Seats
(page
418).
Clean the instrument panel and cluster lens
with a clean, damp and soft cloth, then use
a clean, dry and soft cloth to dry these areas.
417
2022 Corsair (CTF) Canada/United States of America, enUSA, Edition date: 202106, First-Printing Vehicle Care
Page 425 of 676

GENERAL INFORMATION
The recommended tire inflation pressures
are found on the Tire Label which is located
on the B-pillar or the edge of the driver door.
This information can also be found on the
Safety Compliance Certification Label, affixed
to either the door hinge pillar, door-latch
post, or the door edge that meets the
door-latch post; next to the driver’
s seating
position.
We strongly recommend maintaining these
tire pressures at all times. Failure to follow
the tire pressure recommendations can
cause uneven treadwear patterns, reduced
fuel economy, and adversely affect the way
your vehicle handles.
Note: Check and set the tire pressure at the
ambient temperature in which you are
intending to drive your vehicle and when the
tires are cold.
Note: Check your tire pressures at least once
per month.
If your vehicle has a spare tire, set the
pressure to the highest value given for your
vehicle and tire size combination. Use only approved wheels and tire sizes,
using other sizes could damage your vehicle.
If you change the diameter of the factory
installed tires, the speedometer may not
display the correct speed. Take your vehicle
to an authorized dealer and have the engine
management system reprogrammed.
If you intend to change the size of the factory
installed tires, check the suitability with an
authorized dealer.
Additional information related to the
functionality and maintenance of your tires
can be found in the Wheels and Tire section.
See Tire Care (page 431).
Notice to utility vehicle and truck
owners WARNING:
Vehicles with a higher
center of gravity (utility and four-wheel
drive vehicles) handle differently than
vehicles with a lower center of gravity
(passenger cars). Avoid sharp turns,
excessive speed and abrupt steering in
these vehicles. Failure to drive cautiously
increases the risk of losing control of your
vehicle, vehicle rollover, personal injury
and death. WARNING:
In a rollover crash, an
unbelted person is significantly more likely
to die than a person wearing a seatbelt.
Utility vehicles and trucks handle differently
than passenger cars in the various driving
conditions that are encountered on streets,
highways and off-road. Utility vehicles and
trucks are not designed for cornering at
speeds as high as passenger cars any more
than low-slung sports cars are designed to
perform satisfactorily under off-road
conditions.
422
2022 Corsair (CTF) Canada/United States of America, enUSA, Edition date: 202106, First-Printing Wheels and Tires
Page 426 of 676

Study your owner's manual and any
supplements for specific information about
equipment features, instructions for safe
driving and additional precautions to reduce
the risk of an accident or serious injury.
All-wheel drive system (if equipped)
WARNING: Do not become
overconfident in the ability of four-wheel
drive vehicles. Although a four-wheel drive
vehicle may accelerate better than a
two-wheel drive vehicle in low traction
situations, it won't stop any faster than
two-wheel drive vehicles. Always drive at
a safe speed.
A vehicle equipped with all-wheel drive has
the ability to use all four wheels to power
itself. This increases traction which may
enable you to safely drive over terrain and
road conditions that a conventional
two-wheel drive vehicle cannot. For all-wheel-drive vehicles, a spare tire of
a different size other than the tire provided
should never be used. A dissimilar spare tire
size; other than the spare tire provided or
major dissimilar tire sized between the front
and rear axles could cause the
all-wheel-drive system to stop functioning
and default to front-wheel drive.
How your vehicle differs from other
vehicles
Sport utility vehicles and trucks can differ
from some other vehicles in a few noticeable
ways. Your vehicle may be:
•
Higher - to allow higher load carrying
capacity and to allow it to travel over
rough terrain without getting hung up or
damaging underbody components.
• Shorter - to give it the capability to
approach inclines and drive over the
crest of a hill without getting hung up or
damaging underbody components. All
other things held equal, a shorter
wheelbase may make your vehicle
quicker to respond to steering inputs
than a vehicle with a longer wheelbase.
• Narrower - to provide greater
maneuverability in tight spaces,
particularly in off-road use.
As a result of the above dimensional
differences, Sport utility vehicles and trucks
often have a higher center of gravity and a
greater difference in center of gravity
between the loaded and unloaded condition.
These differences that make your vehicle so
versatile also make it handle differently than
an ordinary passenger car.
423
2022 Corsair (CTF) Canada/United States of America, enUSA, Edition date: 202106, First-Printing Wheels and Tires
Page 427 of 676

TIRE SEALANT AND INFLATOR KIT
(IF EQUIPPED)
Note:
The temporary mobility kit contains
enough sealant compound in the canister
for one tire repair only. See your authorized
Ford dealer for replacement sealant
canisters.
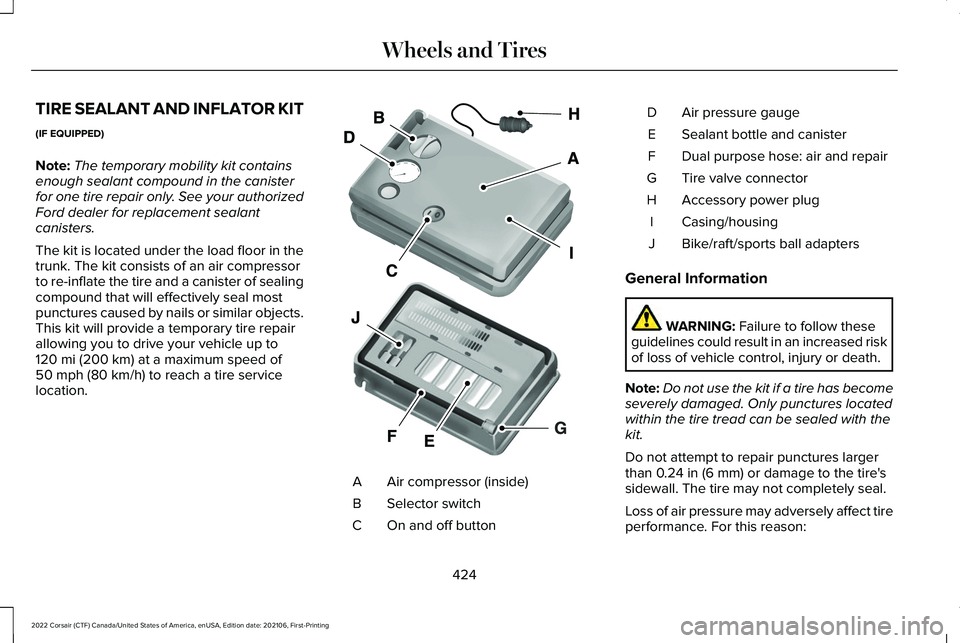
The kit is located under the load floor in the
trunk. The kit consists of an air compressor
to re-inflate the tire and a canister of sealing
compound that will effectively seal most
punctures caused by nails or similar objects.
This kit will provide a temporary tire repair
allowing you to drive your vehicle up to
120 mi (200 km) at a maximum speed of
50 mph (80 km/h) to reach a tire service
location. Air compressor (inside)
A
Selector switch
B
On and off button
C Air pressure gauge
D
Sealant bottle and canister
E
Dual purpose hose: air and repair
F
Tire valve connector
G
Accessory power plug
H
Casing/housing
I
Bike/raft/sports ball adapters
J
General Information WARNING:
Failure to follow these
guidelines could result in an increased risk
of loss of vehicle control, injury or death.
Note: Do not use the kit if a tire has become
severely damaged. Only punctures located
within the tire tread can be sealed with the
kit.
Do not attempt to repair punctures larger
than
0.24 in (6 mm) or damage to the tire's
sidewall. The tire may not completely seal.
Loss of air pressure may adversely affect tire
performance. For this reason:
424
2022 Corsair (CTF) Canada/United States of America, enUSA, Edition date: 202106, First-Printing Wheels and TiresE175977
Page 429 of 676

What to do when a Tire Is Punctured
A tire puncture within the tire's tread area
can be repaired in two stages with the kit.
•
In the first stage, the tire will be reinflated
with a sealing compound and air. After
the tire has been inflated, you will need
to drive the vehicle a short distance 4 mi
(6 km) to distribute the sealant in the tire.
• In the second stage, you will need to
check the tire pressure and adjust, if
necessary, to the vehicle's specified tire
inflation pressure.
First Stage: Reinflating the Tire with
Sealing Compound and Air WARNING: Do not stand directly over
the kit while inflating the tire. If you notice
any unusual bulges or deformations in the
tire's sidewall during inflation, stop and call
roadside assistance. WARNING: If the tire does not inflate
to the recommended tire pressure within
15 minutes, stop and call roadside
assistance. WARNING:
Do not run the engine
when operating the air compressor unless
the vehicle is outdoors or in a
well-ventilated area.
Preparation: Park the vehicle in a safe, level
and secure area, away from moving traffic.
Turn the hazard lights on. Apply the parking
brake and turn the engine off. Inspect the
flat tire for visible damage.
Sealant compound contains latex. Use
appropriate precautions to avoid any allergic
reactions.
Do not remove any foreign object that has
pierced the tire. If a puncture is located in
the tire sidewall, stop and call roadside
assistance.
1. Remove the valve cap from the tire valve. 2. Unwrap the dual purpose hose (black
tube) from the back of the compressor
housing.
3. Fasten the hose to the tire valve by turning the connector clockwise. Tighten
the connection securely.
426
2022 Corsair (CTF) Canada/United States of America, enUSA, Edition date: 202106, First-Printing Wheels and Tires