2022 LEXUS RX350 child seat
[x] Cancel search: child seatPage 59 of 508
571-2. Child safety
1
For safety and security
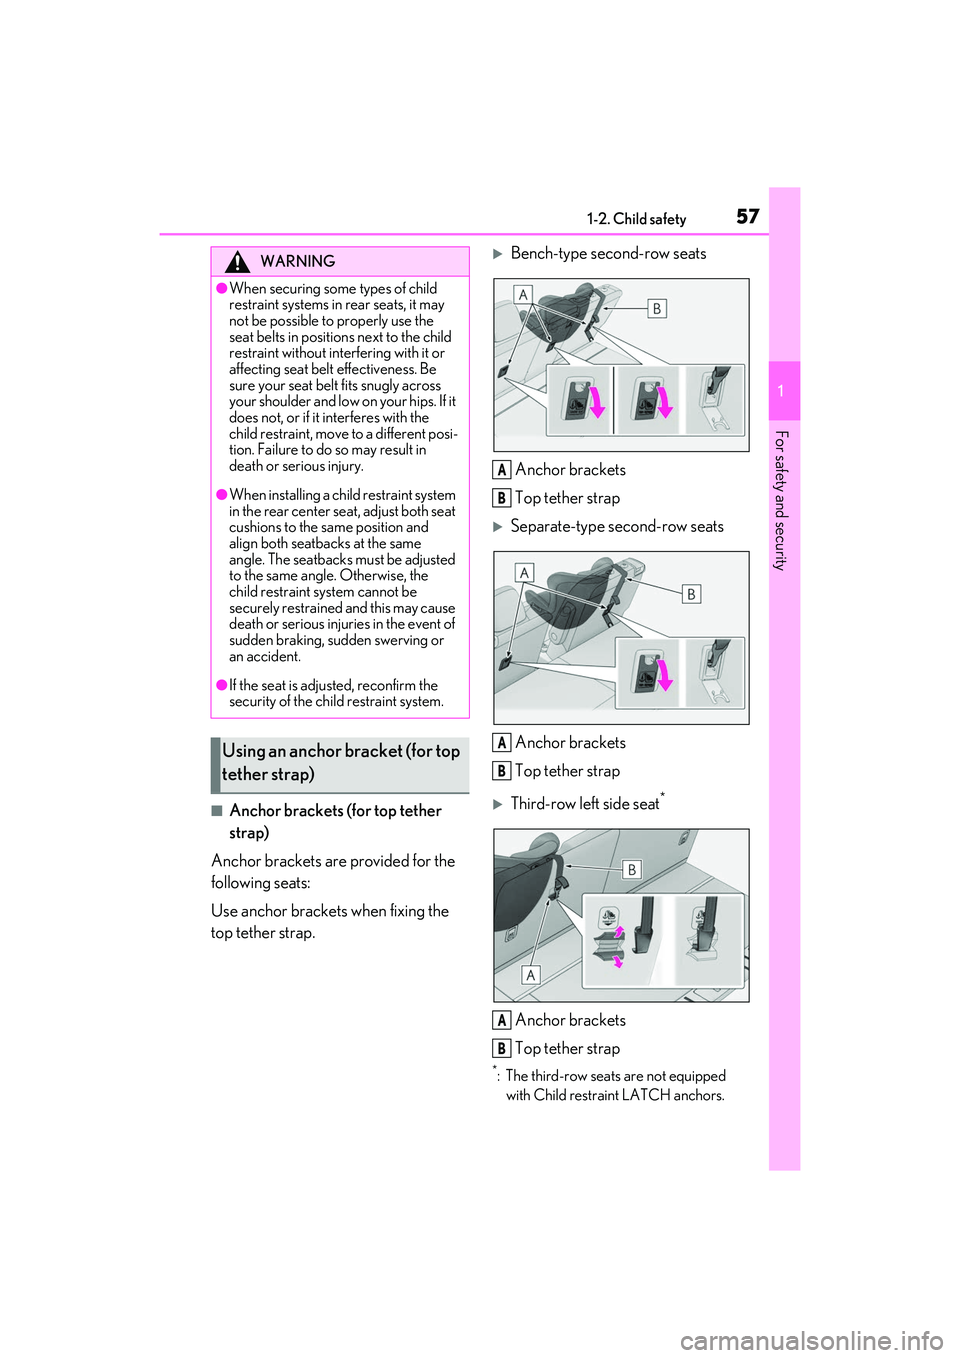
■Anchor brackets (for top tether
strap)
Anchor brackets are provided for the
following seats:
Use anchor brackets when fixing the
top tether strap.
Bench-type second-row seats
Anchor brackets
Top tether strap
Separate-type second-row seats
Anchor brackets
Top tether strap
Third-row left side seat*
Anchor brackets
Top tether strap
*: The third-row seats are not equipped with Child restraint LATCH anchors.
WARNING
●When securing some types of child
restraint systems in rear seats, it may
not be possible to properly use the
seat belts in position s next to the child
restraint without inte rfering with it or
affecting seat belt effectiveness. Be
sure your seat belt fits snugly across
your shoulder and low on your hips. If it
does not, or if it interferes with the
child restraint, move to a different posi-
tion. Failure to do so may result in
death or serious injury.
●When installing a child restraint system
in the rear center seat, adjust both seat
cushions to the same position and
align both seatbacks at the same
angle. The seatbacks must be adjusted
to the same angle. Otherwise, the
child restraint system cannot be
securely restrained and this may cause
death or serious injuries in the event of
sudden braking, sudden swerving or
an accident.
●If the seat is adju sted, reconfirm the
security of the child restraint system.
Using an anchor bracket (for top
tether strap)
A
B
A
B
A
B
Page 60 of 508
581-2. Child safety
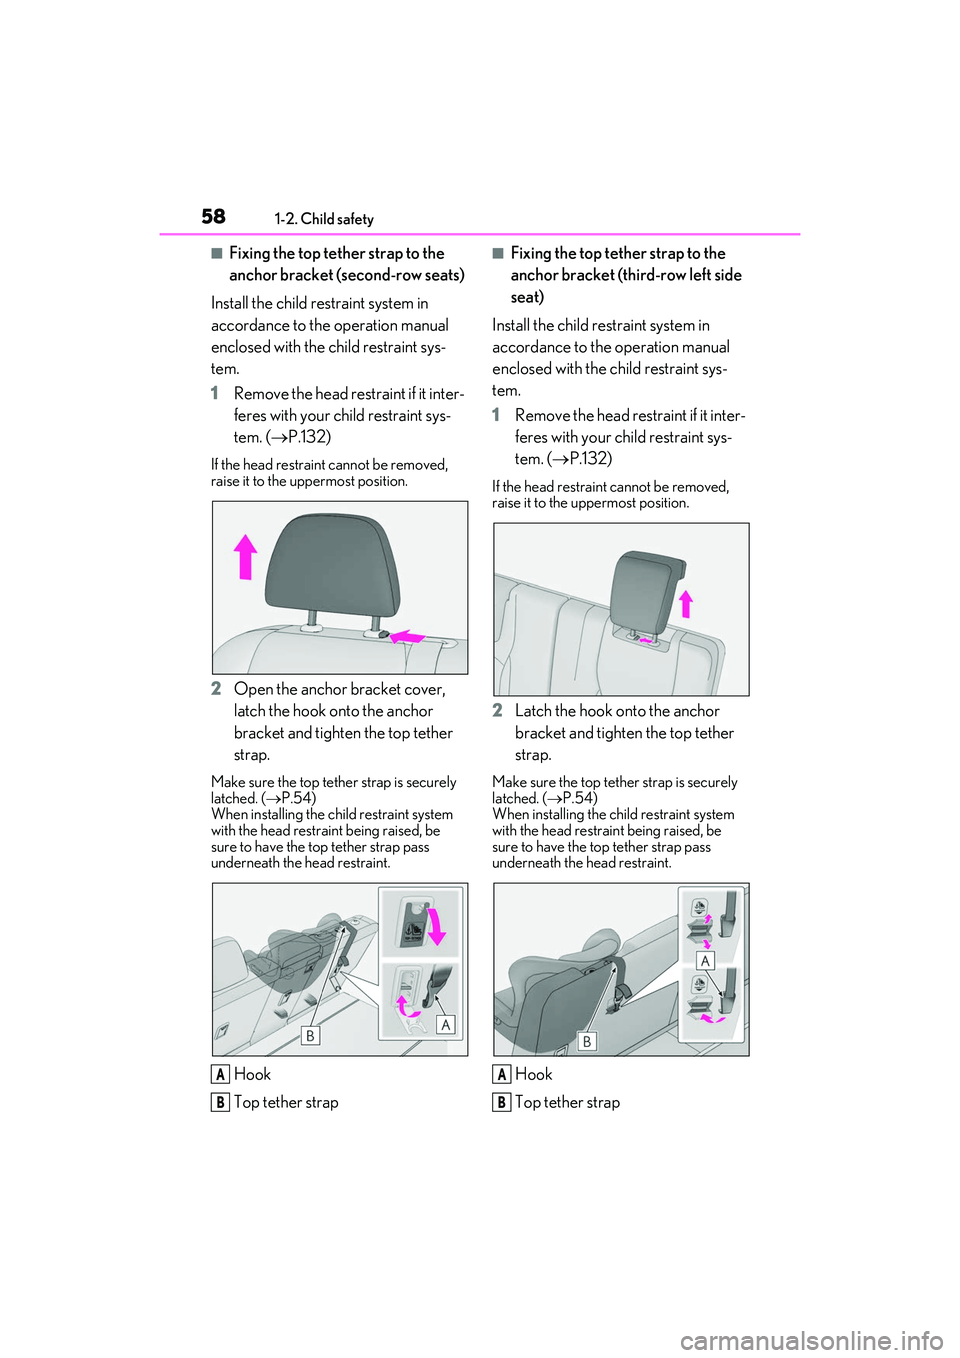
■Fixing the top tether strap to the
anchor bracket (second-row seats)
Install the child restraint system in
accordance to the operation manual
enclosed with the child restraint sys-
tem.
1 Remove the head restraint if it inter-
feres with your child restraint sys-
tem. ( P.132)
If the head restrain t cannot be removed,
raise it to the uppermost position.
2 Open the anchor bracket cover,
latch the hook onto the anchor
bracket and tighten the top tether
strap.
Make sure the top tether strap is securely
latched. ( P.54)
When installing the child restraint system
with the head restraint being raised, be
sure to have the top tether strap pass
underneath the head restraint.
Hook
Top tether strap
■Fixing the top tether strap to the
anchor bracket (third-row left side
seat)
Install the child restraint system in
accordance to the operation manual
enclosed with the child restraint sys-
tem.
1 Remove the head restraint if it inter-
feres with your child restraint sys-
tem. ( P.132)
If the head restraint cannot be removed,
raise it to the uppermost position.
2 Latch the hook onto the anchor
bracket and tighten the top tether
strap.
Make sure the top tether strap is securely
latched. ( P.54)
When installing the child restraint system
with the head restraint being raised, be
sure to have the top tether strap pass
underneath the head restraint.
Hook
Top tether strapA
B
A
B
Page 61 of 508
591-2. Child safety
1
For safety and security
■Laws and regulations pertaining to
anchors
The LATCH system conforms to
FMVSS225 or CMVSS210.2.
Child restraint systems conforming to
FMVSS213 or CMVSS213 specifications
can be used.
This vehicle is designed to conform to SAE
J1819.
WARNING
■When installing a child restraint sys-
tem
Observe the following precautions.
Failure to do so may result in death or
serious injury.
●Firmly attach the top tether strap and
make sure that the belt is not twisted.
●Do not attach the top strap to anything
other than the anchor bracket of the
seat the child restraint system is
installed to.
●Follow all installation instructions pro-
vided by the child restraint system
manufacturer.
●When installing the child restraint sys-
tem with the head restraint being
raised, after the head restraint has
been raised and then the anchor
bracket has been fixed, do not lower
the head restraint.
●When installing a child restraint system
in the rear center seat, adjust both seat
cushions to the same position and
align both seatbacks at the same
angle. The seatbacks must be adjusted
to the same angle. Otherwise, the
child restraint system cannot be
securely restrained and this may cause
death or serious injuries in the event of
sudden braking, sudden swerving or
an accident.
●If the seat is adju sted, reconfirm the
security of the child restraint system.
NOTICE
■Anchor brackets (for top tether
strap)
When not in use, make certain to close
the lid. If it remains open, the lid may be
damaged.
Page 101 of 508

993-2. Opening, closing and locking the doors
3
Before driving
mechanical key. (P.421)
■Customization
Some functions can be customized.
( P.449)
■Door lock switches (to
lock/unlock)
1 Locks all the doors
2 Unlocks all the doors
■Inside lock buttons (to lock)
Push down the inside lock button to
lock the door.
■Inside door handles (to unlock)
For the front doors
Pull the handle to unlock and open the
door.
When the door is unlocked, the inside lock
button will pop up.
For the rear doors
Pull the handle to unlock the door. Pull
the handle a second time to open the
door.
WARNING
■To prevent an accident
Observe the following precautions while
driving the vehicle.
Failure to do so may result in a door
opening and an occupant falling out,
resulting in death or serious injury.
●Ensure that all doors are properly
closed and locked.
●Do not pull the inside handle of the
doors while driving.
Be especially careful for the front doors,
as the doors may be opened even if the
inside lock buttons are in locked position.
●Set the rear door ch ild-protector locks
when children are seated in the rear
seats.
■When opening or closing a door
Check the surroundings of the vehicle
such as whether the vehicle is on an
incline, whether there is enough space
for a door to open and whether a strong
wind is blowing. When opening or clos-
ing the door, hold the door handle tightly
to prepare for any unpredictable move-
ment.
Unlocking and locking the doors
from the inside
Page 120 of 508
1183-3. Adjusting the seats
Rear seats
WARNING
■When a rear seatback is folded
Observe the following precautions.
Failure to do so may result in death or
serious injury.
●Do not fold down the rear seatbacks
while driving.
●Stop the vehicle on level ground, apply
the parking brake and shift the shift
lever to P.
●Do not allow anyone to sit on a folded
rear seatback or in the luggage com-
partment while driving.
●Do not allow children to enter the lug-
gage compartment.
■When operating the rear seatback
Observe the following precautions.
Failure to do so may result in death or
serious injury.
●Make sure that passengers are clear of
the rear seatback before operating it.
●To prevent hands and other body parts
from being caught, keep them away
from the gaps in the seats and the mov-
ing parts of the seat s when operating a
rear seatback.
●Power seat: Do not let children oper-
ate the rear seatback. Other passen-
gers may get caught in the seat.
●Power seat: Make su re that all passen-
gers are clear of a seat before folding
it. Do not let passeng ers sit in the seat
while it is being folded.
■Seat adjustment
Second-row seats: To reduce the risk of
sliding under the lap belt during a colli-
sion, do not recline the seat more than
necessary.
If the seat is reclin ed excessively, the lap
belt may slide past the hips and apply
restraint forces direct ly to the abdomen,
or your neck may contact the shoulder
belt, increasing the risk of death or seri-
ous injury in the event of an accident.
■After adjusting the rear seats
Observe the following precautions.
Failure to do so may result in death or
serious injury.
●Make sure that the rear seatback is
securely locked in position by lightly
pushing it back and forth.
●Check that the seat belts are not
twisted or caught between or behind
in the rear seatback.
●Arrange the seat belts in the proper
positions for ready use.
■Jam protection function (power seat)
Observe the following precautions.
Failure to do so may result in death or
serious injury.
●Never use any part of your body to
intentionally activate the jam protec-
tion function.
●The jam protection function may not
operate if somethin g is caught just
before the fully folded position. Be
careful so that finger s, etc. do not get
caught.
●The jam protection function may not
operate depending on the shape or
position of the obstruction. Be careful
so that fingers, etc. do not get caught.
Page 212 of 508
2104-5. Using the driving support systems
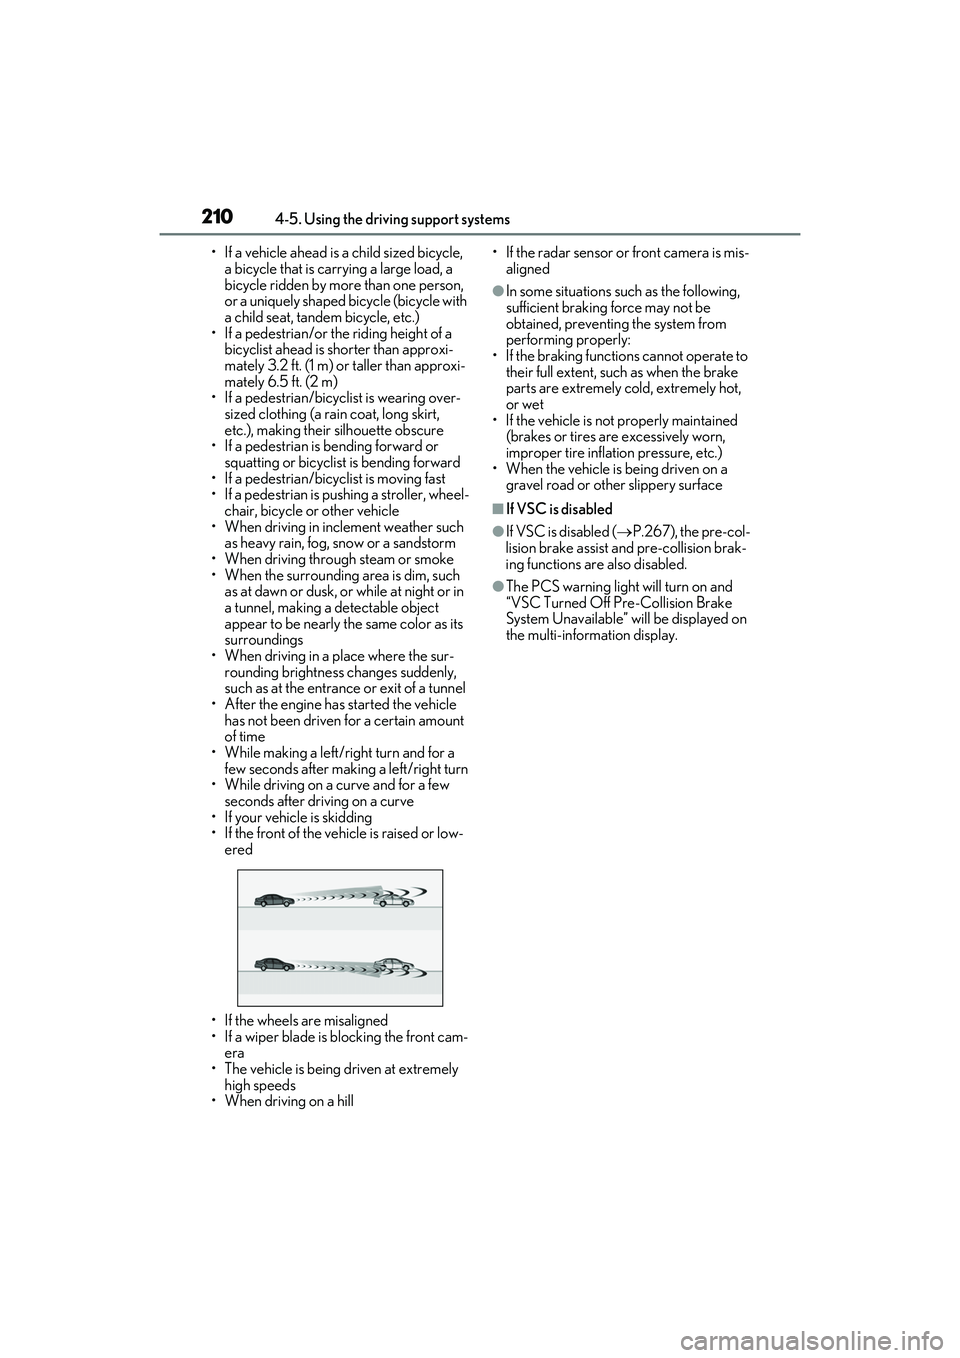
• If a vehicle ahead is a child sized bicycle, a bicycle that is carrying a large load, a
bicycle ridden by more than one person,
or a uniquely shaped bicycle (bicycle with
a child seat, tandem bicycle, etc.)
• If a pedestrian/or the riding height of a
bicyclist ahead is shorter than approxi-
mately 3.2 ft. (1 m) or taller than approxi-
mately 6.5 ft. (2 m)
• If a pedestrian/bicyclist is wearing over- sized clothing (a rain coat, long skirt,
etc.), making their silhouette obscure
• If a pedestrian is bending forward or squatting or bicyclist is bending forward
• If a pedestrian/bicyc list is moving fast
• If a pedestrian is pushing a stroller, wheel- chair, bicycle or other vehicle
• When driving in inclement weather such
as heavy rain, fog, snow or a sandstorm
• When driving through steam or smoke
• When the surrounding area is dim, such as at dawn or dusk, or while at night or in
a tunnel, making a detectable object
appear to be nearly the same color as its
surroundings
• When driving in a place where the sur- rounding brightness changes suddenly,
such as at the entrance or exit of a tunnel
• After the engine has started the vehicle has not been driven for a certain amount
of time
• While making a left/right turn and for a few seconds after making a left/right turn
• While driving on a curve and for a few seconds after driving on a curve
• If your vehicle is skidding
• If the front of the vehicle is raised or low-
ered
• If the wheels are misaligned
• If a wiper blade is blocking the front cam- era
• The vehicle is being driven at extremely
high speeds
• When driving on a hill • If the radar sensor or front camera is mis-
aligned
●In some situations su ch as the following,
sufficient braking force may not be
obtained, preventing the system from
performing properly:
• If the braking functions cannot operate to their full extent, such as when the brake
parts are extremely cold, extremely hot,
or wet
• If the vehicle is not properly maintained
(brakes or tires are excessively worn,
improper tire inflation pressure, etc.)
• When the vehicle is being driven on a
gravel road or other slippery surface
■If VSC is disabled
●If VSC is disabled ( P.267), the pre-col-
lision brake assist and pre-collision brak-
ing functions are also disabled.
●The PCS warning light will turn on and
“VSC Turned Off Pre-Collision Brake
System Unavailable” will be displayed on
the multi-information display.
Page 299 of 508
2975-3. Using the air conditioning system and defogger
5
Interior features
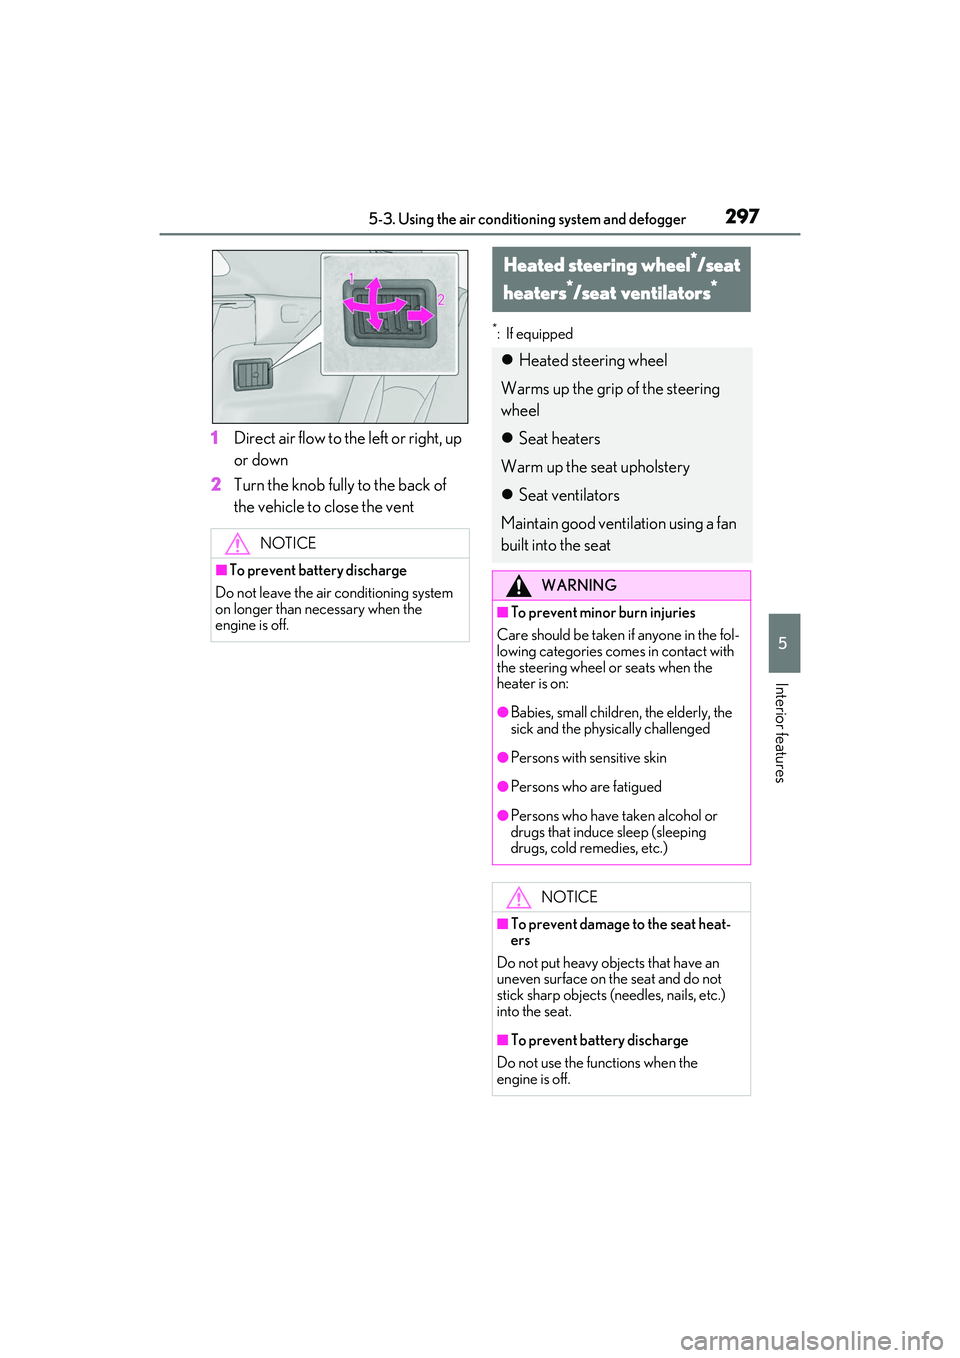
1Direct air flow to the left or right, up
or down
2 Turn the knob fully to the back of
the vehicle to close the vent
*: If equipped
NOTICE
■To prevent battery discharge
Do not leave the air conditioning system
on longer than ne cessary when the
engine is off.
Heated steering wheel*/seat
heaters
*/seat ventilators*
Heated steering wheel
Warms up the grip of the steering
wheel
Seat heaters
Warm up the seat upholstery
Seat ventilators
Maintain good ventilation using a fan
built into the seat
WARNING
■To prevent minor burn injuries
Care should be taken if anyone in the fol-
lowing categories comes in contact with
the steering wheel or seats when the
heater is on:
●Babies, small children, the elderly, the
sick and the physically challenged
●Persons with sensitive skin
●Persons who are fatigued
●Persons who have taken alcohol or
drugs that induce sleep (sleeping
drugs, cold remedies, etc.)
NOTICE
■To prevent damage to the seat heat-
ers
Do not put heavy objects that have an
uneven surface on the seat and do not
stick sharp objects (needles, nails, etc.)
into the seat.
■To prevent battery discharge
Do not use the functions when the
engine is off.
Page 483 of 508

481Alphabetical Index
Alphabetical Index
A
A/CAir conditioning filter ............................... 366
Front automatic air conditioning system......................................................................... 284
Front seat concentr ated airflow mode
(S-FLOW)................................................. 292
Rear automatic air conditioning system ......................................................................... 294
ABS (Anti-lock Brake System).............. 265 Warning light ...............................................395
ACA (Active Cornering Assist) ........... 266
Active Cornering Assist (ACA) ........... 266
Adaptive Front-lighting System (AFS) 186
Adaptive Variable Suspension System266
AFS (Adaptive Front- lighting System) 186
AHB (Automatic High Beam) .................187
Air conditioning filter ................................. 366
Air conditioning system Air conditioning filter ............................... 366
Front automatic air conditioning system......................................................................... 284
Front seat concentr ated airflow mode
(S-FLOW)................................................. 292
Rear automatic air conditioning system ......................................................................... 294
Airbags Airbag operating conditions................... 33
Airbag precautions for your child ........ 36
Correct driving posture ............................ 25
Curtain shield airbag operating condi- tions .................................................................. 33
Curtain shield airbag precautions ....... 36
Front passenger occupa nt classification
system ............................................................. 39
General airbag precautions ................... 36
Locations of airbags.................................... 30
Modification and disp osal of airbags . 38
Side airbag operating conditions ......... 33
Side airbag precautions ............................ 36 Side and curtain shie
ld airbags operating
conditions ...................................................... 33
Side and curtain shield airbags precau- tions .................................................................. 36
SRS airbags......................................................30
SRS warning light.......................................394
Alarm ....................................................................67 Warning buzzer .........................................393
Anchor brackets ..................................... 46, 57
Antennas (smart acc ess system with
push-button start)........................................ 113
Anti-lock Brake System (ABS).............. 265 Warning light .............................................. 395
Approach warning...................................... 228
Armrest............................................................ 322
Assist grips ..................................................... 322
Audio system-linked display ...................... 83
Automatic headlight leveling system ... 185
Automatic High Beam ................................187
Automatic light control system............... 184
Automatic transmission .............................. 174 M mode ............................................................ 177
Paddle shift switches ........................176, 177
Auxiliary boxes .................................... 308, 311
Average fuel economy................................. 80
Average vehicle speed ................................ 80
AWD Control....................................................81
B
Back door .......................................................... 101
Back-up light Wattage .......................................................... 437
Back-up lights Replacing light bulbs..................... 375, 381
Battery Battery checking ....................................... 355
If the battery is discharged .................... 423
Preparing and checking before winter............................................................................ 271
Warning light ...............................................394
Blind Spot Monitor (BSM)....................... 232
Bottle holders ................................................ 307