2022 LEXUS RX350 light
[x] Cancel search: lightPage 404 of 508

4027-2. Steps to take in an emergency
WARNING
TPMS (tire pressure warning system)
malfunctions may occur for a variety of
reasons, including the installation of
replacement or alternate tires or wheels
on the vehicle that prevent the TPMS
(tire pressure warning system) from func-
tioning properly. Always check the
TPMS (tire pressure warning system)
malfunction telltale after replacing one
or more tires or wheels on your vehicle to
ensure that the replacement or alternate
tires and wheels allow the TPMS (tire
pressure warning system) to continue to
function properly.
NOTICE
■To ensure the tire pressure warning
system operates properly
Do not install tires wi th different specifi-
cations or makers, as the tire pressure
warning system may not operate prop-
erly.
If a warning message is dis-
played
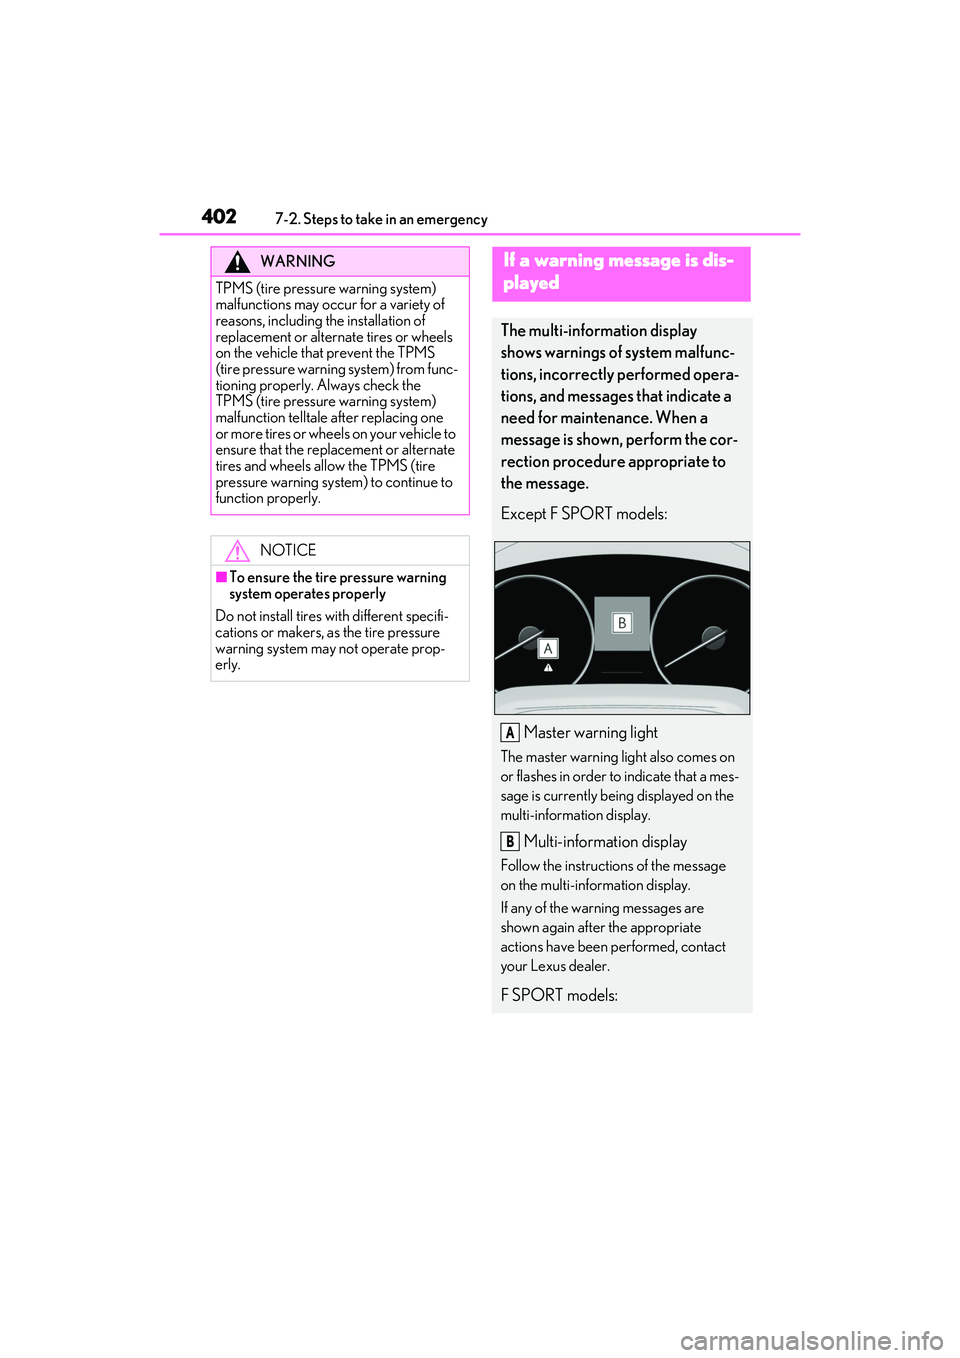
The multi-information display
shows warnings of system malfunc-
tions, incorrectly performed opera-
tions, and messages that indicate a
need for maintenance. When a
message is shown, perform the cor-
rection procedure appropriate to
the message.
Except F SPORT models:
Master warning light
The master warning light also comes on
or flashes in order to indicate that a mes-
sage is currently being displayed on the
multi-information display.
Multi-information display
Follow the instructions of the message
on the multi-information display.
If any of the warning messages are
shown again after the appropriate
actions have been performed, contact
your Lexus dealer.
F SPORT models:
A
B
Page 405 of 508

4037-2. Steps to take in an emergency
7
When trouble arises
The master warning light and warning buzzers operate as follows depending on
the content of the message. If a message indicates the need for inspection by a
dealer, have the vehicle inspected by your Lexus dealer immediately.
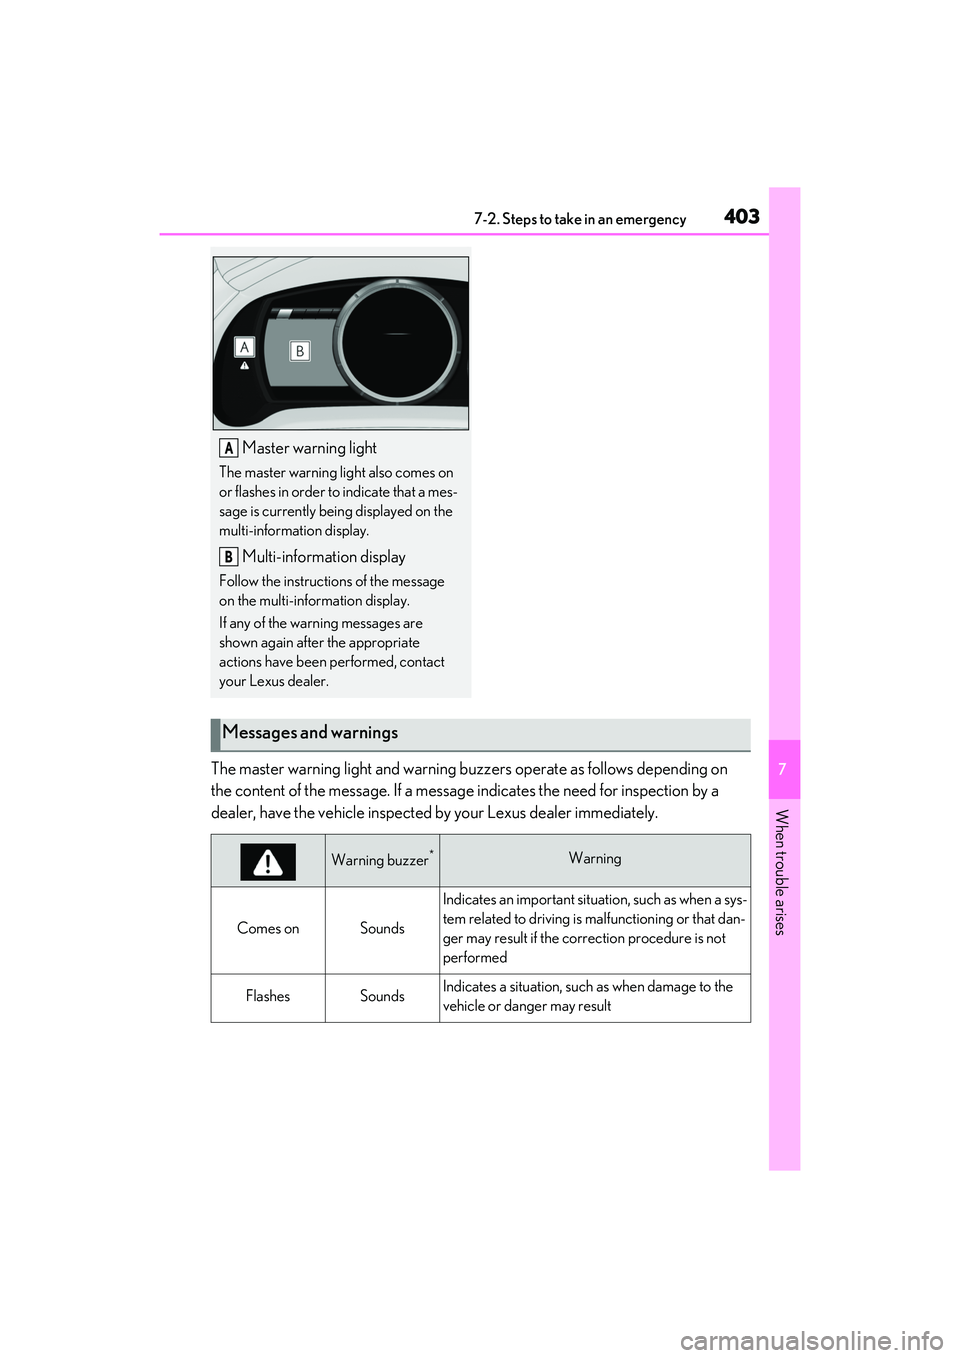
Master warning light
The master warning light also comes on
or flashes in order to indicate that a mes-
sage is currently being displayed on the
multi-information display.
Multi-information display
Follow the instructions of the message
on the multi-information display.
If any of the warning messages are
shown again after the appropriate
actions have been performed, contact
your Lexus dealer.
A
B
Messages and warnings
Warning buzzer*Warning
Comes onSounds
Indicates an important situat ion, such as when a sys-
tem related to driving is ma lfunctioning or that dan-
ger may result if the co rrection procedure is not
performed
FlashesSoundsIndicates a situation, such as when damage to the
vehicle or danger may result
Page 406 of 508

4047-2. Steps to take in an emergency
In some situations, the master warning light and warning buzzer may not oper-
ate as specified. In this case, follow the instructions displayed in the warning
message.
If a warning light comes on or flashes at the same time that a warning message is
displayed, take corrective actio n according to the warning light. ( P.393)
*: A buzzer sounds the first time a message is shown on the multi-information display.
■Warning messages
The warning messages explained below
may differ from the actual messages
according to operation conditions and vehi-
cle specifications.
■Warning buzzer
In some cases, the bu zzer may not be heard
due to being in a noisy location or audio
sound.
■If “Shift to P Before Exiting Vehicle” is
displayed
Message is displayed when the driver’s
door is opened withou t turning the engine
switch off with the shift lever in any position
other than P.
Shift the shift lever to P.
■If “Power Turned Off to Save Battery” is
displayed
This message is disp layed when the power
was cut off due to the automatic power off
function. The next time the engine is started,
increase the engine speed slightly and
maintain it at that speed for approximately
5 minutes to recharge the battery.
■If “AWD System Overheated Switching
to 2WD Mode” or “AWD System Over-
heated 2WD Mode Engaged” is dis-
played (AWD models)
This message may be displayed when driv-
ing under extremely high load conditions.
Drive the vehicle at low speeds or stop the
vehicle in a safe place with the engine run-
ning until the message is cleared.
If the message is not cleared, have the vehi-
cle inspected by your Lexus dealer.
■If “Headlight System Malfunction Visit
Your Dealer” is displayed
The following systems may be malfunction-
ing. Have the vehicle inspected by your
Lexus dealer immediately.
●The LED headlight system
●AFS (Adaptive Front-lighting System) (if
equipped)
●The automatic headlight leveling system
●Automatic High Beam
■If “Radar Cruise Control Unavailable
See Owner's Manual” is displayed
The dynamic radar cruise control with
full-speed range syst em is suspended tem-
porarily or until the problem shown in the
message is re solved. (causes and coping
methods: P.202)
Comes onDoes not sound
Indicates a condition, such as malfunction of electri-
cal components, their cond ition, or indicates the
need for maintenance
FlashesDoes not sound
Indicates a situation, such as when an operation has
been performed incorrectly, or indicates how to
perform an operation correctly
Warning buzzer*Warning
Page 413 of 508

4117-2. Steps to take in an emergency
7
When trouble arises
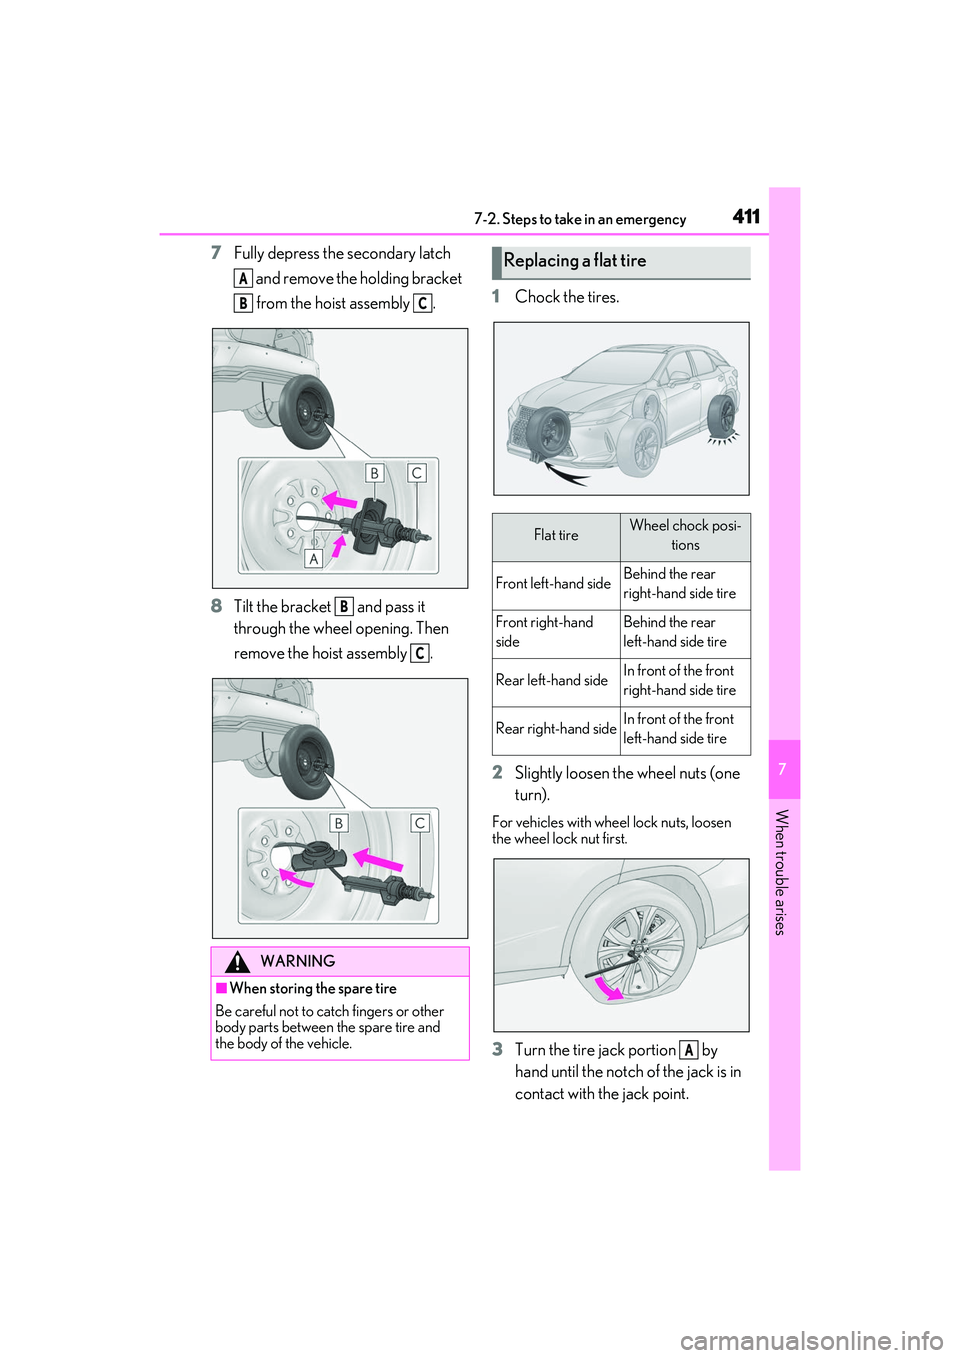
7Fully depress the secondary latch
and remove the holding bracket
from the hoist assembly .
8 Tilt the bracket and pass it
through the wheel opening. Then
remove the hoist assembly . 1
Chock the tires.
2 Slightly loosen the wheel nuts (one
turn).
For vehicles with wheel lock nuts, loosen
the wheel lock nut first.
3Turn the tire jack portion by
hand until the notch of the jack is in
contact with the jack point.
WARNING
■When storing the spare tire
Be careful not to catch fingers or other
body parts between the spare tire and
the body of the vehicle.
A
BC
B
C
Replacing a flat tire
Flat tireWheel chock posi- tions
Front left-hand sideBehind the rear
right-hand side tire
Front right-hand
sideBehind the rear
left-hand side tire
Rear left-hand sideIn front of the front
right-hand side tire
Rear right-hand sideIn front of the front
left-hand side tire
A
Page 414 of 508

4127-2. Steps to take in an emergency
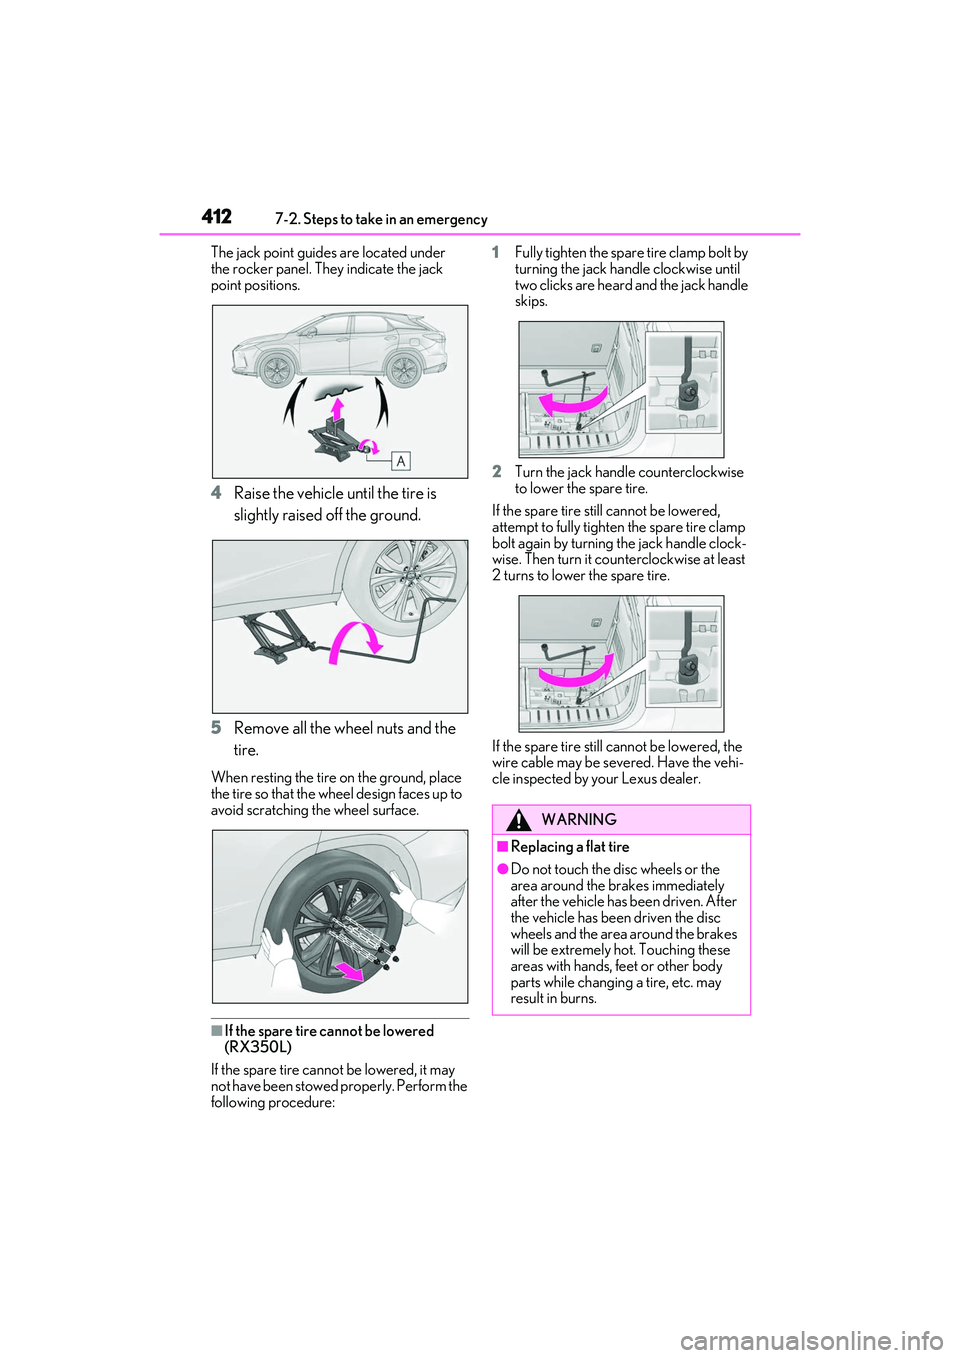
The jack point guides are located under
the rocker panel. They indicate the jack
point positions.
4Raise the vehicle until the tire is
slightly raised off the ground.
5 Remove all the wheel nuts and the
tire.
When resting the tire on the ground, place
the tire so that the wheel design faces up to
avoid scratching the wheel surface.
■If the spare tire cannot be lowered
(RX350L)
If the spare tire cannot be lowered, it may
not have been stowed properly. Perform the
following procedure: 1
Fully tighten the spare tire clamp bolt by
turning the jack handle clockwise until
two clicks are heard and the jack handle
skips.
2 Turn the jack handle counterclockwise
to lower the spare tire.
If the spare tire still cannot be lowered,
attempt to fully tighten the spare tire clamp
bolt again by turning the jack handle clock-
wise. Then turn it coun terclockwise at least
2 turns to lower the spare tire.
If the spare tire still cannot be lowered, the
wire cable may be seve red. Have the vehi-
cle inspected by your Lexus dealer.
WARNING
■Replacing a flat tire
●Do not touch the disc wheels or the
area around the brakes immediately
after the vehicle has been driven. After
the vehicle has been driven the disc
wheels and the area around the brakes
will be extremely hot. Touching these
areas with hands, feet or other body
parts while changing a tire, etc. may
result in burns.
Page 418 of 508

4167-2. Steps to take in an emergency
■The compact spare tire
●The compact spare tire is identified by the
label “TEMPORARY USE ONLY” on
the tire sidewall. Use the compact spare
tire temporarily, and only in an emer-
gency.
●Make sure to check the tire inflation pres-
sure of the compact spare tire. (P.436)
■When using the compact spare tire
As the compact spare tire is not equipped
with a tire pressure warning valve and trans-
mitter, low inflation pressure of the spare
tire will not be indicated by the tire pressure
warning system. Also, if you replace the
compact spare tire after the tire pressure
warning light comes on, the light remains
on.
■When the compact spare tire is
equipped
When driving with the compact spare tire
installed, the vehicle he ight will be different
than when driving with standard tires.
■If you have a flat fron t tire on a road cov-
ered with snow or ice
Install the compact spar e tire on one of the
rear wheels of the vehicle. Perform the fol-
lowing steps and fit tire chains to the front
tires:
1 Replace a rear tire with the compact
spare tire.
2 Replace the flat front tire with the tire
removed from the rear of the vehicle.
3 Fit tire chains to the front tires.
WARNING
■When using the compact spare tire
●Remember that the compact spare tire
provided is specifically designed for
use with your vehicle. Do not use your
compact spare tire on another vehicle.
●Do not use more than one compact
spare tire simultaneously.
●Replace the compact spare tire with a
standard tire as soon as possible.
●Avoid sudden acceleration, abrupt
steering, sudden braking and shifting
operations that cause sudden engine
braking.
■When the compact spare tire is
attached
The vehicle speed may not be correctly
detected, and the following systems may
not operate correctly:
• ABS & Brake assist
•VSC
•TRAC
• Trailer Sway Control
•EPS
•VDIM (if equipped)
• Adaptive Variable Suspension System (if equipped)
• Dynamic radar cruise control with full-speed range
• PCS (Pre-Collision System)
• LTA (Lane Tracing Assist)
• RSA (Road Sign Assist) (if equipped)
• Automatic High Beam
• AFS (Adaptive Fron t-lighting System)
(if equipped)
• Tire pressure warning system
• Intuitive parking assist (if equipped)
• PKSB (Parking Support Brake) (if equipped)
• Lexus parking assist monitor (if equipped)
• Panoramic view monitor (if equipped)
• BSM (Blind Spot Monitor) (if equipped)
• Navigation system (if equipped)
Page 420 of 508

4187-2. Steps to take in an emergency
One of the following may be the cause
of the problem:
There may not be sufficient fuel in
the vehicle’s tank.
Refuel the vehicle.
The engine may be flooded.
Try to restart the engine again fol-
lowing correct starting procedures.
( P.170)
There may be a malfunction in the
engine immobilizer system.
( P.66)
One of the following may be the cause
of the problem:
The battery may be discharged.
( P.423)
The battery terminal connections
may be loose or corroded.
( P.355) The engine starting system may be
malfunctioning due to an electrical
problem such as electronic key battery
depletion or a blown fuse. However, an
interim measure is available to start the
engine. (
P.418)
One of the following may be the cause
of the problem:
One or both of the battery terminals
may be disconnected. ( P.355)
The battery may be discharged.
( P.423)
There may be a malfunction in the
steering lock system.
Contact your Lexus dealer if the problem
cannot be repaired, or if repair procedures
are unknown.
When the engine does not start, the
following steps can be used as an
interim measure to start the engine if
the engine switch is functioning nor-
mally.
Do not use this starting procedure
except in cases of emergency.
1 Turn the engine switch to IGNI-
TION ON mode and check that
If the engine will not start
If the engine will not start even
though correct starting procedures
are being followed ( P.170), con-
sider each of the following points:
The engine will not start even
though the starter motor oper-
ates normally.
The starter motor turns over
slowly, the interior lights and
headlights are dim, or the horn
does not sound or sounds at a low
volume.
The starter motor does not turn
over
The starter motor does not turn
over, the interior lights and head-
lights do not turn on, or the horn
does not sound.
Starting the engine in an emer-
gency
Page 426 of 508

4247-2. Steps to take in an emergency
Positive (+) battery terminal (second vehicle)
Negative (-) battery terminal (second vehicle)
Solid, stationary, unpainted metallic point away from the battery and any mov-
ing parts as shown in the illustration
4 Start the engine of the second vehi-
cle. Increase the engine speed
slightly and maintain at that level for
approximately 5 minutes to
recharge the battery of your vehi-
cle.
5 Open and close any of the doors of
your vehicle with the engine switch
off.
6 Maintain the engine speed of the
second vehicle and start the engine
of your vehicle by turning the
engine switch to IGNITION ON
mode.
7 Once the vehicle’s engine has
started, remove the jumper cables
in the exact reverse order from
which they were connected.
Once the engine starts, have the vehi-
cle inspected at your Lexus dealer as
soon as possible.
■Starting the engine when the battery is
discharged
The engine cannot be started by push-start-
ing.
■To prevent battery discharge
●Turn off the headlights and the audio sys-
tem while the engine is off.
●Turn off any unnecessary electrical com-
ponents when the vehicle is running at a
low speed for an extended period, such
as in heavy traffic.
■When removing the battery terminals
When the battery terminals are removed, the information stored in the ECU is
cleared. Before removi
ng the battery termi-
nals, contact your Lexus dealer.
■Charging the battery
The electricity stored in the battery will dis-
charge gradually even when the vehicle is
not in use, due to natural discharge and the
draining effects of certain electrical appli-
ances. If the vehicle is left for a long time,
the battery may discharge, and the engine
may be unable to start. (The battery
recharges automatically during driving.)
■When the battery is removed or dis-
charged
●In some cases, it may not be possible to
unlock the doors using the smart access
system with push-button start when the
battery is discharged. Use the wireless
remote control or the mechanical key to
lock or unlock the doors.
●The engine may not start on the first
attempt after the battery has recharged
but will start normally after the second
attempt. This is not a malfunction.
●The engine switch mode is memorized by
the vehicle. When the battery is recon-
nected, the system will return to the
mode it was in before the battery was dis-
charged. Before disconnecting the bat-
tery, turn the engine switch off.
If you are unsure wh at mode the engine
switch was in before the battery dis-
charged, be especially careful when
reconnecting the battery.
●The power back door must be initialized.
( P.107)
■Replacing the battery
●Use a battery with the same case size as
the previous battery and an equivalent
20 hour rate capacity (20HR) or greater.
• If the sizes differ, the battery cannot be
properly secured.
• If the 20 hour rate capacity is low, even if
B
C
D