2022 LEXUS RX350 windshield wipers
[x] Cancel search: windshield wipersPage 194 of 508

1924-3. Operating the lights and wipers
present on the windshield
●If the wiper switch is turned to the
“AUTO” position while the engine switch
is in IGNITION ON mode, the wipers
will operate once to show that AUTO
mode is activated.
●When the sensor sensitivity ring is turned
toward high while in “AUTO” position, the
wipers will operate once to indicate that
the sensor sensitivity is enhanced.
●If the temperature of the raindrop sensor
is 194°F (90°C) or higher, or 5°F (-15°C)
or lower, automatic operation may not
occur. In this case, operate the wipers in
any mode other than AUTO mode.
■If no windshield washer fluid sprays
Check that the washer nozzles are not
blocked, if there is washer fluid in the
washer fluid tank.
■Front door opening linked windshield
wiper stop function
When “AUTO” is selected and the wind-
shield wipers are operatin g, if a front door is
opened, the operation of the windshield
wipers will be stopped to prevent anyone
near the vehicle from being sprayed by
water from the wipers, provided the vehicle
is stopped with the parking brake applied or
the shift lever in P. Wh en the front door is
closed, wiper operation will resume.
■Customization
Some functions can be customized.
( P.449)
When the windshield wipers are not
being used, they retract to below the
hood. To enable the windshield wipers
to be lifted when parking in cold condi-
tions or when replacing a windshield
wiper insert, change the rest position of
the windshield wipers to the service
position using the wiper lever.
WARNING
■Caution regarding the use of wind-
shield wipers in AUTO mode
The windshield wipers may operate
unexpectedly if the se nsor is touched or
the windshield is subj ect to vibration in
AUTO mode. Take care that your fingers,
etc. do not become caught in the wind-
shield wipers.
■Caution regarding the use of washer
fluid
When it is cold, do not use the washer
fluid until the windshield becomes warm.
The fluid may freeze on the windshield
and cause low visibility. This may lead to
an accident, resulting in death or serious
injury.
NOTICE
■When the washer fluid tank is empty
Do not operate the switch continually as
the washer fluid pump may overheat.
■When a nozzle becomes blocked
In this case, contact your Lexus dealer.
Do not try to clear it with a pin or other
object. The nozzle will be damaged.
Changing the windshield wiper
rest position/Lifting the wind-
shield wipers
Page 195 of 508

1934-3. Operating the lights and wipers
4
Driving
■Raising the wipers to the service
position
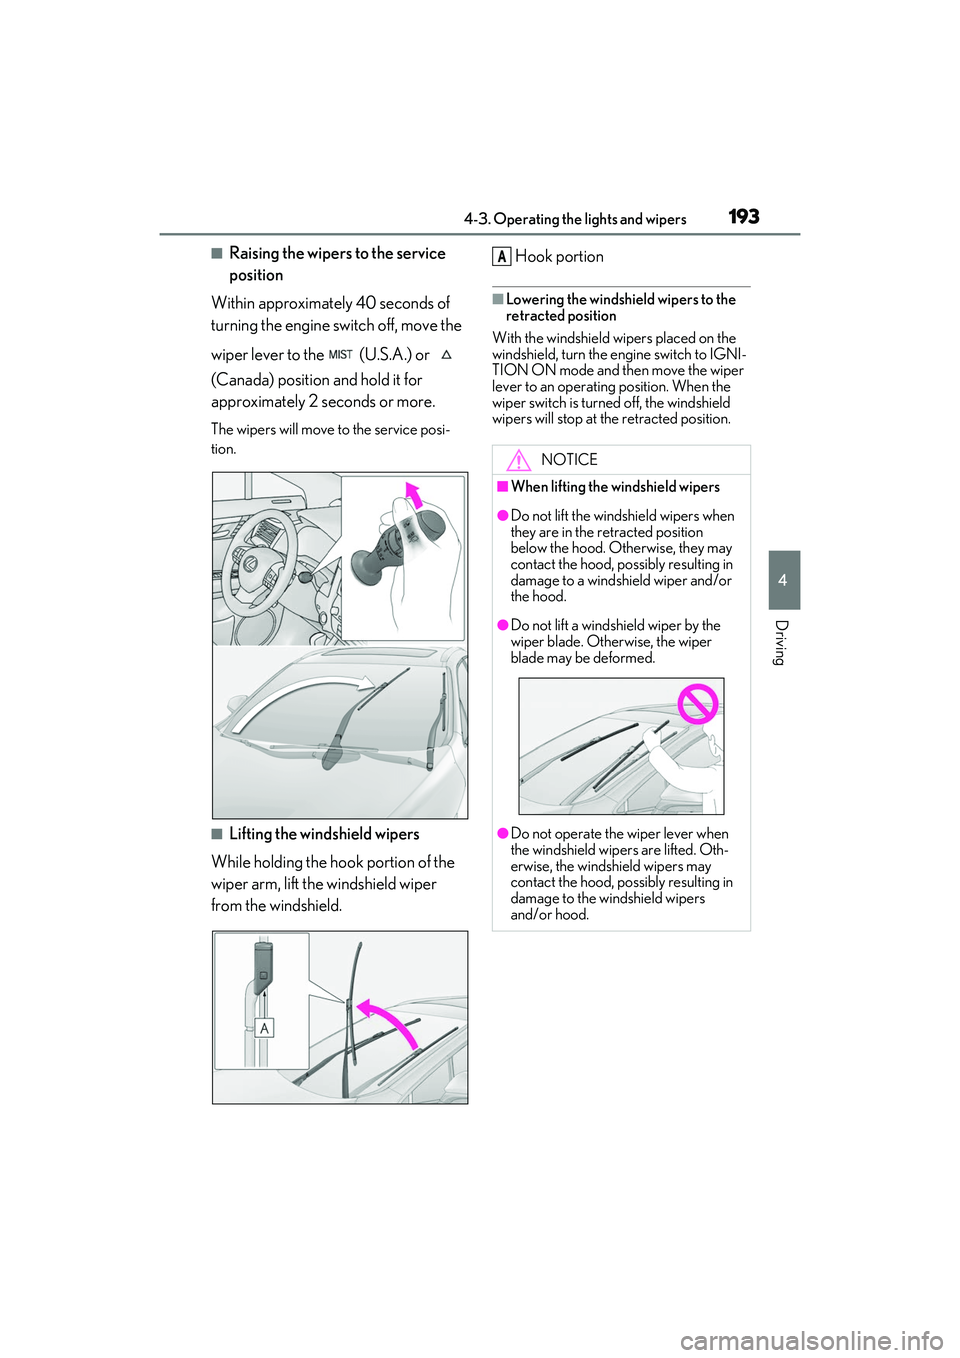
Within approximately 40 seconds of
turning the engine switch off, move the
wiper lever to the (U.S.A.) or
(Canada) position and hold it for
approximately 2 seconds or more.
The wipers will move to the service posi-
tion.
■Lifting the windshield wipers
While holding the hook portion of the
wiper arm, lift the windshield wiper
from the windshield. Hook portion
■Lowering the windshield wipers to the
retracted position
With the windshield wipers placed on the
windshield, turn the en gine switch to IGNI-
TION ON mode and then move the wiper
lever to an operating position. When the
wiper switch is turned off, the windshield
wipers will stop at the retracted position.
NOTICE
■When lifting the windshield wipers
●Do not lift the windshield wipers when
they are in the retracted position
below the hood. Otherwise, they may
contact the hood, possibly resulting in
damage to a windshield wiper and/or
the hood.
●Do not lift a windshield wiper by the
wiper blade. Otherwise, the wiper
blade may be deformed.
●Do not operate the wiper lever when
the windshield wipe rs are lifted. Oth-
erwise, the windshield wipers may
contact the hood, possibly resulting in
damage to the windshield wipers
and/or hood.
A
Page 201 of 508

1994-5. Using the driving support systems
4
Driving
WARNING
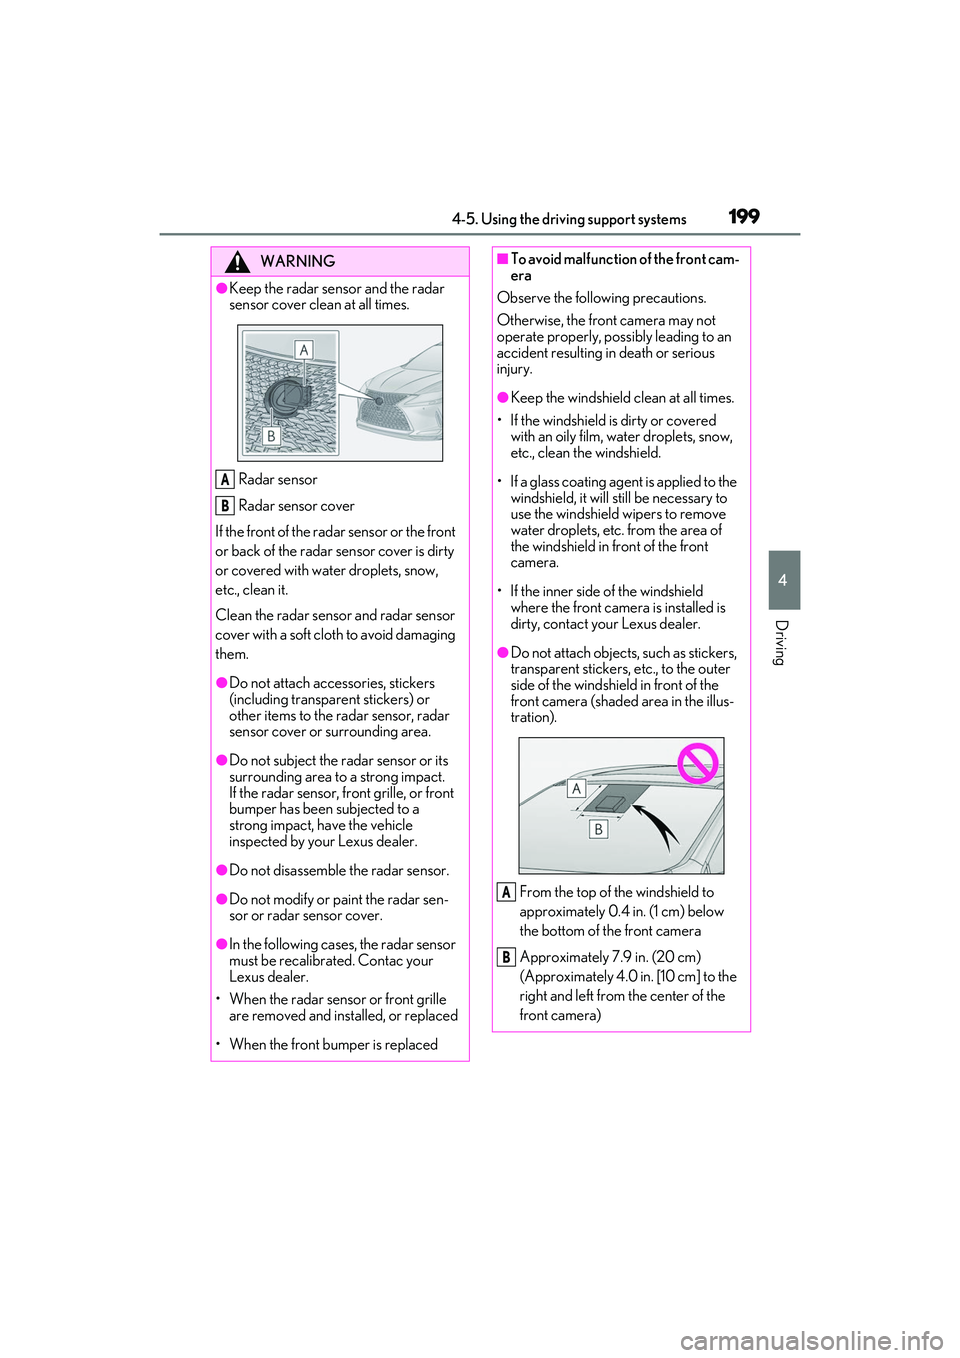
●Keep the radar sensor and the radar
sensor cover clean at all times.
Radar sensor
Radar sensor cover
If the front of the rada r sensor or the front
or back of the radar sensor cover is dirty
or covered with water droplets, snow,
etc., clean it.
Clean the radar sensor and radar sensor
cover with a soft cloth to avoid damaging
them.
●Do not attach accessories, stickers
(including transparent stickers) or
other items to the radar sensor, radar
sensor cover or surrounding area.
●Do not subject the radar sensor or its
surrounding area to a strong impact.
If the radar sensor, front grille, or front
bumper has been subjected to a
strong impact, have the vehicle
inspected by your Lexus dealer.
●Do not disassemble the radar sensor.
●Do not modify or paint the radar sen-
sor or radar sensor cover.
●In the following case s, the radar sensor
must be recalibrated. Contac your
Lexus dealer.
• When the radar sensor or front grille are removed and installed, or replaced
• When the front bumper is replaced
A
B
■To avoid malfunction of the front cam-
era
Observe the following precautions.
Otherwise, the front camera may not
operate properly, possibly leading to an
accident resulting in death or serious
injury.
●Keep the windshield clean at all times.
• If the windshield is dirty or covered with an oily film, water droplets, snow,
etc., clean the windshield.
• If a glass coating agent is applied to the windshield, it will still be necessary to
use the windshield wipers to remove
water droplets, etc. from the area of
the windshield in front of the front
camera.
• If the inner side of the windshield where the front camera is installed is
dirty, contact your Lexus dealer.
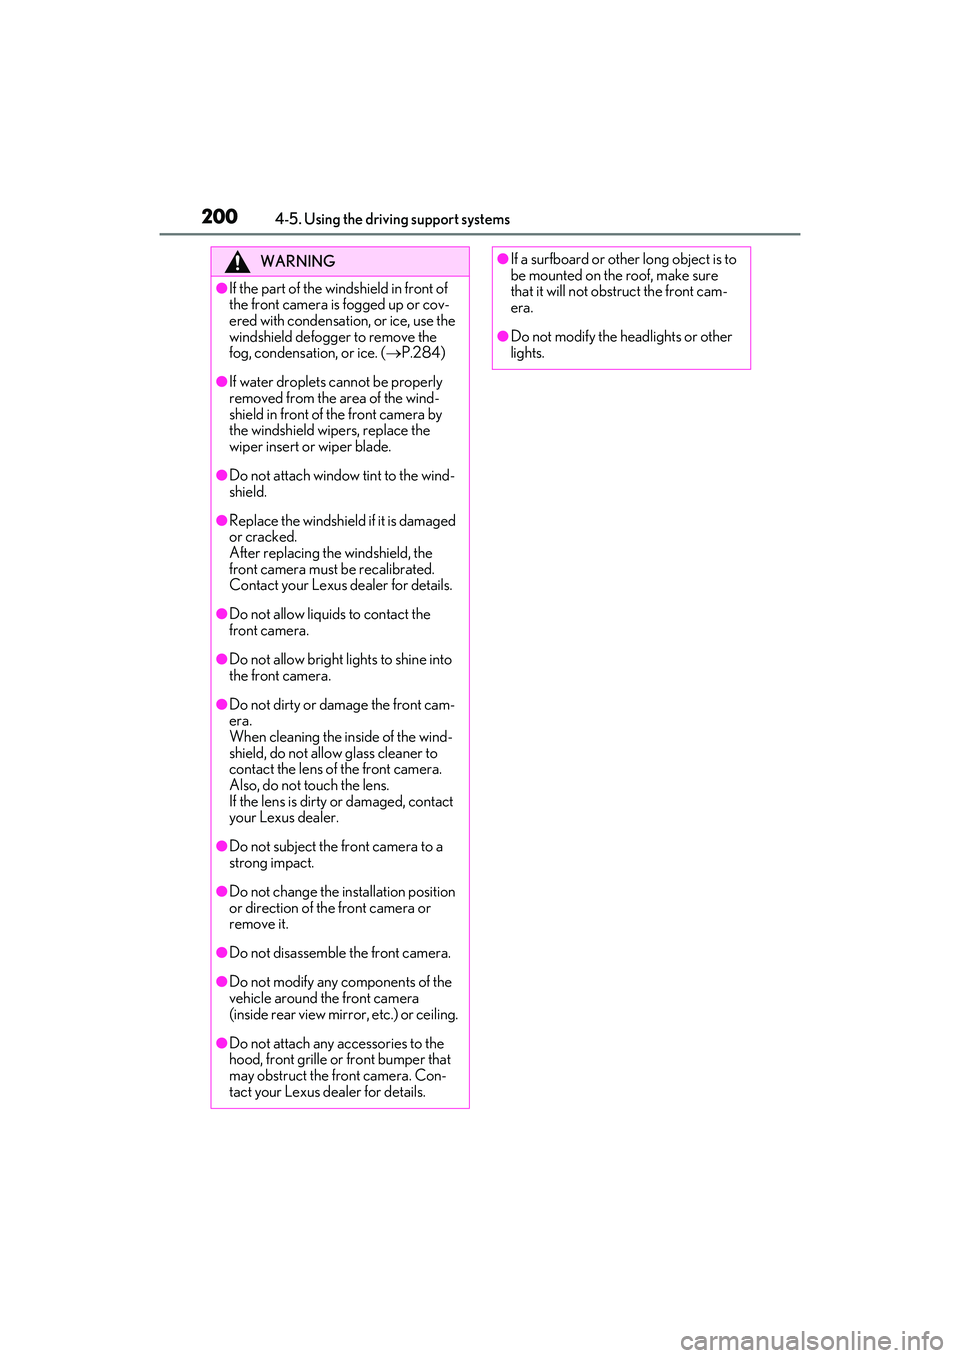
●Do not attach objects, such as stickers,
transparent stickers, etc., to the outer
side of the windshield in front of the
front camera (shaded area in the illus-
tration).
From the top of th e windshield to
approximately 0.4 in. (1 cm) below
the bottom of the front camera
Approximately 7.9 in. (20 cm)
(Approximately 4.0 in. [10 cm] to the
right and left from the center of the
front camera)
A
B
Page 202 of 508

2004-5. Using the driving support systems
WARNING
●If the part of the windshield in front of
the front camera is fogged up or cov-
ered with condensation, or ice, use the
windshield defogger to remove the
fog, condensation, or ice. (P.284)
●If water droplets cannot be properly
removed from the area of the wind-
shield in front of the front camera by
the windshield wipers, replace the
wiper insert or wiper blade.
●Do not attach window tint to the wind-
shield.
●Replace the windshield if it is damaged
or cracked.
After replacing the windshield, the
front camera must be recalibrated.
Contact your Lexus dealer for details.
●Do not allow liquids to contact the
front camera.
●Do not allow bright lights to shine into
the front camera.
●Do not dirty or damage the front cam-
era.
When cleaning the inside of the wind-
shield, do not allow glass cleaner to
contact the lens of the front camera.
Also, do not touch the lens.
If the lens is dirty or damaged, contact
your Lexus dealer.
●Do not subject the front camera to a
strong impact.
●Do not change the installation position
or direction of the front camera or
remove it.
●Do not disassemble the front camera.
●Do not modify any components of the
vehicle around the front camera
(inside rear view mirror, etc.) or ceiling.
●Do not attach any accessories to the
hood, front grille or front bumper that
may obstruct the front camera. Con-
tact your Lexus dealer for details.
●If a surfboard or other long object is to
be mounted on the roof, make sure
that it will not obstruct the front cam-
era.
●Do not modify the headlights or other
lights.
Page 275 of 508

2734-6. Driving tips
4
Driving
length)
Regulations regarding the use of tire
chains vary depending on location and
type of road. Always check local regu-
lations before installing chains.
■Tire chain installation
Observe the following precautions when
installing and removing chains:
●Install and remove tire chains in a safe
location.
●Install tire chains on the front tires only.
Do not install tire chains on the rear tires.
●Install tire chains on fr ont tires as tightly as
possible. Retighten chains after driving
1/4 1/2 mile (0.5 1.0 km).
●Install tire chains following the instruc-
tions provided with the tire chains.
To enable the windshield wipers to be
lifted when heavy snow or icy condi-
tions are expected, change the rest
position of the windshield wipers from
the retracted position below the hood
to the service position using the wiper
lever. ( P.192)
Specific design characteristics give
it a higher center of gravity than
ordinary passenger cars. This vehi-
cle design feature causes this type
of vehicle to be more likely to
rollover. And, utility vehicles have a
significantly higher rollover rate
than other types of vehicles.
An advantage of th e higher ground
clearance is a better view of the
road allowing you to anticipate
problems.
It is not designed for cornering at
the same speeds as ordinary pas-
senger cars any more than
low-slung sports cars are designed
to perform satisfactorily under
off-road conditions. Therefore,
sharp turns at excessive speeds may
cause the vehicle to rollover.
Regulations on the use of tire
chains
NOTICE
■Fitting tire chains
The tire pressure warning valves and
transmitters may not function correctly
when tire chains are fitted.
Windshield wipers
Utility vehicle precautions
This vehicle belongs to the utility
vehicle class, which has higher
ground clearance and narrower
tread in relation to the height of its
center of gravity.
Utility vehicle feature
WARNING
■Utility vehicle precautions
Always observe the following precau-
tions to minimize the risk of death, seri-
ous injury or damage to your vehicle:
Page 339 of 508

3376-1. Maintenance and care
6
Maintenance and care
■Brake pads and calipers
Rust may form if the vehicle is parked with
wet brake pads or disc rotors, causing them
to stick. Before parking the vehicle after it is
washed, drive slowly and apply the brakes
several times to dry the parts.
■Bumpers
Do not scrub with abrasive cleaners.
■Front side windows water-repellent
coating
●The following precautions can extend the
effectiveness of the water-repellent coat-
ing.
• Remove any dirt, etc. from the front side
windows regularly.
• Do not allow dirt and dust to accumulate on the windows for a long period.
Clean the windows with a soft, damp
cloth as soon as possible.
• Do not use wax or glass cleaners that
contain abrasives when cleaning the win-
dows.
• Do not use any metallic objects to
remove condensation build up.
●When the water-repellent performance
has become insufficient, the coating can
be repaired. Contact your Lexus dealer.
■Plated portions
If dirt cannot be removed, clean the parts as
follows:
●Use a soft cloth dampened with an
approximately 5% solution of neutral
detergent and water to clean the dirt off.
●Wipe the surface with a dry, soft cloth to
remove any remaining moisture.
●To remove oily deposits, use alcohol wet
wipes or a similar product.
WARNING
■When washing the vehicle
Do not apply water to the inside of the
engine compartment. Doing so may
cause the electrical components, etc. to
catch fire.
■When cleaning the windshield
Set the wiper switch to off.
If the switch is in “AUTO”, the wipers may
operate unexpectedly in the following sit-
uations, and may result in hands being
caught or other serious injuries and
cause damage to the wiper blades.
Off
AUTO
●When the upper part of the windshield
where the raindrop sensor is located is
touched by hand
●When a wet rag or similar is held close
to the raindrop sensor
●If something bumps against the wind-
shield
●If you directly touch the raindrop sen-
sor body or if something bumps into
the raindrop sensor
■Precautions regarding the exhaust
pipes and rear bumper diffusers
Exhaust gasses cause the exhaust pipes
and rear bumper diffusers to become
quite hot.
When washing the vehicle, be careful not
to touch the pipes and diffusers until they
have cooled sufficiently, as touching hot
exhaust pipes and rear bumper diffusers
can cause burns.
■Precaution regarding the rear
bumper
If the paint of the re ar bumper is chipped
or scratched, the following systems may
not function correctly. If this occurs, con-
sult your Lexus dealer.
●Lexus Safety System + 2.0
A
B
Page 370 of 508

3686-3. Do-it-yourself maintenance
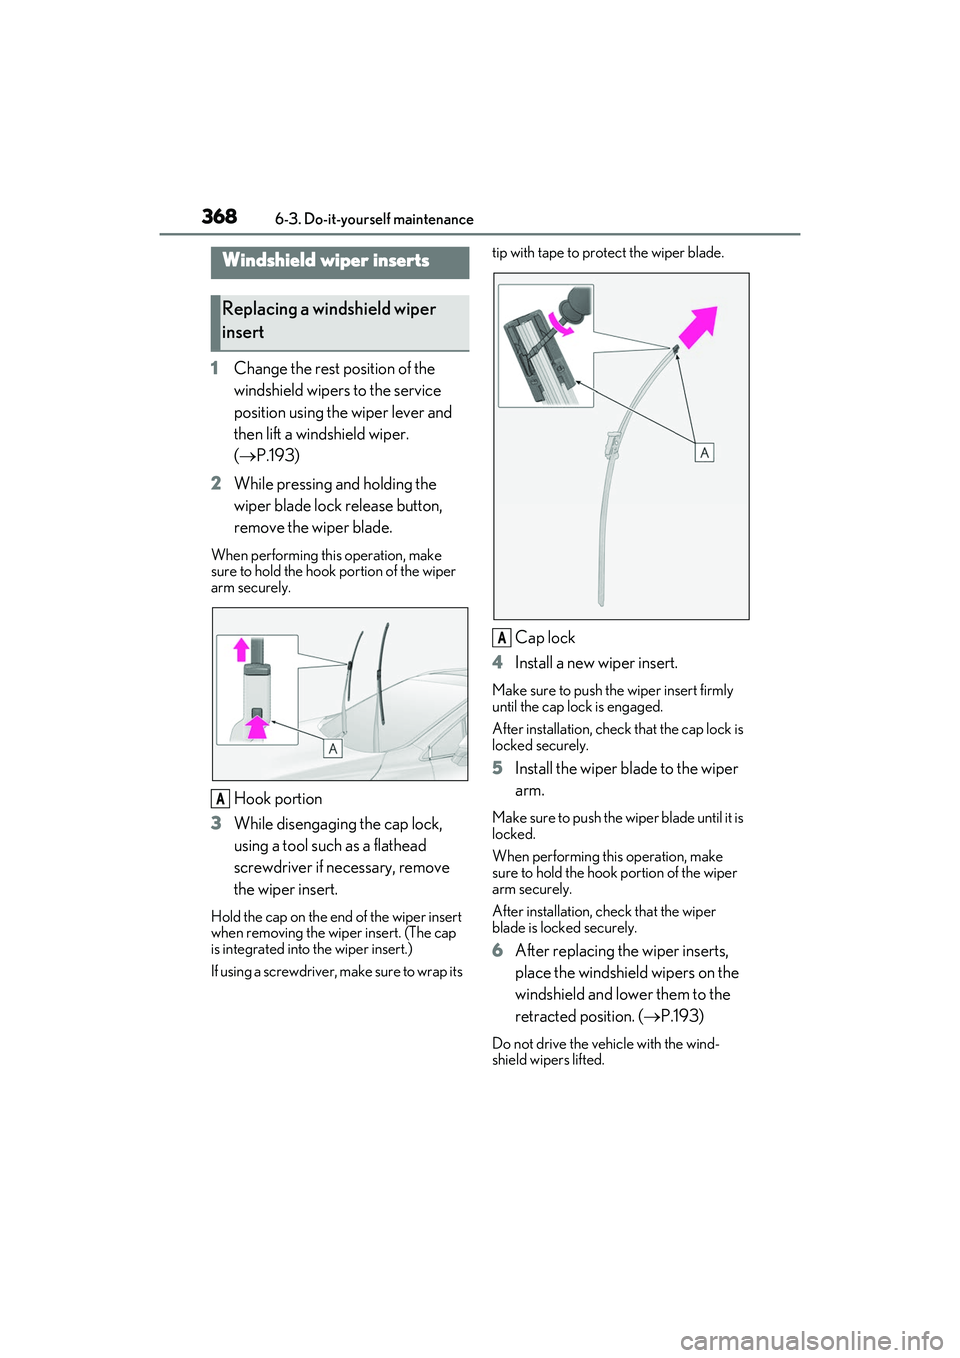
1Change the rest position of the
windshield wipers to the service
position using the wiper lever and
then lift a windshield wiper.
( P.193)
2 While pressing and holding the
wiper blade lock release button,
remove the wiper blade.
When performing this operation, make
sure to hold the hook portion of the wiper
arm securely.
Hook portion
3 While disengaging the cap lock,
using a tool such as a flathead
screwdriver if necessary, remove
the wiper insert.
Hold the cap on the end of the wiper insert
when removing the wi per insert. (The cap
is integrated into the wiper insert.)
If using a screwdriver, make sure to wrap its tip with tape to protect the wiper blade.
Cap lock
4 Install a new wiper insert.
Make sure to push the wiper insert firmly
until the cap lock is engaged.
After installation, check that the cap lock is
locked securely.
5 Install the wiper blade to the wiper
arm.
Make sure to push the wiper blade until it is
locked.
When performing this operation, make
sure to hold the hook portion of the wiper
arm securely.
After installation, check that the wiper
blade is locked securely.
6After replacing the wiper inserts,
place the windshield wipers on the
windshield and lower them to the
retracted position. ( P.193)
Do not drive the vehicle with the wind-
shield wipers lifted.
Windshield wiper inserts
Replacing a windshield wiper
insert
A
A
Page 458 of 508

4568-2. Customization
■Turn signal lever (P.178)
■Automatic light control system ( P.184)
■Lights ( P.184)
*1:Except for Canada
*2: If equipped
■Rain-sensing windshield wipers* ( P.190)
*:If equipped
FunctionDefault settingCustomized setting
The number of times the turn
signal lights flash automatically
when the turn signal lever is
moved to the first position
during a lane change
3
5
——O7
Off
FunctionDefault settingCustomized setting
Light sensor sensitivityStandard-2 to 2O—O
Time elapsed before head-
lights automatically turn off
after doors are closed
30 seconds
Off
O—O60 seconds
90 seconds
FunctionDefault settingCustomized setting
Daytime running lightsOnOff*1O—O
Welcome lightingOnOff——O
AFS (Adaptive Front-lighting
System)
*2OnOff——O
Windshield wiper linked head-
light illuminationOnOff——O
FunctionDefault settingCustomized setting
Wiper operation when the
wiper switch is in the “AUTO”
positionRain-sensing opera-
tion
Intermittent opera-
tion linked to vehicle speed (with interval adjuster)
——O
ABC
ABC
ABC
ABC