2022 LEXUS IS300 air condition
[x] Cancel search: air conditionPage 253 of 440

2515-2. Using the air conditioning system and defogger
5
Interior features
*:If equipped
Turn the heated steering wheel on/off
The indicator light comes on when the heated steering wheel is operating.
■Operation condition
The engine switch is in IGNITION ON
mode.
■Timer function
The heated steering wheel will automati-
cally turn off after about 30 minutes.
Type A
Each time the switch is pressed, the
intensity of the seat heater changes
and the level indicator lights (amber) light as follows:
Hi (3 segments lit) Mid (2 segments
lit) Lo (1 segment lit) Off
Type B
Each time the switch is pressed, the
intensity of the seat heater changes
and the level indicator lights (amber)
Heated steering wheel*/seat
heaters
*/seat ventilators*
Heated steering wheel and seat
heaters heat the side grips of the
steering wheel and seats, respec-
tively. Seat ventilators maintain
good airflow by blowing air from the
seats.
WARNING
■To prevent minor burn injuries
Care should be taken to prevent injury if
anyone in the following categories
comes in contact with the steering wheel
or seats when the heater is on:
●Babies, small children, the elderly, the
sick and the phys ically challenged
●Persons with sensitive skin
●Persons who are fatigued
●Persons who have taken alcohol or
drugs that induce sleep (sleeping
drugs, cold remedies, etc.)
NOTICE
■To prevent damage to the seat heat-
ers and seat ventilators
Do not put heavy objects that have an
uneven surface on the seat and do not
stick sharp objects (needles, nails, etc.)
into the seat.
■To prevent battery discharge
Do not use the functions when the
engine is off.
Heated steering wheel
Seat heaters
A
Page 254 of 440

2525-2. Using the air conditioning system and defogger
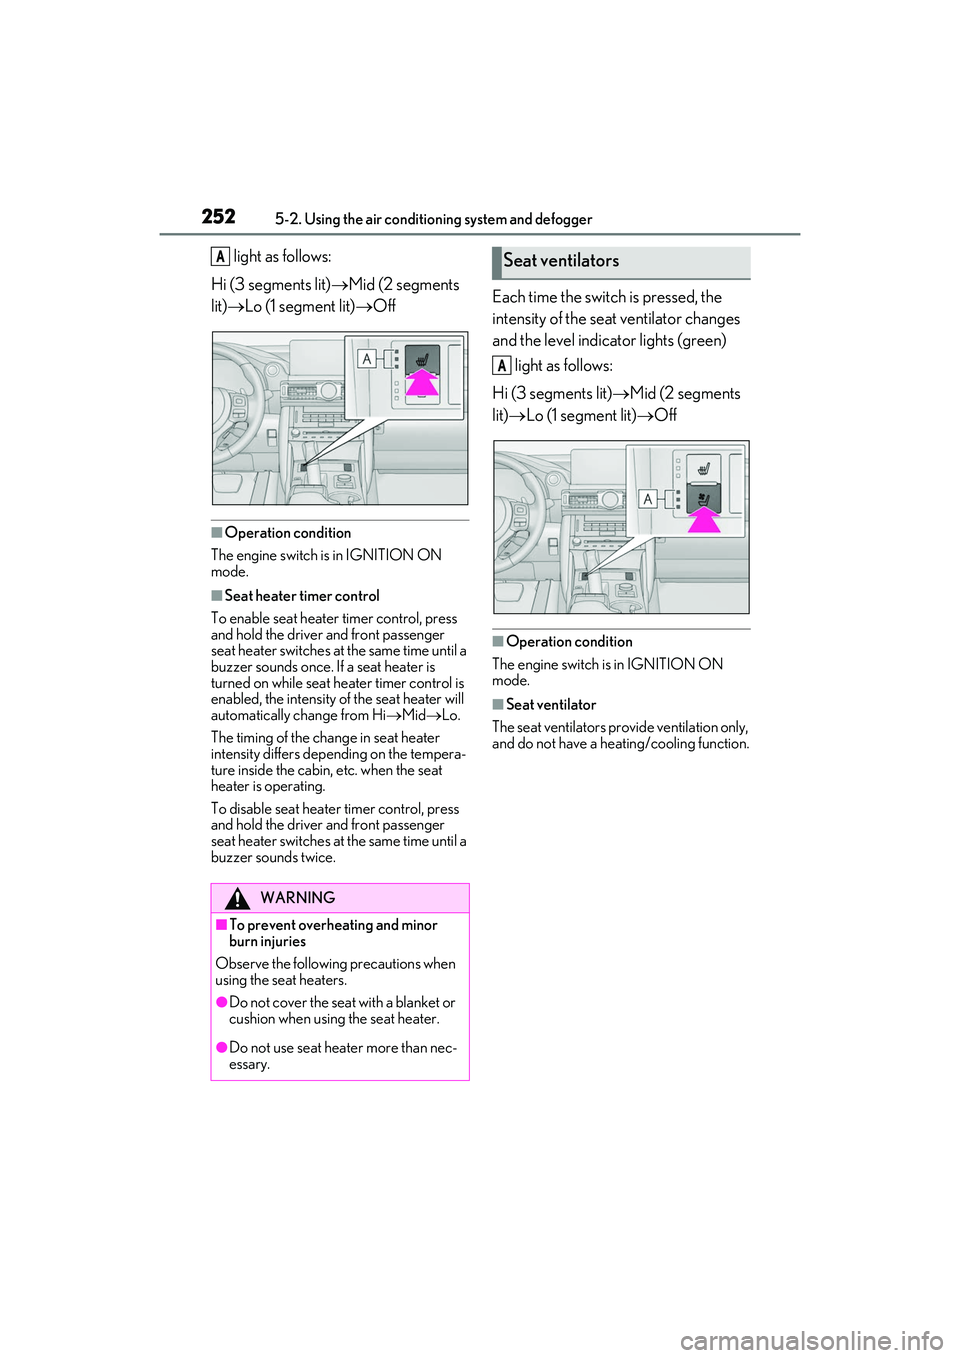
light as follows:
Hi (3 segments lit) Mid (2 segments
lit) Lo (1 segment lit) Off
■Operation condition
The engine switch is in IGNITION ON
mode.
■Seat heater timer control
To enable seat heater timer control, press
and hold the driver and front passenger
seat heater switches at the same time until a
buzzer sounds once. If a seat heater is
turned on while seat he ater timer control is
enabled, the intensity of the seat heater will
automatically change from Hi MidLo.
The timing of the chan ge in seat heater
intensity differs depending on the tempera-
ture inside the cabin, etc. when the seat
heater is operating.
To disable seat heater timer control, press
and hold the driver and front passenger
seat heater switches at the same time until a
buzzer sounds twice.
Each time the switch is pressed, the
intensity of the seat ventilator changes
and the level indicator lights (green)
light as follows:
Hi (3 segments lit) Mid (2 segments
lit) Lo (1 segment lit) Off
■Operation condition
The engine switch is in IGNITION ON
mode.
■Seat ventilator
The seat ventilators provide ventilation only,
and do not have a heating/cooling function.
WARNING
■To prevent overheating and minor
burn injuries
Observe the following precautions when
using the seat heaters.
●Do not cover the seat with a blanket or
cushion when using the seat heater.
●Do not use seat heater more than nec-
essary.
ASeat ventilators
A
Page 256 of 440

2545-3. Using the interior lights
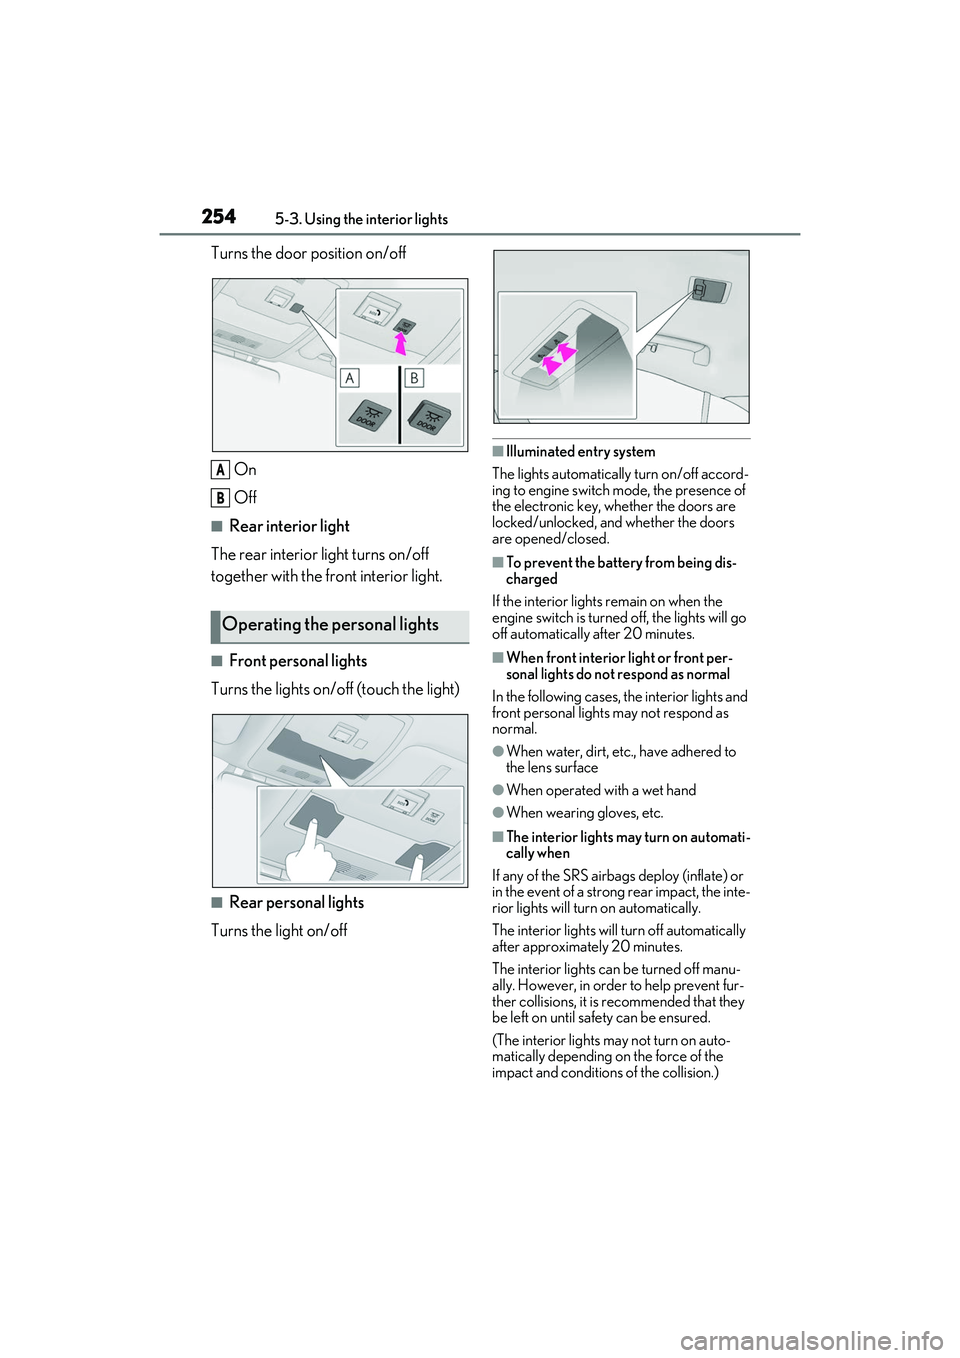
Turns the door position on/off
On
Off
■Rear interior light
The rear interior light turns on/off
together with the front interior light.
■Front personal lights
Turns the lights on/off (touch the light)
■Rear personal lights
Turns the light on/off
■Illuminated entry system
The lights automatically turn on/off accord-
ing to engine switch mode, the presence of
the electronic key, whether the doors are
locked/unlocked, and whether the doors
are opened/closed.
■To prevent the battery from being dis-
charged
If the interior lights remain on when the
engine switch is turned off, the lights will go
off automatically after 20 minutes.
■When front interior light or front per-
sonal lights do not respond as normal
In the following cases, the interior lights and
front personal lights may not respond as
normal.
●When water, dirt, etc., have adhered to
the lens surface
●When operated with a wet hand
●When wearing gloves, etc.
■The interior lights may turn on automati-
cally when
If any of the SRS airbag s deploy (inflate) or
in the event of a strong rear impact, the inte-
rior lights will turn on automatically.
The interior lights will turn off automatically
after approximately 20 minutes.
The interior lights can be turned off manu-
ally. However, in order to help prevent fur-
ther collisions, it is recommended that they
be left on until sa fety can be ensured.
(The interior lights may not turn on auto-
matically depending on the force of the
impact and conditions of the collision.)
Operating the personal lights
A
B
Page 271 of 440

269
6
6
Maintenance and care
Maintenance and care
.6-1. Maintenance and careCleaning and protecting the vehi-cle exterior ................................ 270
Cleaning and protecting the vehi- cle interior ................................. 274
6-2. Maintenance Maintenance requirements........................................................ 278
General maintenance ............. 279
Emission inspection and mainte- nance (I/M) programs ......... 282
6-3. Do-it-yourself maintenance Do-it-yourself service precautions........................................................ 283
Hood............................................... 285
Positioning a floor jack............ 285
Engine compartment............... 287
Tires ................................................ 296
Tire inflation pressure.............. 304
Wheels........................................... 305
Air conditioning filter...............307
Electronic key battery ............. 308
Checking and replacing fuses ......................................................... 310
Headlight aim............................... 312
Light bulbs ..................................... 313
Page 275 of 440

2736-1. Maintenance and care
6
Maintenance and care
NOTICE
■When using an automatic car wash
(vehicles with rain-sensing windshield
wipers)
Set the wiper switch to the off position.
( P.150)
If the wiper switch is in “AUTO”, the wip-
ers may operate and the wiper blades
may be damaged.
■When using a high pressure car wash
●When washing the vehicle, do not let
water of the high pressure washer hit
directly or the vicinity of the camera.
Due to the shock from the high pres-
sure water, it is possible the device may
not operate as normal.
●Do not spray water directly on the
radar which is equipped behind the
emblem. Otherwise it may cause the
device to be damaged.
●Do not bring the nozzle tip close to
boots (rubber or re sin manufactured
cover), connectors or the following
parts. The parts may be damaged if
they come into contact with high-pres-
sure water.
• Traction related parts
•Steering parts
•Suspension parts
• Brake parts
●Keep the cleaning nozzle at least 11.9
in. (30 cm) away from the vehicle
body. Otherwise resin section, such as
moldings and bumpers, may be
deformed and damaged.
Also, do not continuously hold the nozzle
in the same place.
●Do not spray the lower part of the
windshield continuously.
If water enters the air conditioning sys-
tem intake located near the lower part of
the windshield, the air conditioning sys-
tem may not oper ate correctly.
●Do not wash the underside of the vehi-
cle using a high pressure car washer.
Page 276 of 440

2746-1. Maintenance and care
Remove dirt and dust using a vac-
uum cleaner. Wipe dirty surfaces
with a cloth dampened with luke-
warm water.
If dirt cannot be removed, wipe it off
with a soft cloth dampened with
neutral detergent diluted to approx-
imately 1%.
Wring out any excess water from
the cloth and thoroughly wipe off
remaining traces of detergent and
water.
■Shampooing the carpets
There are several commercial foaming-type
cleaners available. Use a sponge or brush
to apply the foam. Ru b in overlapping cir-
cles. Do not use water. Wipe dirty surfaces
and let them dry. Excellent results are
obtained by keeping the carpet as dry as
possible.
■Handling the seat belts
Clean with mild soap and lukewarm water
using a cloth or sponge. Also check the
belts periodically for excessive wear, fraying
or cuts.
■When cleaning the carpeted portions of
the glove box, console box, etc.
If a strong adhesive tape is used, there is a
possibility that the surface of the carpet
could be damaged.
Cleaning and protecting the
vehicle interior
The following procedures will help
protect your vehicle’s interior and
keep it in top condition:
Protecting the vehicle interior
WARNING
■Water in the vehicle
●Do not splash or spill liquid in the vehi-
cle.
Doing so may cause electrical compo-
nents, etc. to malfunction or catch fire.
●Do not get any of the SRS components
or wiring in the vehicle interior wet.
( P.28)
An electrical malfunction may cause
the airbags to deploy or not function
properly, resulting in death or serious
injury.
■Cleaning the interior (especially
instrument panel)
Do not use polish wax or polish cleaner.
The instrument panel may reflect off the
windshield, obstructin g the driver’s view
and leading to an accident, resulting in
death or serious injury.
NOTICE
■Cleaning detergents
●Do not use the following liquids, as
they may discolor th e vehicle interior
or cause streaks or damage to painted
surfaces:
• Audio system screen: Organic sub- stances such as benzine or gasoline,
alkaline solutions, and alcohol
• Seats: Alkaline solutions, organic sub- stances such as thinner or benzine,
and alcohol
• Other parts: Organic substances such as benzine or gasoline, alkaline or
acidic solutions, dye, and bleach
●Do not use polish wax or polish
cleaner. The instrument panel’s or
other interior part’s painted surface
may be damaged.
Page 299 of 440

2976-3. Do-it-yourself maintenance
6
Maintenance and care
■When to replace your vehicle’s tires
Tires should be replaced if:
●The treadwear indicators are showing on
a tire.
●You have tire damage such as cuts, splits,
cracks deep enough to expose the fabric,
and bulges indicating internal damage
●A tire goes flat repeatedly or cannot be
properly repaired due to the size or loca-
tion of a cut or other damage
If you are not sure, consult with your Lexus
dealer.
■Tire life
Any tire over 6 years old must be checked
by a qualified technician even if it has sel-
dom or never been used or damage is not
obvious.
■Maximum load of tire
Check that the maximum load of the
replacement tire is greater than 1/2 of the
Gross Axle Weight Ratings (GAWR) of
either the front axle or the rear axle, which-
ever is greater.
For the GAWR, see the Certification Label.
For the maximum load of the tire, see the
load limit at maximum cold tire inflation
pressure mentioned on the sidewall of the
tire. ( P.378)
■Tire types
●Summer tires
Summer tires are high-speed performance
tires best suited to highway driving under
dry conditions. Since summer tires do not
have the same traction performance as
snow tires, summer tires are inadequate for
driving on snow-covered or icy roads. For
driving on snow-covered roads or icy roads, the use of snow tires is recom-
mended. When installing snow tires, be
sure to replace all four tires.
●All season tires
All season tires are designed to provide
better traction in snow and to be adequate
for driving in most winter conditions as well
as for use year-round. All season tires,
however, do not have adequate traction
performance compared with snow tires in
heavy or loose snow. Also, all season tires
fall short in accelerati on and handling per-
formance compared with summer tires in
highway driving.
●Snow tires
For driving on snow-covered roads or icy
roads, we recommend us ing snow tires. If
you need snow tires, select tires of the
same size, construction and load capacity
as the originally installed tires. Since your
vehicle has radial tires as original equip-
ment, make sure your snow tires also have
radial construction. Do not install studded
tires without first checking local regula-
tions for possible restrictions. Snow tires
should be installe d on all wheels.
( P.234)
■Low profile tires
Generally, low profile tires will wear more
rapidly and tire grip performance will be
reduced on snowy and/or icy roads when
compared to standard tires. Be sure to use
snow tires or tire chains* on snowy and/or
icy roads and drive car efully at a speed
appropriate for road and weather condi-
tions.
*: Vehicles with front an d rear tires of dif-
fering sizes: Tire chains cannot be
mounted. Snow tires should be used
instead.
■If the tread on snow tires wears down
below 0.16 in. (4 mm)
The effectiveness of the tires as snow tires is
lost.
Page 302 of 440

3006-3. Do-it-yourself maintenance
communication device
If tire position information is not correctly
displayed due to the radio wave conditions,
the display may be corrected by driving and
changing the radio wave conditions.
●When the vehicle is parked, the time
taken for the warning to start or go off
could be extended.
●When tire inflation pressure declines rap-
idly for example when a tire has burst, the
warning may not function.
■Warning performance of the tire pres-
sure warning system
The warning of the tire pressure warning
system will change in accordance with driv-
ing conditions. For this reason, the system
may give a warning even if the tire pressure
does not reach a low enough level, or if the
pressure is higher th an the pressure that
was adjusted to when the system was initial-
ized.
When replacing the tires or wheels, the
tire pressure warning valve and trans-
mitters must be installed to the wheels
which will be installed to the vehicle.
When new tire pressure warning
valves and transmitte rs are installed,
new ID codes must be registered in the
tire pressure warning computer and
the tire pressure warning system must
be initialized. ( P.302)
■Replacing tires and wheels
If the ID code of the tire pressure warning
valve and transmitter is not registered, the
tire pressure warning system will not work
properly. After driving for about 20 min-
utes, the tire pressure warning light blinks
for 1 minute and stays on to indicate a sys-
tem malfunction.
■The tire pressure warning system
must be initialized in the following
circumstances:
When rotating the tires.
When the tire inflation pressure is
changed such as when changing
traveling speed or load weight.
When changing the tire size.
When the tire pressure warning system
is initialized, the current tire inflation
Installing tire pressure warning
valves and transmitters
NOTICE
■Repairing or replac ing tires, wheels,
tire pressure warning valves, trans-
mitters and tire valve caps
●When removing or fitting the wheels,
tires or the tire pressure warning
valves and transmitters, contact your
Lexus dealer as the tire pressure warn-
ing valves and transmitters may be
damaged if not handled correctly.
●Make sure to install the tire valve caps.
If a tire valve cap is not installed, water
may enter the valve and cause it to
corrode, possibly leading to the valve
sticking or air to leak from the tire.
●When replacing tire valve caps, do not
use tire valve caps other than those
specified. The cap may become stuck.
■To avoid damage to the tire pressure
warning valves and transmitters
When a tire is repaired with liquid seal-
ants, the tire pressure warning valve and
transmitter may not operate properly. If a
liquid sealant is used , contact your Lexus
dealer or other qualified service shop as
soon as possible. Afte r use of liquid seal-
ant, make sure to re place the tire pres-
sure warning valve and transmitter when
repairing or replacing the tire.
Initializing the tire pressure
warning system