2022 LEXUS IS300 instrument panel
[x] Cancel search: instrument panelPage 129 of 440

1274-1. Before driving
4
Driving
*3: C =Available cargo and luggage load
In this condition, if 3 more passengers with
the combined weight of D lb. (kg) get on,
the available cargo and luggage load will
be reduced E lb. (kg) as follows:
C lb. (kg) - D*4 lb. (kg) = E*5 lb. (kg)
*4: D =Additional weight of people
*5: E =Available cargo and luggage load
As shown in the example above, if the
number of occupants increases, the
cargo and luggage load will be
reduced by an amount that equals the
increased weight due to the additional
occupants. In other words, if an
increase in the number of occupants
causes an excess of the total load
capacity (combined weight of occu-
pants plus cargo and luggage load),
you must reduce the cargo and lug-
gage on your vehicle.
WARNING
■Things that must not be carried in the
trunk
The following things may cause a fire if
loaded in the trunk:
●Receptacles containing gasoline
●Aerosol cans
■Storage precautions
Observe the following precautions.
Failure to do so may prevent the pedals
from being depressed properly, may
block the driver’s visi on, or may result in
items hitting the driver or passengers,
possibly causing an accident.
●Stow cargo and luggage in the trunk
whenever possible.
●To prevent cargo and luggage from
sliding forward during braking, do not
stack anything in the enlarged trunk.
Keep cargo and luggage low, as close
to the floor as possible.
●When you fold down the rear seats,
long items should not be placed
directly behind the front seats.
●Never allow anyone to ride in the
enlarged trunk. It is not designed for
passengers. They should ride in their
seats with thei r seat belts properly fas-
tened.
●Do not place cargo or luggage in or on
the following locations.
• At the feet of the driver
• On the front passenger or rear seats (when stacking items)
• On the package tray
• On the instrument panel
•On the dashboard
• In front of the Center Display
●Secure all items in the occupant com-
partment.
■Capacity and distribution
●Do not exceed the maximum axle
weight rating or the total vehicle
weight rating.
●Even if the total load of occupant’s
weight and the cargo load is less than
the total load capacity, do not apply the
load unevenly. Improper loading may
cause deterioration of steering or
braking control which may cause
death or serious injury.
Page 146 of 440

1444-2. Driving procedures
*:If equipped
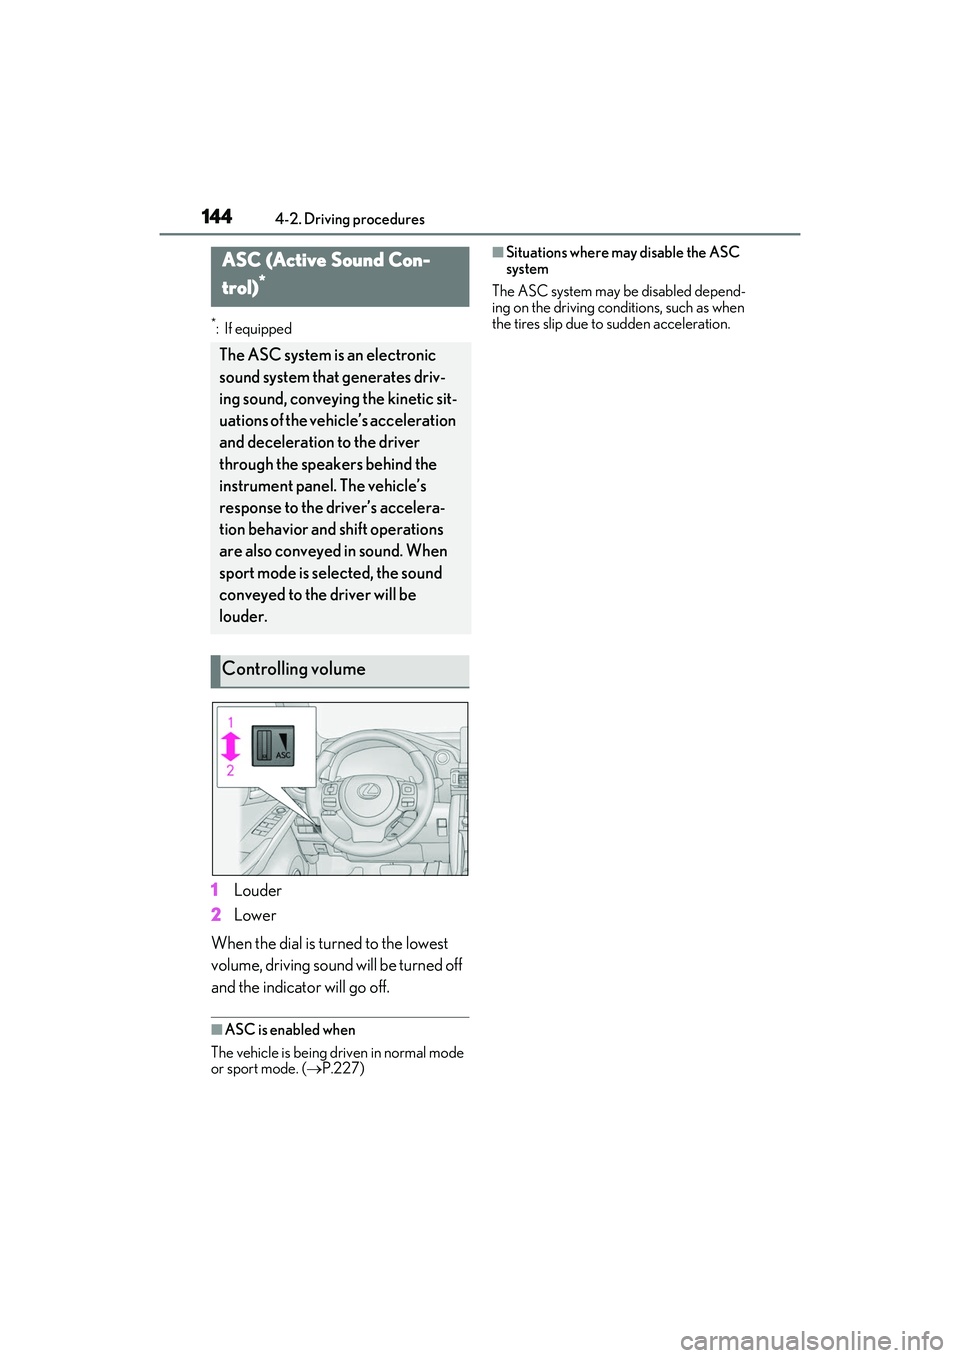
1Louder
2 Lower
When the dial is turned to the lowest
volume, driving sound will be turned off
and the indicator will go off.
■ASC is enabled when
The vehicle is being driven in normal mode
or sport mode. ( P.227)
■Situations where may disable the ASC
system
The ASC system may be disabled depend-
ing on the driving cond itions, such as when
the tires slip due to sudden acceleration.ASC (Active Sound Con-
trol)
*
The ASC system is an electronic
sound system that generates driv-
ing sound, conveying the kinetic sit-
uations of the vehi cle’s acceleration
and deceleration to the driver
through the speakers behind the
instrument panel. The vehicle’s
response to the driver’s accelera-
tion behavior and shift operations
are also conveyed in sound. When
sport mode is selected, the sound
conveyed to the driver will be
louder.
Controlling volume
Page 147 of 440

1454-3. Operating the lights and wipers
4
Driving
4-3.Operating the lights and wipers
Operating the switch turns on
the lights as follows:U.S.A.
Canada
1 The side marker, parking, tail,
license plate, instrument panel
lights, and daytime running lights
( P.145) turn on.
2 The headlights and all lights
listed above (except daytime run-
ning lights) turn on.
3 The headlights, parking lights,
daytime running lights ( P.145) and all the lights listed above turn
on and off automatically. (When the
engine switch is in IGNITION ON
mode.)
4 (U.S.A.) Off
■Daytime running light system
●The daytime running lights illuminate
using the same lights as the parking lights
and illuminate brighter than the parking
lights.
●To make your vehicle more visible to
other drivers during daytime driving, the
daytime running lights turn on automati-
cally when all of the following conditions
are met. (The daytime running lights are
not designed for use at night.)
• The engine is running
• The parking brake is released
• The headlight switch is in the or
* position
*: When the surroundings are bright
The daytime running lights remain on after
they illuminate, even if the parking brake is
set again.
●For the U.S.A.: Daytime running lights
can be turned off by operating the switch.
●Compared to turning on the headlights,
the daytime running light system offers
greater durability and consumes less
electricity, so it can help improve fuel
economy.
■Headlight control sensor
The sensor may not function properly if an
object is placed on the sensor, or anything
that blocks the sensor is affixed to the wind-
shield.
Headlight switch
The headlights can be operated
manually or automatically.
Operating instructions
A
B
Page 252 of 440

2505-2. Using the air conditioning system and defogger
according to the selected air flow
mode.
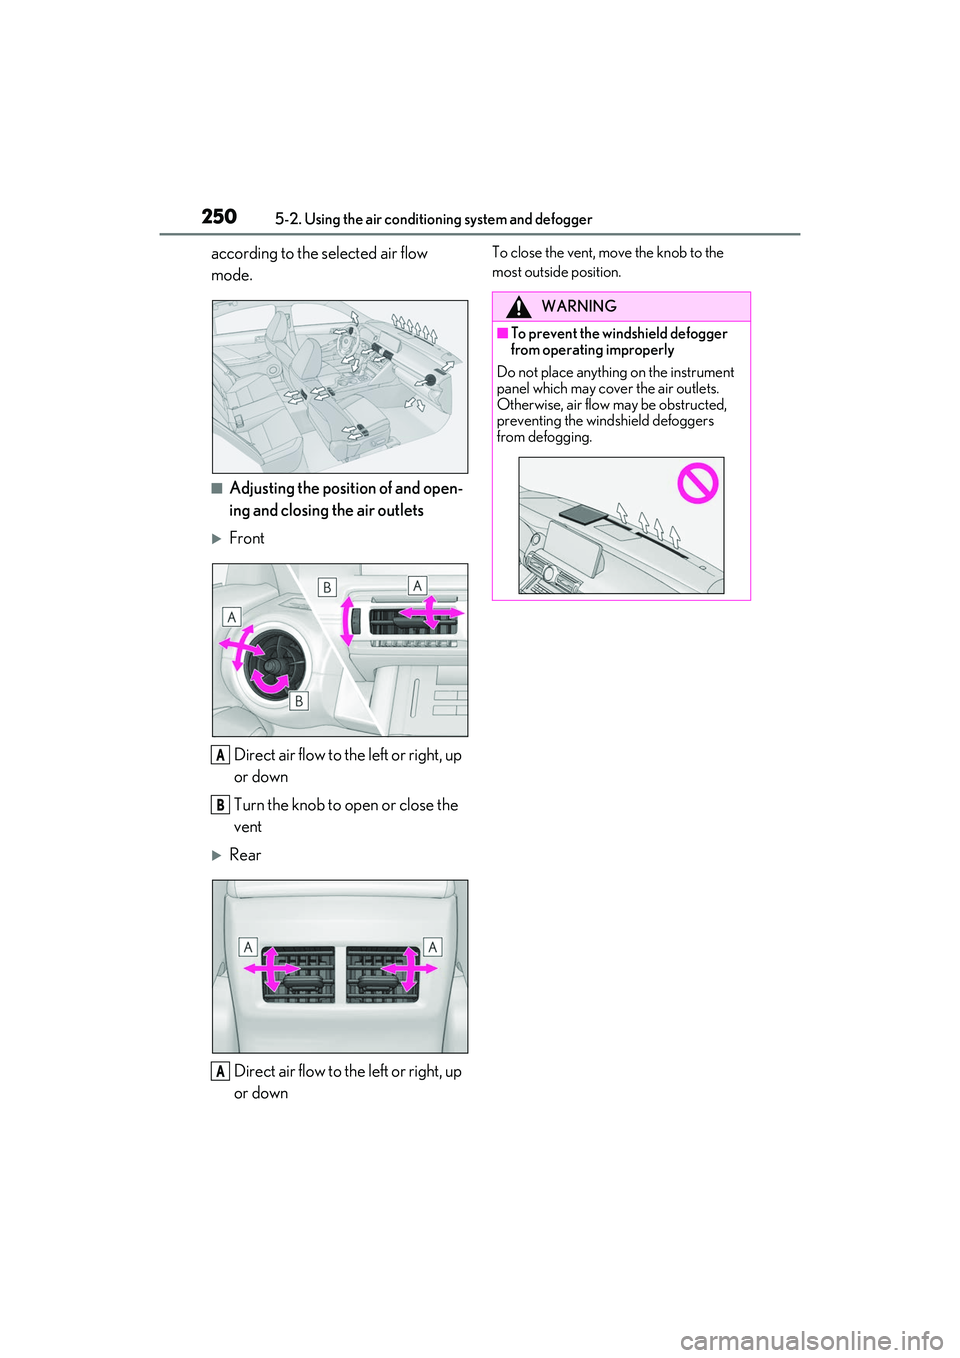
■Adjusting the position of and open-
ing and closing the air outlets
FrontDirect air flow to the left or right, up
or down
Turn the knob to open or close the
vent
RearDirect air flow to the left or right, up
or down
To close the vent, move the knob to the
most outside position.
A
B
A
WARNING
■To prevent the windshield defogger
from operating improperly
Do not place anything on the instrument
panel which may cover the air outlets.
Otherwise, air flow may be obstructed,
preventing the windshield defoggers
from defogging.
Page 276 of 440

2746-1. Maintenance and care
Remove dirt and dust using a vac-
uum cleaner. Wipe dirty surfaces
with a cloth dampened with luke-
warm water.
If dirt cannot be removed, wipe it off
with a soft cloth dampened with
neutral detergent diluted to approx-
imately 1%.
Wring out any excess water from
the cloth and thoroughly wipe off
remaining traces of detergent and
water.
■Shampooing the carpets
There are several commercial foaming-type
cleaners available. Use a sponge or brush
to apply the foam. Ru b in overlapping cir-
cles. Do not use water. Wipe dirty surfaces
and let them dry. Excellent results are
obtained by keeping the carpet as dry as
possible.
■Handling the seat belts
Clean with mild soap and lukewarm water
using a cloth or sponge. Also check the
belts periodically for excessive wear, fraying
or cuts.
■When cleaning the carpeted portions of
the glove box, console box, etc.
If a strong adhesive tape is used, there is a
possibility that the surface of the carpet
could be damaged.
Cleaning and protecting the
vehicle interior
The following procedures will help
protect your vehicle’s interior and
keep it in top condition:
Protecting the vehicle interior
WARNING
■Water in the vehicle
●Do not splash or spill liquid in the vehi-
cle.
Doing so may cause electrical compo-
nents, etc. to malfunction or catch fire.
●Do not get any of the SRS components
or wiring in the vehicle interior wet.
( P.28)
An electrical malfunction may cause
the airbags to deploy or not function
properly, resulting in death or serious
injury.
■Cleaning the interior (especially
instrument panel)
Do not use polish wax or polish cleaner.
The instrument panel may reflect off the
windshield, obstructin g the driver’s view
and leading to an accident, resulting in
death or serious injury.
NOTICE
■Cleaning detergents
●Do not use the following liquids, as
they may discolor th e vehicle interior
or cause streaks or damage to painted
surfaces:
• Audio system screen: Organic sub- stances such as benzine or gasoline,
alkaline solutions, and alcohol
• Seats: Alkaline solutions, organic sub- stances such as thinner or benzine,
and alcohol
• Other parts: Organic substances such as benzine or gasoline, alkaline or
acidic solutions, dye, and bleach
●Do not use polish wax or polish
cleaner. The instrument panel’s or
other interior part’s painted surface
may be damaged.
Page 312 of 440

3106-3. Do-it-yourself maintenance
1Turn the engine switch off.
2 Open the fuse box cover.
Engine compartment: type A fuse
box
Push the tab in and lift the lid off.
Engine compartment: type B fuse
box
Push the tab in and lift the lid off.
Driver’s side instrument panel
Remove the lid.
3Remove the fuse with the pullout
tool.
Only type A fuses can be removed
using the pullout tool.
4 Check if the fuse is blown.
Type A and B:
Replace the blown fuse with a new fuse of
an appropriate amperage rating. The
amperage rating can be found on the fuse
box lid.
Type C and D:
Contact your Lexus dealer.
Type A
Normal fuse
Checking and replacing
fuses
If any of the electrical components
do not operate, a fuse may have
blown. If this happens, check and
replace the fuses as necessary.
Checking and replacing fuses
A
Page 366 of 440

3648-1. Specifications
8-1.Specifications
*1: IS350 AWD/IS350/IS300 AWD/IS300
*2:IS500
*3: Unladen vehicles
*4:2WD models
*5:AWD models
*6: Vehicles with 235/45R18 or 235/40R19 rear tires
*7: Vehicles with 265/35R19 rear tires
■Vehicle identification number
The vehicle identification number
(VIN) is the legal identifier for your
vehicle. This is the primary identifica-
tion number for your Lexus. It is used in registering the ownership of your vehi-
cle.
This number is stamped on the top left
of the instrument panel and in the
engine compartment.
Maintenance data (fuel, oil level, etc.)
Dimensions and weight
Overall length185.4 in. (4710 mm)*1
187.3 in. (4758 mm)*2
Overall width72.4 in. (1840 mm)
Overall height*356.5 in. (1435 mm)*4
56.7 in. (1440 mm)*5
Wheelbase110.2 in. (2800 mm)
Tread*1
Front62.2 in. (1580 mm)
Rear63.0 in. (1600 mm)*6
61.8 in. (1570 mm)*7
Vehicle capacity weight
(Occupants + luggage)825 lb. (375 kg)
Seating capacity
Seating capacity5 (Front 2, Rear 3)
Vehicle identification
Page 417 of 440

415Alphabetical Index
Alphabetical Index
A
A/CAir conditioning filter ............................... 307
Automatic air conditioning system ... 243
Micro dust and pollen filter................... 248
ABS (Anti-lock Brake System).............. 229 Warning light .................................................331
ACA (Active Cornering Assist) ........... 229
Active Cornering Assist (ACA) ........... 229
Active Sound Control (ASC) ..................144
Adaptive Variable Suspension system229
AHB (Automatic High Beam) ................. 147
Air conditioning filter ................................. 307
Air conditioning system Air conditioning filter ............................... 307
Automatic air conditioning system ... 243
Micro dust and pollen filter................... 248
Airbags Airbag operating conditions................... 30
Airbag precautions for your child ........ 33
Correct driving posture .............................23
Curtain shield airbag operating condi- tions .................................................................. 30
Curtain shield airbag precautions ....... 33
Front passenger occupa nt classification
system ............................................................. 36
General airbag precautions ................... 33
Locations of airbags.................................... 28
Modification and disposal of airbags . 35
Side airbag operating conditions ......... 30
Side airbag precautions ............................ 33
Side and curtain shield airbags operating conditions ...................................................... 30
Side and curtain shield airbags precau- tions .................................................................. 33
SRS airbags ..................................................... 28
SRS warning light ......................................330
Alarm ..................................................................... 61 Warning buzzer......................................... 329
Anchor brackets .......................................42, 51 Antennas (smart acc
ess system with
push-button start).........................................97
Anti-lock Brake System (ABS).............. 229 Warning light ................................................ 331
Approach warning........................................192
Armrest............................................................ 260
ASC (Active Sound Control) ..................144
Assist grips ..................................................... 260
Audio system-linked display ...................... 80
Automatic air conditioning system ...... 243
Automatic headlight leveling system ....146
Automatic High Beam ................................ 147
Automatic light control system................145
Automatic transmission ..............................134 M mode ............................................................137
Paddle shift switches ....................... 136, 137
Snow mode.................................................... 136
Average fuel economy................................. 78
Average vehicle speed ................................ 78
B
Back-up lights Replacing light bulbs ..................................314
Battery If the battery is discharged ....................353
Preparing and checking before winter.......................................................................... 234
Warning light .............................................. 330
Blind Spot Monitor (BSM)......................... 197
Boost gauge.......................................................79
Brake Brake hold .......................................................142
Fluid.........................................................294, 371
Parking brake ............................................... 139
Warning light ...............................................329
Brake assist .................................................... 229
Break-in tips...................................................... 121
Brightness control Instrument panel light control................. 75
BSM (Blind Spot Monitor)......................... 197