2022 LEXUS ES350 coolant level
[x] Cancel search: coolant levelPage 67 of 468

652-1. Instrument cluster
2
Vehicle status information and indicators
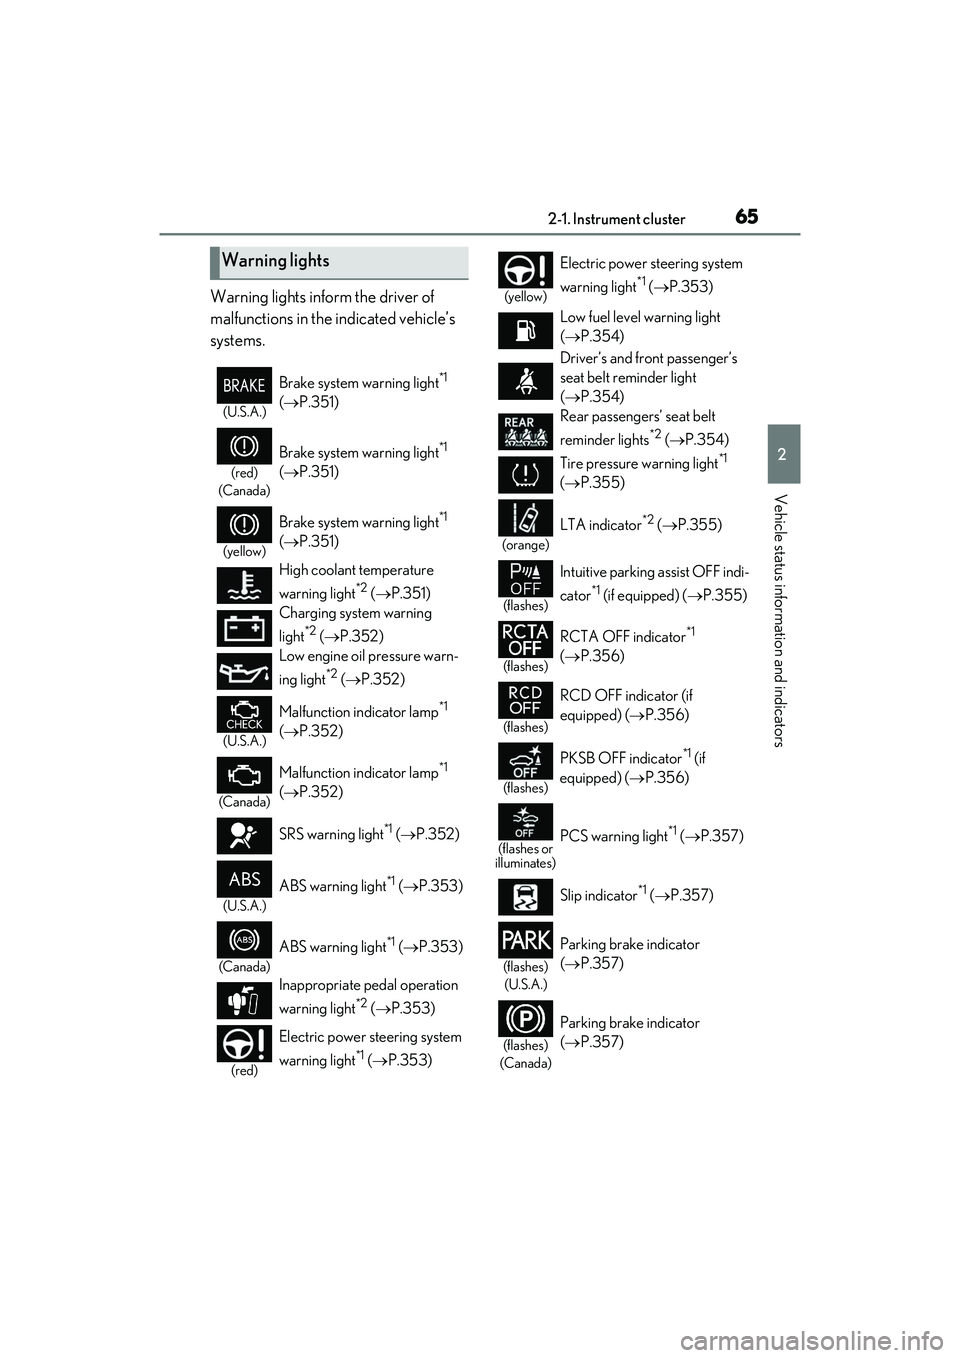
Warning lights inform the driver of
malfunctions in the indicated vehicle’s
systems.
Warning lights
(U.S.A.)
Brake system warning light*1
( P.351)
(red)
(Canada)
Brake system warning light*1
( P.351)
(yellow)
Brake system warning light*1
( P.351)
High coolant temperature
warning light
*2 ( P.351)
Charging system warning
light
*2 ( P.352)
Low engine oil pressure warn-
ing light
*2 ( P.352)
(U.S.A.)
Malfunction indicator lamp*1
( P.352)
(Canada)
Malfunction indicator lamp*1
( P.352)
SRS warning light
*1 ( P.352)
(U.S.A.)
ABS warning light*1 ( P.353)
(Canada)
ABS warning light*1 ( P.353)
Inappropriate pedal operation
warning light
*2 ( P.353)
(red)
Electric power steering system
warning light
*1 ( P.353)
(yellow)
Electric power steering system
warning light
*1 ( P.353)
Low fuel level warning light
( P.354)
Driver’s and front passenger’s
seat belt reminder light
( P.354)
Rear passengers’ seat belt
reminder lights
*2 ( P.354)
Tire pressure warning light
*1
( P.355)
(orange)
LTA indicator*2 ( P.355)
(flashes)
Intuitive parking assist OFF indi-
cator
*1 (if equipped) ( P.355)
(flashes)
RCTA OFF indicator*1
( P.356)
(flashes)
RCD OFF indicator (if
equipped) ( P.356)
(flashes)
PKSB OFF indicator*1 (if
equipped) ( P.356)
(flashes or
illuminates)PCS warning light*1 ( P.357)
Slip indicator
*1 ( P.357)
(flashes)
(U.S.A.)
Parking brake indicator
( P.357)
(flashes)
(Canada)
Parking brake indicator
( P.357)
Page 76 of 468

742-1. Instrument cluster
■Manually updating the fuel gauge and
possible driving range
The fuel gauge and the possible driving
range are linked. If the displays of the fuel
gauge and possible driving range do not
update after adding a small amount of fuel,
the displays can be updated by performing
the following procedure.
1 Stop the vehicle on a level surface.
2 Press the “ODO TRIP” switch to
change the odometer and trip meter
display to odometer.
3 Turn the engine switch off.
4 While pressing and holding the “ODO
TRIP” switch, turn the engine switch to
IGNITION ON mode.
5 Continue to hold the “ODO TRIP”
switch for approximately 5 seconds,
and then release it once the odometer
begins flashing.
Updating is complete once the odometer
flashes for approximately 5 seconds and
then the display returns to normal.
■Outside temperature display
●In the following situations, the correct
outside temperature may not be dis-
played, or the display may take longer
than normal to change:
• When stopped, or driving at low speeds (less than 12 mph [20 km/h])
• When the outside temperature has changed suddenly (at the entrance/exit
of a garage, tunnel, etc.)
●When “--” or “E” is displayed, the system
may be malfunctioning. Take your vehicle
to your Lexus dealer.
■Liquid crystal display
P.77
■Customization
The gauges and meters can be customized
on of the multi-information display.
( P.80)
■Display items
Odometer
Displays the total distance the vehicle has
been driven.
Trip meter A/trip meter B
WARNING
■The information display at low tem-
peratures
Allow the interior of the vehicle to warm
up before using the liquid crystal infor-
mation display. At extremely low tem-
peratures, the information display
monitor may respond slowly, and display
changes may be delayed.
For example, there is a lag between the
driver’s shifting and the new gear num-
ber appearing on the display. This lag
could cause the driver to downshift
again, causing rapid and excessive
engine braking and possibly an accident
resulting in death or injury.
NOTICE
■To prevent damage to the engine and
its components
●Do not let the indicator needle of the
tachometer enter the red zone, which
indicates the maximum engine speed.
●The engine may be overheating if the
engine coolant temperature gauge is
in the red zone (H). In this case, imme-
diately stop the vehicle in a safe place,
and check the engine after it has
cooled completely. ( P.382)
Odometer and trip meter dis-
play
Page 253 of 468

2514-6. Driving tips
4
Driving
4-6.Driving tips
Use fluids that are appropriate to
the prevailing outside temperatures.
•Engine oil
• Engine coolant
•Washer fluid
Have a service technician inspect
the condition of the battery.
Have the vehicle fitted with four
snow tires or purchase a set of tire
chains for the front tires.
*
Ensure that all tires are the specified size
and brand, and that chains match the size
of the tires.
*: Tire chains cannot be mounted on vehi-
cles with 18-inch/19-inch tires.
Perform the following according to the
driving conditions:
Do not try to forcibly open a window
Winter driving tips
Carry out the necessary prepara-
tions and inspection s before driving
the vehicle in winter. Always drive
the vehicle in a manner appropriate
to the prevailing weather condi-
tions.
Preparation for winter
WARNING
■Driving with snow tires
Observe the following precautions to
reduce the risk of accidents.
Failure to do so may result in a loss of
vehicle control and cause death or seri-
ous injury.
●Use tires of the specified size.
●Maintain the recommended level of air
pressure.
●Do not drive in excess of 75 mph (120
km/h), regardless of the type of snow
tires being used.
●Use snow tires on all, not just some
wheels.
■Driving with tire chains (vehicles with
17-inch tires)
Observe the following precautions to
reduce the risk of accidents.
Failure to do so may result in the vehicle
being unable to be driven safely, and may
cause death or serious injury.
●Do not drive in excess of the speed
limit specified for the tire chains being
used, or 30 mph (50 km/h), which-
ever is lower.
●Avoid driving on bumpy road surfaces
or over potholes.
●Avoid sudden acceleration, abrupt
steering, sudden braking and shifting
operations that cause sudden engine
braking.
●Slow down sufficiently before entering
a curve to ensure that vehicle control
is maintained.
●Do not use LTA (Lane Tracing Assist)
system.
NOTICE
■Repairing or replacing snow tires
Request repairs or replacement of snow
tires from Lexus dealers or legitimate tire
retailers.
This is because the removal and attach-
ment of snow tires affects the operation
of the tire pressure warning valves and
transmitters.
Before driving the vehicle
Page 306 of 468

3046-2. Maintenance
3Press or of the meter control
switches and select “Scheduled Mainte-
nance”. Then press “OK”.
4 Select “Yes” and press “OK”.
A message will be displayed when the reset
procedure has been completed.
You can perform some maintenance
procedures by yourself.
Please be aware that do-it-yourself
maintenance may affect warranty cov-
erage.
The use of Lexus repair manuals is recom-
mended.
For details about warranty coverage, refer
to the separate “Owner’s Guide”, “War-
ranty and Service Guide”, “Owner’s Man-
ual Supplement” or “Warranty Booklet”.
Do-it-yourself maintenance
General maintenance
Listed below are the general main-
tenance items that should be per-
formed at the intervals specified in
the “Warranty and Service Guide”
or “Owner’s Manual Supplement”.
It is recommended that any prob-
lem you notice shou ld be brought to
the attention of your Lexus dealer
or qualified service shop for advice.
WARNING
■If the engine is running
Turn the engine off and ensure that there
is adequate ventilation before perform-
ing maintenance checks.
Engine compartment
ItemsCheck points
BatteryCheck the battery
connections. ( P.317)
Brake fluid
Is the brake fluid at the
correct level?
( P.317)
Engine coolant
Is the engine coolant at
the correct level?
( P.316)
Engine oil
Is the engine oil at the
correct level?
( P.313)
Exhaust system
There should not be
any fumes or strange
sounds.
Page 310 of 468

3086-3. Do-it-yourself maintenance
6-3.Do-it-yo urself mainte nance
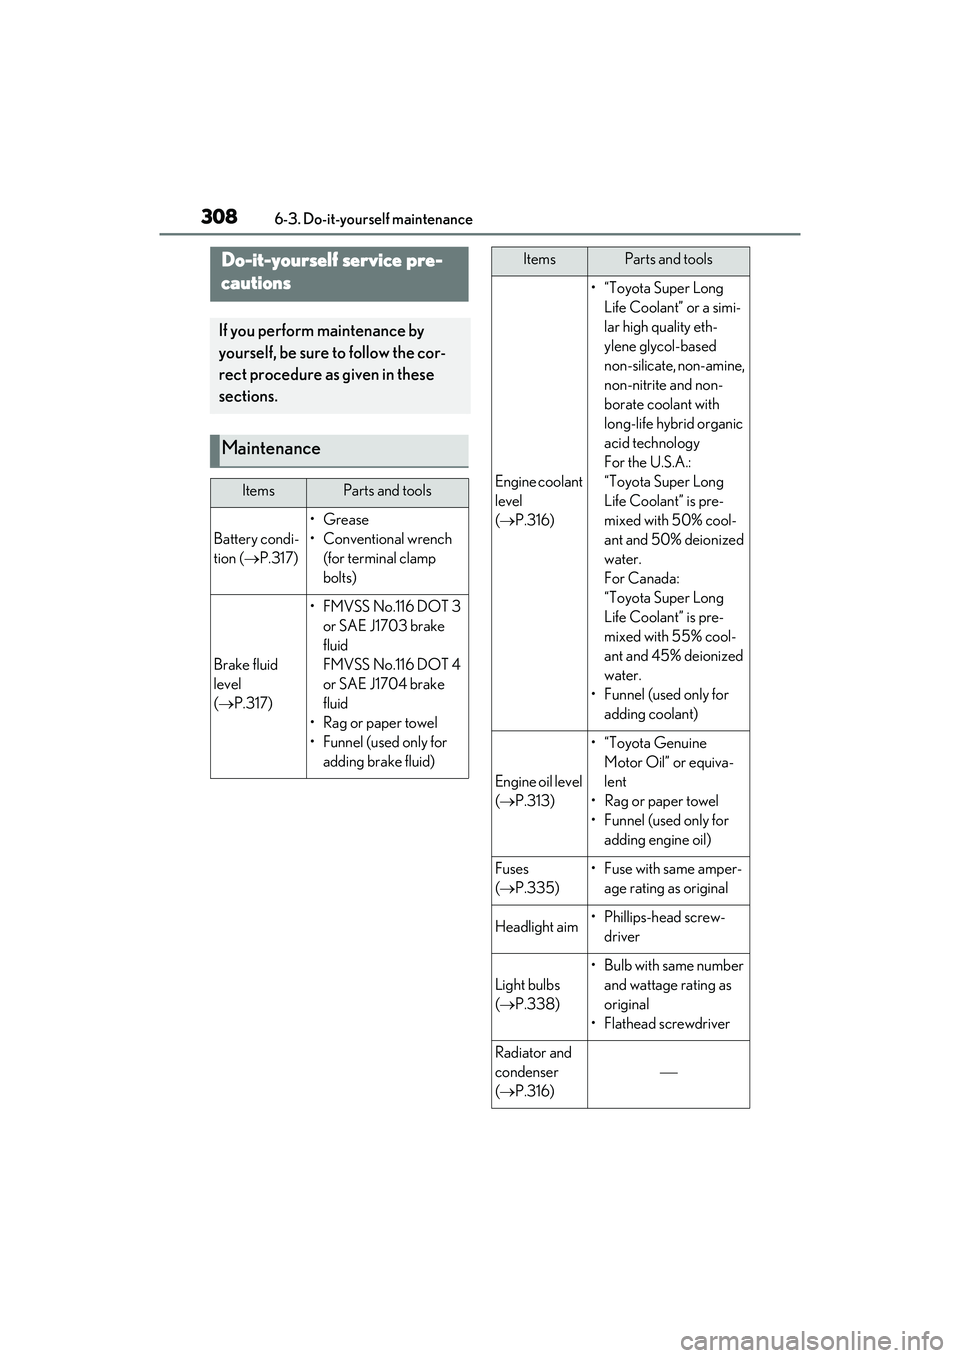
Do-it-yourself service pre-
cautions
If you perform maintenance by
yourself, be sure to follow the cor-
rect procedure as given in these
sections.
Maintenance
ItemsParts and tools
Battery condi-
tion (P.317)
•Grease
• Conventional wrench
(for terminal clamp
bolts)
Brake fluid
level
( P.317)
• FMVSS No.116 DOT 3
or SAE J1703 brake
fluid
FMVSS No.116 DOT 4
or SAE J1704 brake
fluid
•Rag or paper towel
• Funnel (used only for adding brake fluid)
Engine coolant
level
( P.316)
•“Toyota Super Long
Life Coolant” or a simi-
lar high quality eth-
ylene glycol-based
non-silicate, non-amine,
non-nitrite and non-
borate coolant with
long-life hybrid organic
acid technology
For the U.S.A.:
“Toyota Super Long
Life Coolant” is pre-
mixed with 50% cool-
ant and 50% deionized
water.
For Canada:
“Toyota Super Long
Life Coolant” is pre-
mixed with 55% cool-
ant and 45% deionized
water.
• Funnel (used only for adding coolant)
Engine oil level
( P.313)
•“Toyota Genuine
Motor Oil” or equiva-
lent
• Rag or paper towel
• Funnel (used only for adding engine oil)
Fuses
( P.335)• Fuse with same amper-
age rating as original
Headlight aim• Phillips-head screw-driver
Light bulbs
( P.338)
• Bulb with same number
and wattage rating as
original
• Flathead screwdriver
Radiator and
condenser
( P.316)
ItemsParts and tools
Page 314 of 468

3126-3. Do-it-yourself maintenance
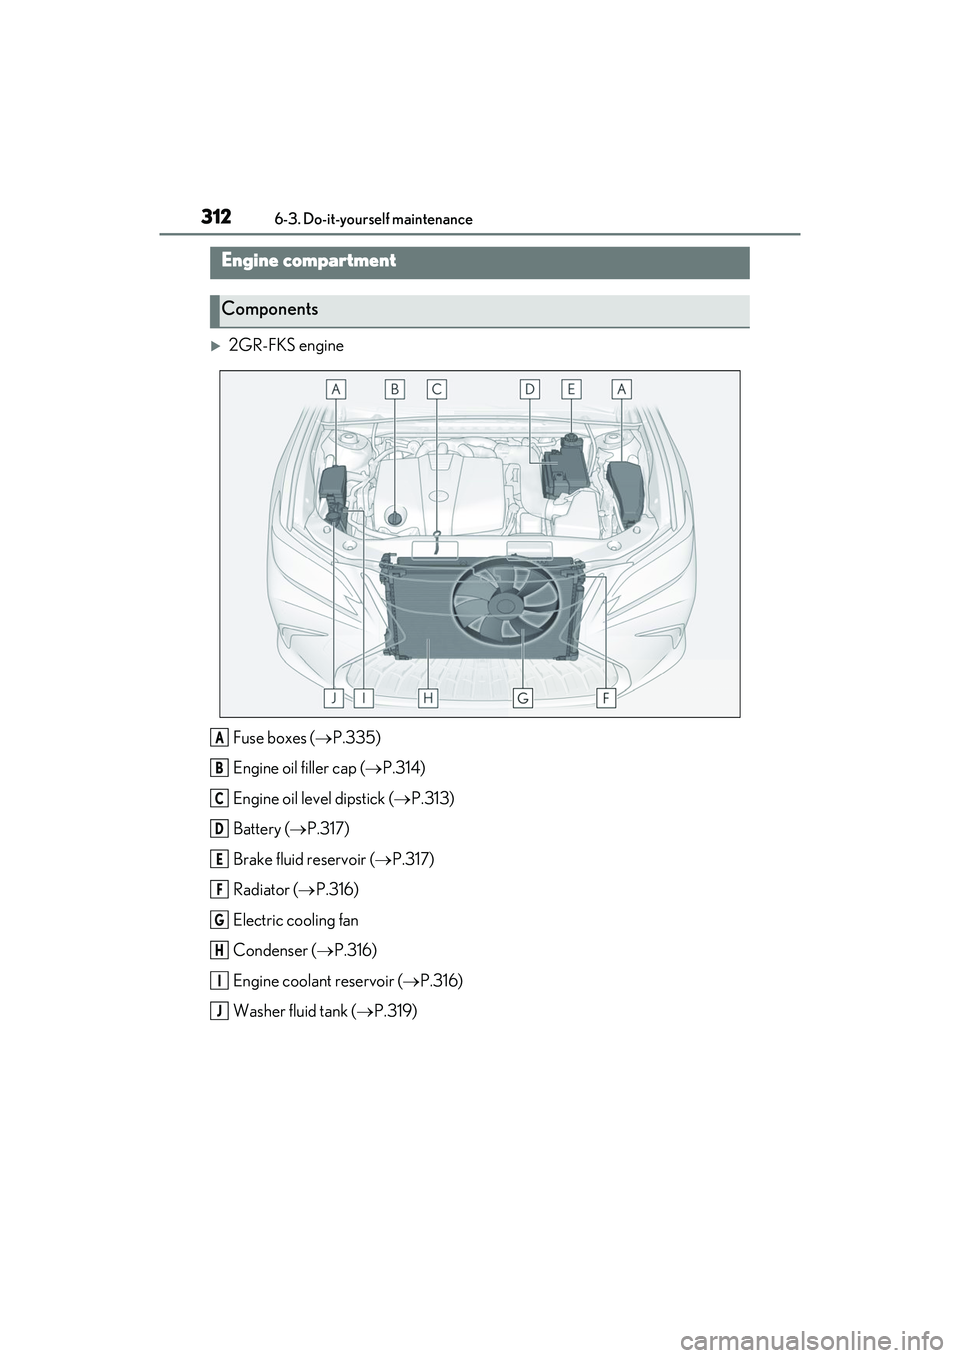
2GR-FKS engineFuse boxes ( P.335)
Engine oil filler cap ( P.314)
Engine oil level dipstick ( P.313)
Battery ( P.317)
Brake fluid reservoir ( P.317)
Radiator ( P.316)
Electric cooling fan
Condenser ( P.316)
Engine coolant reservoir ( P.316)
Washer fluid tank ( P.319)
Engine compartment
Components
A
B
C
D
E
F
G
H
I
J
Page 315 of 468

3136-3. Do-it-yourself maintenance
6
Maintenance and care
A25A-FKS engineFuse boxes ( P.335)
Engine oil filler cap ( P.314)
Engine oil level dipstick ( P.313)
Battery ( P.317)
Brake fluid reservoir ( P.317)
Radiator ( P.316)
Electric cooling fan
Condenser ( P.316)
Engine coolant reservoir ( P.316)
Washer fluid tank ( P.319)
With the engine at operating tempera-
ture and turned off, check the oil level
on the dipstick.
■Checking the engine oil
1 Park the vehicle on level ground.
After warming up the en gine and turning it
off, wait more than 5 minutes for the oil to
drain back into the bottom of the engine.
2 Holding a rag under the end, pull
the dipstick out.
A
B
C
D
E
F
G
H
I
J
Checking and adding the engine
oil
Page 318 of 468

3166-3. Do-it-yourself maintenance
The coolant level is satisfactory if it is
between the “F” and “L” lines on the
reservoir when the engine is cold.Reservoir cap
“F” line
“L” line
If the level is on or below the “L” line, add
coolant up to the “F” line. ( P.382)
■Coolant selection
Only use “Toyota Super Long Life Coolant”
or a similar high quality ethylene glycol
based non-silicate, non-amine, non-nitrite,
and non-borate coolant with long-life
hybrid organic acid technology.
U.S.A.:
“Toyota Super Long Life Coolant” is a mix-
ture of 50% coolant and 50% deionized
water. (Minimum temperature: -31°F [-
35°C])
Canada:
“Toyota Super Long Life Coolant” is a mix-
ture of 55% coolant and 45% deionized
water. (Minimum temperature: -44°F [-
42°C])
For more details about engine coolant, con-
tact your Lexus dealer.
■If the coolant level drops within a short
time of replenishing
Visually check the radiator, hoses, engine
coolant reservoir cap, drain cock and water
pump.
If you cannot find a leak, have your Lexus
dealer test the cap and check for leaks in
the cooling system.
Check the radiator and condenser and
clear away any foreign objects.
If either of the above parts is extremely
dirty or you are not sure of their condi-
tion, have your vehicle inspected by
your Lexus dealer.
NOTICE
●Be sure the engine oil filler cap is prop-
erly tightened.
Checking the engine coolant
A
B
C
WARNING
■When the engine is hot
Do not remove the engine coolant reser-
voir cap or the radiator cap. ( P.384)
The cooling system may be under pres-
sure and may spray hot coolant if the cap
is removed, causing serious injuries, such
as burns.
NOTICE
■When adding coolant
Coolant is neither plain water nor
straight antifreeze. The correct mixture
of water and antifreeze must be used to
provide proper lubrication, corrosion
protection and cooling. Be sure to read
the antifreeze or coolant label.
■If you spill coolant
Be sure to wash it off with water to pre-
vent it from damaging parts or paint.
Checking the radiator and con-
denser