2022 LEXUS ES350 ignition
[x] Cancel search: ignitionPage 86 of 468

842-1. Instrument cluster
Tachometer/Eco Driving Indicator display area (P.86)
Head-up display switch
■Head-up display will operate when
The engine switch is in IGNITION ON
mode.
■When using the head-up display
The head-up display may seem dark or hard
to see when viewed through sunglasses,
especially polarized sunglasses. Adjust the
brightness of the he ad-up display or
remove your sunglasses.
■Street name display
Only street names which are included in the
map data will be displayed.
■Enabling/disabling the head-up
display
Press the Head-up display switch.
■Changing settings of the head-up
display
The following settings can be changed
on of the multi-information display.
( P.76)
Brightness and vertical position of
the head-up display
Select to adjust the brightness or vertical
position of the head-up display.
Tachometer/Eco Driving Indicator
Select to display the tachometer, Eco Dri-
ving Indicator or no content.
Display content
C
D
WARNING
■When using the head-up display
●Check that the position and brightness
of the head-up display image does not
interfere with safe driving. Incorrect
adjustment of the image’s position or
brightness may obstruct the driver’s
view and lead to an accident, resulting
in death or serious injury.
●Do not continuously look at the head-
up display while driving as you may fail
to see pedestrians, objects on the
road, etc. ahead of the vehicle.
NOTICE
■Head-up display projector
●Do not place any drinks near the head-
up display projector. If the projector
gets wet, electrical malfunctions may
result.
●Do not place anything on or put stick-
ers onto the head-up display projector.
Doing so could interrupt head-up dis-
play indications.
●Do not touch the inside of the head-up
display projector or thrust sharp edges
or the like into the projector.
Doing so could cause mechanical mal-
functions.
Using the head-up display
Page 87 of 468

852-1. Instrument cluster
2
Vehicle status information and indicators
Select to enable/disable the following
items:
• Route guidance to destination/street name
• Driving support system display
*
• Compass (heading-up display)
• Audio system operation status
*: Make sure to enable this display when using the driving support systems
Display angle
Select to adjust the angle of the head-up
display.
■Enabling/disabling of the head-up dis-
play
If the head-up display is disabled, it will
remain disabled when the engine switch is
turned off then back to IGNITION ON
mode.
■Display brightness
The brightness of the head-up display can
be adjusted on of the multi-information
display. Also, it is automatically adjusted
according to the ambient brightness.
■Head-up display automatic position
adjustment
If the display position is recorded into mem-
ory, the head-up display will be automati-
cally adjusted to the desired position.
( P.113)
■When the battery is disconnected
The customize settings of the head-up dis-
play will be reset.
Displays the operational status of the
following systems:
LTA (Lane Tracing Assist)
( P.186)
Dynamic radar cruise control with
full-speed range ( P.198)
Details of content displayed on the head-
up display may differ from that displayed
on the multi-information display. For
details, refer to the explanation of each sys-
tem.
Pop-up displays for the following sys-
tems will be displayed when necessary.
■Driving support systems
Displays a warning/suggestion/advice
WARNING
■Caution for changing settings of the
head-up display
As the engine needs to be running while
changing the settings of the head-up dis-
play, ensure that the vehicle is parked in a
place with adequate ventilation. In a
closed area such as a garage, exhaust
gases including harmful carbon monox-
ide (CO) may collect and enter the vehi-
cle. This may lead to death or a serious
health hazard.
NOTICE
■When changing the settings of the
head-up display
To prevent battery discharge, ensure
that the engine is running while changing
the settings of the head-up display.
Driving support system display
area
Pop-up display
Page 101 of 468

993-2. Opening, closing and locking the doors and trunk
3
Before driving
■Inside door handles (to unlock)
For the front doors
Pull the handle to unlock and open the
door.
When the door is unlo cked, the inside lock
button will pop up.
For the rear doors
Pull the handle to unlock the door. Pull
the handle a second time to open the
door.
When the door is unlo cked, the inside lock
button will pop up.
■Locking the front door s from the outside
without a key
1 Push down the inside lock button.
2 Close the door.
The door cannot be locked if the engine
switch is in ACCESSORY or IGNITION
ON mode, or the electronic key is left
inside the vehicle. However, the key may
not be detected correctly and the door may
be locked.
■Open door warning buzzer
If the vehicle speed reaches 3 mph (5
km/h), a buzzer sounds to indicate that the
door(s), the hood or the trunk is not fully
closed.
The open door(s), the hood or the trunk is
displayed on the multi-information display.
The door cannot be opened from inside the vehicle when the lock is set.
1
Unlock
2 Lock
These locks can be set to prevent chil-
dren from opening the rear doors.
Push down on each rear door switch to
lock both rear doors.
The following functions can be set or
canceled:
For instructions on customizing, refer to
P.408.
Rear door child-protector lock
Automatic door locking and
unlocking systems
FunctionOperation
Speed linked
door locking
function
All doors are automati-
cally locked when vehi-
cle speed is
approximately 12 mph
(20 km/h) or higher.
Shift position
linked door lock-
ing functionAll doors are automati-
cally locked when the
shift lever is shifted to a
position other than P.
Page 104 of 468

1023-2. Opening, closing and locking the doors and trunk
■Trunk opener switch
Press the trunk opener switch.
WARNING
●On an incline, the trunk lid may sud-
denly shut after it opens automatically.
Make sure the trunk lid is fully open
and secure before using the trunk.
●In the following situations, the power
trunk lid may detect an abnormality
and automatic operation may be
stopped. In this case, the trunk lid has
to be operated manually. Take extra
care in this situation, as the stopped
trunk lid may suddenly shut, causing an
accident.
• When the trunk lid contacts an obsta- cle
• When the battery voltage suddenly drops, such as when the engine switch
is turned to IGNITION ON mode or
the engine is started during automatic
operation
●Do not attach any accessories other
than genuine Lexus parts to the trunk
lid. The power trunk lid may not oper-
ate, causing itself to malfunction, or the
trunk lid may suddenly shut again after
it is opened.
■Hands Free Power Trunk Lid (vehi-
cles with power trunk lid)
Observe the following precautions.
Failure to do so may cause serious injury.
●Exhaust gases cause the exhaust pipes
to become quite hot. When operating
the Hands Free Power Trunk Lid, be
careful not to touch the exhaust pipe.
●Do not operate the Hands Free Power
Trunk Lid if there is little space under
the rear bumper.
■Jam protection function (vehicles
with power trunk lid)
Observe the following precautions.
Failure to do so may cause serious injury.
●Never use any part of your body to
intentionally activat e the jam protec-
tion function.
●The jam protection function may not
work if something gets caught just
before the trunk lid fully closes. Be
careful not to catch fingers or anything
else in the trunk lid.
●The jam protection function may not
work depending on the shape of the
object that is caught. Be careful not to
catch fingers or anything else.
NOTICE
■To prevent trunk easy closer mal-
functions (vehicles with power trunk
lid)
Do not apply force to the trunk lid while
the trunk easy closer is operating.
■To prevent damage to the power
trunk lid (vehicles with power trunk
lid)
●Make sure that there is no luggage or
snow on the trunk lid before operating
the power trunk lid. In addition, make
sure that there is no ice between the
trunk lid and frame that prevents
movement of the trunk lid. Operating
the power trunk lid when excessive
load is present on the trunk lid may
cause a malfunction.
●Do not apply excessive force to the
trunk lid while the power trunk lid is
operating.
Opening/closing the trunk
Page 117 of 468

1153-3. Adjusting the seats
3
Before driving
■Registering procedure
Record your driving position to button
“1”, “2” or “3” before performing the
following:
Carry only the key you want to regis-
ter, and then close the driver’s door.
If 2 or more keys are in the vehicle, the
driving position cannot be recorded
properly.
1 Check that the shift lever is in P.
2 Turn the engine switch to IGNI-
TION ON mode.
3 Recall the driving position that you
want to record.
4 While pressing the recalled button,
press and hold the door lock switch
(either lock or unlock) until the
buzzer sounds.
If the button could not be registered, the
buzzer sounds continuously for approxi-
mately 3 seconds.
■Cancelation procedure
1 Carry only the key you want to can-
cel and then close the driver’s door.
If 2 or more keys are in the vehicle, the
driving position cannot be canceled prop-
erly.
2Check that the shift lever is in P.
3 Turn the engine switch to IGNI-
TION ON mode.
4 While pressing the “SET” button,
press and hold the door lock switch
(either lock or unlock) until the
buzzer sounds twice.
If the button could not be canceled, the
buzzer sounds continuously for approxi-
mately 3 seconds.
■Recall procedure
1 Make sure that the doors are
locked before recalling the driving
position. Carry the electronic key
that has been registered to the driv-
ing position, and then unlock and
open the driver’s door using the
smart access system with push-but-
ton start or wireless remote control.
The driving position will move to the
recorded position (not including the steer-
ing wheel and head-up display [if
equipped]). However, the seat will move to
a position slightly behind the recorded
position in order to make entering the
vehicle easier.
If the driving position is in a position that
has already been recorded, the seat and
outside rear view mirrors will not move.
2Turn the engine switch to ACCES-
SORY mode or IGNITION ON
mode, or fasten a seat belt.
The seat, steering wheel and head-up dis-
play (if equipped) will move to the
recorded position.
■Recalling the driving position using the
memory recall function
●Different driving positions can be regis-
tered for each electronic key. Therefore,
Registering/cancel ing/recall a
driving position to an electronic
key (including a card key) (mem-
ory recall function)
Page 120 of 468

1183-4. Adjusting the steering wheel and mirrors
3-4.A djusting the steering wheel and mirrors
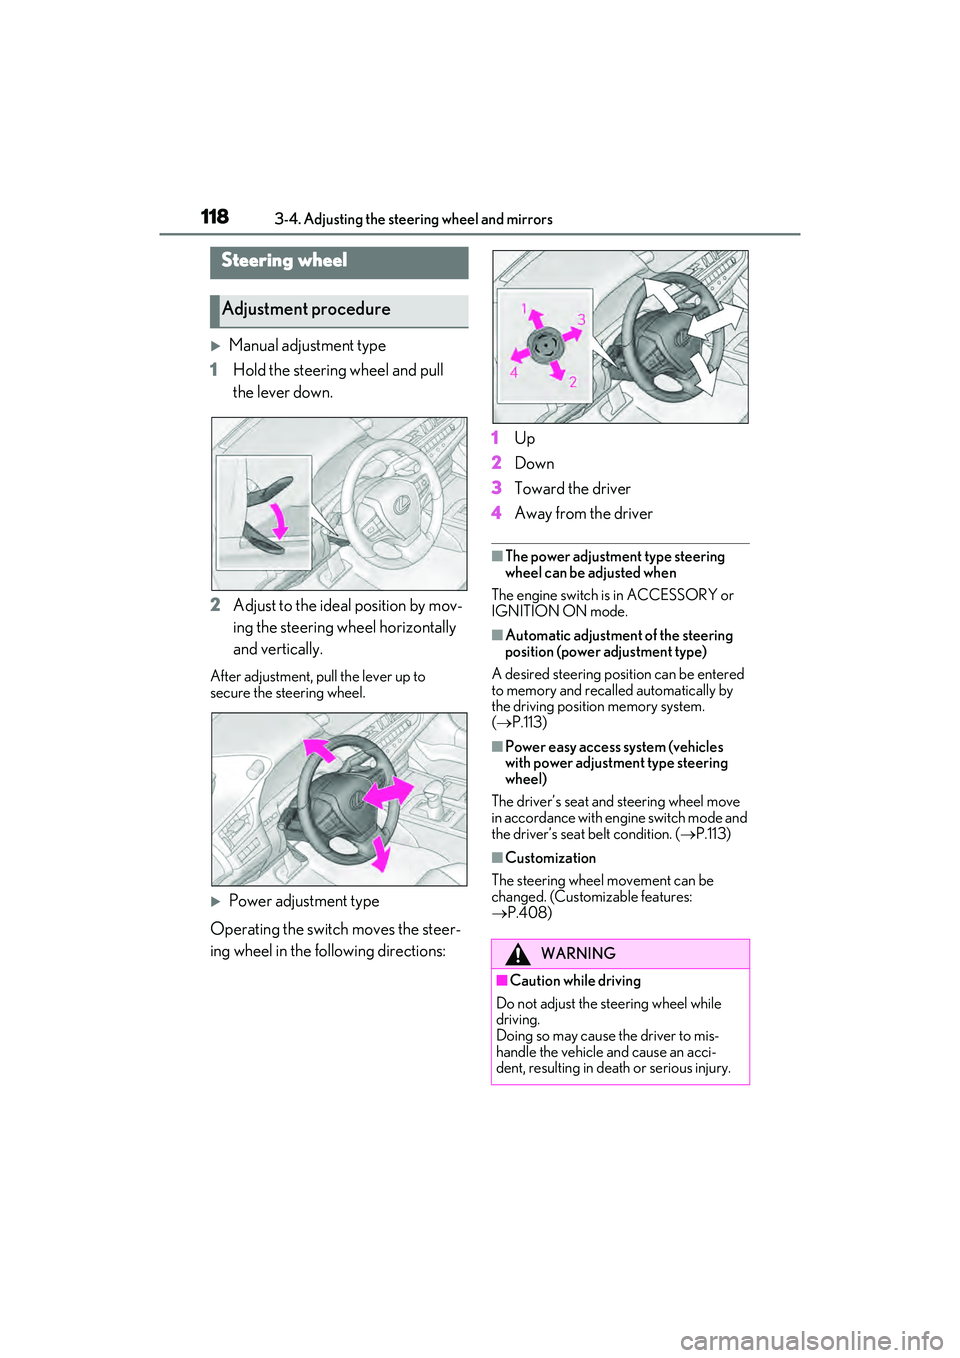
Manual adjustment type
1 Hold the steering wheel and pull
the lever down.
2 Adjust to the ideal position by mov-
ing the steering wheel horizontally
and vertically.
After adjustment, pull the lever up to
secure the steering wheel.
Power adjustment type
Operating the switch moves the steer-
ing wheel in the following directions: 1
Up
2 Down
3 Toward the driver
4 Away from the driver
■The power adjustment type steering
wheel can be adjusted when
The engine switch is in ACCESSORY or
IGNITION ON mode.
■Automatic adjustment of the steering
position (power adjustment type)
A desired steering position can be entered
to memory and recalled automatically by
the driving position memory system.
( P.113)
■Power easy access system (vehicles
with power adjustment type steering
wheel)
The driver’s seat and steering wheel move
in accordance with engine switch mode and
the driver’s seat belt condition. ( P.113)
■Customization
The steering wheel movement can be
changed. (Customizable features:
P.408)
Steering wheel
Adjustment procedure
WARNING
■Caution while driving
Do not adjust the steering wheel while
driving.
Doing so may cause the driver to mis-
handle the vehicle and cause an acci-
dent, resulting in death or serious injury.
Page 123 of 468

1213-4. Adjusting the steering wheel and mirrors
3
Before driving
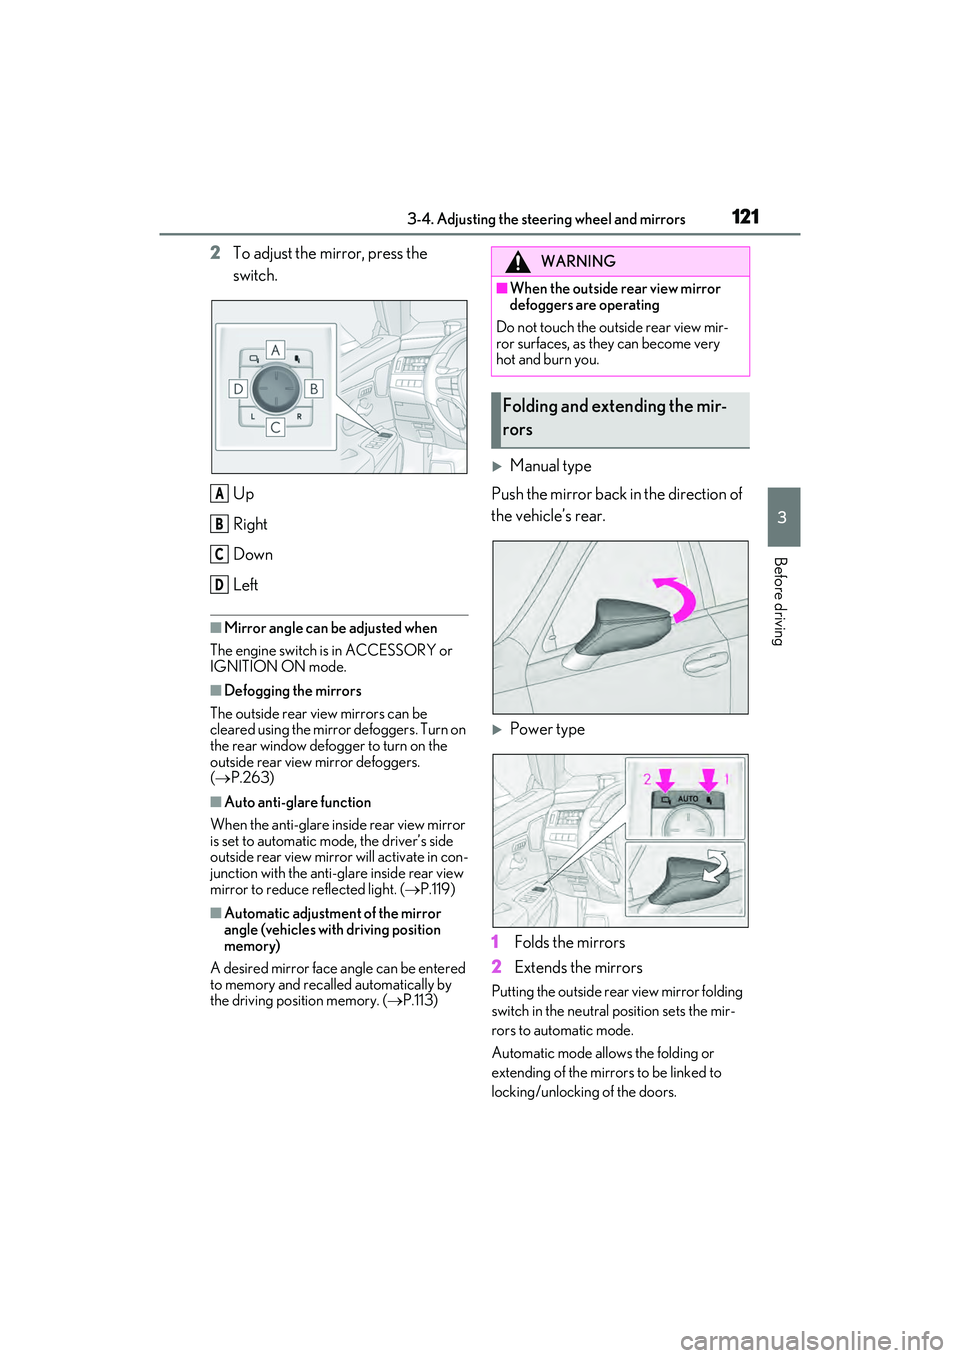
2To adjust the mirror, press the
switch.
Up
Right
Down
Left
■Mirror angle can be adjusted when
The engine switch is in ACCESSORY or
IGNITION ON mode.
■Defogging the mirrors
The outside rear view mirrors can be
cleared using the mirror defoggers. Turn on
the rear window defogger to turn on the
outside rear view mirror defoggers.
( P.263)
■Auto anti-glare function
When the anti-glare inside rear view mirror
is set to automatic mode, the driver’s side
outside rear view mirror will activate in con-
junction with the anti-glare inside rear view
mirror to reduce reflected light. ( P.119)
■Automatic adjustment of the mirror
angle (vehicles with driving position
memory)
A desired mirror face angle can be entered
to memory and recalled automatically by
the driving position memory. ( P.113)
Manual type
Push the mirror back in the direction of
the vehicle’s rear.
Power type
1 Folds the mirrors
2 Extends the mirrors
Putting the outside rear view mirror folding
switch in the neutral position sets the mir-
rors to automatic mode.
Automatic mode allows the folding or
extending of the mirrors to be linked to
locking/unlocking of the doors.
A
B
C
D
WARNING
■When the outside rear view mirror
defoggers are operating
Do not touch the outside rear view mir-
ror surfaces, as they can become very
hot and burn you.
Folding and extending the mir-
rors
Page 125 of 468

1233-5. Opening and closing the windows and moon roof
3
Before driving
3-5.Op ening and closing the wind ows and mo on ro of
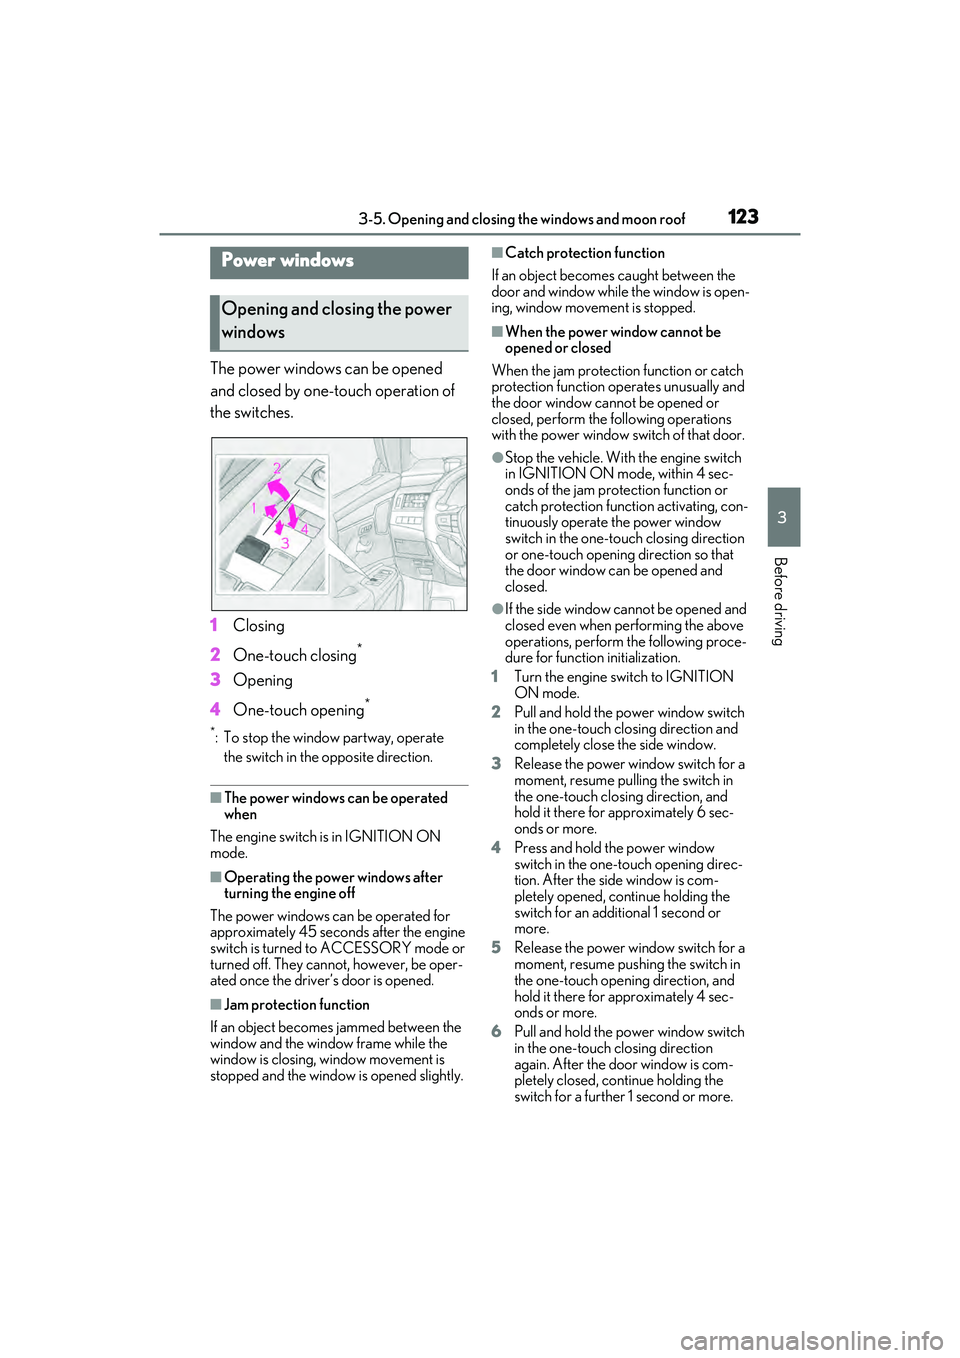
The power windows can be opened
and closed by one-touch operation of
the switches.
1Closing
2 One-touch closing
*
3Opening
4 One-touch opening
*
*: To stop the window partway, operate
the switch in the opposite direction.
■The power windows can be operated
when
The engine switch is in IGNITION ON
mode.
■Operating the power windows after
turning the engine off
The power windows can be operated for
approximately 45 seconds after the engine
switch is turned to ACCESSORY mode or
turned off. They cannot, however, be oper-
ated once the driver’s door is opened.
■Jam protection function
If an object becomes jammed between the
window and the window frame while the
window is closing, window movement is
stopped and the window is opened slightly.
■Catch protection function
If an object becomes caught between the
door and window while the window is open-
ing, window movement is stopped.
■When the power window cannot be
opened or closed
When the jam protection function or catch
protection function operates unusually and
the door window cannot be opened or
closed, perform the following operations
with the power window switch of that door.
●Stop the vehicle. With the engine switch
in IGNITION ON mode, within 4 sec-
onds of the jam protection function or
catch protection function activating, con-
tinuously operate the power window
switch in the one-to uch closing direction
or one-touch opening direction so that
the door window can be opened and
closed.
●If the side window cannot be opened and
closed even when performing the above
operations, perform the following proce-
dure for function initialization.
1 Turn the engine switch to IGNITION
ON mode.
2 Pull and hold the power window switch
in the one-touch closing direction and
completely close the side window.
3 Release the power window switch for a
moment, resume pulling the switch in
the one-touch closing direction, and
hold it there for approximately 6 sec-
onds or more.
4 Press and hold the power window
switch in the one-touch opening direc-
tion. After the side window is com-
pletely opened, continue holding the
switch for an additional 1 second or
more.
5 Release the power window switch for a
moment, resume push ing the switch in
the one-touch opening direction, and
hold it there for approximately 4 sec-
onds or more.
6 Pull and hold the power window switch
in the one-touch closing direction
again. After the door window is com-
pletely closed, continue holding the
switch for a further 1 second or more.
Power windows
Opening and clos ing the power
windows