2022 KIA SPORTAGE key
[x] Cancel search: keyPage 202 of 630
4113
Features of your vehicle
Immobilizer IndicatorLight (Without Smart Key)(if equipped)
This indicator light illuminates:
When the vehicle detects the immobilizer in your key properly
while the ignition switch is ON.
- At this time, you can start theengine.
- The indicator light goes off after starting the engine.
This indicator light blinks:
When there is a malfunction with the immobilizer system.
In this case, have your vehicle
inspected by an authorized Kia
dealer.
Immobilizer Indicator
Light (With Smart Key) (if equipped)
This indicator light illuminates for up
to 30 seconds:
When the vehicle detects the smart key in the vehicle properly
while the Engine Start/Stop Button
is ACC or ON.
- At this time, you can start theengine.
- The indicator light goes off after starting the engine.
This indicator light blinks for a few
seconds:
When the smart key is not in the vehicle.
- At this time, you can not start theengine. This indicator light illuminates for 2
seconds and goes off:
When the vehicle can not detect
the smart key which is in the vehi-
cle while the Engine Start/Stop
Button is ON.
In this case, have your vehicle
inspected by an authorized Kia
dealer.
This indicator light blinks:
When the battery of the smart key is weak.
- At this time, you can not start theengine. However, you can start the
engine if you press the Engine
Start/Stop Button with the smart
key. (For more details, refer to
“Starting the Engine” in chapter 5).
When there is a malfunction with the immobilizer system.
In this case, have your vehicle
inspected by an authorized Kia
dealer.
Page 216 of 630
4127
Features of your vehicle
Battery saver function
The purpose of this feature is toprevent the battery from being dis-
charged if the lights are left in the
ON position. The system automati-
cally shuts off the parking lights 30
seconds after the ignition key is
removed and the driver’s door is
opened and closed.
With this feature, the parking lights will turn off automatically if the driver
parks on the side of the road at night
and opens the driver’s side door.
If necessary, to keep the parking
lights on when the ignition key is
removed, perform the following:
1) Open the driver-side door.
2) Turn the parking lights OFF and ON again using the light switch
on the steering column.
Daytime running light
(if equipped)
The Daytime Running Lights (DRL)
can make it easier for others to see the
front of your vehicle during the day.
DRL can be helpful in many different
driving conditions, and it is especially
helpful after dawn and before sunset.
The DRL system turns OFF when:
1. The headlight switch is ON.
2. The engine is OFF.
3. Engaging the Parking Brake
4. The front fog light is ON.
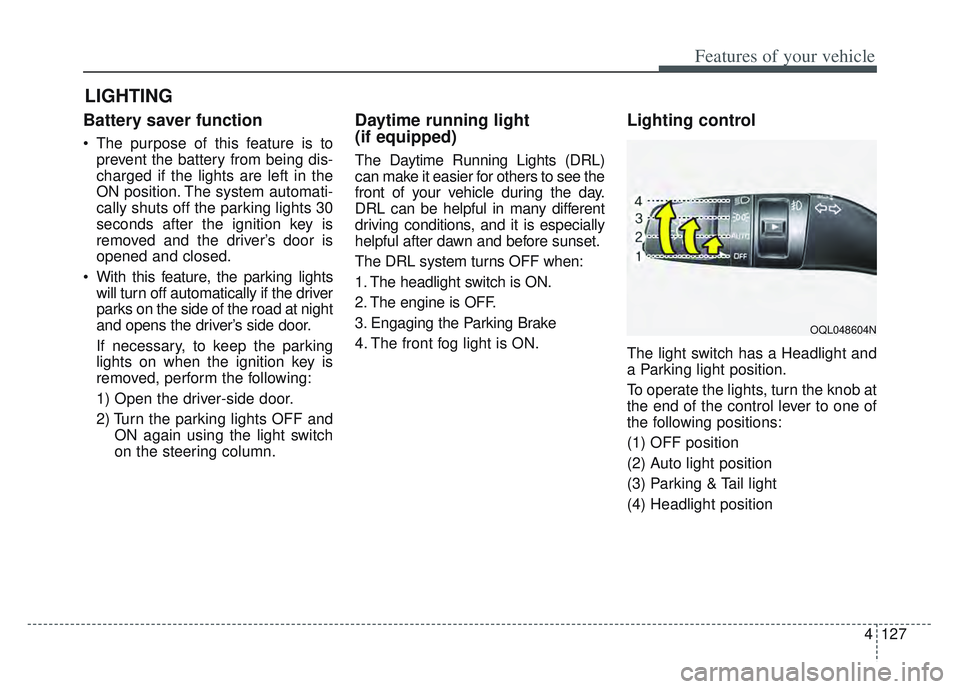
Lighting control
The light switch has a Headlight and
a Parking light position.
To operate the lights, turn the knob at
the end of the control lever to one of
the following positions:
(1) OFF position
(2) Auto light position
(3) Parking & Tail light
(4) Headlight position
LIGHTING
OQL048604N
Page 229 of 630
Features of your vehicle
140
4
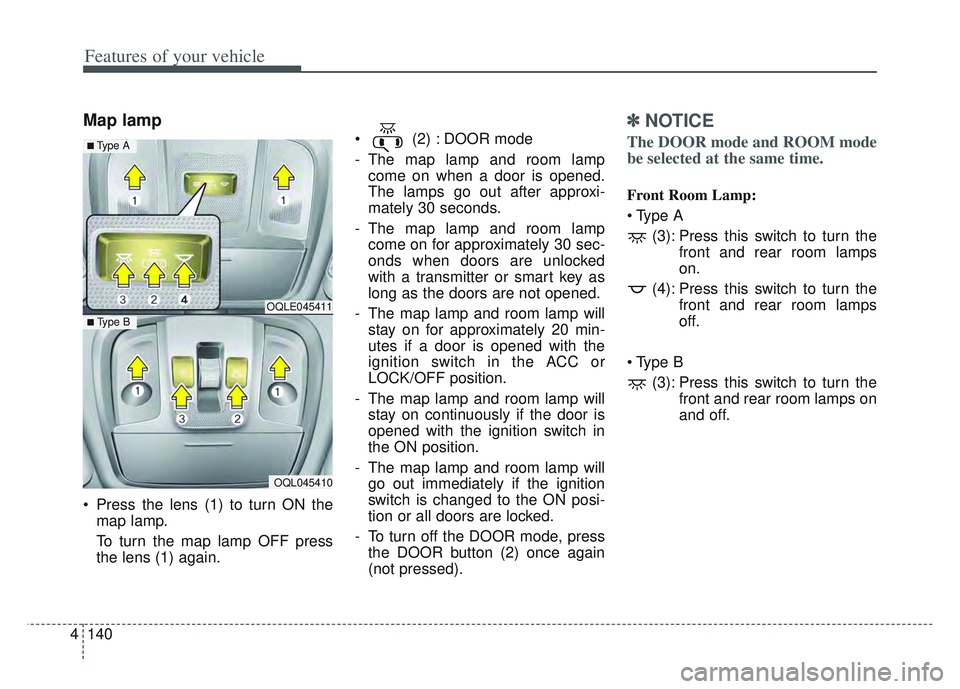
Map lamp
Press the lens (1) to turn ON the
map lamp.
To turn the map lamp OFF press
the lens (1) again. (2) : DOOR mode
- The map lamp and room lamp
come on when a door is opened.
The lamps go out after approxi-
mately 30 seconds.
- The map lamp and room lamp come on for approximately 30 sec-
onds when doors are unlocked
with a transmitter or smart key as
long as the doors are not opened.
- The map lamp and room lamp will stay on for approximately 20 min-
utes if a door is opened with the
ignition switch in the ACC or
LOCK/OFF position.
- The map lamp and room lamp will stay on continuously if the door is
opened with the ignition switch in
the ON position.
- The map lamp and room lamp will go out immediately if the ignition
switch is changed to the ON posi-
tion or all doors are locked.
- To turn off the DOOR mode, press the DOOR button (2) once again
(not pressed).
✽ ✽ NOTICE
The DOOR mode and ROOM mode
be selected at the same time.
Front Room Lamp:
(3): Press this switch to turn the front and rear room lamps
on.
(4): Press this switch to turn the front and rear room lamps
off.
(3): Press this switch to turn the front and rear room lamps on
and off.
OQLE045411
OQL045410
■ Type B
■ Type A
Page 231 of 630
Features of your vehicle
142
4
WELCOME SYSTEM (IF EQUIPPED)
Headlight (Headlamp) escort
function
The headlights (and/or taillights)
remain on for approximately 5 min-
utes after the ignition key is removed
or turned to the ACC or LOCK posi-
tion. However, if the driver’s door is
opened and closed, the headlights
are turned off after 15 seconds.
The headlights can be turned off by
pressing the lock button on the trans-
mitter or smart key twice or turning
off the light switch from the headlight
or Auto light position.
Interior light
When the interior light switch is in the
DOOR position and all doors (and
trunk) are locked and closed, the
room lamp will come on for 30 sec-
onds if any of the below is performed.
Without smart key system
- When the door unlock button ispressed on the transmitter.
With the smart key system - When the door unlock button ispressed on the smart key.
- When the button of the outside door handle is pressed.
At this time, if you press the door lock
button, the lamps will turn off imme-
diately.
Pocket lamp (if equipped)
When all doors are locked and
closed, the pocket lamp will come on
for 15 seconds if any of the below is
performed.
With the smart key system - When the door unlock button ispressed on the smart key.
- When the button of the outside door handle is pressed.
At this time, if you press the door lock
button, the lamps will turn off imme-
diately.
Page 270 of 630
4181
Features of your vehicle
Wireless smart phone charg-
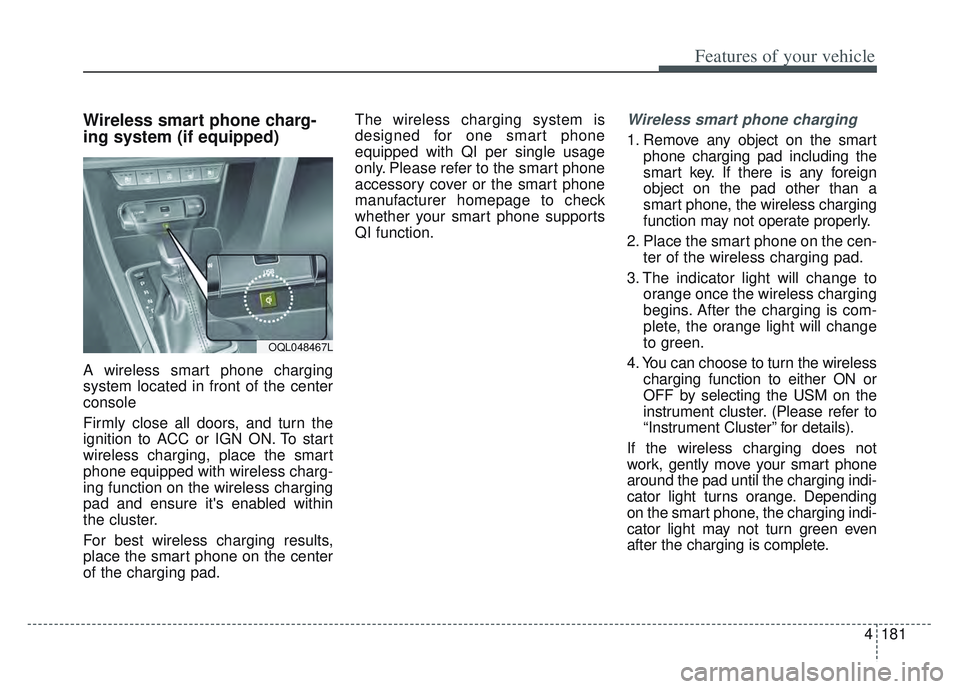
ing system (if equipped)
A wireless smart phone charging
system located in front of the center
console
Firmly close all doors, and turn the
ignition to ACC or IGN ON. To start
wireless charging, place the smart
phone equipped with wireless charg-
ing function on the wireless charging
pad and ensure it's enabled within
the cluster.
For best wireless charging results,
place the smart phone on the center
of the charging pad.The wireless charging system is
designed for one smart phone
equipped with QI per single usage
only. Please refer to the smart phone
accessory cover or the smart phone
manufacturer homepage to check
whether your smart phone supports
QI function.
Wireless smart phone charging
1. Remove any object on the smart
phone charging pad including the
smart key. If there is any foreign
object on the pad other than a
smart phone, the wireless charging
function may not operate properly.
2. Place the smart phone on the cen- ter of the wireless charging pad.
3. The indicator light will change to orange once the wireless charging
begins. After the charging is com-
plete, the orange light will change
to green.
4. You can choose to turn the wireless charging function to either ON or
OFF by selecting the USM on the
instrument cluster. (Please refer to
“Instrument Cluster” for details).
If the wireless charging does not
work, gently move your smart phone
around the pad until the charging indi-
cator light turns orange. Depending
on the smart phone, the charging indi-
cator light may not turn green even
after the charging is complete.
OQL048467L
Page 272 of 630
4183
Features of your vehicle
✽ ✽NOTICE
• When the interior temperature of
the wireless charging system rises
above a set temperature, the wire-
less charging will cease to func-
tion. After the interior tempera-
ture drops below the threshold,
the wireless charging function will
resume.
• The wireless charging may not function properly when there is a
heavy accessory cover on the
smart phone.
• The wireless charging will stop when using the wireless smart key
search function to prevent radio
wave disruption.
• The wireless charging will stop when the smart key is moved out
of the vehicle with the ignition in
ON.
• The wireless charging will stop when any of the doors is opened
(applicable for vehicles equipped
with smart keys).
• The wireless charging will stop when the vehicle is turned OFF.
(Continued)(Continued)
• The wireless charging will stop
when the smart phone is not in
complete contact with the wireless
charging pad.
• Items equipped with magnetic components such as credit cards,
telephone cards, bankbooks or a
transportation ticket may become
damaged during wireless charg-
ing.
• Place the smart phone on the cen- ter of the charge pad for best
results. The smart phone may not
charge when placed near the rim
of the charging pad. When the
smart phone does get charged, it
may heat up excessively.
• For smart phones without built-in wireless charging system, an
appropriate accessory has to be
equipped.
• Smart phones of some manufac- turers may display messages on
weak current. This is due to the
particular characteristic of the
smart phone and does not imply a
malfunction on wireless charging
function. (Continued)(Continued)
• The indicator light of some manu-
facturers’ smart phones may still
be orange after the smart phone is
fully charged. This is due to the
particular characteristic of the
smart phone and not a malfunc-
tion of the wireless charging.
• When any smart phone without a wireless charging function or a
metallic object is placed on the
charging pad, a small noise may
sound. This small sound is due to
the vehicle discerning compatibili-
ty of the object placed on the
charging pad. It does not affect
your vehicle or the smart phone in
any way.
Page 286 of 630
Driving your vehicle
Before driving . . . . . . . . . . . . . . . . . . . . . . . . . . . . . . 5-5
• Before entering vehicle . . . . . . . . . . . . . . . . . . . . . . . . . 5-5
. . . . . . . . . . . . . . . . . . . . . . . . . . 5-5
. . . . . . . . . . . . . . . . . . . . . . . . . . . . . . . . 5-5
Key positions . . . . . . . . . . . . . . . . . . . . . . . . . . . . . . . 5-7
. . . . . . . . . . . . . . . . . . . . . 5-7
. . . . . . . . . . . . . . . . . . . . . . . . . 5-7
. . . . . . . . . . . . . . . . . . . . . . . . . . . . 5-9
ENGINE START/STOP button . . . . . . . . . . . . . . 5-11
. . . . . . 5-11
. . . . . . . . . . 5-11
. . . . . . . . . . . . 5-13
Automatic transmission . . . . . . . . . . . . . . . . . . . . . 5-15
. . . . . . . . . . . . . . . 5-15
. . . . . . . . . . . . . . . . . . . . . . . . 5-22
All Wheel Drive(AWD) . . . . . . . . . . . . . . . . . . . . . 5-23
. . . . . . . . . . . . . . . . . . . . . . 5-24
. . . 5-25
. . . . . . . . . . . . . . . 5-26
Brake system . . . . . . . . . . . . . . . . . . . . . . . . . . . . . . 5-31
. . . . . . . . . . . . . . . . . . . . . . . . . . . . . . . . 5-31
. . . . . . . . . . . . . . . . . . . . . 5-33
. . . . . . . . . . . . . . . . 5-34
. . . . . . . . . . . . . . . . . . . . . . . . . . . . . . . . 5-41 . . . . . . . . . . . . . . . . . . . . . . . . . . . . 5-43
. . . . . . . . . . . . . . . . . . 5-45
. . . . . . . . . . . . . . 5-47
. . . . . . . . . . . . . . . . . 5-51
. . . . . . . . . . . . . . . . . . . . . . . 5-53
. . . . . . . . . . . . 5-53
. . . . . . . . . . . . . . . . . 5-55
Drive mode integrated control system . . . . . . . . . 5-57
. . . . . . . . . . . . . . . . . . . . . . . . . . . . . . . . 5-57
Forward Collision-Avoidance Assist (FCA)
(Front view camera only) . . . . . . . . . . . . . . . . . . 5-59
. . . . . . . . . . . . . . . . . . . 5-59
. . . . . . . . 5-61
. . . . . . . . . . . . . . . . . . . . . . . . . . . . . . 5-63
. . . . . . . . . . . . . . . . . 5-64
. . . . . . . . . . . . . . . . . . . . . . . . . . . 5-65
. . . . . . . . . . . . . . . . . . . . . . . 5-67
Forward Collision-Avoidance Assist (FCA)(Sensor fusion) . . . . . . . . . . . . . . . . . . . . . . . . . . . 5-74
. . . . . . . . . . . . . . . . . . . 5-74
. . . . . . . . 5-76
. . . . . . . . . . . . . . . . . . . . . . . . . . . . . . 5-78
. 5-79
. . . . . . . . . . . . . . . . . . . . . . . . . . . 5-81
5
Page 292 of 630
57
Driving your vehicle
Illuminated ignition switch
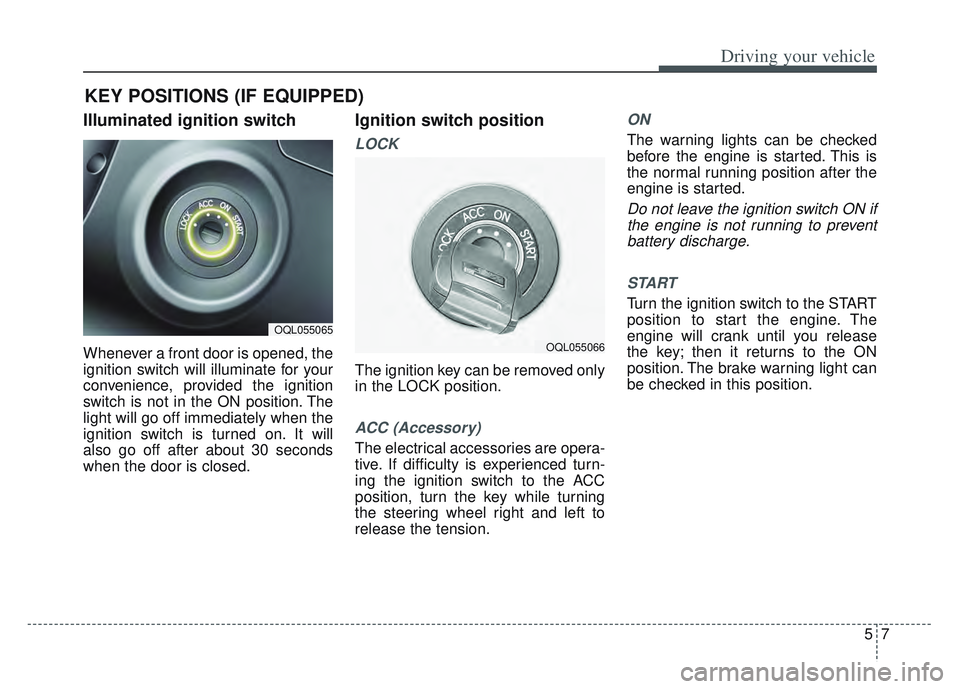
Whenever a front door is opened, the
ignition switch will illuminate for your
convenience, provided the ignition
switch is not in the ON position. The
light will go off immediately when the
ignition switch is turned on. It will
also go off after about 30 seconds
when the door is closed.
Ignition switch position
LOCK
The ignition key can be removed only
in the LOCK position.
ACC (Accessory)
The electrical accessories are opera-
tive. If difficulty is experienced turn-
ing the ignition switch to the ACC
position, turn the key while turning
the steering wheel right and left to
release the tension.
ON
The warning lights can be checked
before the engine is started. This is
the normal running position after the
engine is started.
Do not leave the ignition switch ON ifthe engine is not running to preventbattery discharge.
START
Turn the ignition switch to the START
position to start the engine. The
engine will crank until you release
the key; then it returns to the ON
position. The brake warning light can
be checked in this position.
KEY POSITIONS (IF EQUIPPED)
OQL055065
OQL055066