Page 219 of 630
Features of your vehicle
130
4
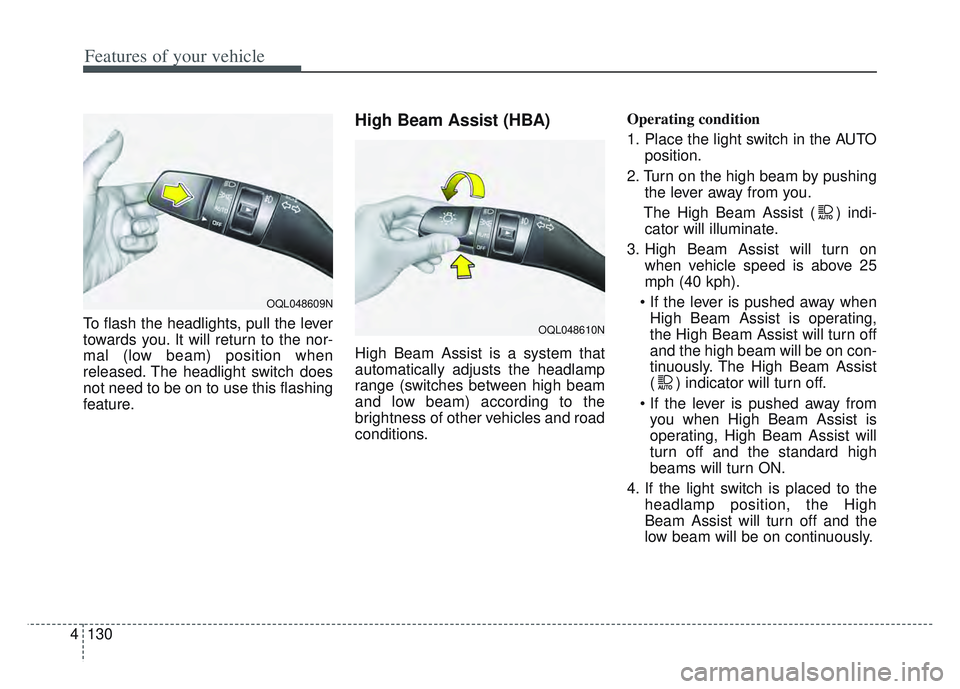
To flash the headlights, pull the lever
towards you. It will return to the nor-
mal (low beam) position when
released. The headlight switch does
not need to be on to use this flashing
feature.
High Beam Assist (HBA)
High Beam Assist is a system that
automatically adjusts the headlamp
range (switches between high beam
and low beam) according to the
brightness of other vehicles and road
conditions. Operating condition
1. Place the light switch in the AUTO
position.
2. Turn on the high beam by pushing the lever away from you.
The High Beam Assist ( ) indi- cator will illuminate.
3. High Beam Assist will turn on when vehicle speed is above 25
mph (40 kph).
High Beam Assist is operating,
the High Beam Assist will turn off
and the high beam will be on con-
tinuously. The High Beam Assist
( ) indicator will turn off.
you when High Beam Assist is
operating, High Beam Assist will
turn off and the standard high
beams will turn ON.
4. If the light switch is placed to the headlamp position, the High
Beam Assist will turn off and the
low beam will be on continuously.
OQL048609N
OQL048610N
Page 221 of 630
Features of your vehicle
132
4
When driving downhill or uphill.
When only part of the vehicle in
front is visible on a crossroad or
curved road.
When there is a traffic light, reflect- ing sign, flashing sign or mirror.
When the road conditions are bad such as being wet or covered with
snow.
When the front vehicle’s head- lamps are off but the fog lamps on.
When a vehicle suddenly appears from a curve.
When the vehicle is tilted from a flat tire or being towed.
When the LKA (Lane Keeping Assist) warning light illuminates.✽ ✽ NOTICE
• Do not place any accessories,
stickers or tint the windshield.
• Have on the windshield glass replaced from an authorized deal-
er.
• Do not remove or damage related parts of the High Beam Assist sys-
tem.
• Be careful that water doesn’t get into the High Beam Assist unit.
• Do not place objects on the dash- board that reflect light such as
mirrors, white paper, etc. The sys-
tem may not function properly if
sunlight is reflected.
• At times, the Smart High Beam system may not operate due to sys-
tem limitations. Always check the
road conditions for your safety.
When the system does not operate
normally, manually change
between the high beam and low
beam.
• While other beeps such as the seat belt warning sound are in opera-
tion and override the LKA alarm-
ing system, LKA beeps may not
occur.
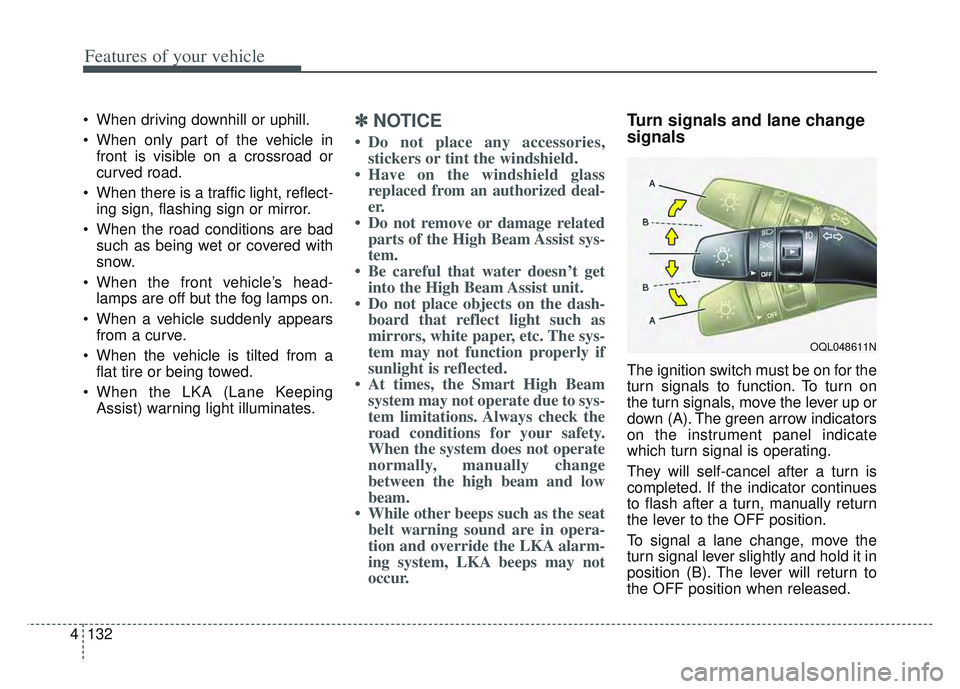
Turn signals and lane change
signals
The ignition switch must be on for the
turn signals to function. To turn on
the turn signals, move the lever up or
down (A). The green arrow indicators
on the instrument panel indicate
which turn signal is operating.
They will self-cancel after a turn is
completed. If the indicator continues
to flash after a turn, manually return
the lever to the OFF position.
To signal a lane change, move the
turn signal lever slightly and hold it in
position (B). The lever will return to
the OFF position when released.
OQL048611N
Page 225 of 630
Features of your vehicle
136
4
✽ ✽
NOTICE
If there is heavy accumulation of
snow or ice on the windshield,
defrost the windshield for about 10
minutes, or until the snow and/or ice
is removed before using the wind-
shield wipers to ensure proper oper-
ation.
If you do not remove the snow
and/or ice before using the wiper
and washer, it may damage the
wiper and washer system.
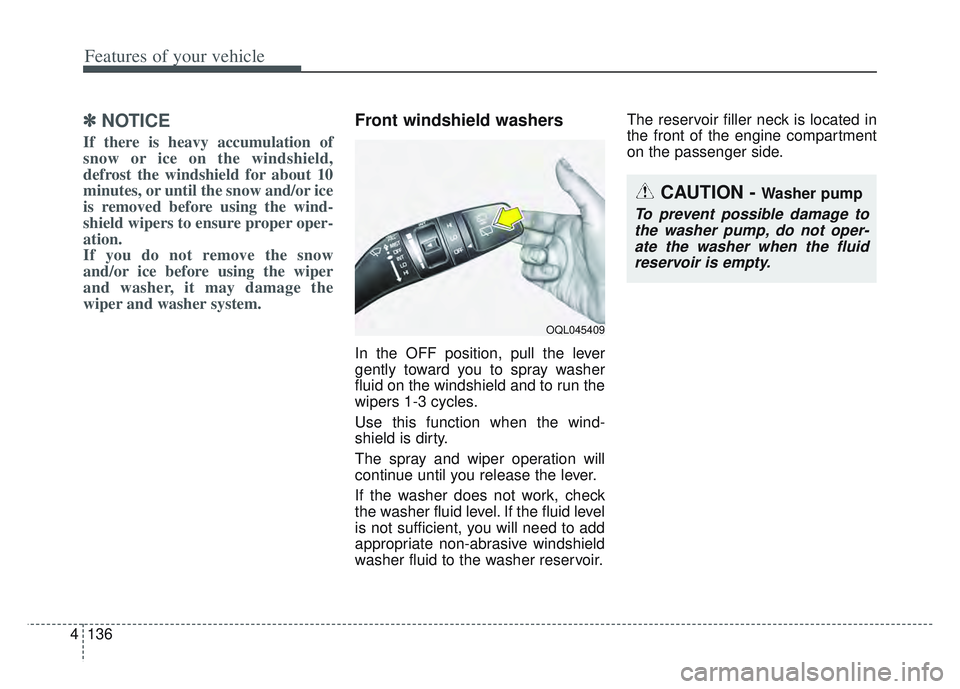
Front windshield washers
In the OFF position, pull the lever
gently toward you to spray washer
fluid on the windshield and to run the
wipers 1-3 cycles.
Use this function when the wind-
shield is dirty.
The spray and wiper operation will
continue until you release the lever.
If the washer does not work, check
the washer fluid level. If the fluid level
is not sufficient, you will need to add
appropriate non-abrasive windshield
washer fluid to the washer reservoir. The reservoir filler neck is located in
the front of the engine compartment
on the passenger side.
OQL045409
CAUTION - Washer pump
To prevent possible damage to
the washer pump, do not oper-ate the washer when the fluidreservoir is empty.
Page 235 of 630
Features of your vehicle
146
4
Mode selection
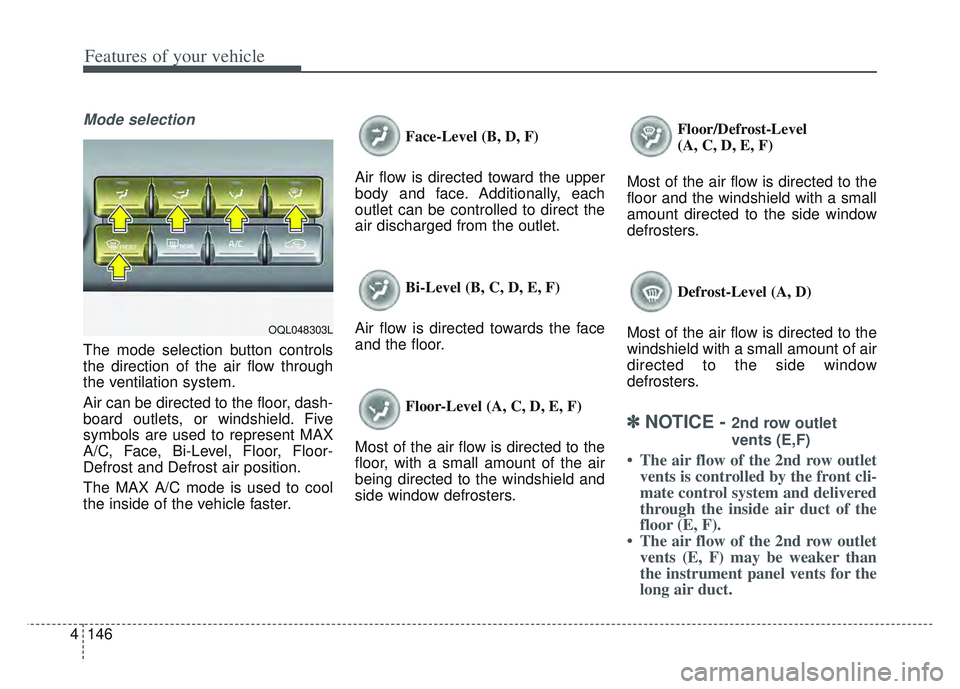
The mode selection button controls
the direction of the air flow through
the ventilation system.
Air can be directed to the floor, dash-
board outlets, or windshield. Five
symbols are used to represent MAX
A/C, Face, Bi-Level, Floor, Floor-
Defrost and Defrost air position.
The MAX A/C mode is used to cool
the inside of the vehicle faster. Face-Level (B, D, F)
Air flow is directed toward the upper
body and face. Additionally, each
outlet can be controlled to direct the
air discharged from the outlet.
Bi-Level (B, C, D, E, F)
Air flow is directed towards the face
and the floor.
Floor-Level (A, C, D, E, F)
Most of the air flow is directed to the
floor, with a small amount of the air
being directed to the windshield and
side window defrosters. Floor/Defrost-Level
(A, C, D, E, F)
Most of the air flow is directed to the
floor and the windshield with a small
amount directed to the side window
defrosters.
Defrost-Level (A, D)
Most of the air flow is directed to the
windshield with a small amount of air
directed to the side window
defrosters.
✽ ✽ NOTICE - 2nd row outlet
vents (E,F)
• The air flow of the 2nd row outlet
vents is controlled by the front cli-
mate control system and delivered
through the inside air duct of the
floor (E, F).
• The air flow of the 2nd row outlet vents (E, F) may be weaker than
the instrument panel vents for the
long air duct.
OQL048303L
Page 236 of 630
4147
Features of your vehicle
MAX A/C selection
The MAX A/C mode is used to cool
the inside of the vehicle faster.
Air flow is directed toward the upper
body and face.
In this mode, the air conditioning and
the recirculated air position will be
selected automatically.Instrument panel vents
The outlet vents can be opened or
closed separately using the thumb-
wheel.
Also, you can adjust the direction of
air flow these vents using the vent
control lever as shown.
Temperature control
The temperature control knob allows
you to control the temperature of the
air flowing from the ventilation system.
To change the air temperature in the
passenger compartment, turn the
knob to the right position for warm and
hot air or left position for cooler air.
OQL048305LOQL048307L
OQL048306L
Page 247 of 630
Features of your vehicle
158
4
Face-Level
Air flow is directed toward the upper
body and face. Additionally, each
outlet can be controlled to direct the
air discharged from the outlet.
Bi-Level
Air flow is directed towards the face
and the floor.
Floor-Level
Most of the air flow is directed to the
floor, with a small amount of the air
being directed to the windshield and
side window defrosters.
Floor/Defrost-Level
Most of the air flow is directed to the
floor and the windshield with a small
amount directed to the side window
defrosters. Defrost-Level
Most of the air flow is directed to the
windshield with a small amount of air
directed to the side window defrosters.
Instrument panel vents
The outlet vents can be opened or
closed separately using the thumb-
wheel.
Also, you can adjust the direction of
air flow from these vents using the
vent control lever as shown.
OQL048343L
■Type A
■ Type B
OQL048306L
Page 260 of 630
4171
Features of your vehicle
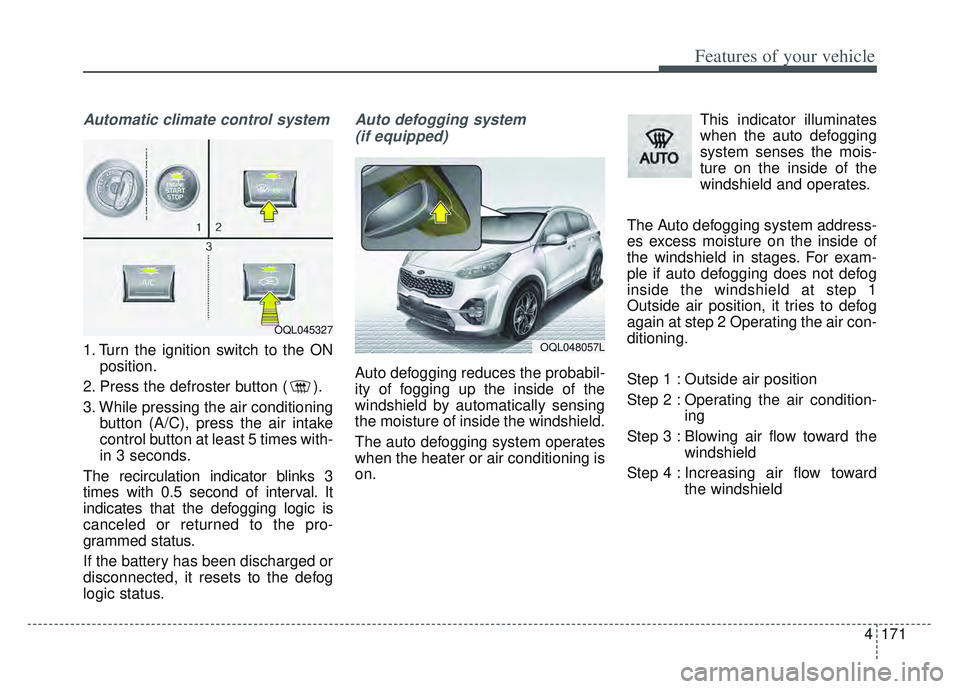
Automatic climate control system
1. Turn the ignition switch to the ONposition.
2. Press the defroster button ( ).
3. While pressing the air conditioning button (A/C), press the air intake
control button at least 5 times with-
in 3 seconds.
The recirculation indicator blinks 3
times with 0.5 second of interval. It
indicates that the defogging logic is
canceled or returned to the pro-
grammed status.
If the battery has been discharged or
disconnected, it resets to the defog
logic status.
Auto defogging system (if equipped)
Auto defogging reduces the probabil-
ity of fogging up the inside of the
windshield by automatically sensing
the moisture of inside the windshield.
The auto defogging system operates
when the heater or air conditioning is
on. This indicator illuminates
when the auto defogging
system senses the mois-
ture on the inside of the
windshield and operates.
The Auto defogging system address-
es excess moisture on the inside of
the windshield in stages. For exam-
ple if auto defogging does not defog
inside the windshield at step 1
Outside air position, it tries to defog
again at step 2 Operating the air con-
ditioning.
Step 1 : Outside air position
Step 2 : Operating the air condition- ing
Step 3 : Blowing air flow toward the windshield
Step 4 : Increasing air flow toward the windshield
OQL045327
OQL048057L
Page 267 of 630
Features of your vehicle
178
4
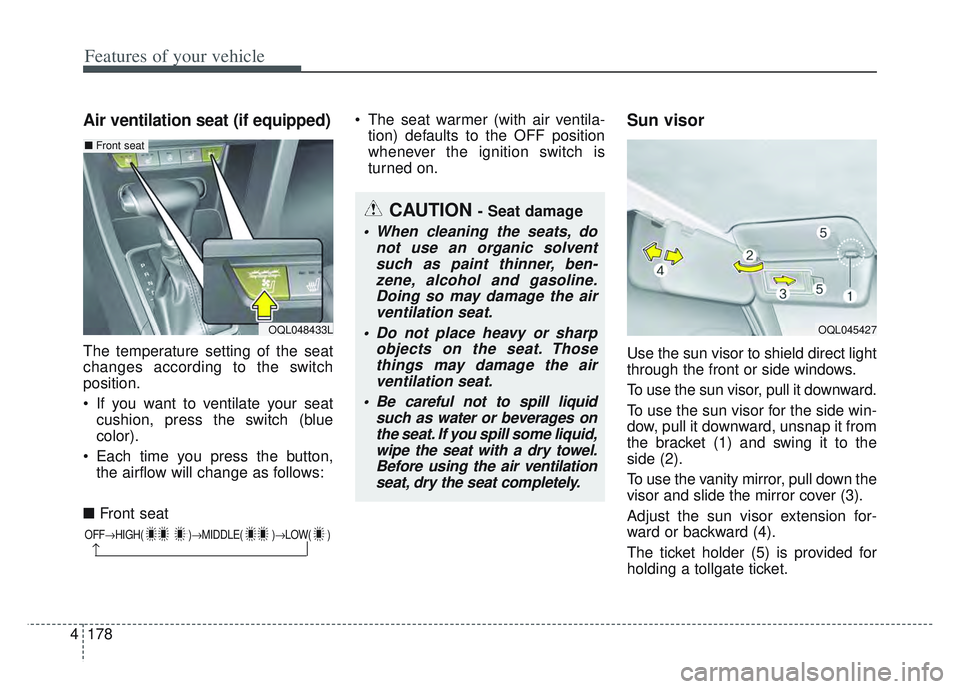
Air ventilation seat (if equipped)
The temperature setting of the seat
changes according to the switch
position.
If you want to ventilate your seat
cushion, press the switch (blue
color).
Each time you press the button, the airflow will change as follows:
■ Front seat The seat warmer (with air ventila-
tion) defaults to the OFF position
whenever the ignition switch is
turned on.
Sun visor
Use the sun visor to shield direct light
through the front or side windows.
To use the sun visor, pull it downward.
To use the sun visor for the side win-
dow, pull it downward, unsnap it from
the bracket (1) and swing it to the
side (2).
To use the vanity mirror, pull down the
visor and slide the mirror cover (3).
Adjust the sun visor extension for-
ward or backward (4).
The ticket holder (5) is provided for
holding a tollgate ticket.
OFF HIGH( ) MIDDLE( )LOW( )
CAUTION - Seat damage
When cleaning the seats, do
not use an organic solventsuch as paint thinner, ben-zene, alcohol and gasoline.Doing so may damage the airventilation seat.
Do not place heavy or sharp objects on the seat. Thosethings may damage the airventilation seat.
Be careful not to spill liquid such as water or beverages onthe seat. If you spill some liquid,wipe the seat with a dry towel.Before using the air ventilationseat, dry the seat completely.
OQL048433L OQL045427
■ Front seat