2022 KIA SOUL ESP
[x] Cancel search: ESPPage 2 of 58

WELCOME TO THE KIA FAMILY!
Your new Kia vehicle has been designed, engineered and manufactured to provide you with years of comfortable and dependable driving. Kia is committed to quality, innovation, safety and — above all — your satisfaction.
USING THIS FEATURES & FUNCTIONS GUIDE
The information contained in this guide is a brief overview of the operation and features of your new Kia vehicle.
This Features & Functions Guide and the specific operational and safety information it provides are not a substitute for your Owner’s Manual. In the interest of your safety and that of the vehicle’s occupants, and to help you avoid risks that may result in death or serious injury, Kia reminds you to carefully read the Owner’s Manual in order to fully familiarize yourself with the important information and safety warnings it contains.
While Kia endeavors to ensure that the information contained in this guide is accurate at the time of printing, Kia may change vehicle specifications without notice in advance of or after the fact and assumes no liability in connection with such changes.
VIDEOS AND QR CODES
Kia provides a number of video resources to assist you with becoming familiar with the features and functions found in your Kia vehicle. You can access these resources by snapping the QR Codes with your mobile device using the built-in QR Code Reader or a downloaded QR Code Reader App.
After opening the QR Code Reader App on your mobile device, the app will utilize your device’s camera. Center the code in the camera viewing area — with some apps, as soon as the app recognizes the code, it will launch the corresponding video.
With other apps, you will have to snap or “take a picture” of the code. The app will then launch the corresponding video.
For operation specifics, refer to the instructions that come with the QR Code Reader App. You can also view the videos by visiting the following website: www.youtube.com/KiaFeatureVideos
Refer to the inside front cover for more information on QR codes.www.youtube.com/KiaFeatureVideos
Vehicle & User Set tings Video
QR CODE
If you’re having trouble scanning codes, check the following:
•
The code should be centered and focused in your mobile device’s camera screen
•
Consider moving your device closer to or far ther away from the code
•
The code should be well lit, without significant shadow
•Avoid scanning from a significant angle
•
Confirm that the device’s app suppor ts 2D QR Code scanning
•
Tr y another QR Code Reader App; not all apps are created equal
After scanning, you may experience a “connection error ” message or a “connecting” message with no subsequent response. These messages t ypically indicate that your device is having trouble connecting to the Internet
QUICK TIPS
Page 3 of 58

GETTING STARTED
As you get to know your new Kia, you can explore this booklet to better understand
how to operate its many features and systems. You can find the complete Table of
Contents on the next two pages, but first, be sure to review the following to better
understand some of your Kia’s most used features:
1 Smart Key . . . . . . . . . . . . . . . . . . . . . . . . . . . . . . . . . . . . . . . . 44
2 Fuel Filler Release Lever . . . . . . . . . . . . . . . . . . . . . . . . . . . . . . . . 45
3 Power Adjustable Driver’s Seat* / Front Seat Headrest Adjustment . . . . . 40-41
4 Seat Warmers* . . . . . . . . . . . . . . . . . . . . . . . . . . . . . . . . . . . . . . 40
5 Folding Rear Seats . . . . . . . . . . . . . . . . . . . . . . . . . . . . . . . . . . . 42
6 Windshield Wipers & Washers . . . . . . . . . . . . . . . . . . . . . . . . . . . . . 25
7 Smart Cruise Control (SCC)* . . . . . . . . . . . . . . . . . . . . . . . . . . . . . . . 16
8 Normal Maintenance Schedules . . . . . . . . . . . . . . . . . . . .50, Back Cover
9 User Settings Mode* / Vehicle Settings - Audio Head Unit* . . . . . . . . . . . . 08
10 Bluetooth® Wireless Technology . . . . . . . . . . . . . . . . . . . . . . . . . 26-27
11 UVO link Activation* / UVO Assistance* . . . . . . . . . . . . . . . . . . . . . . . .30
12 Standard Audio System . . . . . . . . . . . . . . . . . . . . . . . . . . . . . . . . 29
13 Kia Access with UVO link App Download . . . . . . . . . . . . . . . . . . . . . . 31
14 Kia Access with UVO link App Features Guide . . . . . . . . . . . . . . . . . . . 31
15 Android Auto™ / Apple CarPlay® Setup . . . . . . . . . . . . . . . . . . . . . . . . 28
Driving while distracted can result in a loss of vehicle control that may lead to an accident, severe personal injur y or death . The driver ’s primar y responsibilit y is in the safe and legal operation of a vehicle . Handheld devices, other equipment or vehicle systems which take the driver ’s eyes, at tention and focus away from the safe operation of a vehicle or that are not permissible by law, should never be used during operation of the vehicle .
www .kia .com Consumer Affairs – Roadside Assistance†1 5: 1-800-333-4KIA (800-333-4542)
Always check the Owner ’s Manual for complete operating information and safet y warnings .
1 *IF EQUIPPEDSOUL FEATURES & FUNCTIONS GUIDE
Page 10 of 58
VEHICLESETTINGS
VEHICLE SETTINGS
8†LEGAL DISCL AIMERS ON BACK INSIDE COVER | *IF EQUIPPEDSOUL FEATURES & FUNCTIONS GUIDE
Refer to section 4 in the Owner ’s Manual for more information .
CANCEL
RES
SET+ _
CRUISE
RES
SET+ _<
<+>>-
MODE
+>
>-
MODE
CRUISE
CANCEL
OK
<
<
OK
(For Type B cluster; But tons located on steering wheel)
A
B
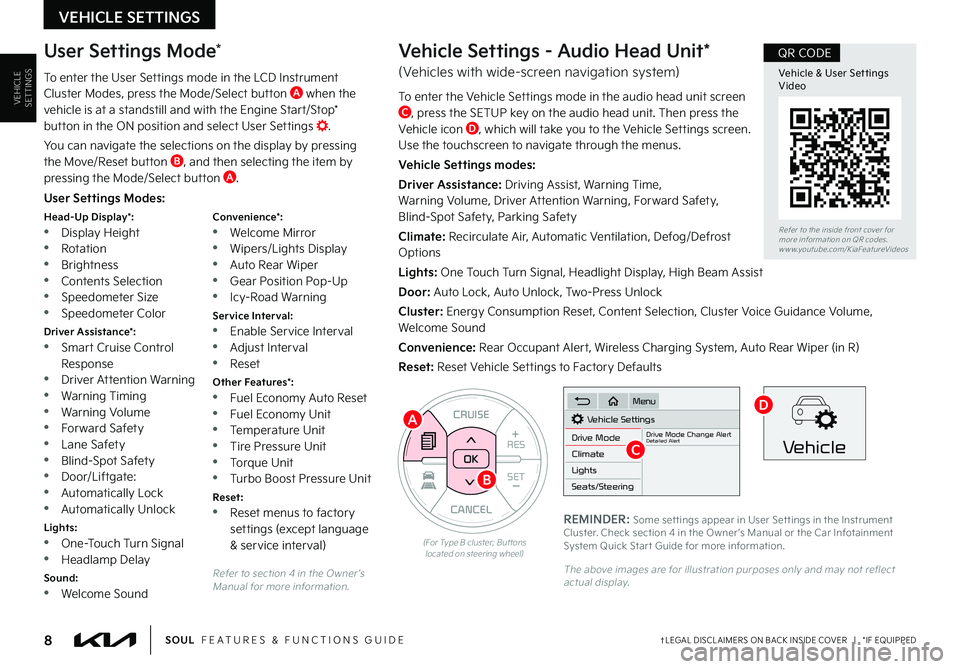
User Settings Modes:
Head-Up Display*: •Display Height •Rotation
•Brightness •Contents Selection •Speedometer Size •Speedometer Color
Driver Assistance*: •Smart Cruise Control Response •Driver Attention Warning •Warning Timing
•Warning Volume •Forward Safety •Lane Safety •Blind-Spot Safety •Door/Liftgate: •Automatically Lock •Automatically Unlock
Lights: •One-Touch Turn Signal •Headlamp Delay
Sound: •Welcome Sound
Convenience*: •Welcome Mirror •Wipers/Lights Display
•Auto Rear Wiper •Gear Position Pop-Up •Icy-Road Warning
Service Interval: •Enable Service Interval •Adjust Interval •Reset
Other Features*: •Fuel Economy Auto Reset •Fuel Economy Unit •Temperature Unit •Tire Pressure Unit
•Torque Unit •Turbo Boost Pressure Unit
Reset: •Reset menus to factory settings (except language & service interval)
User Settings Mode*
To enter the User Settings mode in the LCD Instrument Cluster Modes, press the Mode/Select button A when the vehicle is at a standstill and with the Engine Start/Stop* button in the ON position and select User Settings .
You can navigate the selections on the display by pressing the Move/Reset button B, and then selecting the item by pressing the Mode/Select button A .
Vehicle Settings - Audio Head Unit*
(Vehicles with wide-screen navigation system)
To enter the Vehicle Settings mode in the audio head unit screen C, press the SETUP key on the audio head unit . Then press the Vehicle icon D, which will take you to the Vehicle Settings screen . Use the touchscreen to navigate through the menus .
Vehicle Settings modes:
Driver Assistance: Driving Assist, Warning Time, Warning Volume, Driver Attention Warning, Forward Safety, Blind-Spot Safety, Parking Safety
Climate: Recirculate Air, Automatic Ventilation, Defog/Defrost Options
Lights: One Touch Turn Signal, Headlight Display, High Beam Assist
Door: Auto Lock, Auto Unlock, Two-Press Unlock
Cluster: Energy Consumption Reset, Content Selection, Cluster Voice Guidance Volume, Welcome Sound
Convenience: Rear Occupant Alert, Wireless Charging System, Auto Rear Wiper (in R)
Reset: Reset Vehicle Settings to Factory Defaults
Vehicle Settings
Drive ModeDrive Mode Change AlertDetailed AlertClimate
Lights
Seats/Steering
Menu
Vehicle
REMINDER: Some set tings appear in User Set tings in the Instrument Cluster . Check section 4 in the Owner ’s Manual or the Car Infotainment System Quick Star t Guide for more information .
The above images are for illustration purposes only and may not reflect actual display .
C
D
Refer to the inside front cover for more information on QR codes .www .youtube .com/KiaFeatureVideos
Vehicle & User Set tings Video
QR CODE
Page 11 of 58
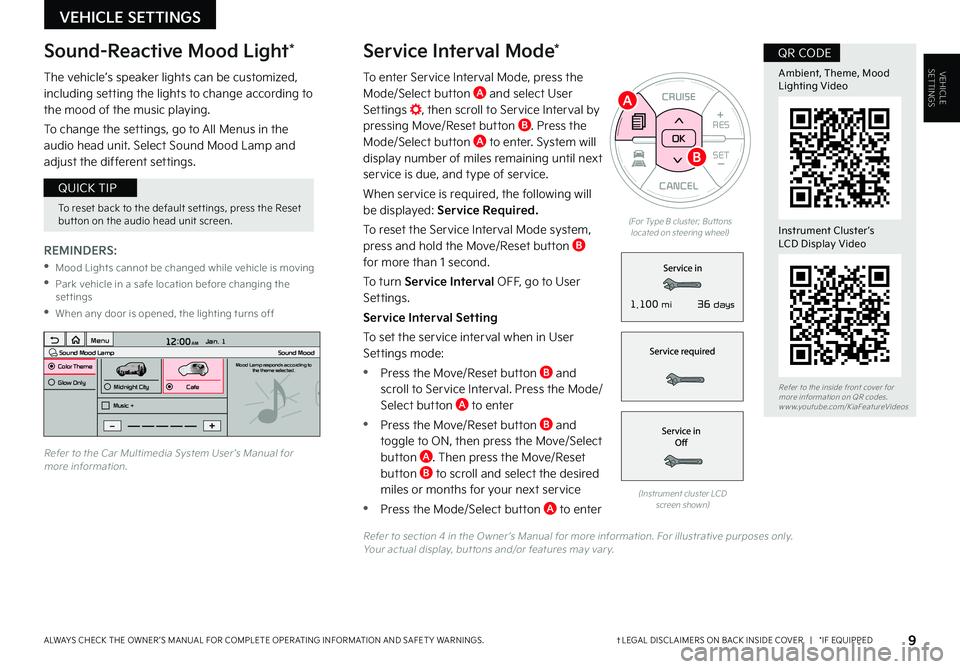
To enter Service Interval Mode, press the Mode/Select button A and select User Settings , then scroll to Service Interval by pressing Move/Reset button B . Press the Mode/Select button A to enter . System will display number of miles remaining until next service is due, and type of service .
When service is required, the following will be displayed: Service Required.
To reset the Service Interval Mode system, press and hold the Move/Reset button B for more than 1 second .
To turn Service Interval OFF, go to User Settings .
Service Interval Setting
To set the service interval when in User Settings mode:
•Press the Move/Reset button B and scroll to Service Interval . Press the Mode/Select button A to enter
•Press the Move/Reset button B and toggle to ON, then press the Move/Select button A . Then press the Move/Reset button B to scroll and select the desired
miles or months for your next service
•Press the Mode/Select button A to enter
VEHICLESETTINGS
VEHICLE SETTINGS
Service Interval Mode*
9†LEGAL DISCL AIMERS ON BACK INSIDE COVER | *IF EQUIPPEDALWAYS CHECK THE OWNER ’S MANUAL FOR COMPLETE OPER ATING INFORMATION AND SAFET Y WARNINGS .
CANCEL
RES
SET+ _
CRUISE
RES
SET+ _<
<+>>-
MODE
+>
>-
MODE
CRUISE
CANCELOK
<
<
OK
(For Type B cluster; But tons located on steering wheel)
REMINDERS:
•Mood Lights cannot be changed while vehicle is moving
•Park vehicle in a safe location before changing the settings
•When any door is opened, the lighting turns off
The vehicle’s speaker lights can be customized, including setting the lights to change according to the mood of the music playing .
To change the settings, go to All Menus in the audio head unit . Select Sound Mood Lamp and adjust the different settings .
(Instrument cluster LCD screen shown)
12:00 AM Jan. 1
MenuSound Mood LampColor ThemeSound MoodMood Lamp responds according to
the theme selected.
Glow Only
Music +Midnight CityCafe
Refer to the Car Multimedia System User ’s Manual for more information .
Refer to section 4 in the Owner ’s Manual for more information . For illustrative purposes only . Your actual display, but tons and/or features may var y .
Sound-Reactive Mood Light*
To reset back to the default set tings, press the Reset but ton on the audio head unit screen .
QUICK TIP
A
B
Refer to the inside front cover for more information on QR codes .www .youtube .com/KiaFeatureVideos
Ambient, Theme, Mood Lighting Video
Instrument Cluster’s LCD Display Video
QR CODE
36 days1,100 mi
Page 18 of 58

16†LEGAL DISCL AIMERS ON BACK INSIDE COVER | *IF EQUIPPEDSOUL FEATURES & FUNCTIONS GUIDE
ADAS
ADVANCED DRIVER ASSISTANCE SYSTEMS (ADAS)
Smart Cruise Control is designed to maintain a predetermined distance from vehicles it detects detected ahead by automatically adjusting the driving speed as needed . When traffic is detected, the vehicle will automatically slow to maintain a set distance behind traffic without depressing the accelerator or brake pedal .
To set/adjust the SCC speed:
•Push the CRUISE button A to turn system ON . The CRUISE indicator will illuminate on the instrument cluster
•Press the SET- button B to set the speed . Press the RES+/SET- button B up/down to increase/decrease the set speed
To set the vehicle distance: Press the Vehicle Distance button C on the steering wheel . The images on the LCD screen D in the Instrument Cluster will change when scrolling through the settings . Each time the button is pressed, the vehicle distance changes E .
To cancel SCC operation: Press the CANCEL button F or press the brake pedal .
To turn SCC OFF: Press the CRUISE button A . The CRUISE indicator on the instrument cluster will turn OFF .
To adjust the sensitivity of SCC: Press the mode button on the Steering Wheel G . With the OK button H, select Drive Assistance, then SCC Response . Then select Fast, Normal or Slow .
Images are for illustrative purposes only and may var y on actual vehicle .
SCC is a supplemental system and is not a substitute for safe driving . It is the responsibilit y of the driver to always check the speed and distance to the vehicle ahead .
Refer to section 5 in the Owner ’s Manual for more information .
The distance set tings are approximations and may var y depending vehicle speed at the time . See owner ’s manual for more information
Smart Cruise Control (SCC)*†4 , 1 6
REMINDERS:
•SCC only operates at speeds above 6 mph
•
SCC is activated when ignition is turned on . Speed will need to be reset when ignition is cycled ON
•
In standard Cruise Control, the driver needs to manually assess the distance from other vehicles as the system will not apply brakes to slow down automatically in order to turn SCC ON/OFF
•
SCC is also canceled when the driver ’s door is opened, gear shift is changed out of D (Drive) and various other conditions . See Owner ’s Manual for other conditions
•
If the SCC system is left on, it can be activated inadver tently . Keep the system off when not in use to avoid set ting a speed which the driver is not aware of
172ft130ft
82ft
106ft
(But tons located on right side on Steering Wheel)
•To change the Cruise Control mode from SCC to standard Cruise Control, press and hold but ton A . Repeat to switch modes again (SCC must not be activated to change modes)
•For the SCC System to operate, the vehicle must be traveling at a minimum speed of 5 mph
•When following a vehicle, the system will automatically adjust your cruise speed based on the vehicle detected in front . It may bring the vehicle to a complete stop if necessar y . If the vehicle stops for more than 3 seconds, the system will disable
QUICK TIPS
Refer to the inside front cover for more information on QR codes .www .youtube .com/KiaFeatureVideos
Smar t Cruise ControlVideo
QR CODE
B
D
EF
A
C
G
H
Page 25 of 58
23†LEGAL DISCL AIMERS ON BACK INSIDE COVER | *IF EQUIPPEDALWAYS CHECK THE OWNER ’S MANUAL FOR COMPLETE OPER ATING INFORMATION AND SAFET Y WARNINGS .
REMINDER: If the steering wheel becomes too warm, turn the system off . The heated steering wheel may cause burns even at low temperatures, especially if used for long periods of time .
(But ton located to the right of gearshift)
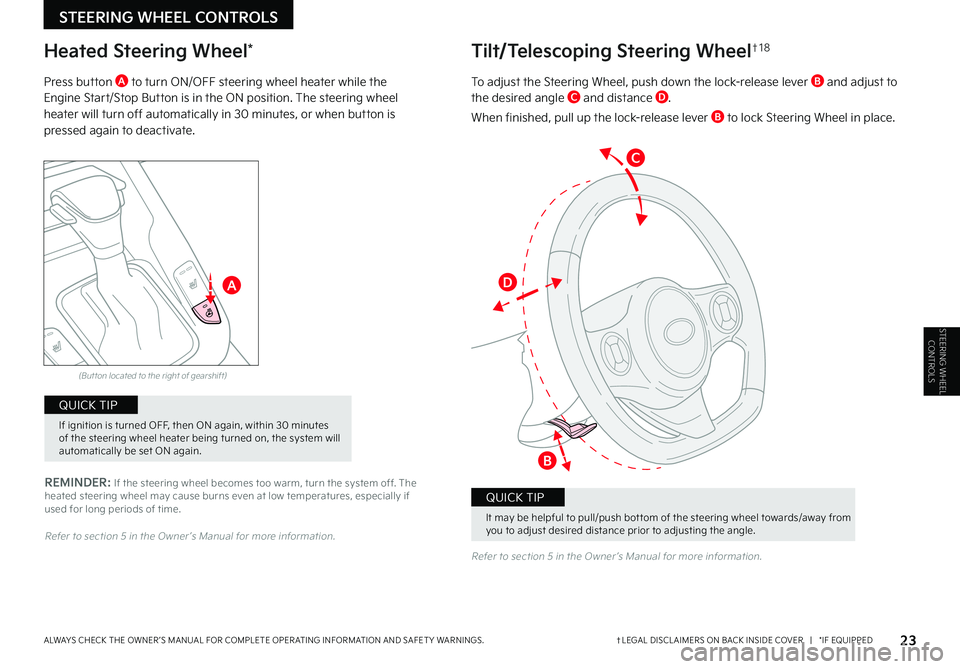
Heated Steering Wheel*
Press button A to turn ON/OFF steering wheel heater while the Engine Start/Stop Button is in the ON position . The steering wheel heater will turn off automatically in 30 minutes, or when button is pressed again to deactivate .
Refer to section 5 in the Owner ’s Manual for more information .
Refer to section 5 in the Owner ’s Manual for more information .
A
C
D
B
It may be helpful to pull/push bot tom of the steering wheel towards/away from you to adjust desired distance prior to adjusting the angle .
QUICK TIP
If ignition is turned OFF, then ON again, within 30 minutes of the steering wheel heater being turned on, the system will automatically be set ON again .
QUICK TIP
Tilt/Telescoping Steering Wheel†1 8
To adjust the Steering Wheel, push down the lock-release lever B and adjust to the desired angle C and distance D .
When finished, pull up the lock-release lever B to lock Steering Wheel in place .
STEERING WHEEL CONTROLS
STEERING WHEEL CONTROLS
Page 30 of 58
AUDIO SYSTEMS
AUDIOSYSTEMS
28†LEGAL DISCL AIMERS ON BACK INSIDE COVER | *IF EQUIPPEDSOUL FEATURES & FUNCTIONS GUIDE
Android AutoTM†3 / Apple CarPlay®†3 Setup
Driving while distracted can result in a loss of vehicle control that may lead to an accident, severe bodily injur y, or death . The driver ’s primar y responsibilit y is in the safe and legal operation of a vehicle . Handheld devices, other equipment, or vehicle systems which take the driver ’s eyes, at tention and focus away from the safe operation of a vehicle or which are not permissible by law, should never be used during operation of the vehicle .
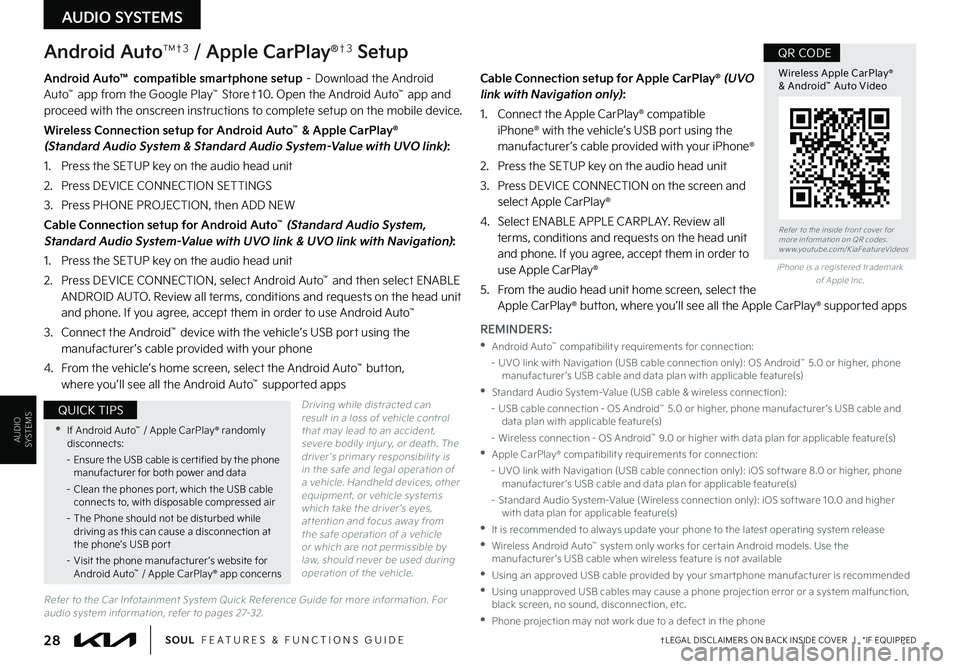
Android Auto™ compatible smartphone setup – Download the Android Auto™ app from the Google Play™ Store†10 . Open the Android Auto™ app and proceed with the onscreen instructions to complete setup on the mobile device .
Wireless Connection setup for Android Auto™ & Apple CarPlay® (Standard Audio System & Standard Audio System-Value with UVO link):
1 . Press the SETUP key on the audio head unit
2 . Press DEVICE CONNECTION SETTINGS
3 . Press PHONE PROJECTION, then ADD NEW
Cable Connection setup for Android Auto™ (Standard Audio System, Standard Audio System-Value with UVO link & UVO link with Navigation):
1 . Press the SETUP key on the audio head unit
2 . Press DEVICE CONNECTION, select Android Auto™ and then select ENABLE ANDROID AUTO . Review all terms, conditions and requests on the head unit and phone . If you agree, accept them in order to use Android Auto™
3 . Connect the Android™ device with the vehicle’s USB port using the manufacturer ’s cable provided with your phone
4 . From the vehicle’s home screen, select the Android Auto™ button, where you’ll see all the Android Auto™ supported apps
Cable Connection setup for Apple CarPlay® (UVO link with Navigation only):
1 . Connect the Apple CarPlay® compatible iPhone® with the vehicle’s USB port using the manufacturer ’s cable provided with your iPhone®
2 . Press the SETUP key on the audio head unit
3 . Press DEVICE CONNECTION on the screen and select Apple CarPlay®
4 . Select ENABLE APPLE CARPL AY . Review all terms, conditions and requests on the head unit and phone . If you agree, accept them in order to use Apple CarPlay®
5 . From the audio head unit home screen, select the Apple CarPlay® button, where you’ll see all the Apple CarPlay® supported apps
Refer to the inside front cover for more information on QR codes .www .youtube .com/KiaFeatureVideos
Wireless Apple CarPlay® & Android™ Auto Video
QR CODE
•If Android Auto™ / Apple CarPlay® randomly disconnects:
– Ensure the USB cable is cer tified by the phone manufacturer for both power and data
– Clean the phones por t, which the USB cable connects to, with disposable compressed air
– The Phone should not be disturbed while driving as this can cause a disconnection at the phone’s USB por t
– Visit the phone manufacturer ’s website for Android Auto™ / Apple CarPlay® app concerns
QUICK TIPS
REMINDERS:
•Android Auto™ compatibilit y requirements for connection:
– UVO link with Navigation (USB cable connection only): OS Android™ 5 .0 or higher, phone manufacturer ’s USB cable and data plan with applicable feature(s)
•Standard Audio System-Value (USB cable & wireless connection):
– USB cable connection - OS Android™ 5 .0 or higher, phone manufacturer ’s USB cable and data plan with applicable feature(s)
– Wireless connection - OS Android™ 9 .0 or higher with data plan for applicable feature(s)
•Apple CarPlay® compatibilit y requirements for connection:
– UVO link with Navigation (USB cable connection only): iOS soft ware 8 .0 or higher, phone manufacturer ’s USB cable and data plan for applicable feature(s)
– Standard Audio System-Value (Wireless connection only): iOS soft ware 10 .0 and higher with data plan for applicable feature(s)
•
It is recommended to always update your phone to the latest operating system release
•
Wireless Android Auto™ system only works for cer tain Android models . Use the manufacturer ’s USB cable when wireless feature is not available
•
Using an approved USB cable provided by your smar tphone manufacturer is recommended
•
Using unapproved USB cables may cause a phone projection error or a system malfunction, black screen, no sound, disconnection, etc .
•Phone projection may not work due to a defect in the phone
iPhone is a registered trademark of Apple Inc .
Refer to the Car Infotainment System Quick Reference Guide for more information . For audio system information, refer to pages 27-32 .
Page 31 of 58
AUDIO SYSTEMS
AUDIOSYSTEMS
29†LEGAL DISCL AIMERS ON BACK INSIDE COVER | *IF EQUIPPEDALWAYS CHECK THE OWNER ’S MANUAL FOR COMPLETE OPER ATING INFORMATION AND SAFET Y WARNINGS .
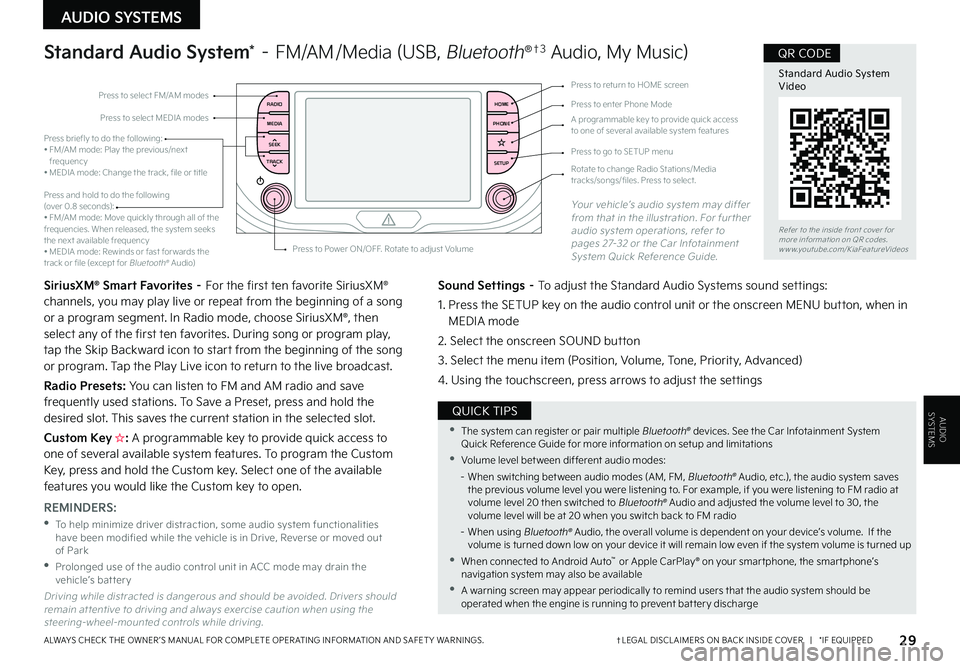
RADIO
MEDIA
TRACK SEEKHOME
PHONE
SETUPPress to select FM/AM modes
A programmable key to provide quick access to one of several available system features
Press to Power ON/OFF . Rotate to adjust Volume
Press to select MEDIA modesPress to enter Phone Mode
Press to return to HOME screen
Press briefly to do the following:• FM/AM mode: Play the previous/next frequency• MEDIA mode: Change the track, file or title Press and hold to do the following (over 0 .8 seconds):• FM/AM mode: Move quickly through all of the frequencies . When released, the system seeks the next available frequency• MEDIA mode: Rewinds or fast for wards the track or file (except for Bluetooth® Audio)
Press to go to SETUP menu
Rotate to change Radio Stations/Media tracks/songs/files . Press to select .
Standard Audio System* – FM/AM /Media (USB, Bluetooth®†3 Audio, My Music)
SiriusXM® Smart Favorites – For the first ten favorite SiriusXM® channels, you may play live or repeat from the beginning of a song or a program segment . In Radio mode, choose SiriusXM®, then select any of the first ten favorites . During song or program play, tap the Skip Backward icon to start from the beginning of the song or program . Tap the Play Live icon to return to the live broadcast .
Radio Presets: You can listen to FM and AM radio and save frequently used stations . To Save a Preset, press and hold the desired slot . This saves the current station in the selected slot .
Custom Key H: A programmable key to provide quick access to one of several available system features . To program the Custom Key, press and hold the Custom key . Select one of the available features you would like the Custom key to open .
Your vehicle’s audio system may differ from that in the illustration . For further audio system operations, refer to pages 27-32 or the Car Infotainment System Quick Reference Guide .
Sound Settings – To adjust the Standard Audio Systems sound settings:
1 . Press the SETUP key on the audio control unit or the onscreen MENU button, when in MEDIA mode
2 . Select the onscreen SOUND button
3 . Select the menu item (Position, Volume, Tone, Priority, Advanced)
4 . Using the touchscreen, press arrows to adjust the settings
Driving while distracted is dangerous and should be avoided . Drivers should remain at tentive to driving and always exercise caution when using the steering-wheel-mounted controls while driving .
REMINDERS:
•
To help minimize driver distraction, some audio system functionalities have been modified while the vehicle is in Drive, Reverse or moved out of Park
•
Prolonged use of the audio control unit in ACC mode may drain the vehicle’s battery
•The system can register or pair multiple Bluetooth® devices . See the Car Infotainment System Quick Reference Guide for more information on setup and limitations
•Volume level bet ween different audio modes:
– When switching bet ween audio modes (AM, FM, Bluetooth® Audio, etc .), the audio system saves the previous volume level you were listening to . For example, if you were listening to FM radio at volume level 20 then switched to Bluetooth® Audio and adjusted the volume level to 30, the volume level will be at 20 when you switch back to FM radio
– When using Bluetooth® Audio, the overall volume is dependent on your device’s volume . If the volume is turned down low on your device it will remain low even if the system volume is turned up
•When connected to Android Auto™ or Apple CarPlay® on your smar tphone, the smar tphone’s navigation system may also be available
•A warning screen may appear periodically to remind users that the audio system should be operated when the engine is running to prevent bat ter y discharge
QUICK TIPS
Refer to the inside front cover for more information on QR codes .www .youtube .com/KiaFeatureVideos
Standard Audio System Video
QR CODE