2022 KIA NIRO change time
[x] Cancel search: change timePage 82 of 164

5-4
\333Note
\225Depending on the vehicle model or
specifications, displayed screens and
available functions may vary.
\225When connecting a USB storage device,
do not use an extension cable. If you use
a USB hub or an extension cable, the
device may not be recognized.
\225Fully insert a USB connector into the
USB port. Failure to do so may cause a
communication error.
\225When you disconnect a USB device, a
distorted noise may occur.
\225The system can play only files encoded
in a standard format.
\225The following types of USB devices may
not be recognized or work correctly:
- Encrypted MP3 players
-USB devices not recognized as
removable disks
\225A USB device may not be recognized
depending on its condition.
\225Some USB devices may be incompatible
with your system.
\225Depending on the USB device's type,
capacity, or the format of files, USB
recognition time may be longer.
\225Depending on the specification, some
USB devices may not support charging
via a USB connection.
[Controlling the USB player
Use the buttons on the media player
screen to control the music playback.
Pausing/Resuming playback
Press to pause music playback. Press
to resume playback.
Rewinding/Fast forwarding
Press and hold or to rewind or
fast forward the song.
\225 Alternatively, use the Search backward
button (SEEK) or the Search forward
button (TRACK) on the control panel.
\225You can also use the Search lever/
button on the steering wheel.
\225You can change the playback position
by pressing the progress bar on the
screen. Music will begin playing from
the selected location.
Page 85 of 164

5-7
bbcc
eeffgg
dd
aa
hh
ii
Option A
bbcc
eeffgg
dd
ii
hh
Option B
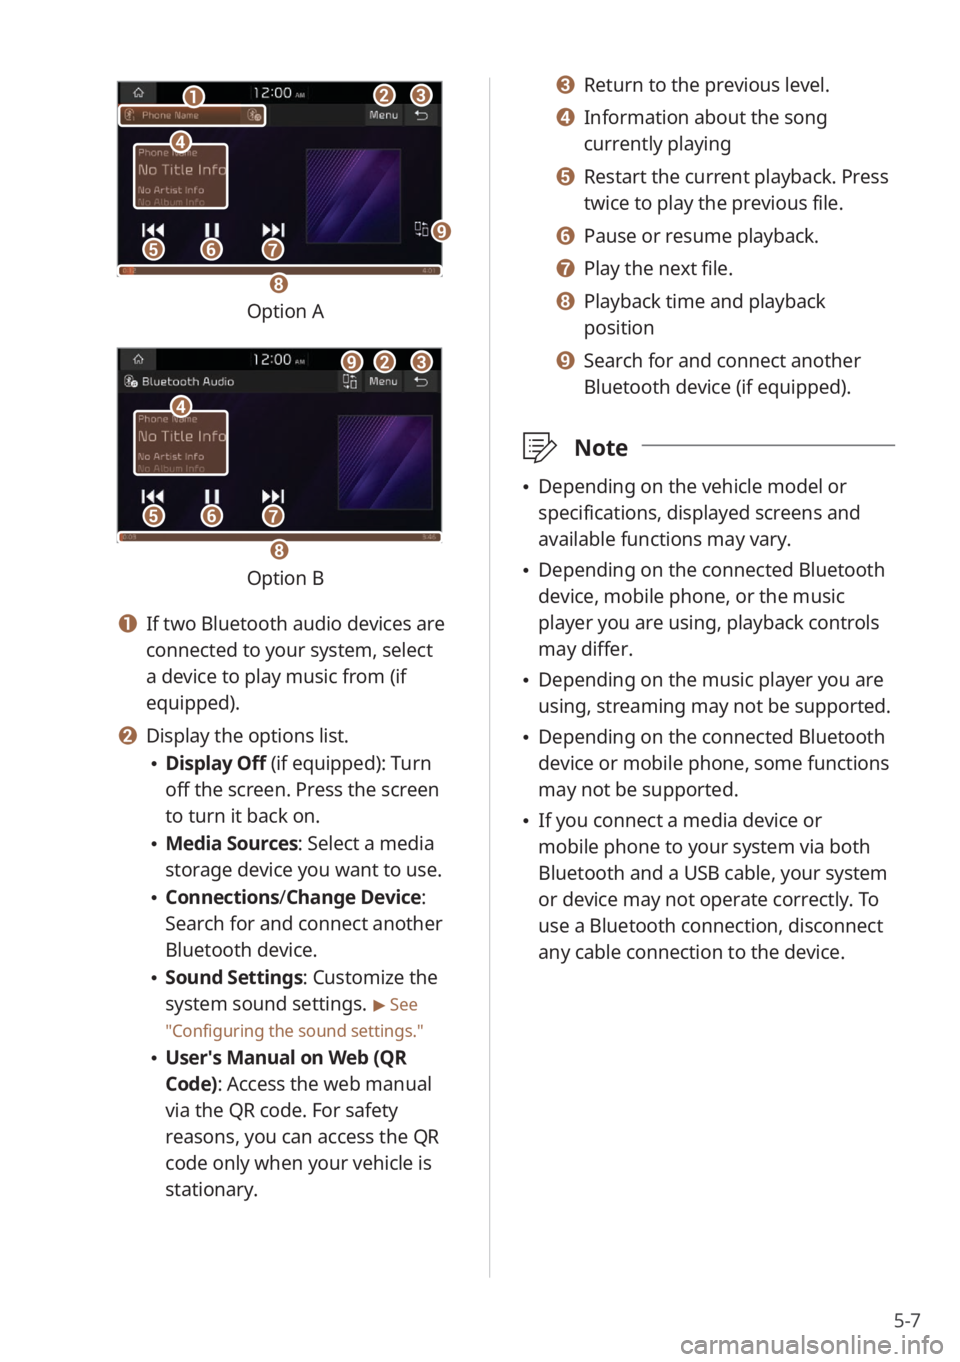
a a If two Bluetooth audio devices are
connected to your system, select
a device to play music from (if
equipped).
b b Display the options list.
\225Display Off (if equipped): Turn
off the screen. Press the screen
to turn it back on.
\225Media Sources: Select a media
storage device you want to use.
\225Connections /Change Device:
Search for and connect another
Bluetooth device.
\225 Sound Settings: Customize the
system sound settings.
> See
″ Configuring the sound settings.″
\225 User′s Manual on Web (QR
Code): Access the web manual
via the QR code. For safety
reasons, you can access the QR
code only when your vehicle is
stationary.
c c Return to the previous level.
d d Information about the song
currently playing
e e Restart the current playback. Press
twice to play the previous file.
f f Pause or resume playback.
g g Play the next file.
h h Playback time and playback
position
i i Search for and connect another
Bluetooth device (if equipped).
\333 Note
\225Depending on the vehicle model or
specifications, displayed screens and
available functions may vary.
\225Depending on the connected Bluetooth
device, mobile phone, or the music
player you are using, playback controls
may differ.
\225Depending on the music player you are
using, streaming may not be supported.
\225Depending on the connected Bluetooth
device or mobile phone, some functions
may not be supported.
\225If you connect a media device or
mobile phone to your system via both
Bluetooth and a USB cable, your system
or device may not operate correctly. To
use a Bluetooth connection, disconnect
any cable connection to the device.
Page 89 of 164

6-3
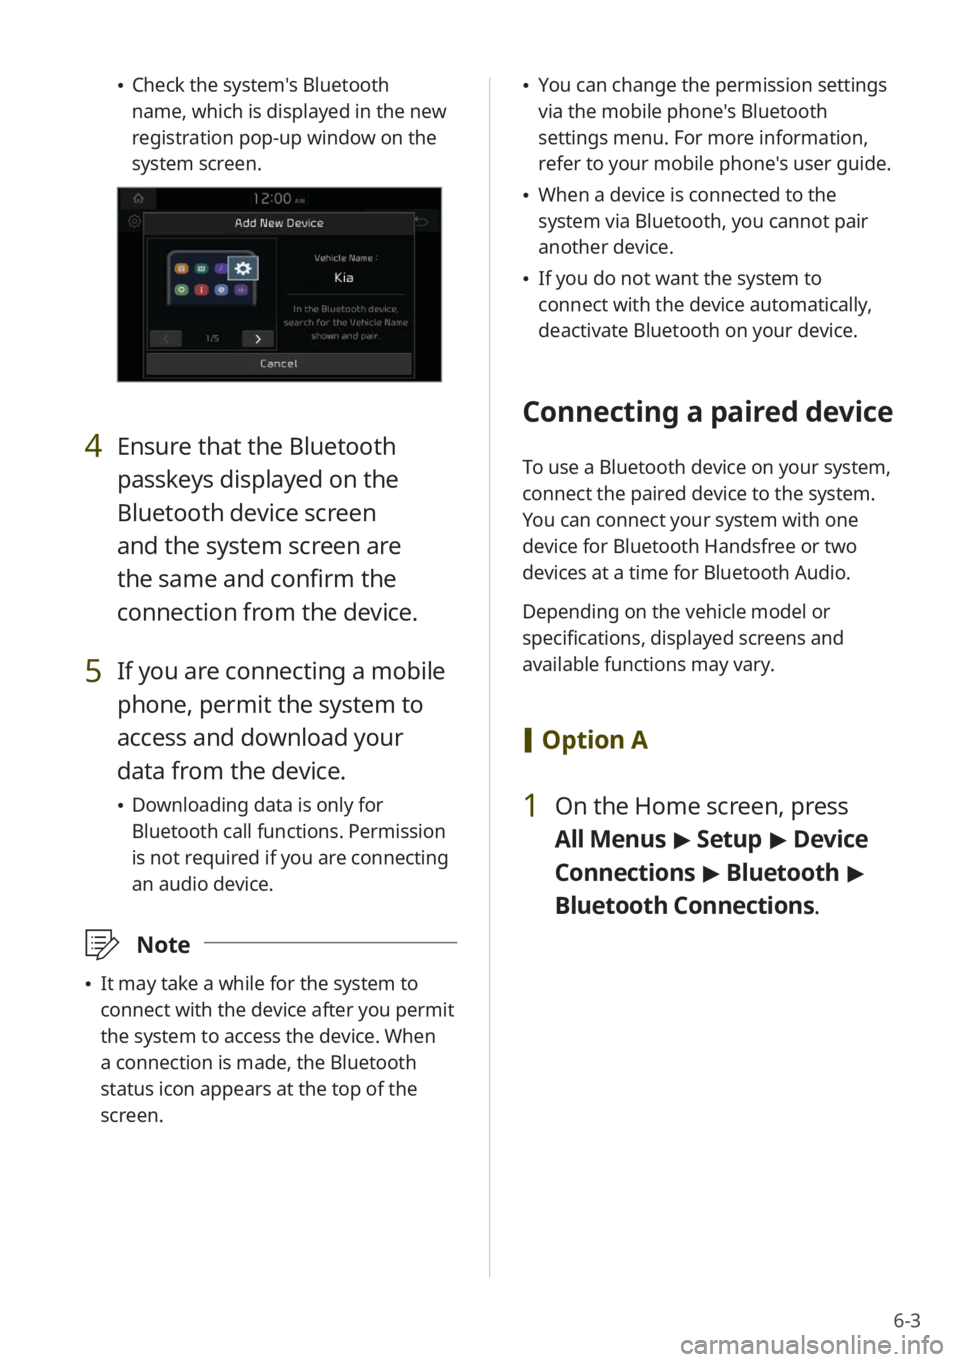
\225Check the system's Bluetooth
name, which is displayed in the new
registration pop-up window on the
system screen.
4 Ensure that the Bluetooth
passkeys displayed on the
Bluetooth device screen
and the system screen are
the same and confirm the
connection from the device.
5 If you are connecting a mobile
phone, permit the system to
access and download your
data from the device.
\225Downloading data is only for
Bluetooth call functions. Permission
is not required if you are connecting
an audio device.
\333 Note
\225It may take a while for the system to
connect with the device after you permit
the system to access the device. When
a connection is made, the Bluetooth
status icon appears at the top of the
screen.
\225You can change the permission settings
via the mobile phone's Bluetooth
settings menu. For more information,
refer to your mobile phone's user guide.
\225When a device is connected to the
system via Bluetooth, you cannot pair
another device.
\225If you do not want the system to
connect with the device automatically,
deactivate Bluetooth on your device.
Connecting a paired device
To use a Bluetooth device on your system,
connect the paired device to the system.
You can connect your system with one
device for Bluetooth Handsfree or two
devices at a time for Bluetooth Audio.
Depending on the vehicle model or
specifications, displayed screens and
available functions may vary.
[Option A
1 On the Home screen, press
All Menus > Setup > Device
Connections > Bluetooth >
Bluetooth Connections .
Page 118 of 164

9-4
Seat Position Change Alert
(if equipped)
You can set the system to display a
notification when you change the position,
height, or angle of the driver′s seat.
Heated/Ventilated
Features
(if equipped)
You can set the steering wheel heater and
the driver seat heater or ventilation to be
controlled automatically.
The auto control mode will be deactivated
if you operate the heater or ventilation
controls manually. Selecting this option
again or restarting the vehicle will
reactivate the auto control mode.
Climate (if equipped)
You can change the vehicle′s climate
control settings.
[Recirculate Air (if equipped)
You can set the system to cut off the
inflow of outdoor air to maintain a
comfortable environment.
\225Activate upon Washer Fluid Use: Set to
activate air recirculation to decrease the
inflow of the washer fluid smell while
spraying washer fluid.
[Automatic Ventilation (if
equipped)
You can set the system to activate
automatic air ventilation to maintain a
comfortable environment when the air in
the vehicle is stuffy.
\225 Auto Dehumidify : Set to activate air
ventilation automatically to prevent the
interior from becoming humid over time
due to air recirculation.
\225 Scheduled Ventilation (if equipped):
Set the climate control system to lower
the interior temperature by ventilating
your vehicle′s interior at a specified time
when the engine is stopped. To set a
time for scheduled ventilation, press
.
Page 124 of 164
![KIA NIRO 2022 Quick Start Guide Base Audio 9-10
[∧ ]/[∨ ] Buttons (Steering
Wheel)
(if equipped)
You can assign a function to the Search
lever/button on your steering wheel.
Configuring the
general system
settings
You can customize yo KIA NIRO 2022 Quick Start Guide Base Audio 9-10
[∧ ]/[∨ ] Buttons (Steering
Wheel)
(if equipped)
You can assign a function to the Search
lever/button on your steering wheel.
Configuring the
general system
settings
You can customize yo](/manual-img/2/54798/w960_54798-123.png)
9-10
[∧ ]/[∨ ] Buttons (Steering
Wheel)
(if equipped)
You can assign a function to the Search
lever/button on your steering wheel.
Configuring the
general system
settings
You can customize your system settings,
such as the time and date, the system
language, and more.
Depending on the vehicle model or
specifications, displayed screens and
available options may vary.
On the Home screen, press All
Menus > Setup > General and
select an option to change.
SW Info/Update (if equipped)
You can view your system′s version
information or update it to the latest
version. To update your system, visit your
local dealership.
\335 Caution
\225Depending on data size, an update may
take several minutes.
\225Do not turn off the system or remove
the storage device while the update is in
progress. If the power supply is cut off
or the storage device is removed from
the system, it may corrupt the data or
cause a system malfunction.
System Info
You can view your system information
or reset your system settings to default
values.
Page 125 of 164

9-11
[SW Info/Update (if equipped)
You can view your system′s version
information or update it to the latest
version. To update your system, visit your
local dealership.
\335 Caution
\225Depending on data size, an update may
take several minutes.
\225Do not turn off the system or remove
the storage device while the update is in
progress. If the power supply is cut off
or the storage device is removed from
the system, it may corrupt the data or
cause a system malfunction.
[Storage
You can view your system′s memory
storage information.
[User′s Manual on Web (QR
Code)
You can access the web manual of the
system by scanning the QR code with your
smartphone.
\334 Warning
Park your vehicle in a safe location before
scanning the QR code. For safety reasons,
you are not able to access QR codes from
the system′s screen while the vehicle is
moving.
[Reset (if equipped)
You can reset your system settings to
default values. All user data stored in the
system will also be deleted.
Date & Time
You can set the current time and date or
change the time display format.
[GPS Time
You can set the system to receive time
information from the GPS. When you
deactivate this option, you can set the
time and date manually.
[Time Zone
You can select your time zone.
[Daylight Saving Time
You can apply daylight saving time.
[24 Hours
You can set the time in the 24 hour
format.
Page 128 of 164

9-14
Configuring the sound
settings
You can adjust/modify sound settings
such as speaker volume or sound effects.
Depending on the vehicle model or
specifications, displayed screens and
available options may vary.
On the Home screen, press All
Menus > Setup > Sound and
select an option to change.
Volume (if equipped)
You can adjust the volume levels for
various system features, including phone
projection.
[ System Sound
You can adjust the volume levels for
individual system features.
\333 Note
To restore the default volume settings for
system features, press Reset.
[Phone Projection
You can adjust the volume levels for
phone projection features individually.
\333 Note
To restore the default volume settings for
phone projection, press Reset.
Priority (if equipped)
You can set specific sounds to take priority
over other sounds when they play at the
same time.
[Parking Safety Priority
You can set to give priority to the
proximity warning feature and lower all
other sounds when parking your vehicle.
[Start-up Volume Limit
You can set to automatically lower the
system volume upon vehicle start-up, if
the volume has been previously set to a
high level.
Page 136 of 164

9-22
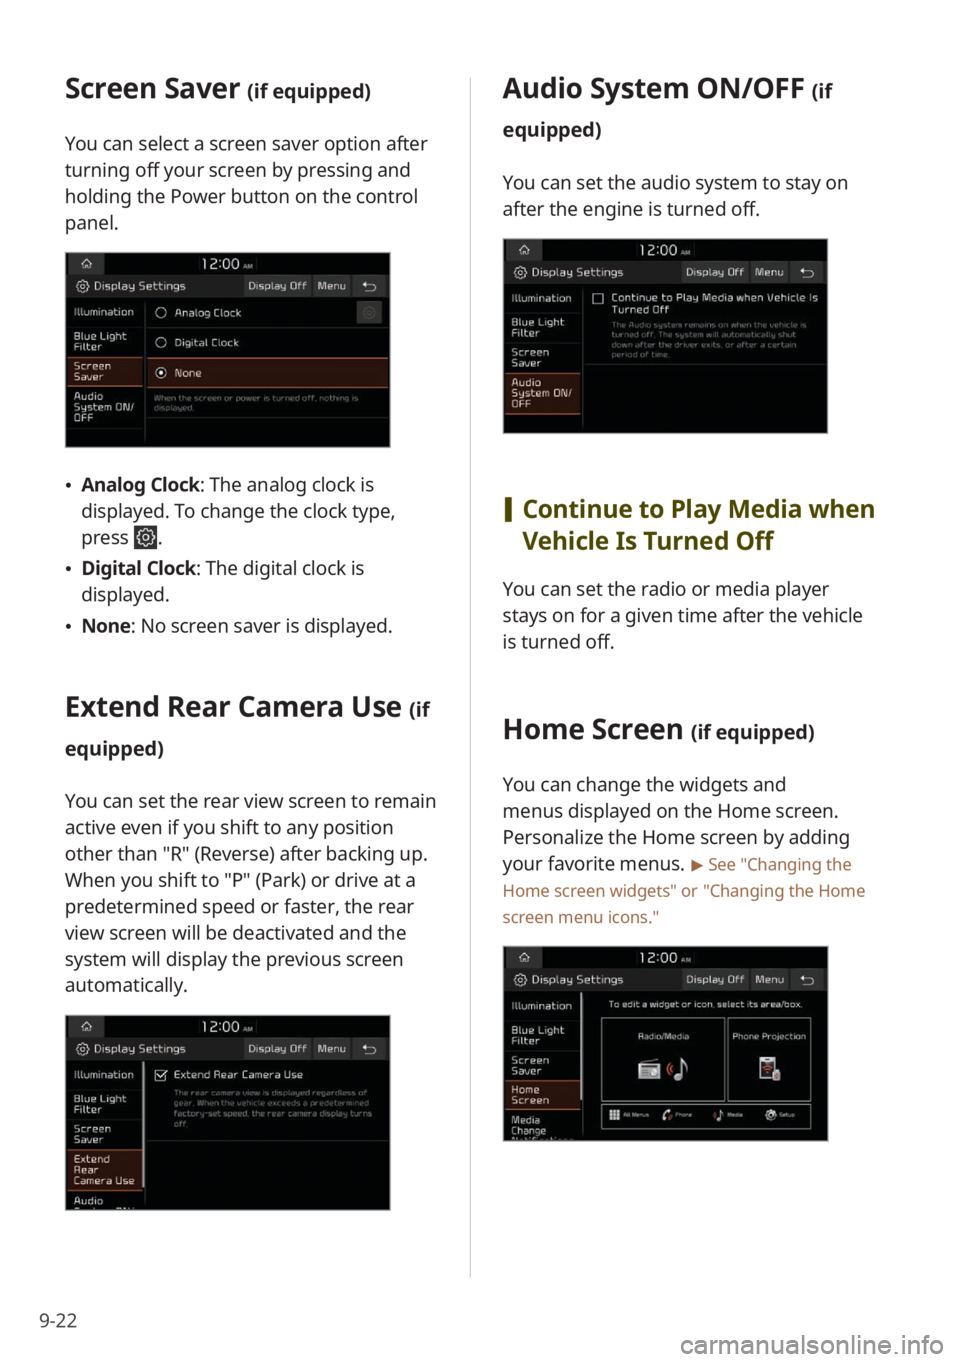
Screen Saver (if equipped)
You can select a screen saver option after
turning off your screen by pressing and
holding the Power button on the control
panel.
\225Analog Clock : The analog clock is
displayed. To change the clock type,
press
.
\225 Digital Clock : The digital clock is
displayed.
\225 None: No screen saver is displayed.
Extend Rear Camera Use (if
equipped)
You can set the rear view screen to remain
active even if you shift to any position
other than ″R″ (Reverse) after backing up.
When you shift to ″P″ (Park) or drive at a
predetermined speed or faster, the rear
view screen will be deactivated and the
system will display the previous screen
automatically.
Audio System ON/OFF (if
equipped)
You can set the audio system to stay on
after the engine is turned off.
[ Continue to Play Media when
Vehicle Is Turned Off
You can set the radio or media player
stays on for a given time after the vehicle
is turned off.
Home Screen (if equipped)
You can change the widgets and
menus displayed on the Home screen.
Personalize the Home screen by adding
your favorite menus.
> See ″Changing the
Home screen widgets″ or
″ Changing the Home
screen menu icons.″