2022 KIA NIRO PHEV oil type
[x] Cancel search: oil typePage 295 of 710

4155
Features of your vehicle
Air Conditioning refrigerant
label
❈The actual Air Conditioning refrig-
erant label in the vehicle may differ
from the illustration. Each symbol and specification on
the air conditioning refrigerant label
is represented below :
1. Classification of refrigerant
2. Amount of refrigerant
3. Classification of Compressor lubri-
cant
4. Caution
5. Flammable Refrigerant
6. To requires Registered Technician to Service Air Conditioning system
Refer to chapter 8 for more detail on
the location of air conditioning refrig-
erant label.
ODEP081005N
CAUTION - AC Repair
It is important that the correct type and amount of oil andrefrigerant is used, otherwisedamage to the vehicle mayoccur. To prevent damage, theair conditioning system in yourvehicle should only be servicedby trained and certified techni-cians.
ODEEV041619
■
Example
Page 296 of 710

Features of your vehicle
156
4
Checking the amount of air
conditioner refrigerant and
compressor lubricant
When the amount of refrigerant is
low, the performance of the air condi-
tioning is reduced. Overfilling also
has a negative impact on the air con-
ditioning system.
Therefore, if abnormal operation is
found, have the system inspected by
an authorized Kia dealer.
WARNING - Vehicles
equipped with R-1234yf
Since the refrigerantis mildly flammable
and operated at high
pressure, the air con-
ditioning system
should only be serv-
iced by trained and
certified technicians.
(Refer to the SAE
J2845)
It is important that the correct
type and amount of oil and
refrigerant are used.
All refrigerants should be
reclaimed with proper equip-
ment.
Venting refrigerants directly to
the atmosphere is harmful to
individuals and environment.
Failure to heed these warnings
can lead to serious injuries.
Page 513 of 710

Driving your vehicle
190
5
The use of chains may adversely
affect vehicle handling.
Do not exceed 20 mph (30 km/h) or the chain manufacturer’s recom-
mended speed limit, whichever is
lower.
Drive carefully and avoid bumps, holes, sharp turns, and other road
hazards, which may cause the
vehicle to bounce.
Avoid sharp turns or locked-wheel braking.Use high quality ethylene gly-
col coolant
Your vehicle is delivered with high
quality ethylene glycol coolant in the
cooling system. It is the only type of
coolant that should be used because
it helps prevent corrosion in the cool-
ing system, lubricates the water
pump and prevents freezing. Be sure
to replace or replenish your coolant
in accordance with the maintenance
schedule in chapter 8. Before winter,
have your coolant tested to assure
that its freezing point is sufficient for
the temperatures anticipated during
the winter.
Check battery and cables
Winter puts additional burdens on
the battery system. Visually inspect
the battery and cables as described
in chapter 8. The level of charge in
your battery can be checked by an
authorized Kia dealer or a service
station.
Change to "winter weight" oil
if necessary
In some climates it is recommended
that a lower viscosity "winter weight"
oil be used during cold weather. See
chapter 9 for recommendations. If
you aren't sure what weight oil you
should use, consult an authorized
Kia dealer.
Check spark plugs and ignition
system
Inspect your spark plugs as
described in chapter 8 and replace
them if necessary. Also check all
ignition wiring and components to be
sure they are not cracked, worn or
damaged in any way.CAUTION- Snow chains
Chains that are the wrong size or improperly installed candamage your vehicle's brakelines, suspension, body andwheels.
Stop driving and retighten the chains any time you hear themhitting the vehicle.
Page 590 of 710

727
Maintenance
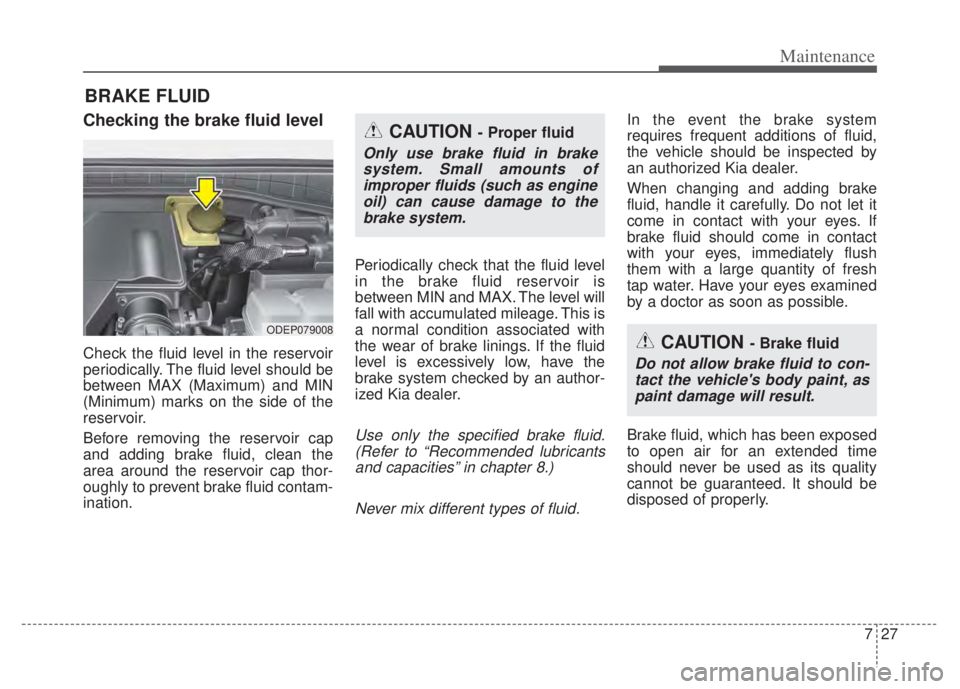
BRAKE FLUID
Checking the brake fluid level
Check the fluid level in the reservoir
periodically. The fluid level should be
between MAX (Maximum) and MIN
(Minimum) marks on the side of the
reservoir.
Before removing the reservoir cap
and adding brake fluid, clean the
area around the reservoir cap thor-
oughly to prevent brake fluid contam-
ination.Periodically check that the fluid level
in the brake fluid reservoir is
between MIN and MAX. The level will
fall with accumulated mileage. This is
a normal condition associated with
the wear of brake linings. If the fluid
level is excessively low, have the
brake system checked by an author-
ized Kia dealer.
Use only the specified brake fluid.
(Refer to “Recommended lubricantsand capacities” in chapter 8.)
Never mix different types of fluid.
In the event the brake system
requires frequent additions of fluid,
the vehicle should be inspected by
an authorized Kia dealer.
When changing and adding brake
fluid, handle it carefully. Do not let it
come in contact with your eyes. If
brake fluid should come in contact
with your eyes, immediately flush
them with a large quantity of fresh
tap water. Have your eyes examined
by a doctor as soon as possible.
Brake fluid, which has been exposed
to open air for an extended time
should never be used as its quality
cannot be guaranteed. It should be
disposed of properly.
CAUTION - Brake fluid
Do not allow brake fluid to con-tact the vehicle's body paint, aspaint damage will result.
CAUTION - Proper fluid
Only use brake fluid in brakesystem. Small amounts ofimproper fluids (such as engineoil) can cause damage to thebrake system.
ODEP079008
Page 592 of 710

729
Maintenance
ENGINE CLUTCH ACTUATOR FLUID
Checking the engine clutch
actuator fluid level
In normal driving conditions, the
actuator fluid level does not go down
rapidly. However, oil consumption
rate may rise as vehicle mileage
increases, and leakage in actuator
related parts may result in increased
consumption of the engine clutch
actuator oil. Regularly check and
make sure the engine clutch actuator
oil fluid level is between [MIN] and
[MAX] marks.
If the oil level is below [MIN] mark,
we recommend that your vehicle be
checked by an authorized Kia dealer.If the fluid level is excessively low, we
recommend that the system be
checked by an authorized Kia dealer.
Use only the specified engine clutch
actuator fluid.
(Refer to “Recommended lubricants
or capacities” in chapter 8.)
Never mix different types of fluid.
✽ ✽
NOTICE - Loss of engine
clutch actuator fluid
In the event the engine clutch actua-
tor requires frequent additions of
fluid, we recommend that the system
be inspected by an authorized Kia
dealer.
WARNING- Engine clutch actuator fluid
When changing and adding
engine clutch actuator fluid,
handle it carefully. Do not let it
come in contact with your eyes.
If engine clutch actuator fluid
should come in contact with
your eyes, immediately flush
them with a large quantity of
fresh water, and seek medical
attention as soon as possible.
ODE076057
Page 622 of 710

759
Maintenance
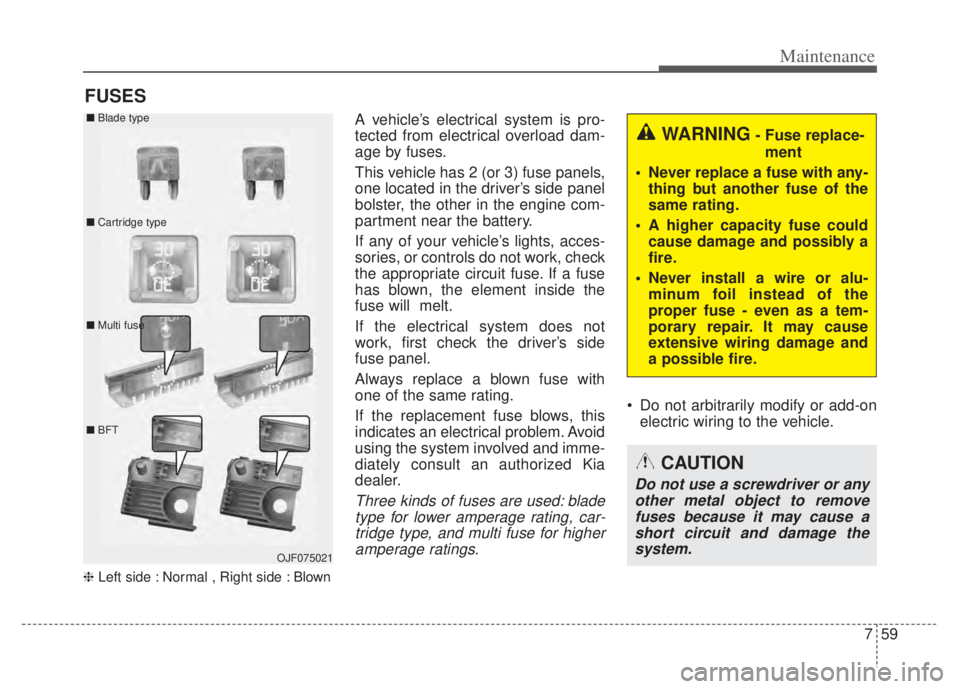
FUSES
❈Left side : Normal , Right side : Blown
A vehicle’s electrical system is pro-
tected from electrical overload dam-
age by fuses.
This vehicle has 2 (or 3) fuse panels,
one located in the driver’s side panel
bolster, the other in the engine com-
partment near the battery.
If any of your vehicle’s lights, acces-
sories, or controls do not work, check
the appropriate circuit fuse. If a fuse
has blown, the element inside the
fuse will melt.
If the electrical system does not
work, first check the driver’s side
fuse panel.
Always replace a blown fuse with
one of the same rating.
If the replacement fuse blows, this
indicates an electrical problem. Avoid
using the system involved and imme-
diately consult an authorized Kia
dealer.
Three kinds of fuses are used: blade
type for lower amperage rating, car-tridge type, and multi fuse for higheramperage ratings.
Do not arbitrarily modify or add-on electric wiring to the vehicle.
WARNING- Fuse replace-
ment
Never replace a fuse with any- thing but another fuse of the
same rating.
A higher capacity fuse could cause damage and possibly a
fire.
Never install a wire or alu- minum foil instead of the
proper fuse - even as a tem-
porary repair. It may cause
extensive wiring damage and
a possible fire.
CAUTION
Do not use a screwdriver or anyother metal object to removefuses because it may cause ashort circuit and damage thesystem.
OJF075021
■
Blade type
■ Cartridge type
■ Multi fuse
■ BFT
Page 655 of 710

Maintenance
92
7
Front turn signal lamp (Bulb
type) bulb replacement
(Headlamp type A)
1. Open the hood.
2. Remove the dust cover (A) from
the headlamp assembly then bulb-
socket by turning the counter-
clockwise until the tabs on the
bulb-socket align with the slots on
the headlamp assembly.
3. Remove the bulb from the bulb- socket by pressing it in and rotat-
ing it counterclockwise until the
tabs on the bulb align with the
slots in the bulb-socket. Pull the
bulb out of the bulb-socket. 4. Insert a new bulb by inserting it
into the bulb-socket and rotating it
until it locks into place.
5. Install the socket in the headlamp assembly by aligning the tabs on
the bulb-socket with the slots in
the assembly. Push the bulb-sock-
et into the headlamp assembly
and turn the socket clockwise.
(Continued)
Always handle them carefully,and avoid scratches and abra-
sions. If the bulbs are lit, avoid
contact with liquids. Never
touch the glass with bare
hands. Residual oil may cause
the bulb to overheat and burst
when lit.
A bulb should be operated
only when installed in a head-
light.
If a bulb becomes damaged or cracked, replace it immediate-
ly and carefully dispose of it.
Wear eye protection when changing a bulb. Allow the bulb
to cool down before handling it.
ODE076058L
Page 668 of 710

7105
Maintenance
APPEARANCE CARE
Exterior care
Exterior general caution
It is very important to follow the label
directions when using any chemical
cleaner or polish. Read all warning
and caution statements that appear
on the label.
✽ ✽NOTICE
If you park the vehicle around a
stainless signboard or windshield
building etc., the plastic exterior
trim (bumper, spoiler, garnish,
lamp, outside mirror etc.) may be
damaged by reflected sunlight from
the external structure. To avoid
damaging the plastic exterior trim,
park the vehicle away from the
areas where the reflected light may
occur or use a vehicle cover
(Depending on the vehicle, the type
of exterior trim applied such as
spoiler may differ).
Finish maintenance
Washing
To help protect your vehicle’s finish
from rust and deterioration, wash it
thoroughly and frequently at least
once a month with lukewarm or cold
water.
If you use your vehicle for off-road
driving, you should wash it after each
off-road trip. Pay special attention to
the removal of any accumulation of
salt, dirt, mud, and other foreign mate-
rials. Make sure the drain holes in the
lower edges of the doors and rocker
panels are kept clear and clean.
Insects, tar, tree sap, bird droppings,
industrial pollution and similar
deposits can damage your vehicle’s
finish if not removed immediately.
Even prompt washing with plain water
may not completely remove all these
deposits. A mild soap, safe for use on
painted surfaces, may be used.
After washing, rinse the vehicle thor-
oughly with lukewarm or cold water.
Do not allow soap to dry on the finish. After washing the vehicle, test the
brakes while driving slowly to see if
they have been affected by water. If
braking performance is impaired, dry
the brakes by applying them lightly
while maintaining a slow forward
speed.