2022 KIA NIRO PHEV display
[x] Cancel search: displayPage 12 of 66
10*IF EQUIPPEDNIRO HYBRID / PLUG-IN HYBRID FEATURES & FUNCTIONS GUIDE
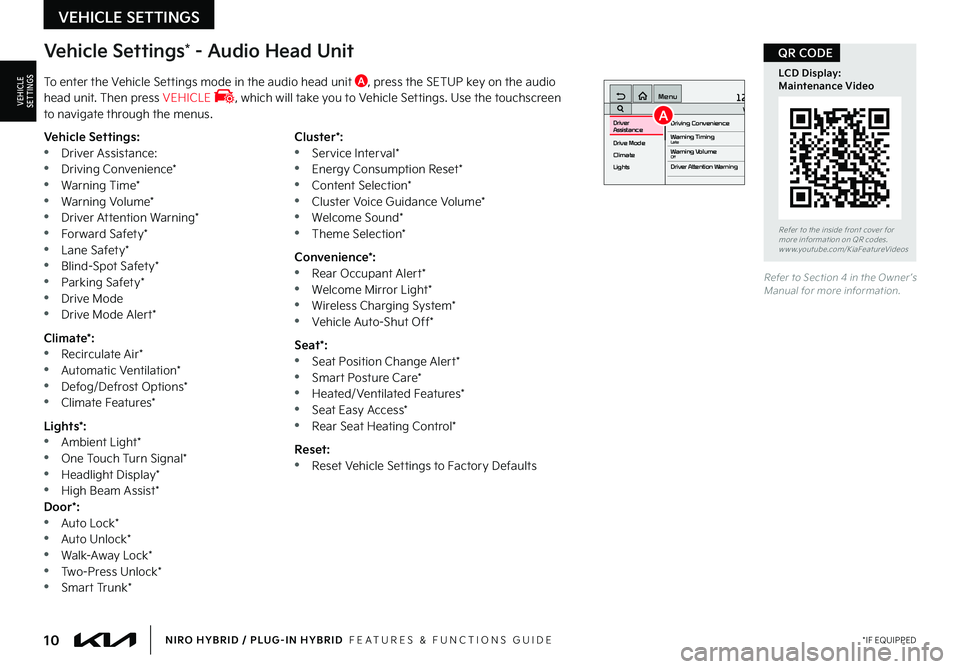
Vehicle Settings* - Audio Head Unit
To enter the Vehicle Settings mode in the audio head unit A, press the SETUP key on the audio head unit Then press VEHICLE , which will take you to Vehicle Settings Use the touchscreen to navigate through the menus
12:00 AM Jan. 1MenuVehicle SettingsDriving Convenience
Drive Mode
Climate
LightsDriver
AssistanceWarning TimingLateWarning VolumeOffDriver Attention Warning
Vehicle Settings: •Driver Assistance: •Driving Convenience* •Warning Time* •Warning Volume* •Driver Attention Warning* •Forward Safety* •Lane Safety* •Blind-Spot Safety* •Parking Safety* •Drive Mode •Drive Mode Alert*
Climate*: •Recirculate Air* •Automatic Ventilation* •Defog/Defrost Options* •Climate Features*
Lights*: •Ambient Light* •One Touch Turn Signal* •Headlight Display* •High Beam Assist*Door*: •Auto Lock* •Auto Unlock* •Walk-Away Lock* •Two-Press Unlock* •Smart Trunk*
Cluster*: •Service Interval* •Energy Consumption Reset* •Content Selection* •Cluster Voice Guidance Volume* •Welcome Sound* •Theme Selection*
Convenience*: •Rear Occupant Alert* •Welcome Mirror Light* •Wireless Charging System* •Vehicle Auto-Shut Off*
Seat*: •Seat Position Change Alert* •Smart Posture Care* •Heated/Ventilated Features* •Seat Easy Access* •Rear Seat Heating Control*
Reset: •Reset Vehicle Settings to Factory Defaults
Refer to Section 4 in the Owner ’s Manual for more information
Refer to the inside front cover for more information on QR codes www youtube com/KiaFeatureVideos
LCD Display: Maintenance Video
QR CODE
VEHICLE SETTINGS
VEHICLESETTINGSA
Page 13 of 66
11*IF EQUIPPEDALWAYS CHECK THE OWNER ’S MANUAL FOR COMPLETE OPER ATING INFORMATION AND SAFET Y WARNINGS
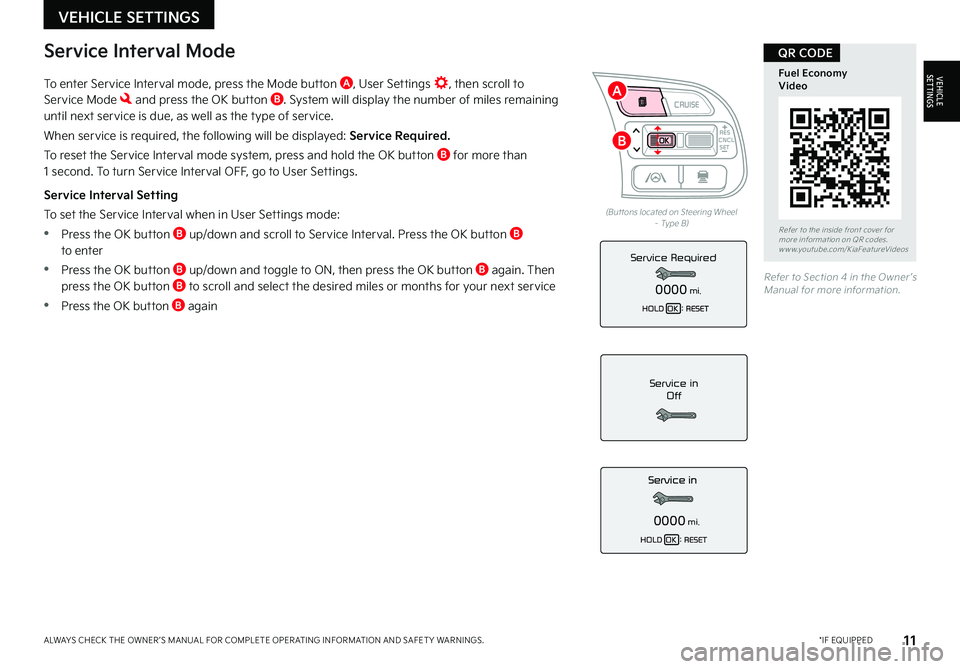
To enter Service Interval mode, press the Mode button A, User Settings , then scroll to Service Mode and press the OK button B System will display the number of miles remaining until next service is due, as well as the type of service
When service is required, the following will be displayed: Service Required.
To reset the Service Interval mode system, press and hold the OK button B for more than 1 second To turn Service Interval OFF, go to User Settings
Service Interval Setting
To set the Service Interval when in User Settings mode:
•Press the OK button B up/down and scroll to Service Interval Press the OK button B to enter
•Press the OK button B up/down and toggle to ON, then press the OK button B again Then press the OK button B to scroll and select the desired miles or months for your next service
•Press the OK button B again
Service in
Off
0000mi.
Service Required
0000mi.
(But tons located on Steering Wheel – Type B)
Refer to Section 4 in the Owner ’s Manual for more information
Refer to the inside front cover for more information on QR codes www youtube com/KiaFeatureVideos
Fuel Economy Video
QR CODEService Interval Mode
CNCLRES
CRUISE
SETCNCLRES
CRUISE
SET
VEHICLE SETTINGS
VEHICLESETTINGS
B
A
Page 14 of 66

12*IF EQUIPPEDNIRO HYBRID / PLUG-IN HYBRID FEATURES & FUNCTIONS GUIDE
A
The audio head unit screen provides information on economical operation and Plug-In Hybrid* system modes To enter the Plug-In Hybrid display mode, press the ALL MENUS button on the Home screen Then select one of the menus A - EV Range, Energy Information, Charge Management, ECO Driving, Energy Flow (Systems with Navigation only) Some examples are below:
Energy Flow - Displays the current flow of power between the main powertrain components
ECO Level - The more economically you drive, the more the ECO Level increases Plug-In Hybrid System Home Screen - Range, Energy Info, Charge Management, ECO Driving, Energy Flow
Fuel Economy - Displays the average fuel economy over the duration of a trip
EV Range
217 mi
Energy Information
85 %
Charge Management
Next Departure
Jan | Wed | 1:00 AM
On
ECO Driving
Energy Flow
Plug-In Hybrid
Hybrid Ready
Energy Flow
Wheels
Engine
Electric Motor Battery
Fuel Economy
History
Eco Driving Eco Driving
Fuel Economy
Fuel Economy
History
Fuel EconomyHybrid Fuel Economy05-06-2019
05-04-2019
05-03-2019
05-02-2019
05-01-2019 27 mi
13.2 mpg
12.9 mpg
13.6 mpg
Driving dates, distances and
fuel economy for the past
30 drives in the History are
displayed.
12.3 mpg
13.6 mpg
22 mi
14 mi 7 mi
18 mi
75
50
25
MPGElectric Motor Use
75
50
25
MPGNow 510 15202530354045505560
EV Range
217 mi
Energy Information
85 %
Charge Management
Next Departure
Jan | Wed | 1:00 AM
On
ECO Driving
Energy Flow
Plug-In Hybrid
Hybrid Ready
Energy Flow
Wheels
Engine
Electric Motor Battery
Fuel Economy
History
Eco DrivingEco Driving
Fuel Economy
Fuel Economy
History
Fuel Economy
Hybrid Fuel Economy05-06-2019
05-04-2019
05-03-2019
05-02-2019
05-01-2019 27 mi
13.2 mpg
12.9 mpg
13.6 mpg
Driving dates, distances and
fuel economy for the past
30 drives in the History are
displayed.
12.3 mpg
13.6 mpg
22 mi
14 mi 7 mi
18 mi
75
50
25
MPGElectric Motor Use
75
50
25
MPGNow 510 15202530354045505560
EV Range
217 mi
Energy Information
85 %
Charge Management
Next Departure
Jan | Wed | 1:00 AM
On
ECO Driving
Energy Flow
Plug-In Hybrid
Hybrid Ready
Energy Flow
Wheels
Engine
Electric Motor Battery
Fuel Economy
History
Eco Driving Eco Driving
Fuel Economy
Fuel Economy
History
Fuel EconomyHybrid Fuel Economy05-06-2019
05-04-2019
05-03-2019
05-02-2019
05-01-2019 27 mi
13.2 mpg
12.9 mpg
13.6 mpg
Driving dates, distances and
fuel economy for the past
30 drives in the History are
displayed.
12.3 mpg
13.6 mpg
22 mi
14 mi 7 mi
18 mi
75
50
25
MPGElectric Motor Use
75
50
25
MPGNow 510 15202530354045505560
EV Range
217 mi
Energy Information
85 %
Charge Management
Next Departure
Jan | Wed | 1:00 AM
On
ECO Driving
Energy Flow
Plug-In Hybrid
Hybrid Ready
Energy Flow
Wheels
Engine
Electric Motor Battery
Fuel Economy
History
Eco DrivingEco Driving
Fuel Economy
Fuel Economy
History
Fuel Economy
Hybrid Fuel Economy05-06-2019
05-04-2019
05-03-2019
05-02-2019
05-01-2019 27 mi
13.2 mpg
12.9 mpg
13.6 mpg
Driving dates, distances and
fuel economy for the past
30 drives in the History are
displayed.
12.3 mpg
13.6 mpg
22 mi
14 mi 7 mi
18 mi
75
50
25
MPGElectric Motor Use
75
50
25
MPGNow 510 15202530354045505560
The images shown are for illustration purposes only Not all available displays are shown Screens may var y
For more information, refer to the Owner ’s Manual or the Car Infotainment System Quick Reference Guide
Plug-In Hybrid Display*
HYBRID / PLUG-IN HYBRID SYSTEM
HYBRID/PLUG-IN
HYBRID
Page 15 of 66

13*IF EQUIPPEDALWAYS CHECK THE OWNER ’S MANUAL FOR COMPLETE OPER ATING INFORMATION AND SAFET Y WARNINGS
Plug-In Hybrid displays shown The images shown are for illustration purposes only Not all available displays are shown Screens may var y
For more information, refer to the Owner ’s Manual
The instrument cluster LCD screen displays the following plug-in hybrid system modes to inform the driver of its status To change modes, go to User Settings in the LCD Instrument Cluster modes
EV Propulsion - The electric motor is moving the vehicle Engine-Only Propulsion - The engine is moving your vehicle
Power Assist - Both the electric motor AND the engine are moving the vehicle Engine Generation - While the vehicle is stopped, the engine is charging the hybrid battery
Instrument Cluster - Energy Flow
HYBRID / PLUG-IN HYBRID SYSTEM
HYBRID/PLUG-IN
HYBRID
mi
mi
mi
mi
Page 16 of 66

14*IF EQUIPPEDNIRO HYBRID / PLUG-IN HYBRID FEATURES & FUNCTIONS GUIDE
Plug-In Hybrid displays shown The images shown are for illustration purposes only Not all available displays are shown Screens may var y
For more information, refer to the Owner ’s Manual
The instrument cluster LCD screen displays the following plug-in hybrid system modes to inform the driver of its status To change modes, go to User Settings in the LCD Instrument Cluster modes
Vehicle Stop - The vehicle’s hybrid system is standing by Engine Generation/Regeneration - The engine and the regenerative braking system are both recharging the hybrid battery
Power Reserve - While the engine powers the vehicle, it is also recharging the hybrid battery Engine Brake/Regeneration - The regenerative braking system is recharging the hybrid battery
Instrument Cluster - Energy Flow
HYBRID / PLUG-IN HYBRID SYSTEM
HYBRID/PLUG-IN
HYBRID
mi
mi
mi
mi
Page 19 of 66
17*IF EQUIPPEDALWAYS CHECK THE OWNER ’S MANUAL FOR COMPLETE OPER ATING INFORMATION AND SAFET Y WARNINGS
Refer to the inside front cover for more information on QR codes www youtube com/KiaFeatureVideos
Niro EV Charging – Connecting & Disconnecting Video
QR CODE
REMINDER: For more detail and/or subsequent steps in charging your vehicle, please see the Owner ’s Manual
Charging the Plug-In Hybrid Vehicle (Continued)
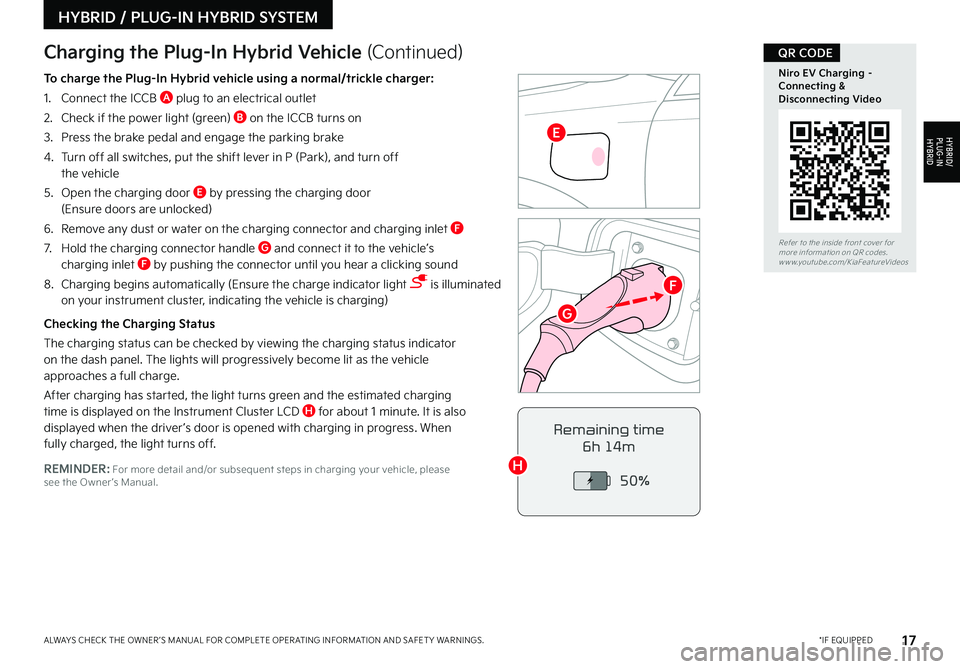
To charge the Plug-In Hybrid vehicle using a normal/trickle charger:
1 Connect the ICCB A plug to an electrical outlet
2 Check if the power light (green) B on the ICCB turns on
3 Press the brake pedal and engage the parking brake
4 Turn off all switches, put the shift lever in P (Park), and turn off the vehicle
5 Open the charging door E by pressing the charging door (Ensure doors are unlocked)
6 Remove any dust or water on the charging connector and charging inlet F
7 Hold the charging connector handle G and connect it to the vehicle’s charging inlet F by pushing the connector until you hear a clicking sound
8 Charging begins automatically (Ensure the charge indicator light is illuminated on your instrument cluster, indicating the vehicle is charging)
Checking the Charging Status
The charging status can be checked by viewing the charging status indicator on the dash panel The lights will progressively become lit as the vehicle approaches a full charge
After charging has started, the light turns green and the estimated charging time is displayed on the Instrument Cluster LCD H for about 1 minute It is also displayed when the driver ’s door is opened with charging in progress When fully charged, the light turns off Remaining time
6h 14m
50%
HYBRID / PLUG-IN HYBRID SYSTEM
HYBRID/PLUG-IN
HYBRID
G
H
E
F
Page 20 of 66
18*IF EQUIPPEDNIRO HYBRID / PLUG-IN HYBRID FEATURES & FUNCTIONS GUIDE
AUTOOFF
(But tons are located left of the Steering Wheel)
AB
Scheduled Charging*
(Plug-In Hybrid Only)
Charging Connector Auto/Lock Mode
(Plug-In Hybrid Only)
Charging time can be set in the Plug-In Hybrid audio system home screen, under charge management, or using the Kia Access with UVO link app
Charging with the UVO link Smartphone App:
The Kia Access with UVO link app can help you find the nearest charging station and displays charging-status and the Scheduled Charging information On your Smartphone, go to an app store or marketplace to download the Kia Access with UVO link app
REMINDER: When Scheduled Charging is set and the charger is plugged in, charging will not begin until the set time & date are met to complete the charging The green charge indicator on top of the dash will temporar y flash ON/OFF to show that scheduled/reser ve charging is set
Deactivate Scheduled Charging - Depress the
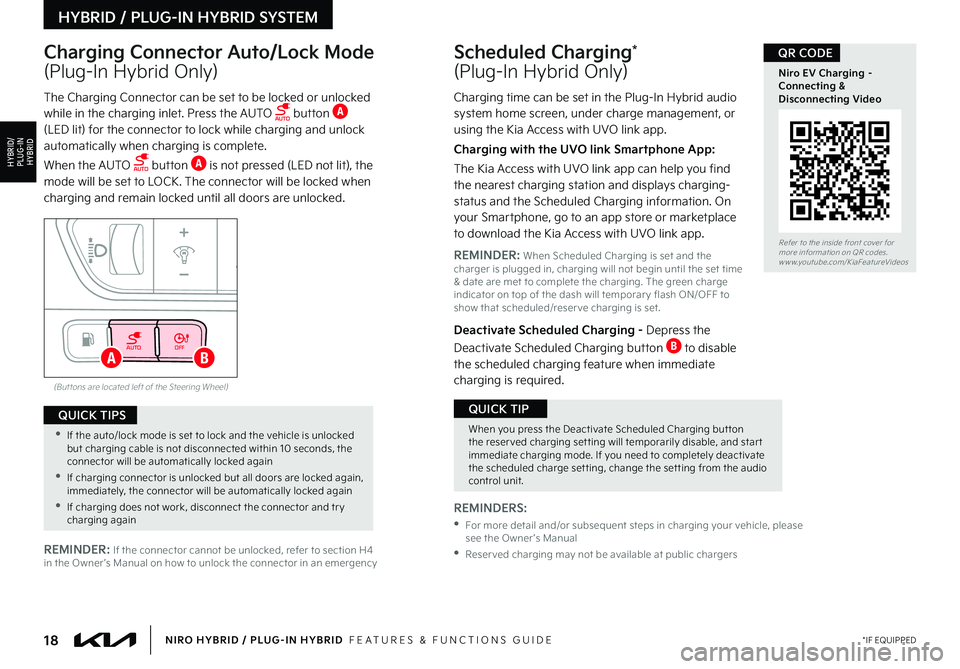
Deactivate Scheduled Charging button B to disable the scheduled charging feature when immediate charging is required
The Charging Connector can be set to be locked or unlocked while in the charging inlet Press the AUTO button A (LED lit) for the connector to lock while charging and unlock automatically when charging is complete
When the AUTO button A is not pressed (LED not lit), the mode will be set to LOCK The connector will be locked when charging and remain locked until all doors are unlocked
REMINDERS:
• For more detail and/or subsequent steps in charging your vehicle, please see the Owner ’s Manual
•Reser ved charging may not be available at public chargersREMINDER: If the connector cannot be unlocked, refer to section H4 in the Owner ’s Manual on how to unlock the connector in an emergency
Refer to the inside front cover for more information on QR codes www youtube com/KiaFeatureVideos
Niro EV Charging – Connecting & Disconnecting Video
QR CODE
When you press the Deactivate Scheduled Charging but ton the reser ved charging set ting will temporarily disable, and star t immediate charging mode If you need to completely deactivate the scheduled charge set ting, change the set ting from the audio control unit
QUICK TIP
•If the auto/lock mode is set to lock and the vehicle is unlocked but charging cable is not disconnected within 10 seconds, the connector will be automatically locked again
•If charging connector is unlocked but all doors are locked again, immediately, the connector will be automatically locked again
•If charging does not work, disconnect the connector and tr y charging again
QUICK TIPS
HYBRID / PLUG-IN HYBRID SYSTEM
HYBRID/PLUG-IN
HYBRID
Page 22 of 66
20†LEGAL DISCL AIMERS ON BACK INSIDE COVER | *IF EQUIPPEDNIRO HYBRID / PLUG-IN HYBRID FEATURES & FUNCTIONS GUIDE
Lane Keeping Assist
Lane Keeping Assist
Lane Keeping Assist
Lane Keeping Assist
Lane Keeping Assist
Lane Keeping Assist Lane Keeping Assist
Lane Keeping Assist
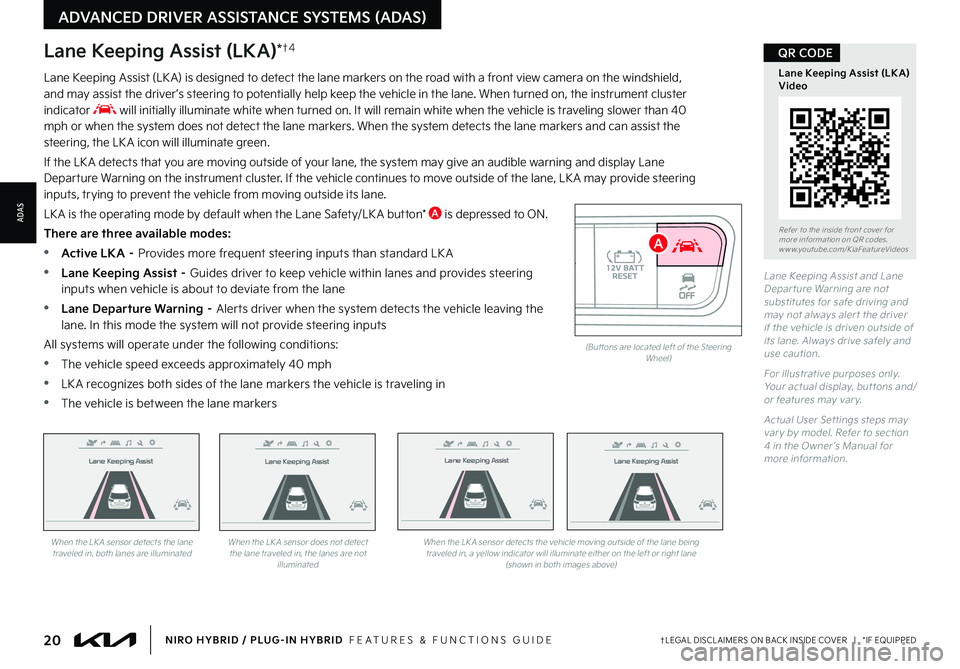
When the LK A sensor detects the lane traveled in, both lanes are illuminatedWhen the LK A sensor does not detect the lane traveled in, the lanes are not illuminated
When the LK A sensor detects the vehicle moving outside of the lane being traveled in, a yellow indicator will illuminate either on the left or right lane (shown in both images above)
Lane Keeping Assist
Lane Keeping Assist Lane Keeping Assist
Lane Keeping AssistLane Keeping Assist
Lane Keeping AssistLane Keeping Assist
Lane Keeping Assist
AUTO OFF(But tons are located left of the Steering Wheel)
Lane Keeping Assist and Lane Depar ture Warning are not substitutes for safe driving and may not always aler t the driver if the vehicle is driven outside of its lane Always drive safely and use caution
For illustrative purposes only Your actual display, but tons and/or features may var y
Actual User Set tings steps may var y by model Refer to section 4 in the Owner ’s Manual for more information
Lane Keeping Assist (LKA)*†4
Lane Keeping Assist (LK A) is designed to detect the lane markers on the road with a front view camera on the windshield, and may assist the driver ’s steering to potentially help keep the vehicle in the lane When turned on, the instrument cluster indicator will initially illuminate white when turned on It will remain white when the vehicle is traveling slower than 40 mph or when the system does not detect the lane markers When the system detects the lane markers and can assist the steering, the LK A icon will illuminate green
If the LK A detects that you are moving outside of your lane, the system may give an audible warning and display Lane Departure Warning on the instrument cluster If the vehicle continues to move outside of the lane, LK A may provide steering inputs, trying to prevent the vehicle from moving outside its lane
LK A is the operating mode by default when the Lane Safety/LK A button* A is depressed to ON
There are three available modes:
•Active LKA – Provides more frequent steering inputs than standard LK A
•
Lane Keeping Assist – Guides driver to keep vehicle within lanes and provides steering inputs when vehicle is about to deviate from the lane
•
Lane Departure Warning – Alerts driver when the system detects the vehicle leaving the lane In this mode the system will not provide steering inputs
All systems will operate under the following conditions:
•The vehicle speed exceeds approximately 40 mph
•
LK A recognizes both sides of the lane markers the vehicle is traveling in
•
The vehicle is between the lane markers
Refer to the inside front cover for more information on QR codes www youtube com/KiaFeatureVideos
Lane Keeping Assist (LK A) Video
QR CODE
ADVANCED DRIVER ASSISTANCE SYSTEMS (ADAS)
ADAS
A