2022 KIA EV6 sensor
[x] Cancel search: sensorPage 22 of 70
20†LEGAL DISCL AIMERS ON BACK INSIDE COVER | *IF EQUIPPEDEV6 FEATURES & FUNCTIONS GUIDE
Refer to the inside front cover for more information on QR codes.www.youtube.com/KiaFeatureVideos
Blind-Spot Collision-Avoidance Assist (BCA) Video
QR CODEBlind-Spot Collision-Avoidance Assist (BCA)†4
REMINDERS:
•
The BCA warning may sound when turning left into an intersection. Maintain a proper distance from oncoming vehicles
•
BCA will not issue a warning if the vehicle speed is 6 mph or more above the surrounding vehicles
•
When BCA is ON and the ignition is cycled, BCA returns to its previous state
When engaged, BCA is a supplemental system. Do not solely rely on this system and always pay at tention to the road and its conditions.
Refer to section 6 in the Owner ’s Manual for more information.
The images on this page are for illustrative purposes only and may not reflect actual feature or operation.
•BCA Warning Volume can be adjusted in the Vehicle Set tings in the Infotainment System. Go to Driver Assistance, then Warning Volume
•BCA will activate when:
-The system is turned on
-
Other vehicles are detected on the rear sides of the vehicle
-Vehicle speed is above approximately 20 mph
QUICK TIPS
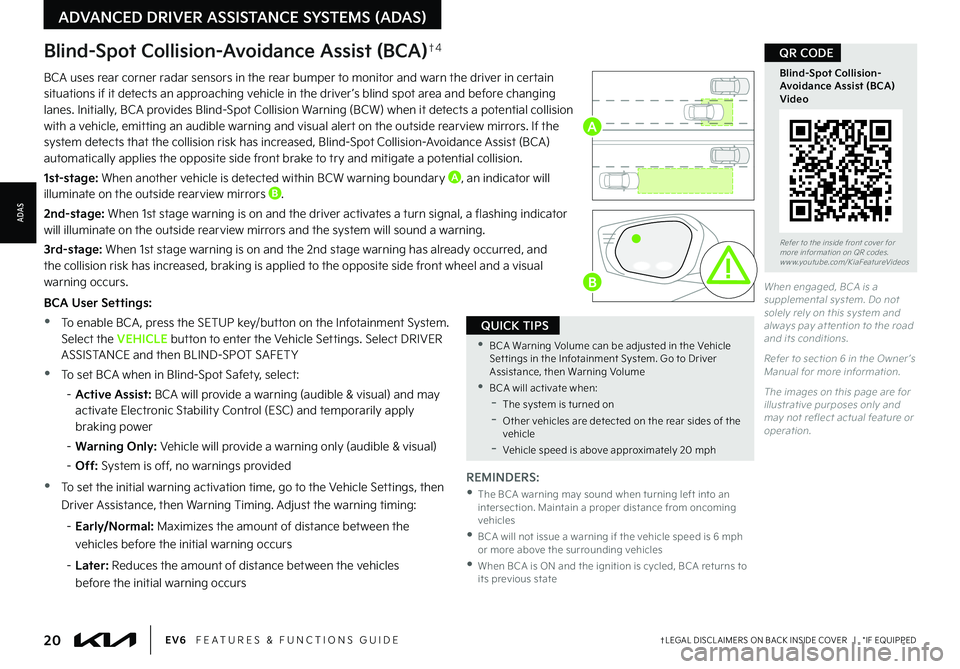
BCA uses rear corner radar sensors in the rear bumper to monitor and warn the driver in certain situations if it detects an approaching vehicle in the driver ’s blind spot area and before changing lanes. Initially, BCA provides Blind-Spot Collision Warning (BCW) when it detects a potential collision with a vehicle, emitting an audible warning and visual alert on the outside rearview mirrors. If the system detects that the collision risk has increased, Blind-Spot Collision-Avoidance Assist (BCA) automatically applies the opposite side front brake to try and mitigate a potential collision.
1st-stage: When another vehicle is detected within BCW warning boundary A, an indicator will illuminate on the outside rearview mirrors B.
2nd-stage: When 1st stage warning is on and the driver activates a turn signal, a flashing indicator will illuminate on the outside rearview mirrors and the system will sound a warning.
3rd-stage: When 1st stage warning is on and the 2nd stage warning has already occurred, and the collision risk has increased, braking is applied to the opposite side front wheel and a visual warning occurs.
BCA User Settings:
•To enable BCA , press the SETUP key/button on the Infotainment System. Select the VEHICLE button to enter the Vehicle Settings. Select DRIVER ASSISTANCE and then BLIND-SPOT SAFET Y
•
To set BCA when in Blind-Spot Safety, select:
– Active Assist: BCA will provide a warning (audible & visual) and may activate Electronic Stability Control (ESC) and temporarily apply braking power
– Warning Only: Vehicle will provide a warning only (audible & visual)
– Off: System is off, no warnings provided
•
To set the initial warning activation time, go to the Vehicle Settings, then
Driver Assistance, then Warning Timing. Adjust the warning timing:
– Early/Normal: Maximizes the amount of distance between the
vehicles before the initial warning occurs
–
Later: Reduces the amount of distance between the vehicles
before the initial warning occurs
B
ADVANCED DRIVER ASSISTANCE SYSTEMS (ADAS)
ADAS
A
Page 23 of 70
21†LEGAL DISCL AIMERS ON BACK INSIDE COVER | *IF EQUIPPEDALWAYS CHECK THE OWNER ’S MANUAL FOR COMPLETE OPER ATING INFORMATION AND SAFET Y WARNINGS.
Refer to the inside front cover for more information on QR codes.www.youtube.com/KiaFeatureVideos
Rear Cross-Traffic Collision-Avoidance Assist (RCCA) Video
QR CODERear Cross-Traffic Collision-Avoidance Assist (RCCA)*†4
When engaged, RCCA is a supplemental system. Do not solely rely on this system and always pay at tention to the road and its conditions.
Refer to section 6 in the Owner ’s Manual for more information.
REMINDERS:
•
When vehicle power is cycled, RCCA will remain in the previous state
•
When a vehicle is approaching within the sensing range and coming up faster than 3 mph, the RCCA system will show a warning
RCCA Warning Volume can be adjusted in the Vehicle Set tings on the Infotainment System. Go to Driver Assistance, then Warning Volume.
QUICK TIP
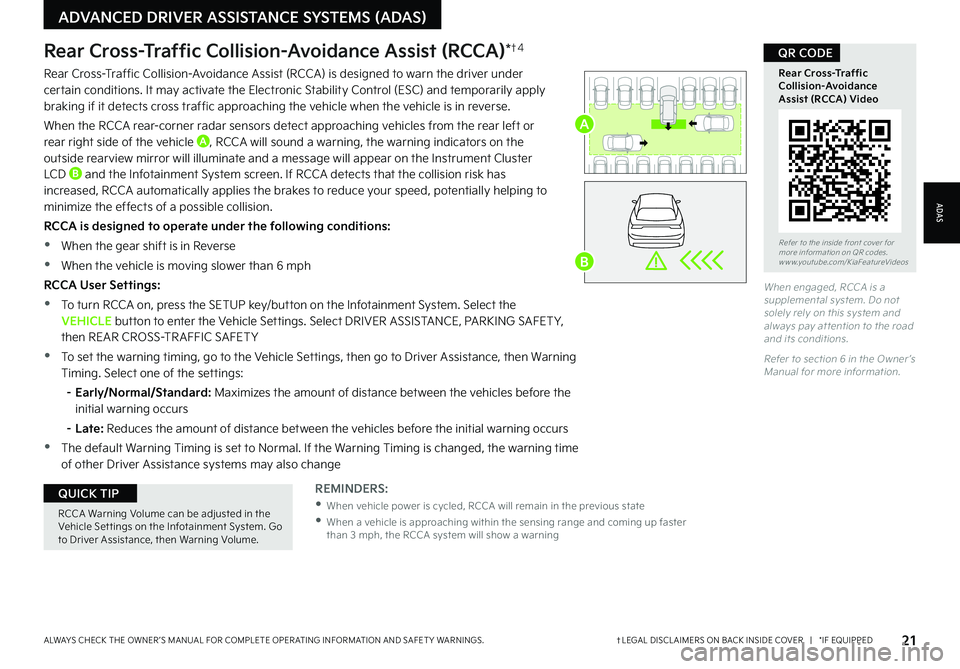
Rear Cross-Traffic Collision-Avoidance Assist (RCCA) is designed to warn the driver under certain conditions. It may activate the Electronic Stability Control (ESC) and temporarily apply braking if it detects cross traffic approaching the vehicle when the vehicle is in reverse.
When the RCCA rear-corner radar sensors detect approaching vehicles from the rear left or rear right side of the vehicle A, RCCA will sound a warning, the warning indicators on the outside rearview mirror will illuminate and a message will appear on the Instrument Cluster LCD B and the Infotainment System screen. If RCCA detects that the collision risk has increased, RCCA automatically applies the brakes to reduce your speed, potentially helping to minimize the effects of a possible collision.
RCCA is designed to operate under the following conditions:
•When the gear shift is in Reverse
•When the vehicle is moving slower than 6 mph
RCCA User Settings:
•To turn RCCA on, press the SETUP key/button on the Infotainment System. Select the VEHICLE button to enter the Vehicle Settings. Select DRIVER ASSISTANCE, PARKING SAFET Y, then REAR CROSS-TR AFFIC SAFET Y
•To set the warning timing, go to the Vehicle Settings, then go to Driver Assistance, then Warning Timing. Select one of the settings:
–
Early/Normal/Standard: Maximizes the amount of distance between the vehicles before the initial warning occurs
– Late: Reduces the amount of distance between the vehicles before the initial warning occurs
•The default Warning Timing is set to Normal. If the Warning Timing is changed, the warning time
of other Driver Assistance systems may also change
ADAS
ADVANCED DRIVER ASSISTANCE SYSTEMS (ADAS)
A
B
Page 31 of 70

29†LEGAL DISCL AIMERS ON BACK INSIDE COVER | *IF EQUIPPEDALWAYS CHECK THE OWNER ’S MANUAL FOR COMPLETE OPER ATING INFORMATION AND SAFET Y WARNINGS.
ADAS
ADVANCED DRIVER ASSISTANCE SYSTEMS (ADAS)
Forward*/Reverse Parking Distance Warning (PDW)†4
Forward*/Reverse Parking Distance Warning (PDW) is a supplemental system that is designed to warn the driver by chiming if any object is detected within the sensing area to the front and rear of the vehicle when moving forward or backing up.
PDW is activated when the Power button is on and the vehicle is in R (Reverse). To deactivate PDW, press the PDW button A (LED illuminated), when vehicle is in D (Drive) or R (Reverse).
To activate, press button A again (LED not illuminated).
PDW User Settings:
•To enable Parking Distance Auto On, with the ignition on, press the SETUP key/button on the Infotainment System, VEHICLE, DRIVER ASSISTANCE, PARKING SAFET Y, then PARKING DISTANCE WARNING AUTO ON
•To adjust the warning volume, press the SETUP key/button on the Infotainment System, VEHICLE, DRIVER ASSISTANCE then WARNING VOLUME. Select high, medium, low
REMINDERS:
•If the vehicle is moving at speeds over 3 mph, the system may not activate correctly
•
When more than t wo objects are sensed at the same time, the closest one will be recognized first
•
The above images are for illustration purposes only. Operational details may var y
•
Adjusting the Warning Timing and Warning Volume may adjust timing and volume levels for other driving assist systems
When engaged, PDW is not a substitute for proper and safe parking and backing-up procedures. Always drive safely and use caution when backing up. Reverse Parking Distance Warning (PDW) may not detect ever y object in front of or behind the vehicle.
Refer to section 4 in the Owner ’s Manual for more information.
Refer to section 6 in the Owner ’s Manual for more information.
Images are for illustrative purposes only. But ton and sensor locations may var y.
Refer to the inside front cover for more information on QR codes.www.youtube.com/KiaFeatureVideos
Forward/Reverse Parking Distance Warning (PDW) Video
QR CODE
A
EV
RN
P
AUTO
HOLD
D
(Rear Ultrasonic Sensors highlighted)(Front Ultrasonic Sensors highlighted)(But ton located below gear shift knob)
Page 33 of 70
Refer to the inside front cover for more information on QR codes.www.youtube.com/KiaFeatureVideos
Navigation-based Smart Cruise Control (NSCC) Video
QR CODE
31†LEGAL DISCL AIMERS ON BACK INSIDE COVER | *IF EQUIPPEDALWAYS CHECK THE OWNER ’S MANUAL FOR COMPLETE OPER ATING INFORMATION AND SAFET Y WARNINGS.
ADAS
ADVANCED DRIVER ASSISTANCE SYSTEMS (ADAS)
The speed set ting for SCC can be adjusted under the following conditions:
-You must be traveling at a minimum speed of 5 mph (may var y on newer models)
-
When following a vehicle, there is no minimum speed requirement
-
If your vehicle speed is less than 20 mph, when SCC is turned on and activated, the vehicle speed will be set to 20 mph
-Always keep the front-view camera and front radar sensor areas clean and free from debris to maintain optimal per formance
QUICK TIPS
Navigation-based Smart Cruise Control
(NSCC)* †4 , 8
Navigation-based Smart Cruise Control can automatically adjust the vehicle speed when it detects a curved road ahead and when it receives road information from the navigation system.
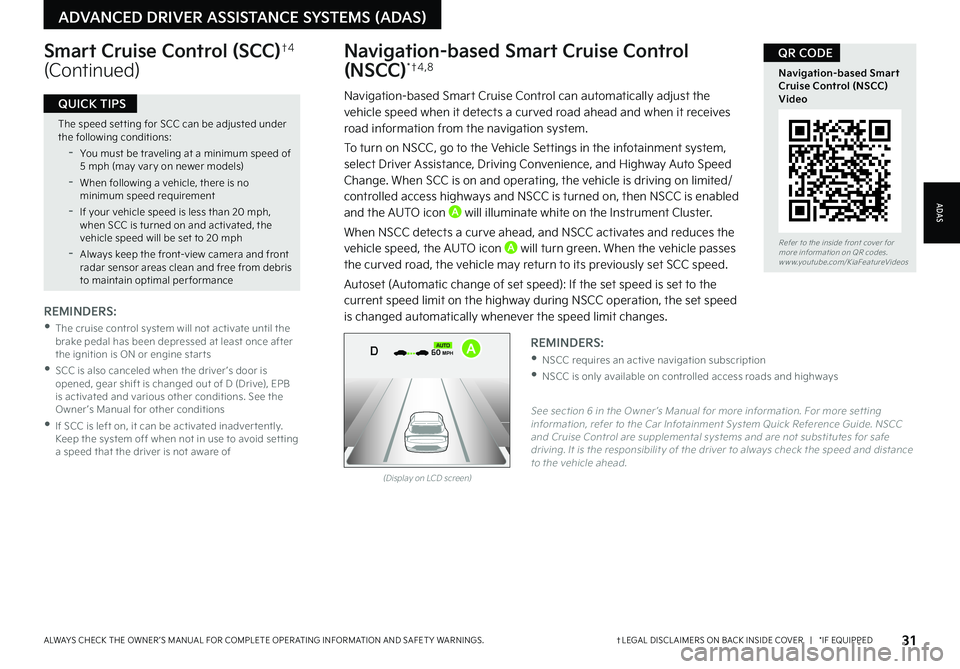
To turn on NSCC, go to the Vehicle Settings in the infotainment system, select Driver Assistance, Driving Convenience, and Highway Auto Speed Change. When SCC is on and operating, the vehicle is driving on limited/controlled access highways and NSCC is turned on, then NSCC is enabled and the AUTO icon A will illuminate white on the Instrument Cluster.
When NSCC detects a curve ahead, and NSCC activates and reduces the vehicle speed, the AUTO icon A will turn green. When the vehicle passes
the curved road, the vehicle may return to its previously set SCC speed.
Autoset (Automatic change of set speed): If the set speed is set to the current speed limit on the highway during NSCC operation, the set speed is changed automatically whenever the speed limit changes.
Smart Cruise Control (SCC)†4
(Continued)
REMINDERS:
•
The cruise control system will not activate until the brake pedal has been depressed at least once after the ignition is ON or engine star ts
•
SCC is also canceled when the driver ’s door is opened, gear shift is changed out of D (Drive), EPB is activated and various other conditions. See the Owner ’s Manual for other conditions
•
If SCC is left on, it can be activated inadver tently. Keep the system off when not in use to avoid set ting a speed that the driver is not aware of
See section 6 in the Owner ’s Manual for more information. For more set ting information, refer to the Car Infotainment System Quick Reference Guide. NSCC and Cruise Control are supplemental systems and are not substitutes for safe driving. It is the responsibilit y of the driver to always check the speed and distance to the vehicle ahead.
REMINDERS:
•NSCC requires an active navigation subscription
•NSCC is only available on controlled access roads and highways
(Display on LCD screen)
0mph
0 KMH020 4060
202 m100 kWh/ 100m96%Lv 1READY66°F
2 72m
CHG
PWR
60 MPH
0mph
0 KMH
020 4060
202 m100 kWh/ 100m96%Lv 1READY66°F
2 72m
CHG
PWR
60 MPH
0mph
0 KMH
020 4060
202 m100 kWh/ 100m96%Lv 1READY66°F
2 72m
CHG
PWR
60 MPHCRUISED
DAUTOA
Page 36 of 70
34†LEGAL DISCL AIMERS ON BACK INSIDE COVER | *IF EQUIPPEDEV6 FEATURES & FUNCTIONS GUIDE
Refer to the inside front cover for more information on QR codes.www.youtube.com/KiaFeatureVideos
Remote Smart Parking Assist (RSPA) Video
QR CODE
(But tons located below gear shift knob)
Remotely moving for ward or backward
Parallel reverse parking and for ward exit
HOLDHOLD
ADVANCED DRIVER ASSISTANCE SYSTEMS (ADAS)
ADAS
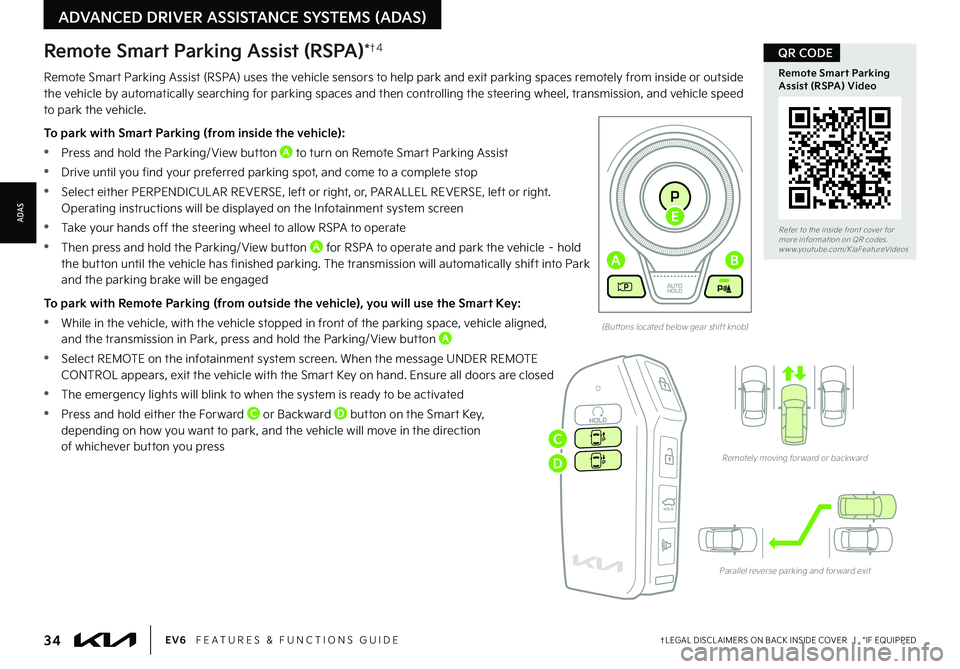
Remote Smart Parking Assist (RSPA) uses the vehicle sensors to help park and exit parking spaces remotely from inside or outside the vehicle by automatically searching for parking spaces and then controlling the steering wheel, transmission, and vehicle speed to park the vehicle.
To park with Smart Parking (from inside the vehicle):
•Press and hold the Parking/ View button A to turn on Remote Smart Parking Assist
•Drive until you find your preferred parking spot, and come to a complete stop
•Select either PERPENDICUL AR REVERSE, left or right, or, PAR ALLEL REVERSE, left or right. Operating instructions will be displayed on the Infotainment system screen
•Take your hands off the steering wheel to allow RSPA to operate
•Then press and hold the Parking/ View button A for RSPA to operate and park the vehicle – hold
the button until the vehicle has finished parking. The transmission will automatically shift into Park and the parking brake will be engaged
To park with Remote Parking (from outside the vehicle), you will use the Smart Key:
•While in the vehicle, with the vehicle stopped in front of the parking space, vehicle aligned, and the transmission in Park, press and hold the Parking/ View button A
•Select REMOTE on the infotainment system screen. When the message UNDER REMOTE CONTROL appears, exit the vehicle with the Smart Key on hand. Ensure all doors are closed
•The emergency lights will blink to when the system is ready to be activated
•Press and hold either the Forward C or Backward D button on the Smart Key, depending on how you want to park, and the vehicle will move in the direction of whichever button you press
Remote Smart Parking Assist (RSPA)*†4
EV
RN
P
AUTO
HOLD
D
AB
E
C
D
Page 45 of 70
43†LEGAL DISCL AIMERS ON BACK INSIDE COVER | *IF EQUIPPEDALWAYS CHECK THE OWNER ’S MANUAL FOR COMPLETE OPER ATING INFORMATION AND SAFET Y WARNINGS.
STEERING WHEEL CONTROLS
STEERING
WHEEL CONTROLS
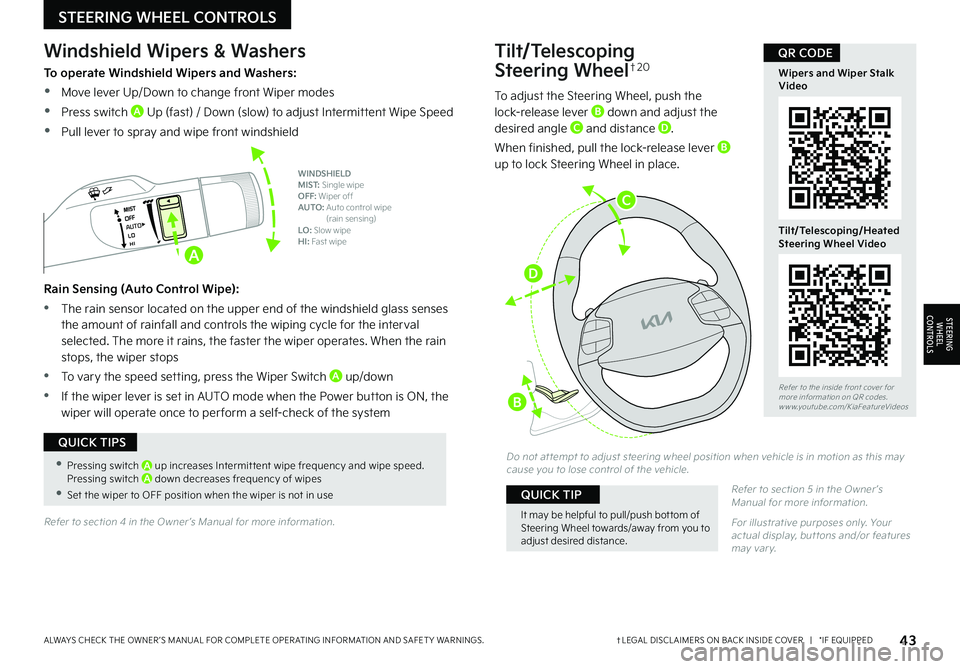
Tilt/Telescoping
Steering Wheel†2 0
To adjust the Steering Wheel, push the lock-release lever B down and adjust the desired angle C and distance D.
When finished, pull the lock-release lever B up to lock Steering Wheel in place.
Do not at tempt to adjust steering wheel position when vehicle is in motion as this may cause you to lose control of the vehicle.
Refer to section 5 in the Owner ’s Manual for more information.
For illustrative purposes only. Your actual display, but tons and/or features may var y.
It may be helpful to pull/push bot tom of Steering Wheel towards/away from you to adjust desired distance.
QUICK TIP
Refer to the inside front cover for more information on QR codes.www.youtube.com/KiaFeatureVideos
Wipers and Wiper Stalk Video
Tilt/Telescoping/Heated Steering Wheel Video
QR CODE
•Pressing switch A up increases Intermit tent wipe frequency and wipe speed. Pressing switch A down decreases frequency of wipes
•Set the wiper to OFF position when the wiper is not in use
QUICK TIPS
AUTO
Windshield Wipers & Washers
To operate Windshield Wipers and Washers:
•Move lever Up/Down to change front Wiper modes
•Press switch A Up (fast) / Down (slow) to adjust Intermittent Wipe Speed
•Pull lever to spray and wipe front windshield
Rain Sensing (Auto Control Wipe):
•The rain sensor located on the upper end of the windshield glass senses the amount of rainfall and controls the wiping cycle for the interval selected. The more it rains, the faster the wiper operates. When the rain stops, the wiper stops
•To vary the speed setting, press the Wiper Switch A up/down
•If the wiper lever is set in AUTO mode when the Power button is ON, the wiper will operate once to per form a self-check of the system
WINDSHIELD MIST: Single wipeOFF: Wiper offAUTO: Auto control wipe (rain sensing)LO: Slow wipeHI: Fast wipe
Refer to section 4 in the Owner ’s Manual for more information.
A
C
D
B
Page 60 of 70

58†LEGAL DISCL AIMERS ON BACK INSIDE COVER | *IF EQUIPPEDEV6 FEATURES & FUNCTIONS GUIDE
Refer to the inside front cover for more information on QR codes.www.youtube.com/KiaFeatureVideos
Exterior Flush Door Handles & Walk Away Lock Video
QR CODE
HOLDHOLD
Refer to section 4 in the Owner ’s Manual for more information.
OTHER KEY FEATURES
OTHER KEY F E AT U R E S
To remove ice from door handles, tap around the door handle perimeter using your hand until the door handle pops out, when unlocking the door. Press in and pull out a few times to remove any ice residue
QUICK TIPREMINDER: After unlocking the doors, if one of the doors has not been opened, the doors will re-lock automatically after 30 seconds.
Hood Release Lever and Latch
Opening the Hood:
•Pull the Hood Release Lever A to unlatch the Hood
•In the front of the vehicle, lift the Hood slightly, pull the secondary Latch B inside of the Hood’s center to the left and lift the Hood
(Located on Driver side kick panel)(Latch located inside hood)
REMINDERS:
•
Sunvisor may not shield all direct light
•
Do not operate the vehicle if Sunvisor is impairing your visibility
•
Be aware of your seating position when adjusting or swinging Sunvisor around from the front or side windows
Sunvisor†1 9
Use the Sunvisor to shield direct light through the front or side windows. Slide the Sunvisor out and adjust as needed.
Exterior Flush Door Handle
Operation
Manual Type - To unlock the driver ’s door, with the Smart Key in your possession:
•Push the engraved button C on the door handle – the hazard lights will blink twice, a chime will sound twice, and the door unlocks
•Press on the front of the door handle. Then the rear handle will pop out
•Pull on the door handle to open the door
To lock the doors using the Smart Key, press the lock button D.
Electric type - When the “Approach Unlock ” feature is activated in Vehicle Settings, the door handles will pop out when you approach the vehicle with the Smart Key in your possession. To activate the “Approach Unlock ” feature, press the SETUP button/key on the infotainment system. Select VEHICLE, then DOOR and select ACTIVATE APPROACH UNLOCK
When you’re within one foot of the vehicle with the Smart Key in your possession, the outside door handles will slide out, the doors will unlock, the Hazard Warning Flashers will blink twice, and a chime will sound twice. Then pull the door handle to open the door.
To lock the electric door handles, press the sensor/engraved button C on the door handle or use the lock button on the Smart Key.
Refer to section 4 in the Owner ’s Manual for more information.
Closing the Hood: Lower the Hood about halfway and then press down to securely lock in place.
A
C
D
B