Page 17 of 70
 FEATURES
ELECTRIC VEHICLE (EV) F E AT U R E S
OPENOFFHOLD
OPENOFFHO")
15*IF EQUIPPEDALWAYS CHECK THE OWNER ’S MANUAL FOR COMPLETE OPER ATING INFORMATION AND SAFET Y WARNINGS.
ELECTRIC VEHICLE (EV) FEATURES
ELECTRIC VEHICLE (EV) F E AT U R E S
OPENOFFHOLD
OPENOFFHOLD
OPENOFF
HOLD
OPENOFF
HOLD
(Trickle / normal charge shown)
(Panel located on left side of Steering Wheel)
Charging Your EV (Continued)
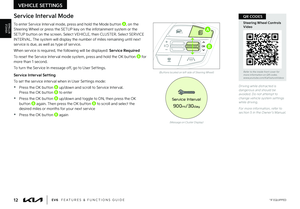
To charge your EV using a charger:
•Ensure scheduled charging is not set on the infotainment system or the Kia Access App
•Press the brake pedal and engage the parking brake
•Turn off all switches, turn the Rotary Dial Shifter Knob to P (Park), and turn off the vehicle
•To open the charge port door, press the left edge of the charge port door A or press the Charging Door Open button B on the Driver ’s Panel inside (the charging door can be opened when the vehicle is unlocked)
•Hold the charging connector handle and connect it to the vehicle’s charging inlet C by pushing the connector until you hear a clicking sound
•Charging begins automatically (Ensure the charge indicator light is illuminated red on your instrument cluster, indicating the vehicle is charging, and ensure scheduled charging is not set)
Checking the Charging Status
The charging status can be checked by viewing the charging status indicator D next to the charging inlet or on the dash panel. The lights will progressively become lit as the vehicle approaches a full charge.
REMINDER: For more detail and/or subsequent steps in charging your vehicle, including safet y precautions that should be taken, please see section 1 of the Owner ’s Manual.
C
A
B
D
Page 18 of 70
 FEATURES
ELECTRIC VEHICLE (EV) F E AT U R E S
Refer to the inside front cover for more information on QR codes.www.youtube.com")
16 *IF EQUIPPEDEV6 FEATURES & FUNCTIONS GUIDE
ELECTRIC VEHICLE (EV) FEATURES
ELECTRIC VEHICLE (EV) F E AT U R E S
Refer to the inside front cover for more information on QR codes.www.youtube.com/KiaFeatureVideos
EV Charge Transfer / Vehicle to Load (V2L) Video
QR CODE
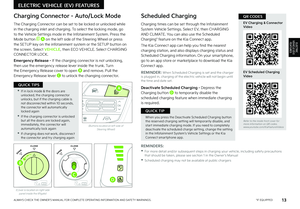
EV Charge Transfer / Vehicle to Load (V2L) allows you to use the vehicle’s high voltage battery to power electrical devices like home appliances or other electronic devices. V2L can also be used to charge items like electric bikes or another electric vehicle.
If equipped, there are two ports in the interior and exterior. The interior port A is under the rear seat and the other is the charging por t for your EV.
If your EV ’s high-voltage battery discharges to the limit set, the system will automatically stop supply to the ports. Set your EV ’s battery discharge limit in the Infotainment System’s Settings. Press the EV button onscreen. Select VEHICLE TO LOAD (V2L), and EV CHARGE TR ANSFER SETTINGS.
Interior Port - The EV Power button needs to be on to operate the port. Use the Smart Key fob mechanical key to unlock the power outlet cover B. Check the indicators on the port to ensure power is on.
Exterior Port - Open the cover of the V2L connector C and connect your appliance or electronic device. Connect the V2L connector to the charging inlet on the EV, and press the button D on the connector.
REMINDER: Maximum wat tage is 1.9 kW, or 1,900 wat ts.
Refer to section 1 in the Owner ’s Manual for more information.
EV Charge Transfer / Vehicle to Load (V2L)*
OPENOFF
HOLD
� �5�S�J�D�L�M�F�������O�P�S�N�B�M���D�I�B�S�H�F���T�I�P�X�O�
AB
A
D
C
Page 19 of 70

17 *IF EQUIPPEDALWAYS CHECK THE OWNER ’S MANUAL FOR COMPLETE OPER ATING INFORMATION AND SAFET Y WARNINGS.
10: 51AM Tue, Oct. 26
490m
445m
459m
IRVINE CO OFC/JBC
2855 02
N ext Departure
Departure Time must be set first to use
Scheduled Charging/Climate Control.
Electric Vehicle
Driving
Convenience Forward Safety
Speed Limit
Lane Safety
Blind-Spot Safety
Parking Safety
Driver Attention
Warning
Smart Cruise Control
�����
�����
��
Battery
S cheduled Charging and ClimateE V Charge TransferV 2L
O n
Off
Off Off
96%
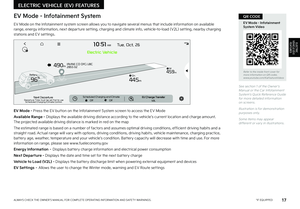
EV Mode - Infotainment System
EV Mode on the Infotainment system screen allows you to navigate several menus that include information on available range, energy information, next departure setting, charging and climate info, vehicle-to-load (V2L) setting, nearby charging stations and EV settings.
EV Mode - Press the EV button on the Infotainment System screen to access the EV Mode
Available Range - Displays the available driving distance according to the vehicle’s current location and charge amount. The projected available driving distance is marked in red on the map
The estimated range is based on a number of factors and assumes optimal driving conditions, efficient driving habits and a straight road. Actual range will vary with options, driving conditions, driving habits, vehicle maintenance, charging practice, battery age, weather, temperature and your vehicle’s condition. Battery capacity will decrease with time and use. For more information on range, please see www.fueleconomy.gov
Energy Information – Displays battery charge information and electrical power consumption
Next Departure - Displays the date and time set for the next battery charge
Vehicle to Load (V2L) - Displays the battery discharge limit when powering external equipment and devices
EV Settings – Allows the user to change the Winter mode, warning and EV Route settings
See section 1 of the Owner ’s Manual or the Car Infotainment System’s Quick Reference Guide for more detailed information on screens.
Illustration is for demonstration purposes only.
Some items may appear different or var y in illustrations.
ELECTRIC VEHICLE (EV) FEATURES
ELECTRIC VEHICLE (EV) F E AT U R E S
Refer to the inside front cover for more information on QR codes.www.youtube.com/KiaFeatureVideos
EV Mode - Infotainment System Video
QR CODE
Page 20 of 70
 FEATURES
ELECTRIC VEHICLE (EV) F E AT U R E S
Refer to the inside front cover for more information on QR codes.www.youtube.com/")
18*IF EQUIPPEDEV6 FEATURES & FUNCTIONS GUIDE
ELECTRIC VEHICLE (EV) FEATURES
ELECTRIC VEHICLE (EV) F E AT U R E S
Refer to the inside front cover for more information on QR codes.www.youtube.com/KiaFeatureVideos
Regenerative Braking - Paddle Switches, Drive Mode Video
Regenerative Braking - i-Pedal Video
QR CODE
Each of the different Drive Modes allows the regenerative braking level to be set at the driver ’s preference.
QUICK TIP
(Indicator on lower left corner of Instrument display)
Regenerative Braking with Paddle Switches
The regenerative braking system charges the battery when coasting or when you use the brakes to stop the vehicle. Use the paddle switches to adjust the regenerative braking level from 0 to 3 during decelerating or braking. The level will be displayed on the instrument cluster A.
•Pull the left paddle switch B to increase regenerative braking and deceleration
•Pull the right paddle switch C to decrease regenerative braking and deceleration
The paddle shifters do not operate when:
•Both paddle shifters are pulled at the same time
•The vehicle is decelerating by depressing the brake pedal
•Smart Cruise Control (SCC) is active
i-Pedal
i-Pedal driving controls the vehicle speed by the accelerator pedal, both acceleration and deceleration. To activate i-Pedal:
•Pull the left side paddle switch B to Level 3 regenerative braking (see indicator on Instrument Cluster)
•Then pull the left side paddle switch B once again when the regenerative braking level is set to Level 3
The i-Pedal indicator symbol will be illuminated on the instrument cluster.
+
-
96%Lv 1READY
+
-
96%Lv 1READY
For more information on regenerative braking, i-pedal driving or the Smar t Regeneration System, please refer to section 6 in the Owner ’s Manual.
A
BC
REMINDER: The driver ’s seat belt must be fastened to operate i-pedal driving.
Do not solely rely on i-pedal driving to stop the vehicle, as it may not be able to stop the vehicle depending on vehicle and road conditions. Always use pedal braking when necessar y. Pay at tention to the road condition ahead and apply the brake if necessar y.
+
-
96%Lv 1READY
+
-
96%Lv 1READY
Page 21 of 70

19*IF EQUIPPEDALWAYS CHECK THE OWNER ’S MANUAL FOR COMPLETE OPER ATING INFORMATION AND SAFET Y WARNINGS.
Refer to the inside front cover for more information on QR codes.www.youtube.com/KiaFeatureVideos
Regenerative Braking - Smart Regeneration Video
QR CODE
One-Pedal Driving
One-Pedal Driving increases the regenerative braking amount to above level 3 and may slow the vehicle down by pulling down the left switch.
•Pull and hold the left paddle switch B while coasting to activate One-Pedal Driving
•When the vehicle speed is above 2 mph, release the left paddle switch B for less than 0.5 seconds to return to the previously set level of regenerative braking
•When the vehicle speed is below 2 mph, One-Pedal Driving can stop the vehicle even though the left paddle switch is released
REMINDER: The driver ’s seat belt must be fastened to operate one-pedal driving.
Do not solely rely on one-pedal driving to stop the vehicle, as it may not be able to stop the vehicle depending on vehicle and road conditions. Always use pedal braking when necessar y and pay at tention to the road conditions ahead and apply the brake if necessar y.
Smart Regeneration System
This system automatically adjusts the regenerative braking level based on a vehicle being detected in front and road conditions.
•Activate Smart Regeneration in the Vehicle Settings on the Infotainment System by pressing SETUP on the screen, VEHICLE and ECO VEHICLE, and then SMART REGENER ATION. AUTO D will be displayed on the instrument cluster. AUTO regenerative brake adjusts regenerative braking based on the distance with the vehicle in front and its speed
•Pull and hold the right paddle switch C for more than 1 second to turn on/off the automatic change of the regenerative braking. The minimum regenerative braking level can be adjusted when in AUTO mode by using the left and right paddle switches
Smar t Regeneration is a supplemental system for the driver ’s convenience. Do not solely rely on this system to stop the vehicle or avoid collisions. Always cautiously look ahead to prevent unexpected or sudden situations.
Regenerative Braking with Paddle Switches (Continued)
ELECTRIC VEHICLE (EV) FEATURES
ELECTRIC VEHICLE (EV) F E AT U R E S
+
-
96%AUTO
READY
(Indicator on lower left corner of Instrument display)
D
Page 22 of 70

20†LEGAL DISCL AIMERS ON BACK INSIDE COVER | *IF EQUIPPEDEV6 FEATURES & FUNCTIONS GUIDE
Refer to the inside front cover for more information on QR codes.www.youtube.com/KiaFeatureVideos
Blind-Spot Collision-Avoidance Assist (BCA) Video
QR CODEBlind-Spot Collision-Avoidance Assist (BCA)†4
REMINDERS:
•
The BCA warning may sound when turning left into an intersection. Maintain a proper distance from oncoming vehicles
•
BCA will not issue a warning if the vehicle speed is 6 mph or more above the surrounding vehicles
•
When BCA is ON and the ignition is cycled, BCA returns to its previous state
When engaged, BCA is a supplemental system. Do not solely rely on this system and always pay at tention to the road and its conditions.
Refer to section 6 in the Owner ’s Manual for more information.
The images on this page are for illustrative purposes only and may not reflect actual feature or operation.
•BCA Warning Volume can be adjusted in the Vehicle Set tings in the Infotainment System. Go to Driver Assistance, then Warning Volume
•BCA will activate when:
-The system is turned on
-
Other vehicles are detected on the rear sides of the vehicle
-Vehicle speed is above approximately 20 mph
QUICK TIPS
BCA uses rear corner radar sensors in the rear bumper to monitor and warn the driver in certain situations if it detects an approaching vehicle in the driver ’s blind spot area and before changing lanes. Initially, BCA provides Blind-Spot Collision Warning (BCW) when it detects a potential collision with a vehicle, emitting an audible warning and visual alert on the outside rearview mirrors. If the system detects that the collision risk has increased, Blind-Spot Collision-Avoidance Assist (BCA) automatically applies the opposite side front brake to try and mitigate a potential collision.
1st-stage: When another vehicle is detected within BCW warning boundary A, an indicator will illuminate on the outside rearview mirrors B.
2nd-stage: When 1st stage warning is on and the driver activates a turn signal, a flashing indicator will illuminate on the outside rearview mirrors and the system will sound a warning.
3rd-stage: When 1st stage warning is on and the 2nd stage warning has already occurred, and the collision risk has increased, braking is applied to the opposite side front wheel and a visual warning occurs.
BCA User Settings:
•To enable BCA , press the SETUP key/button on the Infotainment System. Select the VEHICLE button to enter the Vehicle Settings. Select DRIVER ASSISTANCE and then BLIND-SPOT SAFET Y
•
To set BCA when in Blind-Spot Safety, select:
– Active Assist: BCA will provide a warning (audible & visual) and may activate Electronic Stability Control (ESC) and temporarily apply braking power
– Warning Only: Vehicle will provide a warning only (audible & visual)
– Off: System is off, no warnings provided
•
To set the initial warning activation time, go to the Vehicle Settings, then
Driver Assistance, then Warning Timing. Adjust the warning timing:
– Early/Normal: Maximizes the amount of distance between the
vehicles before the initial warning occurs
–
Later: Reduces the amount of distance between the vehicles
before the initial warning occurs
B
ADVANCED DRIVER ASSISTANCE SYSTEMS (ADAS)
ADAS
A
Page 23 of 70

21†LEGAL DISCL AIMERS ON BACK INSIDE COVER | *IF EQUIPPEDALWAYS CHECK THE OWNER ’S MANUAL FOR COMPLETE OPER ATING INFORMATION AND SAFET Y WARNINGS.
Refer to the inside front cover for more information on QR codes.www.youtube.com/KiaFeatureVideos
Rear Cross-Traffic Collision-Avoidance Assist (RCCA) Video
QR CODERear Cross-Traffic Collision-Avoidance Assist (RCCA)*†4
When engaged, RCCA is a supplemental system. Do not solely rely on this system and always pay at tention to the road and its conditions.
Refer to section 6 in the Owner ’s Manual for more information.
REMINDERS:
•
When vehicle power is cycled, RCCA will remain in the previous state
•
When a vehicle is approaching within the sensing range and coming up faster than 3 mph, the RCCA system will show a warning
RCCA Warning Volume can be adjusted in the Vehicle Set tings on the Infotainment System. Go to Driver Assistance, then Warning Volume.
QUICK TIP
Rear Cross-Traffic Collision-Avoidance Assist (RCCA) is designed to warn the driver under certain conditions. It may activate the Electronic Stability Control (ESC) and temporarily apply braking if it detects cross traffic approaching the vehicle when the vehicle is in reverse.
When the RCCA rear-corner radar sensors detect approaching vehicles from the rear left or rear right side of the vehicle A, RCCA will sound a warning, the warning indicators on the outside rearview mirror will illuminate and a message will appear on the Instrument Cluster LCD B and the Infotainment System screen. If RCCA detects that the collision risk has increased, RCCA automatically applies the brakes to reduce your speed, potentially helping to minimize the effects of a possible collision.
RCCA is designed to operate under the following conditions:
•When the gear shift is in Reverse
•When the vehicle is moving slower than 6 mph
RCCA User Settings:
•To turn RCCA on, press the SETUP key/button on the Infotainment System. Select the VEHICLE button to enter the Vehicle Settings. Select DRIVER ASSISTANCE, PARKING SAFET Y, then REAR CROSS-TR AFFIC SAFET Y
•To set the warning timing, go to the Vehicle Settings, then go to Driver Assistance, then Warning Timing. Select one of the settings:
–
Early/Normal/Standard: Maximizes the amount of distance between the vehicles before the initial warning occurs
– Late: Reduces the amount of distance between the vehicles before the initial warning occurs
•The default Warning Timing is set to Normal. If the Warning Timing is changed, the warning time
of other Driver Assistance systems may also change
ADAS
ADVANCED DRIVER ASSISTANCE SYSTEMS (ADAS)
A
B
Page 24 of 70

22†LEGAL DISCL AIMERS ON BACK INSIDE COVER | *IF EQUIPPEDEV6 FEATURES & FUNCTIONS GUIDE
Refer to the inside front cover for more information on QR codes.www.youtube.com/KiaFeatureVideos
Lane Keeping Assist (LK A) Video
QR CODE
When engaged, Lane Keeping Assist is not a substitute for safe driving and may not always warn the driver if the vehicle is driven outside of its lane. Always drive safely and use caution.
For illustrative purposes only. Your actual display, but tons and/ or features may var y.
Actual Vehicle Set tings steps may var y by model. Refer to section 5 in the Owner ’s Manual for more information.
REMINDERS:
•
LK A will not issue a warning if the turn signals or hazard lights are activated
•
When the ignition is cycled, LK A will return to the previously set state
Lane Keeping Assist (LKA)*†4
Lane Keeping Assist is designed to detect the lane markers on the road with a front view camera on the windshield, and may assist the driver ’s steering to potentially help keep the vehicle in the lane. When turned on, the instrument cluster indicator will initially illuminate white. It will remain white when the vehicle is traveling slower than 40 mph or when the system does not detect the lane markers. When the system detects the lane markers and can assist the steering, the LK A icon will illuminate green.
If LK A detects that you are moving outside of your lane, the system may give an audible warning and display a Lane Departure Warning on the instrument cluster. If the vehicle continues to move outside of the lane, LK A may provide steering inputs, trying to prevent the vehicle from moving outside its lane.
When LK A is enabled, press and hold the Lane Safety button A to turn LK A on or off.
LKA User Settings:
To enable LK A , press the SETUP key/button on the Infotainment System. Select the VEHICLE button to enter the Vehicle Settings. Select DRIVER ASSISTANCE then L ANE SAFET Y.
•Assist: LK A will automatically assist the driver ’s steering when lane departure is detected to help prevent the vehicle from moving out of its lane
•Warning Only: LK A will warn the driver with an audible warning when lane departure is detected. This mode does NOT provide any steering assist
•Off: LK A will turn off. The indicator light B will turn off on the cluster
All systems will operate under the following conditions:
•The vehicle speed exceeds approximately 40 mph
•LK A recognizes the lane the vehicle is traveling in
•The vehicle is between the lane markers
When the front-view camera detects the lane traveled in, both lanes are illuminated
When the front-view camera does not detect the lane traveled in the lanes are not illuminated
When the front-view camera detects the vehicle moving outside of the lane being traveled in, a yellow indicator will illuminate either on the left or right lane (shown in both images above)
The LK A Warning Volume can be adjusted in the Vehicle Set tings* on the Infotainment System
QUICK TIP
(But tons located on right side of steering wheel)
OKOKOK
OK
MODEMODEMODE
OKOK
MODEMODEMODE
OKOKOK
MODEMODEMODE
OKOKOK
MODEMODEMODE
A
0mph
0 KMH020 4060
202 m100 kWh/ 100m96%Lv 1READY66°F
2 72m
CHG
PWR
0mph
0 KMH
020 4060
202 m100 kWh/ 100m96%Lv 1READY66°F
2 72m
CHG
PWR
0mph
0 KMH
020 4060
202 m100 kWh/ 100m96%Lv 1READY66°F
2 72m
CHG
PWR
0mph
0 KMH
020 4060
202 m100 kWh/ 100m96%Lv 1READY66°F
2 72m
CHG
PWR
0mph
0 KMH
020 4060
202 m100 kWh/ 100m96%Lv 1READY66°F
2 72m
CHG
PWR
0mph
0 KMH
020 4060
202 m100 kWh/ 100m96%Lv 1READY66°F
2 72m
CHG
PWR
0mph
0 KMH
020 4060
202 m100 kWh/ 100m96%Lv 1READY66°F
2 72m
CHG
PWR
0mph
0 KMH
020 4060
202 m100 kWh/ 100m96%Lv 1READY66°F
2 72m
CHG
PWR
0mph
0 KMH
020 4060
202 m100 kWh/ 100m96%Lv 1READY66°F
2 72m
CHG
PWR
0mph
0 KMH
020 4060
202 m100 kWh/ 100m96%Lv 1READY66°F
2 72m
CHG
PWR
0mph
0 KMH
020 4060
202 m100 kWh/ 100m96%Lv 1READY66°F
2 72m
CHG
PWR
0mph
0 KMH
020 4060
202 m100 kWh/ 100m96%Lv 1READY66°F
2 72m
CHG
PWR
0mph
0 KMH
020 4060
202 m100 kWh/ 100m96%Lv 1READY66°F
2 72m
CHG
PWR
0mph
0 KMH
020 4060
202 m100 kWh/ 100m96%Lv 1READY66°F
2 72m
CHG
PWR
0mph
0 KMH
020 4060
202 m100 kWh/ 100m96%Lv 1READY66°F
2 72m
CHG
PWR
0mph
0 KMH
020 4060
202 m100 kWh/ 100m96%Lv 1READY66°F
2 72m
CHG
PWR
�#
�"�%�7�"�/�$�&�%���%�3�*�7�&�3���"�4�4�*�4�5�"�/�$�&���4�:�4�5�&�.�4��� �"�%�"�4�
�"�%�"�4