2022 INFINITI QX50 warning lights
[x] Cancel search: warning lightsPage 155 of 540
WARNING
• To avoid personal injury, keep your
hands, fingers and head away from the
sunshade arm, the arm rail and sunshade
inlet port.
• Do not allow children near the sunshade
system. They could be injured.
• Do not place objects on or near the sun-
shade. This could cause improper opera-
tion or damage it.
• Do not pull or push the sunshade. This
could cause improper operation or dam-
age it.
CAUTION
• Do not place objects (such as newspa-
pers, handkerchiefs, etc.) on the sun-
shade inlet port. Doing so may entangle
these objects in the sunshade when it is
extending or retracting, causing im-
proper operation or damage to the
sunshade.
• Do not push the sunshade arm with your
hands, etc., as this may deform it. Im-
proper operation or damage to the sun-
shade may result. •
Do not put any object into the sunshade
inlet port as this may result in improper
operation or damage the sunshade.
• Do not hang any object on the arm rail as
this may result in improper operation or
damage the sunshade.
• Do not forcefully pull the sunshade. Do-
ing so may elongate the sunshade. Im-
proper operation or damage to the sun-
shade may result.
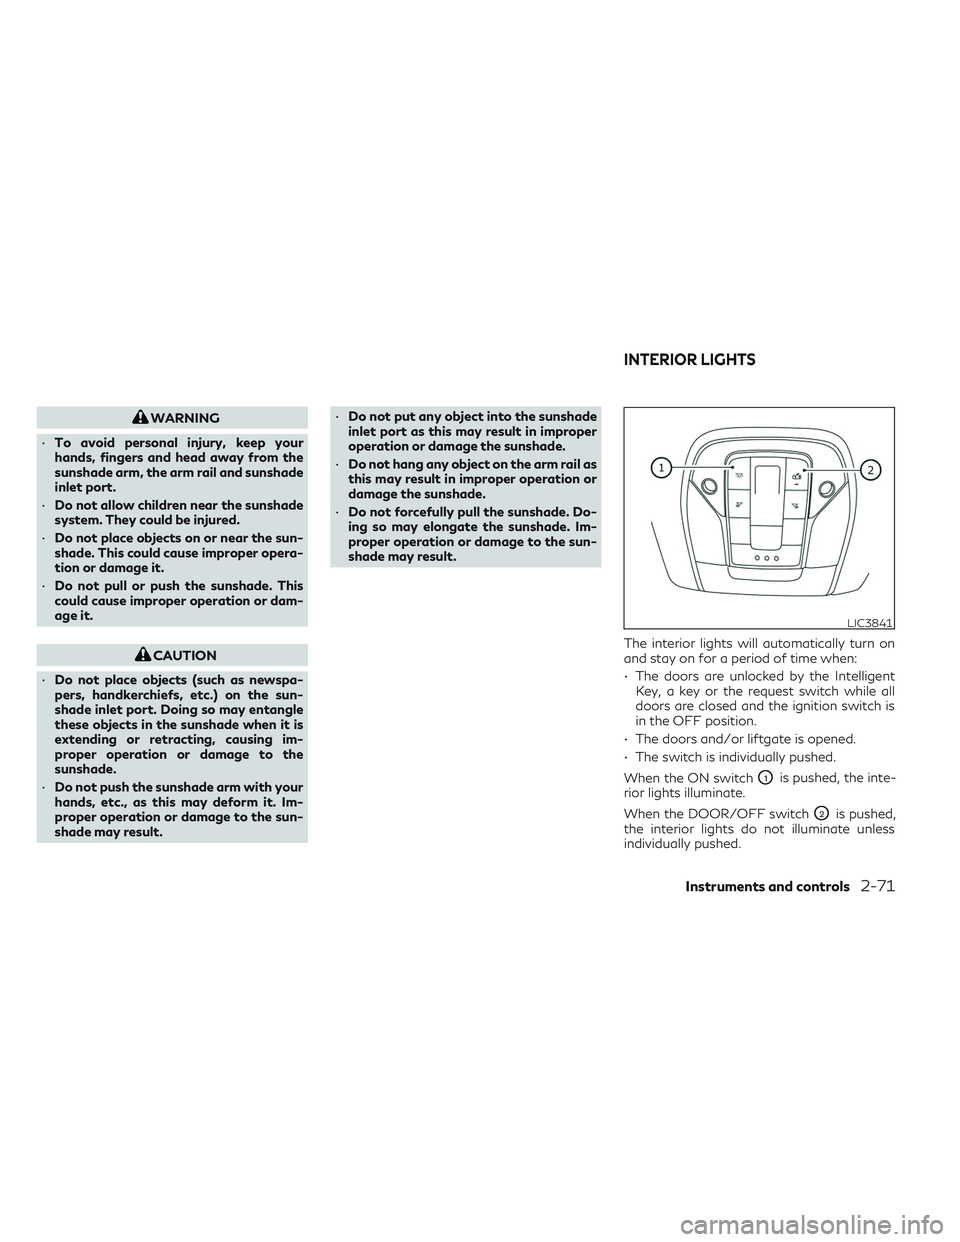
The interior lights will automatically turn on
and stay on for a period of time when:
• The doors are unlocked by the IntelligentKey, a key or the request switch while all
doors are closed and the ignition switch is
in the OFF position.
• The doors and/or liftgate is opened.
• The switch is individually pushed.
When the ON switch
O1is pushed, the inte-
rior lights illuminate.
When the DOOR/OFF switch
O2is pushed,
the interior lights do not illuminate unless
individually pushed.
LIC3841
INTERIOR LIGHTS
Instruments and controls2-71
Page 157 of 540

For additional information, see “Exterior and
interior lights” (P. 8-24).The HomeLink® Universal Transceiver pro-
vides a convenient way to consolidate the
functions of up to three individual hand-held
transmitters into one built-in device.
HomeLink® Universal Transceiver:
• Will operate most radio frequency devices
such as garage doors, gates, home and
office lighting, entry door locks and security
systems.
• Is powered by your vehicle's battery. No separate batteries are required. If the vehi-
cle's battery is discharged or is discon-
nected, HomeLink® will retain all
programming.
When the HomeLink® Universal Transceiver
is programmed, retain the original transmit-
ter for future programming procedures (Ex-
ample: new vehicle purchases). Upon sale of
the vehicle, the programmed HomeLink®
Universal Transceiver buttons should be
erased for security purposes. For additional
information, see “Programming
HomeLink®” (P. 2-74).WARNING
• Your vehicle's engine should be turned
off while programming the HomeLink®
Universal Transceiver. For additional in-
formation, see “Push-button ignition
switch” (P. 5-13). Do not breathe ex-
haust gases; they contain colorless and
odorless carbon monoxide. Carbon mon-
oxide is dangerous. It can cause uncon-
sciousness or death.
• Do not use the HomeLink® Universal
Transceiver with any garage door opener
that lacks safety stop and reverse fea-
tures as required by federal safety stan-
dards. (These standards became effec-
tive for opener models manufactured
after April 1, 1982.) A garage door
opener which cannot detect an object in
the path of a closing garage door and
then automatically stop and reverse
does not meet current federal safety
standards. Using a garage door opener
without these features increases the risk
of serious injury or death.
• During the programming procedure your
garage door or security gate will open
and close (if the transmitter is within
range). Make sure that people or objects
are clear of the garage door, gate, etc.,
that you are programming.
HOMELINK® UNIVERSAL
TRANSCEIVER (if so equipped)
Instruments and controls2-73
Page 177 of 540

3. Press thebutton on the Intelligent
Key.
4. The hazard indicator lights flash twice and the horn beeps once.
5. All doors, liftgate and fuel-filler door will be locked.
WARNING
After locking the doors using the Intelli-
gent Key, be sure that the doors have been
securely locked by operating the door
handles within two seconds of locking.
Failure to follow these instructions may re-
sult in inadvertently unlocking the doors,
which may decrease the safety and secu-
rity of your vehicle.
Unlocking doors and fuel-filler door
1. Press thebutton on the Intelligent
Key.
2. The hazard indicator lights flash once and the driver’s and fuel-filler doors unlock.
3. Press the
button again within 1 min-
ute to unlock all doors and liftgate. All doors, liftgate and fuel-filler door will be
locked automatically unless one of the fol-
lowing operations is performed within 1 min-
ute after pressing the
button:
• Opening any doors.
• Pushing the ignition switch.
Using the interior lights
The interior lights illuminate for a period of
time when a door is unlocked.
The lights can be turned off without waiting
by performing one of the following
operations:
• Placing the ignition switch in the ON position.
• Locking the doors with the Intelligent Key.
• Switching the interior light switch to the OFF position.
For additional information, see “Interior
lights” (P. 2-71).
Opening windows
The Intelligent Key allows you to simultane-
ously open windows equipped with auto-
matic operation.
To open the windows, press and hold the
button on the Intelligent Key for longer
than 3 seconds after all doors are unlocked. The door windows will open while pressing
the
button on the Intelligent Key.
The door windows cannot be closed by using
the Intelligent Key.
Releasing the rear liftgate
The rear liftgate can be opened and closed by
performing the following:
• Press the
button for longer than 1
second to open the rear liftgate.
• Press the
button again for longer than
1 second to close the rear liftgate.
When the
button is pressed during the
open or close process, the liftgate motors will
stop. When the
button is pressed again
for longer than 1 second the liftgate will re-
verse direction.
Using the panic alarm
If you are near your vehicle and feel threat-
ened, you may activate the panic alarm to call
attention by pressing and holding the
button on the Intelligent Key for longer than
0.5 seconds.
The panic alarm and headlights will stay on
for a period of time.
Pre-driving checks and adjustments3-15
Page 178 of 540

The panic alarm stops when:
• It has run for a period of time.
• Any button is pressed on the Intelligent Key.
• The request switch on the driver or passen-ger door is pushed and the Intelligent Key is
in range of the door handle.
Answer back horn feature
If desired, the answer back horn feature can
be deactivated using the Intelligent Key.
When it is deactivated and the
button
is pressed, the hazard indicator lights flash
twice. When the
button is pressed, nei-
ther the hazard indicator lights nor the horn
operates.
NOTE:
If you change the answer back horn and light
flash feature with the Intelligent Key, the
lower touch-screen display will show the
current mode after the ignition switch has
been cycled from the OFF to the ON position
of the ”Comfort & Convenience” options of
the “Settings” menu in the lower touch-
screen display can also be used to change the
answer back horn mode between “Conve-
nience” and “Security” settings.
To deactivate: Press and hold the
andbuttonsfor at least 2 seconds. The hazard indicator lights will flash three
times to confirm that the answer back horn
feature has been deactivated.
To activate:
Press and hold the
andbuttonsfor at least 2 seconds once
more.
The hazard indicator lights will flash once and
the horn will sound once to confirm that the
horn beep feature has been reactivated.
Deactivating the horn beep feature does not
silence the horn if the alarm is triggered.
WARNING SIGNALS
To help prevent the vehicle from moving un-
expectedly by erroneous operation of the In-
telligent Key or to help prevent the vehicle
from being stolen, a chime or buzzer sounds
from inside and outside the vehicle and a
warning is displayed in the instrument panel.
When a chime or beep sounds or a warning is
displayed, be sure to check the vehicle and
the Intelligent Key.
For additional information, see “Trouble-
shooting guide” (P. 3-16) and the separate
INFINITI InTouch™ Owner’s Manual.
TROUBLESHOOTING GUIDE
Verify the location of all Intelligent Keys that
are programmed for the vehicle. If another
Intelligent Key is in range or inside the vehicle,
the vehicle system may respond differently
than expected.
3-16Pre-driving checks and adjustments
Page 181 of 540

Laws in some local communities may restrict
or prohibit the use of Remote Engine Start, or
the amount of time a parked vehicle engine
may idle. For example, some laws require a
person using Remote Engine Start to have
the vehicle in view or may restrict idling time
except in freezing temperatures. Check local
regulations for any requirements.
Other conditions may affect the function of
the Remote Engine Start feature. For addi-
tional information, see “Conditions the Re-
mote Engine Start will not work” (P. 3-20).
Other conditions can affect the performance
of the Intelligent Key transmitter. For addi-
tional information, see “INFINITI Intelligent
Key” (P. 3-2).REMOTE ENGINE START
OPERATING RANGE
WARNING
• To help avoid risk of injury or death
through unintended operation of the ve-
hicle and/or its systems, including en-
trapment in windows or inadvertent
door lock activation, do not leave chil-
dren, people who require the assistance
of others or pets unattended in your ve-
hicle. Additionally, the temperature in-
side a closed vehicle on a warm day can
quickly become high enough to cause a
significant risk of injury or death to
people and pets.
• Do not use Remote Engine Start in closed
spaces such as a garage. Do not breathe
exhaust gases; they contain colorless
and odorless carbon monoxide. Carbon
monoxide is dangerous. It can cause un-
consciousness or death.
CAUTION
When the Intelligent Key battery is dis-
charged or other strong radio wave
sources are present near the operating lo-
cation, the Intelligent Key operating range
becomes narrower, and the Intelligent Key
may not function properly.
The Remote Engine Start function can only
be used when the Intelligent Key is within the
specified operating range from the vehicle.
The Remote Engine Start operating range is
approximately 197 ft (60 m) from the vehicle.
REMOTE STARTING THE
VEHICLE
To use the Remote Engine Start feature per-
form the following:
1. Aim the Intelligent Key at the vehicle.
2. Press the
button to lock all doors.
3. Within 5 seconds press and hold the
button until the turn signal lights flash and
the tail lamps turn on. If the vehicle is not
within view press and hold the
but-
ton for at least 2 seconds.
Pre-driving checks and adjustments3-19
Page 182 of 540

The following events will occur when the en-
gine starts:
• The parking lights will turn on and remainon as long as the engine is running.
• The doors will be locked and the climate control system may come on.
• The engine will continue to run for 10 min- utes. Repeat the steps to extend the time
for an additional 10 minutes. For additional
information, see “Extending engine run
time” (P. 3-20).
Press and hold the brake pedal while switch-
ing the ignition to the ON position before
driving. For additional information, see “Driv-
ing the vehicle” (P. 5-18).
EXTENDING ENGINE RUN TIME
The Remote Engine Start feature can be ex-
tended one time by performing the steps
listed in “Remote starting the vehicle”
(P. 3-19). Run time will be calculated as
follows:
• The first 10 minute run time will start when the Remote Engine Start function is
performed. • The second 10 minutes will start immedi-
ately when the Remote Engine Start func-
tion is performed again. For example, if the
engine has been running for 5 minutes, and
10 minutes are added, the engine will run
for a total of 15 minutes.
• Extending engine run time will bring you to the two Remote Engine Start limit.
A maximum of two Remote Engine Starts, or
a single start with an extension, are allowed
between ignition cycles.
The ignition switch must be cycled to the ON
position and then back to the OFF position
before the Remote Engine Start procedure
can be used again.
CANCELING A REMOTE ENGINE
START
To cancel a Remote Engine Start, perform
one of the following:
• Aim the Intelligent Key at the vehicle and press
until the parking lights turn off.
• Turn on the hazard warning flashers.
• Cycle the ignition switch on and then off.
• The extended engine run time has expired.
• The first 10 minute timer has expired.
• Opening the engine hood.
• Shifting the vehicle out of P (Park). • The alarm sounds due to illegal entry into
the vehicle.
• Pushing the ignition switch without the In- telligent Key in the vehicle.
• Not pressing the brake pedal while pressing the ignition switch with the Intelligent Key
in the vehicle.
CONDITIONS THE REMOTE
ENGINE START WILL NOT WORK
The Remote Engine Start will not operate if
any of the following conditions are present:
• The ignition switch is placed in the ONposition.
• The hood is not securely closed.
• The hazard indicator lights are on.
• The engine is still running. The engine must be completely stopped. Wait at least 6 sec-
onds if the engine goes from running to off.
This is not applicable when extending en-
gine run time.
• The
button is not pressed and held for
at least 2 seconds.
• The
button is not pressed and held
within 5 seconds of pressing the lock
button.
• The brake is pressed.
• The doors are not closed and locked.
3-20Pre-driving checks and adjustments
Page 264 of 540

INFINITI VEHICLE IMMOBILIZER
SYSTEM
The INFINITI Vehicle Immobilizer System will
not allow the engine to start without the use
of the registered key.
If the engine fails to start using the registered
key, it may be due to interference caused by
another registered key, an automated toll
road device or automated payment device on
the key ring. Restart the engine using the
following procedures:
1. Leave the ignition switch in the ON posi-tion for approximately 5 seconds.
2. Place the ignition switch in the OFF or LOCK position and wait approximately 5
seconds.
3. Repeat steps 1 and 2.
4. Restart the engine while holding the de- vice (which may have caused the interfer-
ence) separate from the registered key.
If the no start condition re-occurs, INFINITI
recommends placing the registered key on a
separate key ring to avoid interference from
other devices. • Make sure the area around the vehicle is
clear.
• Check fluid levels such as engine oil, cool- ant, brake fluid, and windshield-washer
fluid as frequently as possible, or at least
whenever you refuel.
• Check that all windows and lights are clean.
• Visually inspect tires for their appearance and condition. Also check tires for proper
inflation.
• Check that all doors are closed.
• Position seat and adjust head restraints/headrests.
• Adjust inside and outside mirrors.
• Fasten seat belts and ask all passengers to do likewise.
• Check the operation of warning lights when the ignition switch is placed in the ON
position. For additional information, see
“Warning lights, indicator lights and audible
reminders” (P. 2-9) 1. Apply the parking brake.
2. Press the Park button to place the vehicle
in P (Park) or move the shift lever to N
(Neutral). P (Park) is recommended.
The starter is designed not to operate if
the shift lever is in any of the driving
positions.
3. Push the ignition switch to the ON posi- tion. Depress the brake pedal and push
the ignition switch to start the engine.
To start the engine immediately, push and
release the ignition switch while depress-
ing the brake pedal with the ignition
switch in any position.
• If the engine is very hard to start in extremely cold weather or when re-
starting, depress the accelerator pedal a
little (approximately 1/3 to the floor)
and while holding, crank the engine. Re-
lease the accelerator pedal when the
engine starts.
• If the engine is very hard to start be- cause it is flooded, depress the accel-
erator pedal all the way to the floor and
hold it. Push the ignition switch to the
ON position to start cranking the en-
gine. After 5 or 6 seconds, stop cranking
by pushing the ignition switch to the
BEFORE STARTING THE ENGINE STARTING THE ENGINE
5-16Starting and driving
Page 272 of 540
WARNING
• The electronic parking brake will not be
automatically applied when the engine is
stopped without using the ignition
switch (for example, by engine stalling).
Without the vehicle stationary, the elec-
tronic parking brake will not be auto-
matically applied even if the engine is
turned off with the ignition switch.
• Before leaving the vehicle, press the Park
button to place the vehicle in the P (Park)
position and check that the electronic
parking brake indicator light is illumi-
nated to confirm that the electronic
parking brake is applied. The electronic
parking brake indicator light will remain
on for a period of time after the driver’s
door is locked.
CAUTION
When parking in an area where the outside
temperature is below 0°C (32°F ), the park-
ing brake, if applied, may freeze in place
and may be difficult to release.
For safe parking, it is recommended that
you place the shift position in the P (Park)
position and securely block the wheels.
NOTE:
• If a malfunction occurs in the electronic parking brake system (for example, due to
battery discharge), it is recommended that
you visit an INFINITI retailer.
• If the shift position is shifted to the P (Park) position when the brake force is
maintained by the automatic brake hold
function, the electronic parking brake will
apply automatically.
• If the driver’s seat belt is unfastened when the brake force is maintained by the auto-
matic brake hold function, the electronic
parking brake will apply automatically.
• If the ignition switch is placed in the OFF position when the brake force is main-
tained by the automatic brake hold func-
tion, the electronic parking brake will ap-
ply automatically.
• Under the following conditions, the elec- tronic parking brake will automatically be
applied and the brake force of the auto-
matic brake hold will be released:
– The braking force is applied by the auto- matic brake hold function for 3 minutes
or longer.
– The vehicle is placed in the “P” (Park) position.
– The driver’s seat belt is unfastened. – The ignition switch is placed in the
“OFF” position.
– The electronic parking brake is applied.
– If a malfunction occurs in the automatic brake hold function.
MANUAL OPERATION
The electronic parking brake will not be auto-
matically applied if the engine is stopped
without using the ignition switch (for ex-
ample, by engine stalling). In such a case, you
have to apply the parking brake manually.
To apply: Pull the switch up
O1. The indicator
light
OAwill illuminate.
To release: With the ignition switch in the ON
position, depress the brake pedal and push
the switch down
O2. The indicator lightOAwill turn off.
Before driving, check that the electronic
parking brake indicator light (red) (if so
equipped)
orgoes out. For addi-
tional information, see “Warning lights, indi-
cator lights and audible reminders” (P. 2-9).
NOTE:
• A buzzer will sound if the vehicle is driven without releasing the parking brake. For
additional information, see “Warning
lights, indicator lights and audible remind-
ers” (P. 2-9).
5-24Starting and driving