Page 144 of 446
3-66
Convenient features of your vehicle
To reset the information, press and
hold the OK button when viewing the
Accumulated driving info. The trip
distance, the average fuel economy,
and total driving time will reset simul-
taneously.
The accumulated driving information
will continue to be counted while the
engine is still running (for example,
when the vehicle is in traffic or
stopped at a stop light).
Information
The vehicle must be driven for a min-
imum of 0.19 miles (300 meters) since
the last ignition key cycle before the
average fuel economy will be recalcu-
lated.
Drive Info display
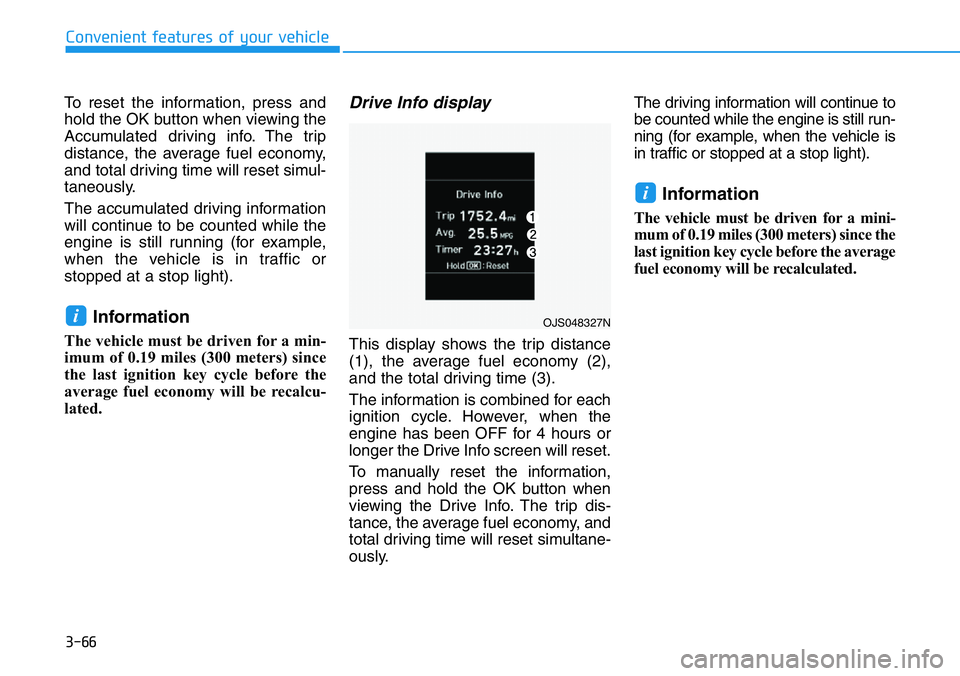
This display shows the trip distance
(1), the average fuel economy (2),
and the total driving time (3).
The information is combined for each
ignition cycle. However, when the
engine has been OFF for 4 hours or
longer the Drive Info screen will reset.
To manually reset the information,
press and hold the OK button when
viewing the Drive Info. The trip dis-
tance, the average fuel economy, and
total driving time will reset simultane-
ously.The driving information will continue to
be counted while the engine is still run-
ning (for example, when the vehicle is
in traffic or stopped at a stop light).
Information
The vehicle must be driven for a mini-
mum of 0.19 miles (300 meters) since the
last ignition key cycle before the average
fuel economy will be recalculated.
i
iOJS048327N
Page 218 of 446
5-24
Driving your vehicle
R (Reverse)
Use this position to drive the vehicle
backward.
Always come to a complete stop
before shifting into or out of R
(Reverse); you may damage the
transmission if you shift into R
(Reverse) while the vehicle is in
motion.
N (Neutral)
The wheels and transmission are not
engaged.
Use N (Neutral) if you need to restart
a stalled engine, or if it is necessary
to stop with the engine ON. Shift into
P (Park) if you need to leave your
vehicle for any reason.
D (Drive)
This is the normal driving position. The
transmission will automatically shift
through a 8-gear sequence, providing
the best fuel economy and power.
For extra power when passing anoth-
er vehicle or driving uphill, depress
the accelerator fully. The transmis-
sion will automatically downshift to
the next lower gear (or gears, as
appropriate).
To stop the vehicle during driving,
Please depress brake pedal fully to
prevent unintended movement.
NOTICE
•Do not shift gear unless your
foot is firmly on the brake
pedal. Shifting into gear when
the engine is running at high
speed can cause the vehicle
to move very rapidly. You
could lose control of the vehi-
cle and hit people or objects.
•Do not drive with the shift
lever in N (Neutral). The
engine brake will not work
and may lead to an accident.
WARNING
Always park the vehicle in P
(Park) for safety and engage the
parking brake.
CAUTION
Page 220 of 446
5-26
Driving your vehicle
In manual shift mode, moving the
shift lever backwards and forwards
will allow you to select the desired
range of gears for the current driving
conditions.
M : Drive mode is shifted to manual
shift mode when shifting lever is
operated at M stage.
Up (+) :Pull the lever backwards
once to shift down one gear.
Down (-) :Push the lever forward
once to shift up one gear.
Information
• If the driver presses the lever to
+(Up) or – (Down) position, the
transmission may not make the
requested gear change if the next
gear is outside of the allowable
engine rpm range. The driver must
execute upshifts in accordance with
road conditions, taking care to keep
the engine rpms below the red zone.
• In manual shift mode, only the 8
forward gears can be selected. To
reverse or park the vehicle, move
the shift lever to the R (Reverse) or
P (Park) position as required, and
only when the vehicle is stopped and
not moving.
• In manual shift mode, downshifts
are made automatically when the
vehicle slows down. When the vehi-
cle stops, 1st gear is automatically
selected.
• To maintain the required levels of
vehicle performance and safety, the
system may not execute certain
gearshifts when the shift lever is
operated.
• In manual shift mode, the fuel effi-
ciency may decrease.While stopping the vehicle by
applying parking brake in D gear,
even if you release the parking
brake, the vehicle may not move.
In this case, you can drive the
vehicle by applying the foot brake
and release, applying the acceler-
ator or shifting the lever (D
→N →
D).
NOTICEi
Page 243 of 446
5-49
Driving your vehicle
5
DRIVE MODE button
The drive mode may be selected
according to the driver's preference
or road condition.
The system resets to be in the NOR-
MAL mode, when the engine is
restarted.The mode changes, whenever the
DRIVE MODE button is pressed.
ECO mode
When the Drive Mode is
set to ECO mode, the
engine and transmission
control logic are changed
to maximize fuel efficiency.
• When the ECO mode is selected by
pressing the DRIVE MODE button,
the ECO indicator will illuminate.
Information
Fuel efficiency depends on the driver's
driving habit and road condition.
i
DRIVE MODE INTEGRATED CONTROL SYSTEM
OPDEN057494
OPDEN047185L
Page 244 of 446
5-50
Driving your vehicle
When ECO mode is activated:
• The acceleration response may be
slightly reduced as the accelerator
pedal is depressed moderately.
• The air conditioner performance
may be limited.
• The engine noise may get louder.
The above situations are normal
conditions when ECO mode is acti-
vated, to improve fuel efficiency.Limitation of ECO mode opera-
tion:
If the following conditions occur while
ECO mode is operating, the system
operation is limited even though
there is no change in ECO indicator.
• When the coolant temperature is
low:
The system will be limited until
engine performance becomes nor-
mal.
• When driving up a hill:
The system will be limited to gain
power when driving uphill because
engine torque is restricted.
The system will be limited due to
the shift location.
• When the accelerator pedal is
deeply depressed for a few sec-
onds:
The system will be limited, judging
that the driver wants to speed up.
SPORT mode
SPORT mode manages
the driving dynamics by
automatically adjusting the
steering effort, the engine
and transmission control
logic for enhanced driving
performance.
• When SPORT mode is selected by
pressing the DRIVE MODE button,
the SPORT indicator will illuminate.
• When SPORT mode is activated:
- The engine rpm will tend to
remain raised over a certain
length of time even after releas-
ing the accelerator
- Upshifts are delayed when accel-
erating
Information
In SPORT mode, the fuel efficiency
may decrease.
i
Page 245 of 446
5-51
Driving your vehicle
5
N button
N mode or CUSTOM mode may be
selected by pressing the N button.
The system resets to be in the NOR-
MAL mode, when the engine is
restarted.The mode changes, whenever the N
button is pressed.
N mode
N mode selects the proper
driving mode among
SPORT and SPORT+ for
each of the components
that will effect the performance of a
high-performance vehicle.
• When N mode is selected by
pressing the N button, the N indi-
cator will illuminate.
• N mode (SPORT/SPORT+) man-
ages the driving dynamics by auto-
matically adjusting the steering
effort, and the engine and trans-
mission control logic for enhanced
driver performance.
• When N mode (SPORT/SPORT+)
is activated:
- The engine rpm will tend to
remain raised over a certain
length of time even after releas-
ing the accelerator
- Upshifts are delayed when accel-
erating
In SPORT/SPORT+ mode, the fuel
efficiency may decrease.
NOTICE
■N mode■N Custom mode
OPDEN047197/OPDEN047198
OPDEN057495
Page 316 of 446
5-122
Driving your vehicle
• Driving too fast through large pud-
dles can affect your brakes. If you
must go through puddles, try to
drive through them slowly.
• If you believe your brakes may be
wet, apply them lightly while driv-
ing until normal braking operation
returns.
Hydroplaning
If the road is wet enough and you are
going fast enough, your vehicle may
have little or no contact with the road
surface and actually ride on the
water. The best advice is SLOW
DOWN when the road is wet.
The risk of hydroplaning increas-
es as the depth of tire tread
decreases, refer to "Tire
Replacement" in chapter 7.
Driving in Flooded Areas
Avoid driving through flooded areas
unless you are sure the water is no
higher than the bottom of the wheel
hub. Drive through any water slowly.
Allow adequate stopping distance
because brake performance may be
reduced.
After driving through water, dry the
brakes by gently applying them sev-
eral times while the vehicle is moving
slowly.
Highway Driving
Tires
Adjust the tire inflation, as specified.
Under-inflation may overheat or
damage the tires.
Do not install worn-out or damaged
tires, which may reduce traction or
adversely affect vehicle handling.
This could lead to sudden tire failure
that may cause loss of vehicle con-
trol resulting in an accident.
Information
Never over-inflate your tires above the
maximum inflation pressure, as speci-
fied on your tires.
Fuel, engine coolant and engine
oil
Driving at higher speeds on the high-
way consumes more fuel and is less
efficient than driving at a slower,
more moderate speed. Maintain a
moderate speed in order to conserve
fuel when driving on the highway.
Be sure to check both the engine
coolant level and the engine oil
before driving.
Drive belt
A loose or damaged drive belt may
overheat the engine.
i
Page 322 of 446
5-128
Driving your vehicle
Two labels on your driver's door sill
show how much weight your vehicle
was designed to carry: the Tire and
Loading Information Label and the
Certification Label.
Before loading your vehicle, familiar-
ize yourself with the following terms
for determining your vehicle's weight
ratings, from the vehicle's specifica-
tions and the Certification Label:
Base Curb Weight
This is the weight of the vehicle
including a full tank of fuel and all
standard equipment. It does not
include passengers, cargo, or option-
al equipment.
Vehicle Curb Weight
This is the weight of your new vehicle
when you picked it up from your deal-
er plus any aftermarket equipment.Cargo Weight
This figure includes all weight added
to the Base Curb Weight, including
cargo and optional equipment.
GAW (Gross Axle Weight)
This is the total weight placed on
each axle (front and rear) - including
vehicle curb weight and all payload.
GAWR (Gross Axle Weight Rating)
This is the maximum allowable
weight that can be carried by a single
axle (front or rear). These numbers
are shown on the Certification Label.
The total load on each axle must
never exceed its GAWR.GVW (Gross Vehicle Weight)
This is the Base Curb Weight plus
actual Cargo Weight plus passen-
gers.
GVWR (Gross Vehicle Weight
Rating)
This is the maximum allowable
weight of the fully loaded vehicle
(including all options, equipment,
passengers and cargo). The GVWR
is shown on the Certification Label
located on the driver’s door sill.
VEHICLE LOAD LIMIT