Page 414 of 446
7-62
Maintenance
Headlamp, Parking lamp,
Daytime Running Light, Turn
signal lamp and Side marker
(1) Headlamp (High)
(2) Headlamp (Low)
(3) Turn signal lamp
(4) Parking lamp &
Daytime running light (DRL)
(5) Side marker
OBU078064N
•Handle halogen bulbs with
care. Halogen bulbs contain
pressurized gas that will pro-
duce flying pieces of glass that
could cause injuries if broken.
•Wear eye protection when
changing a bulb. Allow the
bulb to cool down before han-
dling it.
WARNING
OLMB073042L
•Prior to replacing a lamp,
depress the foot brake, move
the shift lever into N (Neutral)
apply the parking brake, place
the ignition switch to the
LOCK/OFF position, and take
the key with you when leaving
the vehicle to avoid sudden
movement of the vehicle and
to prevent possible electric
shock.
•Be aware the bulbs may be
hot and may burn your fin-
gers.
WARNING
Page 415 of 446

7-63
7
Maintenance
• Always handle them carefully, and
avoid scratches and abrasions. If
the bulbs are lit, avoid contact with
liquids.
• Never touch the glass with bare
hands. Residual oil may cause the
bulb to overheat and burst when lit.
• A bulb should be operated only
when installed in a headlamp.
• If a bulb becomes damaged or
cracked, replace it immediately
and carefully dispose of it.Headlamp (Low beam), side mark-
er, parking lamp and daytime run-
ning light
If the LED lamp does not operate,
have the system be checked by an
authorized HYUNDAI dealer.
The LED lamps cannot be replaced
as a single unit because it is an inte-
grated unit. The LED lamps has to be
replaced with the unit.
A skilled technician should check or
repair the LED lamp, for it may dam-
age related parts of the vehicle.
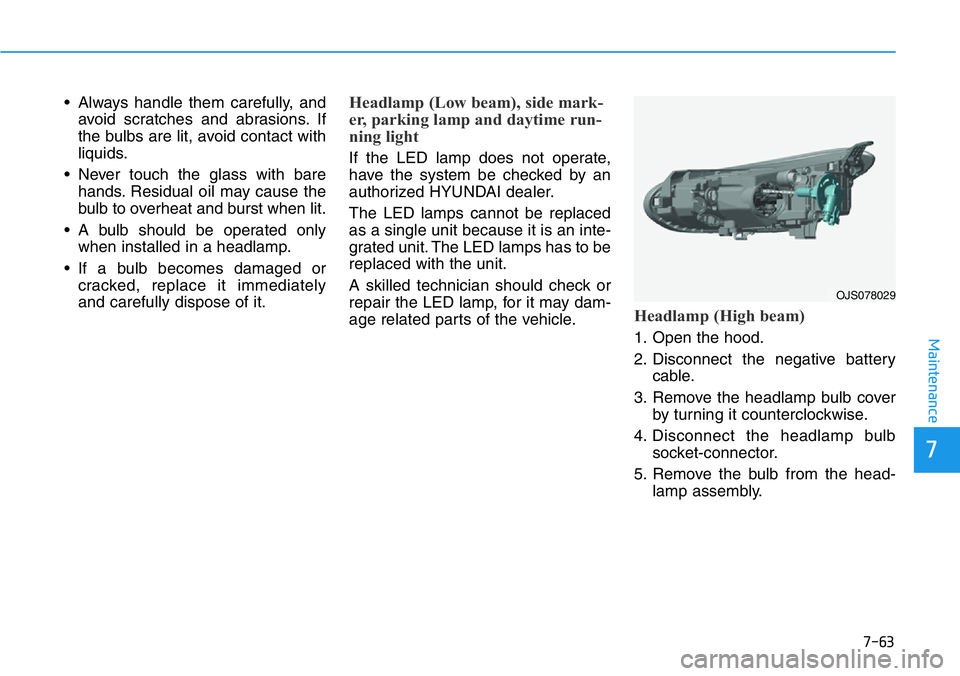
Headlamp (High beam)
1. Open the hood.
2. Disconnect the negative battery
cable.
3. Remove the headlamp bulb cover
by turning it counterclockwise.
4. Disconnect the headlamp bulb
socket-connector.
5. Remove the bulb from the head-
lamp assembly.
OJS078029
Page 416 of 446

7-64
Maintenance
6. Install a new headlamp bulb and
snap the headlamp bulb retaining
wire into position by aligning the
wire with the groove on the bulb.
7. Connect the headlamp bulb sock-
et-connector.
8. Install the headlamp bulb cover by
turning it clockwise.
Information
The headlamp aiming should be
adjusted after an accident or after the
headlamp assembly is reinstalled at an
authorized HYUNDAI dealer.
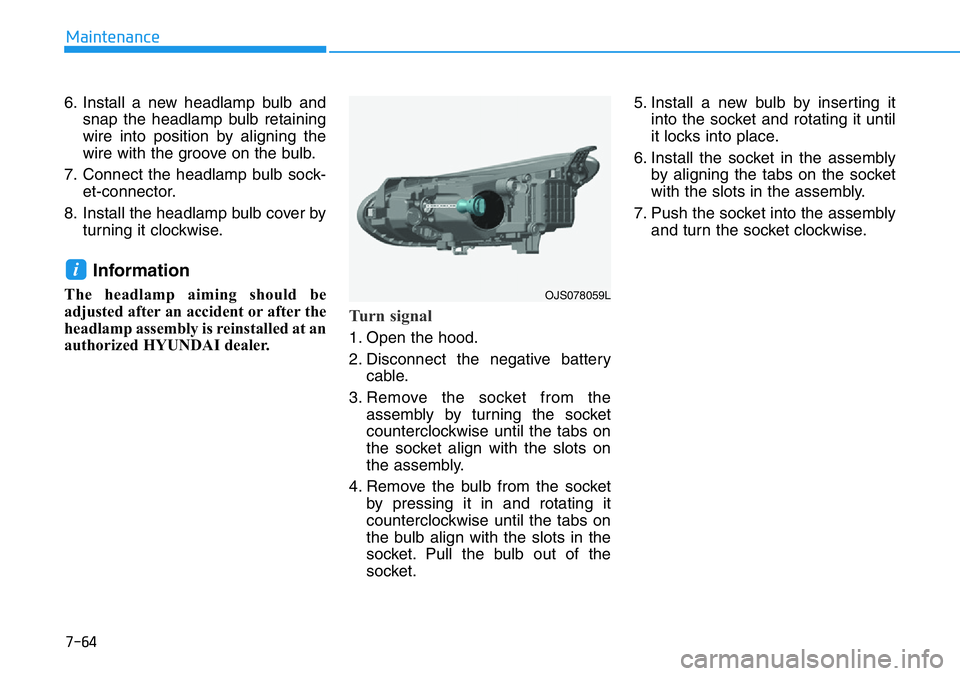
Turn signal
1. Open the hood.
2. Disconnect the negative battery
cable.
3. Remove the socket from the
assembly by turning the socket
counterclockwise until the tabs on
the socket align with the slots on
the assembly.
4. Remove the bulb from the socket
by pressing it in and rotating it
counterclockwise until the tabs on
the bulb align with the slots in the
socket. Pull the bulb out of the
socket.5. Install a new bulb by inserting it
into the socket and rotating it until
it locks into place.
6. Install the socket in the assembly
by aligning the tabs on the socket
with the slots in the assembly.
7. Push the socket into the assembly
and turn the socket clockwise.
i
OJS078059L
Page 417 of 446
7-65
7
Maintenance
Side Repeater Lamp
Replacement
If the light bulb does not operate,
have the vehicle checked by an
authorized HYUNDAI dealer.
Rear Combination Light Bulb
Replacement
(1) Stop/Tail lamp
(2) Turn signal lamp
(3) Backup lamp
(4) Side marker
Side marker and Stop/Tail lamp
light
If the LED lamp does not operate,
have the system be checked by an
authorized HYUNDAI dealer.
The LED lamps cannot be replaced
as a single unit because it is an inte-
grated unit. The LED lamps has to be
replaced with the unit.
A skilled technician should check or
repair the LED lamp, for it may dam-
age related parts of the vehicle.
OJS078030OBU078031N
Page 418 of 446
7-66
Maintenance
Turn signal lamp
1. Open the liftgate.
2. Open the lamp assembly retaining
screw covers.
3. Loosen the lamp assembly retain-
ing screws with a cross-tip screw-
driver.4. Remove the rear combination
lamp assembly from the body of
the vehicle.
5. Remove the socket from the
assembly by turning the socket
counterclockwise until the tabs on
the socket align with the slots on
the assembly.
[A] : Turn signal lamp
6. Remove the bulb from the socket
by pressing it in and rotating it
counterclockwise until the tabs on
the bulb align with the slots in the
socket. Pull the bulb out of the
socket.
7. Insert a new bulb by inserting it
into the socket and rotating it until
it locks into place.
8. Install the socket into the assem-
bly by aligning the tabs on the
socket with the slots in the assem-
bly. Push the socket into the
assembly and turn the socket
clockwise.
9. Reinstall the lamp assembly to the
body of the vehicle.
OJSN078036LOJS078033OJS078032
Page 419 of 446
7-67
7
Maintenance
Backup lamp
1. Turn off the engine.
2. Open the liftgate.
3. Remove the service cover using a
flat-blade screwdriver.
[A] : Backup lamp
4. Remove the socket from the
assembly by turning the socket
counterclockwise until the tabs on
the socket align with the slots on
the assembly.
5. Remove the bulb from the socket
by pressing it in and rotating it
counterclockwise until the tabs on
the bulb align with the slots in the
socket. Pull the bulb out of the
socket.6. Insert a new bulb by inserting it
into the socket and rotating it until
it locks into place.
7. Install the socket into the assem-
bly by aligning the tabs on the
socket with the slots in the assem-
bly. Push the socket into the
assembly and turn the socket
clockwise.
8. Reinstall the lamp assembly to the
body of the vehicle.
OJS078034OJSN078038L
Page 420 of 446
7-68
Maintenance
High Mounted Stop Lamp
Replacement
If the high mounted stop lamp does
not operate, have the vehicle
checked by an authorized HYUNDAI
dealer.
License Plate Light Bulb
Replacement
1. Using a flat-blade screwdriver,
gently pry the lens cover from the
lamp housing.
2. Remove the bulb by pulling it
straight out.
3. Install a new bulb.
4. Reinstall in the reverse order.
Interior Light Bulb
Replacement
Map lamp and room lamp
Your vehicle is equipped with LED
lamps. LED lamps do not have
replacement bulbs. If the LED lamp
does not operate, we recommend
that you have the vehicle inspected
by an authorized HYUNDAI dealer.
OJS078040OJSN078039OAEE076026
OAEE076027
Page 421 of 446
7-69
7
Maintenance
1. Using a flat-head screwdriver,
gently pry the lens from the interi-
or light housing.
2. Remove the bulb by pulling it
straight out.
3. Install a new bulb in the socket.
4. Align the lens tabs with the interior
light housing notches and snap
the lens into place.
Be careful not to damage the
cover, tab, and plastic housing.
NOTICE
Prior to working on the Interior
Lights, ensure that the "OFF"
button is depressed to avoid
burning your fingers or receiv-
ing an electric shock.
WARNING
Map lamp, room lamp, vanity mirror lamp and luggage compartment lamp
OOS077053
■Map lamp
OOS077054
■Room lamp
OJS078041
■Vanity mirror lamp
OBU078042N
■Luggage compartment lamp