2022 HYUNDAI VELOSTER N wheel
[x] Cancel search: wheelPage 348 of 446
![HYUNDAI VELOSTER N 2022 Owners Manual 6-21
What to do in an emergency
6
Towing Service
[A] : Dollies
If emergency towing is necessary,
we recommend having it done by an
authorized HYUNDAI dealer or a
commercial tow-truck service.
Proper l HYUNDAI VELOSTER N 2022 Owners Manual 6-21
What to do in an emergency
6
Towing Service
[A] : Dollies
If emergency towing is necessary,
we recommend having it done by an
authorized HYUNDAI dealer or a
commercial tow-truck service.
Proper l](/manual-img/35/41174/w960_41174-347.png)
6-21
What to do in an emergency
6
Towing Service
[A] : Dollies
If emergency towing is necessary,
we recommend having it done by an
authorized HYUNDAI dealer or a
commercial tow-truck service.
Proper lifting and towing procedures
are necessary to prevent damage to
the vehicle. The use of wheel dollies
or flatbed is recommended.On FWD vehicles, it is acceptable to
tow the vehicle with the rear wheels
on the ground (without dollies) and
the front wheels off the ground. If any
of the loaded wheels or suspension
components are damaged or the
vehicle is being towed with the front
wheels on the ground, use a towing
dolly under the front wheels.
When being towed by a commercial
tow truck and wheel dollies are not
used, the front of the vehicle should
always be lifted, not the rear.
TOWING
•Do not tow the vehicle with the
front wheels on the ground as
this may cause damage to the
vehicle.
•Do not tow with sling-type
equipment. Use a wheel lift or
flatbed equipment.
CAUTION
OJSN068008L
OJSN068015
OJSN068014
Page 349 of 446

6-22
What to do in an emergency
When towing your vehicle in an
emergency without wheel dollies:
1. Place the ignition switch in the
ACC position.
2. Place the shift lever in N (Neutral).
3. Release the parking brake.
Dinghy towing
Your vehicle is not designed to be
dinghy towed (with 4 wheels on the
ground) behind a motor home. To
avoid serious damage to your vehi-
cle, do not tow your vehicle with four
wheels on the ground.
Removable Towing Hook
If your vehicle is equipped with
a rollover sensor, place the igni-
tion switch in the LOCK/OFF or
ACC position when the vehicle
is being towed. The side impact
and curtain air bag may deploy
if the sensor detects the situa-
tion as a rollover.
WARNING
Failure to place the shift lever in
N (Neutral) when being towed
with the front wheels on the
ground can cause internal dam-
age to the transmission.
CAUTION
OBU068032NOBU068029N
OBU068016N
■Front
Page 350 of 446

6-23
What to do in an emergency
6
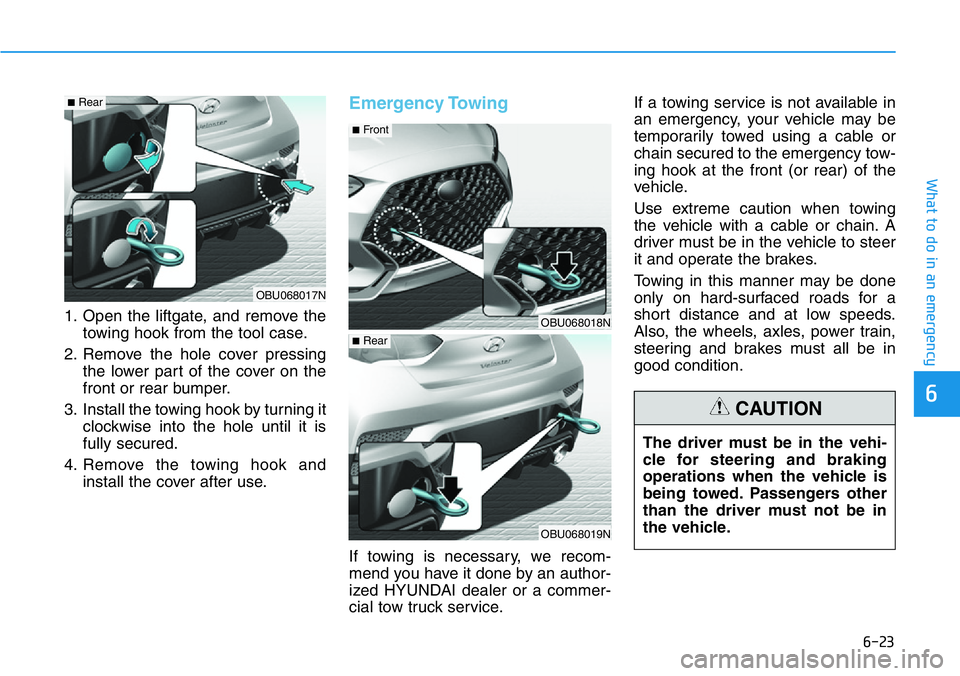
1. Open the liftgate, and remove the
towing hook from the tool case.
2. Remove the hole cover pressing
the lower part of the cover on the
front or rear bumper.
3. Install the towing hook by turning it
clockwise into the hole until it is
fully secured.
4. Remove the towing hook and
install the cover after use.
Emergency Towing
If towing is necessary, we recom-
mend you have it done by an author-
ized HYUNDAI dealer or a commer-
cial tow truck service.If a towing service is not available in
an emergency, your vehicle may be
temporarily towed using a cable or
chain secured to the emergency tow-
ing hook at the front (or rear) of the
vehicle.
Use extreme caution when towing
the vehicle with a cable or chain. A
driver must be in the vehicle to steer
it and operate the brakes.
Towing in this manner may be done
only on hard-surfaced roads for a
short distance and at low speeds.
Also, the wheels, axles, power train,
steering and brakes must all be in
good condition.
OBU068017N
■Rear
OBU068018N
OBU068019N
■Front
■Rear
The driver must be in the vehi-
cle for steering and braking
operations when the vehicle is
being towed. Passengers other
than the driver must not be in
the vehicle.
CAUTION
Page 351 of 446

6-24
What to do in an emergency
Always follow these emergency tow-
ing precautions:
• Place the ignition switch in the
ACC position so the steering wheel
is not locked. (if equipped)
• Place the shift lever in N (Neutral).
• Release the parking brake.
• Depress the brake pedal with more
force than normal since you will
have reduced braking perform-
ance.
• More steering effort will be
required because the power steer-
ing system will be disabled.
• Use a vehicle heavier than your
own to tow your vehicle.
• The drivers of both vehicles should
communicate with each other fre-
quently.
• Before emergency towing, check
that the hook is not broken or dam-
aged.
• Fasten the towing cable or chain
securely to the hook.
• Do not jerk the hook. Apply steady
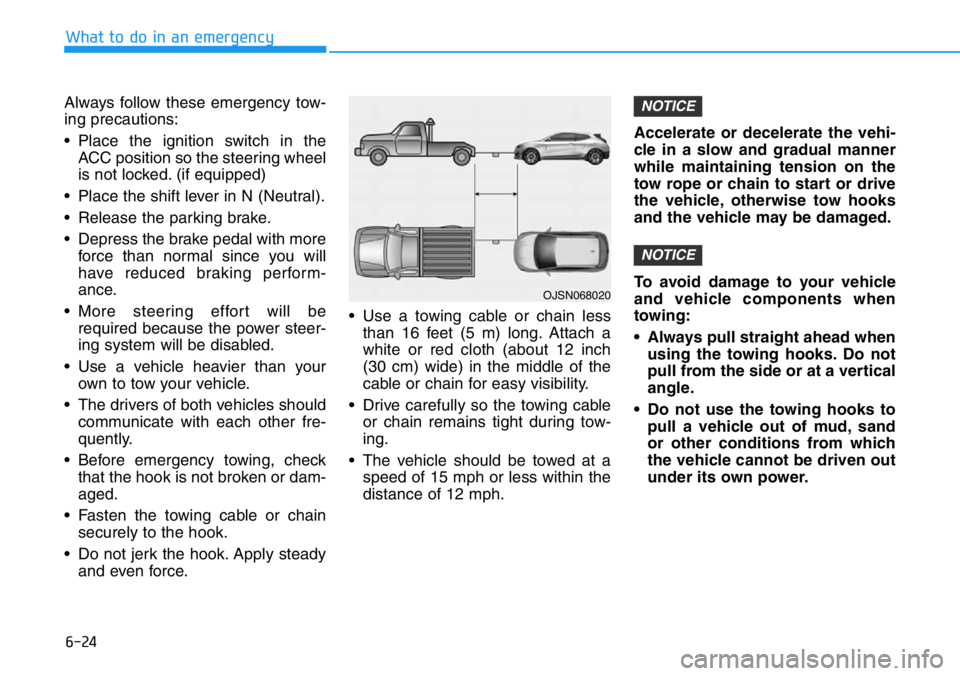
and even force.• Use a towing cable or chain less
than 16 feet (5 m) long. Attach a
white or red cloth (about 12 inch
(30 cm) wide) in the middle of the
cable or chain for easy visibility.
• Drive carefully so the towing cable
or chain remains tight during tow-
ing.
• The vehicle should be towed at a
speed of 15 mph or less within the
distance of 12 mph.Accelerate or decelerate the vehi-
cle in a slow and gradual manner
while maintaining tension on the
tow rope or chain to start or drive
the vehicle, otherwise tow hooks
and the vehicle may be damaged.
To avoid damage to your vehicle
and vehicle components when
towing:
• Always pull straight ahead when
using the towing hooks. Do not
pull from the side or at a vertical
angle.
• Do not use the towing hooks to
pull a vehicle out of mud, sand
or other conditions from which
the vehicle cannot be driven out
under its own power.
NOTICE
NOTICE
OJSN068020
Page 353 of 446

7
Maintenance
7
Maintenance
Engine Compartment .............................................7-3
Maintenance Services ...........................................7-4
Owner's Responsibility .....................................................7-4
Owner Maintenance Precautions..................................7-4
Owner Maintenance ..............................................7-5
Owner Maintenance Schedule .......................................7-6
Scheduled Maintenance Services........................7-7
Normal Maintenance Schedule ......................................7-8
Maintenance Under Severe Usage Conditions ........7-11
Explanation of Scheduled Maintenance
Items ......................................................................7-13
Engine Oil ..............................................................7-16
Checking the Engine Oil Level .....................................7-16
Checking the Engine Oil and Filter .............................7-17
Engine Coolant .....................................................7-18
Checking the Engine Coolant Level ............................7-18
Changing Engine Coolant ..............................................7-21
Brake/Clutch Fluid ...............................................7-22
Checking the brake/clutch Fluid Level ......................7-22
Washer Fluid .........................................................7-23
Checking the Washer Fluid Level................................7-23
Parking Brake .......................................................7-23
Checking the Parking Brake .........................................7-23
Air Cleaner ............................................................7-24
Filter Replacement ..........................................................7-24
Climate Control Air Filter ....................................7-25
Filter Inspection ...............................................................7-25
Wiper Blades.........................................................7-26
Blade Inspection ..............................................................7-26
Blade Replacement .........................................................7-26
Battery...................................................................7-29
For Best Battery Service ..............................................7-30
Battery Recharging ........................................................7-30
Reset Features.................................................................7-31
Tires and Wheels .................................................7-32
Tire Care ............................................................................7-33
Recommended Cold Tire Inflation Pressures ...........7-33
Check Tire Inflation Pressure ......................................7-34
Tire Rotation.....................................................................7-35
Wheel Alignment and Tire Balance ............................7-36
Tire Replacement ............................................................7-36
Wheel Replacement ........................................................7-37
Tire Traction .....................................................................7-37
Tire Maintenance ............................................................7-37
Tire Sidewall Labeling ....................................................7-37
7
Page 358 of 446

7-6
Maintenance
Owner Maintenance Schedule
When you stop for fuel:
• Check the coolant level in the
engine coolant reservoir.
• Check the windshield washer fluid
level.
• Check the for low or under-inflated
tires.
While operating your vehicle:
• Note any changes in the sound of
the exhaust or any smell of
exhaust fumes in the vehicle.
• Check for vibrations in the steering
wheel. Notice if there is any
increased steering effort or loose-
ness in the steering wheel, or
change in its straight-ahead posi-
tion.
• Notice if your vehicle constantly
turns slightly or "pulls" to one side
when traveling on smooth, level
road.
• When stopping, listen and check
for unusual sounds, pulling to one
side, increased brake pedal travel
or "hard-to-push" brake pedal.
• If any slipping or changes in the
operation of your transmission
occurs, check the transmission
fluid level.
• Check the parking brake.
• Check for fluid leaks under your
vehicle (water dripping from the air
conditioning system during or after
use is normal).
At least monthly:
• Check coolant level in the engine
coolant reservoir.
• Check the operation of all exterior
lights, including the brake lights,
turn signals and hazard warning
flashers.
• Check the inflation pressures of all
tires including the spare for tires
that are worn, show uneven wear,
or are damaged.
• Check for loose wheel lug nuts.
At least twice a year:
(i.e., every Spring and Autumn)
• Check radiator, heater and air con-
ditioning hoses for leaks or dam-
age.
• Check windshield washer spray
and wiper operation. Clean wiper
blades with a clean cloth damp-
ened with washer a fluid.
• Check headlamp alignment.
• Check muffler, exhaust pipes,
shields and clamps.
• Check the seat belts for wear and
function. Be careful when checking your
engine coolant level when the
engine is hot. This may result in
coolant being blown out of the
opening and cause serious
burns and other injuries.
WARNING
Page 367 of 446

7-15
7
Maintenance
Manual Transmission Fluid
Inspect the manual transmission
fluid according to the maintenance
schedule.
Brake Hoses and Lines
Visually check for proper installation,
chafing, cracks, deterioration and
any leakage. Replace any deteriorat-
ed or damaged parts immediately.
Brake/Clutch Fluid
Check the brake/clutch fluid level in
the brake/clutch fluid reservoir. The
level should be between the MIN and
the MAX marks on the side of the
reservoir. Use only hydraulic
brake/clutch fluid conforming to DOT
3 or DOT 4 specification.
Parking Brake
Inspect the parking brake system
including the parking brake pedal
and cables.
Brake Discs, Pads, Calipers
and Rotors
Check the pads for excessive wear,
discs for run out and wear, and
calipers for fluid leakage.
Exhaust Pipe and Muffler
Visually inspect the exhaust pipes,
muffler and hangers for cracks, dete-
rioration, or damage. Start the engine
and listen carefully for any exhaust
gas leakage. Tighten connections or
replace parts as necessary.
Suspension Mounting Bolts
Check the suspension connections
for looseness or damage. Retighten
to the specified torque.
Steering Gear Box, Linkage &
Boots/Lower Arm Ball Joint
With the vehicle stopped and the
engine off, check for excessive free-
play in the steering wheel. Check the
linkage for bends or damage. Check
the dust boots and ball joints for
deterioration, cracks, or damage.
Replace any damaged parts.
Drive Shafts and Boots
Check the drive shafts, boots and
clamps for cracks, deterioration, or
damage. Replace any damaged
parts and, if necessary, repack the
grease.
Air Conditioning Refrigerant
Check the air conditioning lines and
connections for leakage and dam-
age.
Page 368 of 446

7-16
Maintenance
ENGINE OIL
Checking the Engine Oil Level
Engine oil is used for lubricating,
cooling, and operating various
hydraulic components in the engine.
Engine oil consumption while driving
is normal, and it is necessary to
check and refill the engine oil regu-
larly. Also, check and refill the oil
level within the recommended main-
tenance schedule to prevent deterio-
ration of oil performance. Check the
engine oil following the below proce-
dure.
1. Follow all of the oil manufacturer's
precautions.
2. Be sure the vehicle is on the level
ground in P (Park) with the park-
ing brake set and the wheels
blocked.
3. Turn the engine on and warm the
engine up until the coolant tem-
perature reaches a constant nor-
mal temperature.
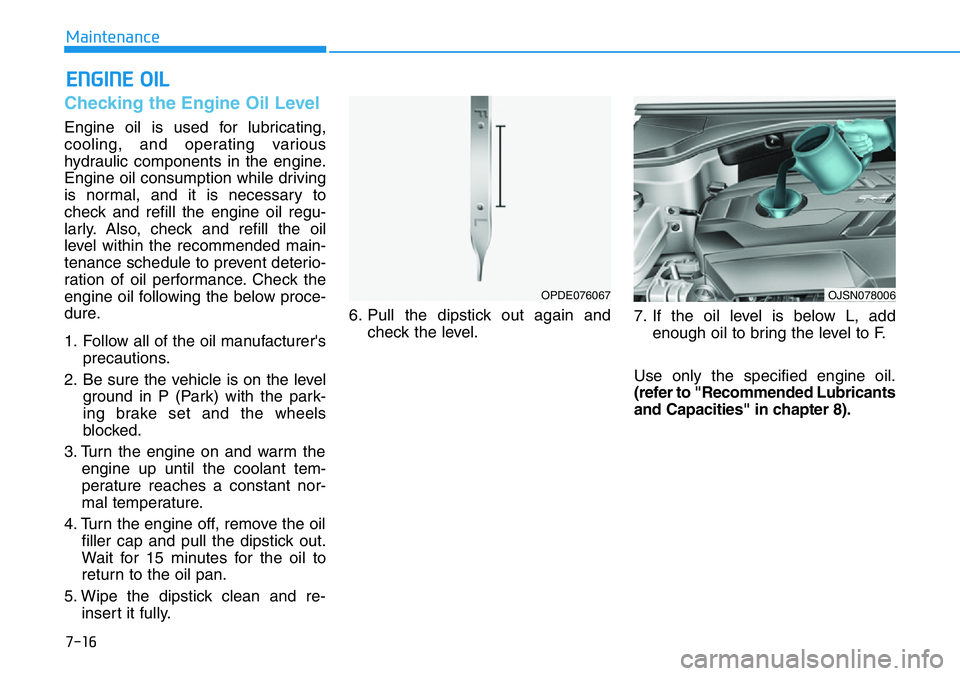
4. Turn the engine off, remove the oil
filler cap and pull the dipstick out.
Wait for 15 minutes for the oil to
return to the oil pan.
5. Wipe the dipstick clean and re-
insert it fully.6. Pull the dipstick out again and
check the level.7. If the oil level is below L, add
enough oil to bring the level to F.
Use only the specified engine oil.
(refer to "Recommended Lubricants
and Capacities" in chapter 8).
OPDE076067OJSN078006