2022 HYUNDAI TUCSON steering wheel lever
[x] Cancel search: steering wheel leverPage 16 of 638

2-4
Vehicle Information, Consumer Information and Reporting Safety Defects
1. Inside door handle ................................5-33
2. Power window switches ......................5-55
3. Power window lock button ..................5-58
4. Outside rearview mirror control
switch
....................................................5-54
5. Driver door lock switch ........................5-34
6. Instrument panel illumination control
switch
......................................................4-5
7. Power liftgate button ...........................5-69
8. ESC OFF button ....................................6-35
9. Steering wheel ......................................5-40
10. Steering wheel tilt/telescopic lever .....5-41
11. Fuse box ................................................9-45
12. Hood release lever ................................5-65
13. Seat ..........................................................3-3
INTERIOR OVERVIEW
„„Type A
The actual shape may differ from the illustration.
ONX4010003N
Page 17 of 638

2-5
02
1. Inside door handle ................................5-33
2. Power window switches ......................5-55
3. Power window lock button ..................5-58
4. Outside rearview mirror control
switch
....................................................5-54
5. Driver door lock switch ........................5-34
6. Instrument panel illumination control
switch
......................................................4-5
7. Power liftgate button ...........................5-69
8. ESC OFF button ....................................6-35
9. Steering wheel ......................................5-40
10. Steering wheel tilt/telescopic lever .....5-41
11. Fuse box ................................................9-45
12. Hood release lever ................................5-65
13. Seat ..........................................................3-3
„„Type B
The actual shape may differ from the illustration.
ONX4010010N
Page 19 of 638

2-7
02
1. Instrument cluster ..................................4-4
2. Driver’s front air bag .............................3-48
3. Engine Start/Stop button .......................6-8
4. Infotainment system ...........................5-136
5. Hazard warning lamp switch .................8-2
6. Climate control system .............5-94/5-103
7. Air ventilation seat ................................3-20
8. Seat warmer ...........................................3-18
9. Heated steering wheel ..........................5-41
10. DBC button ...........................................6-40
11. Parking Safety button ...........................7-137
12. Parking/View button ............................7-113
13. Transmission shift lever .........................6-14
14. EPB (Electronic Parking Brake)
switch ....................................................6-26
15. Auto Hold switch ..................................6-30
16. Drive mode button ...............................6-49
17. AWD lock button ..................................6-52
18. ISG (Idle Stop and Go) OFF button ......6-44
19. Passenger’s front air bag .....................3-48
20. Glove box .............................................5-124
21. USB port ...............................................5-136
22. Power outlet .........................................5-126
23. USB charger .........................................5-127
24. Wireless charging system pad ............5-128
„„Type B
The actual shape may differ from the illustration.
ONX4010012N
Page 37 of 638

Seats & Safety System
3-6
Manual adjustment
The front seat can be adjusted by using
the levers located underneath the seat
cushion. Before driving, adjust the seat
to the proper position so that you can
easily control the steering wheel, foot
pedals and controls on the instrument
panel.
ONX4030002
Forward and rearward adjustment
To move the seat forward or rearward:
1. Pull up the seat slide adjustment lever
and hold it.
2. Slide the seat to the position you
desire.
3. Release the lever and make sure the
seat is locked in place. Move forward
and rearward without using the lever.
If the seat moves, it is not locked
properly.
ONX4030003
Seatback angle
To recline the seatback:
1. Lean forward slightly and lift up the
seatback lever.
2. Carefully lean back on the seat and
adjust the seatback to the position
you desire.
3. Release the knob and make sure the
seatback is locked in place.
Reclining seatback
Sitting in a reclined position when the
vehicle is in motion can be dangerous.
Even when buckled up, the protections
of your restraint system (seat belts
and/or air bags) is greatly reduced by
reclining your seatback.
WARNING
NEVER ride with a reclined seatback
when the vehicle is moving.
Riding with a reclined seatback
increases your chance of serious or fatal
injuries in the event of a collision or
sudden stop.
Drivers and passengers should ALWAYS
sit well back in their seats, properly
belted, and with the seatbacks upright.
Page 38 of 638

03
3 -7
Seat belts must be snug against your
hips and chest to work properly. When
the seatback is reclined, the shoulder
belt cannot do its job because it will not
be snug against your chest. Instead,
it will be in front of you. During an
accident, you could be thrown into the
seat belt, causing neck or other injuries.
The more the seatback is reclined,
the greater chance the passenger’s
hips will slide under the lap belt or the
passenger’s neck will strike the shoulder
belt.
ONX4030004
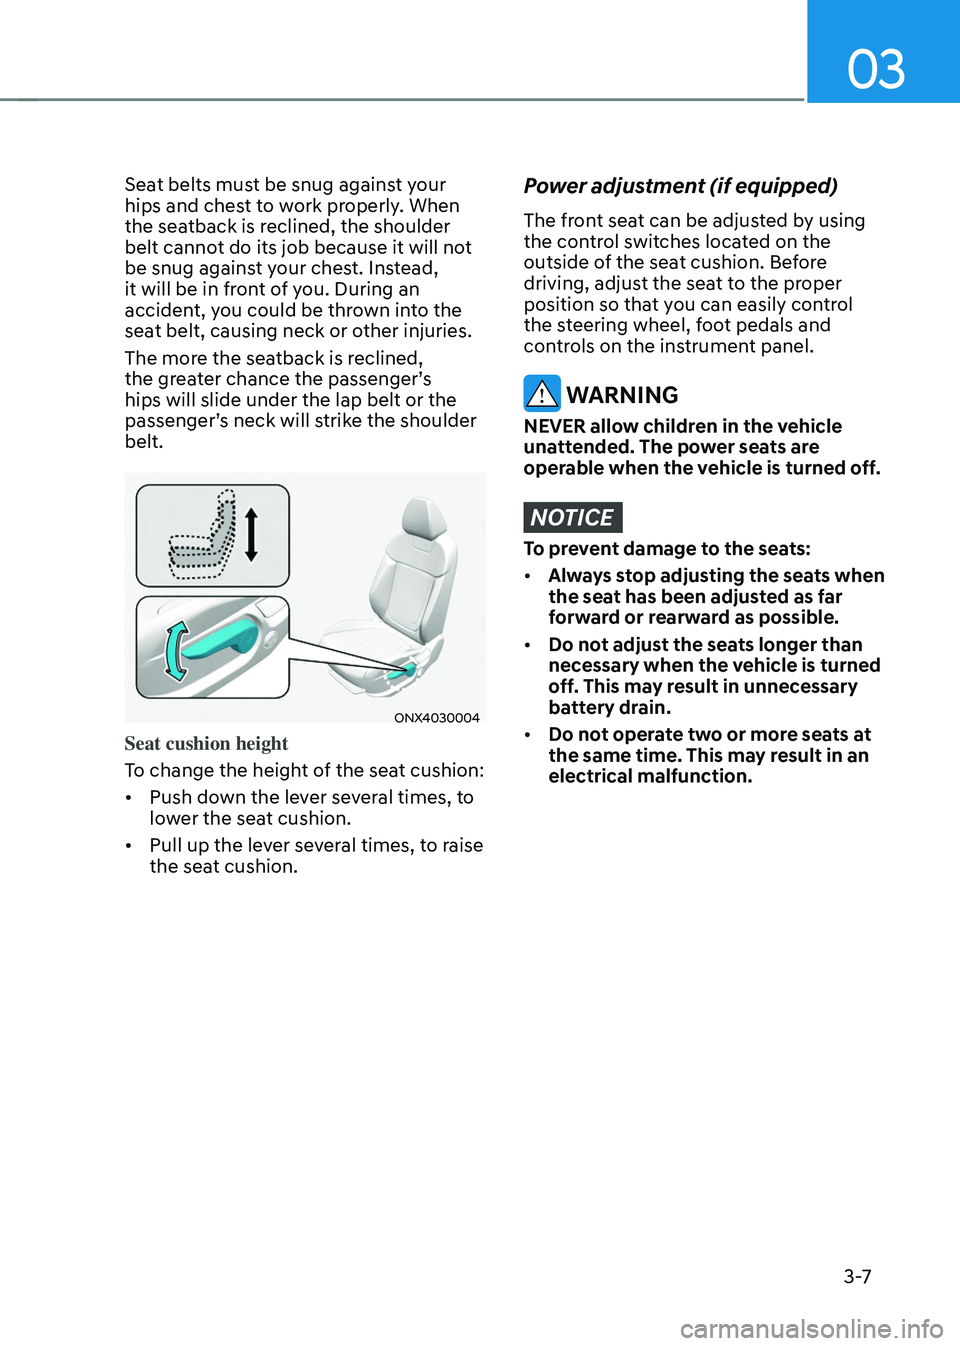
Seat cushion height
To change the height of the seat cushion:
• Push down the lever several times, to
lower the seat cushion.
• Pull up the lever several times, to raise
the seat cushion.
Power adjustment (if equipped)
The front seat can be adjusted by using
the control switches located on the
outside of the seat cushion. Before
driving, adjust the seat to the proper
position so that you can easily control
the steering wheel, foot pedals and
controls on the instrument panel.
WARNING
NEVER allow children in the vehicle
unattended. The power seats are
operable when the vehicle is turned off.
NOTICE
To prevent damage to the seats:
• Always stop adjusting the seats when
the seat has been adjusted as far
forward or rearward as possible.
• Do not adjust the seats longer than
necessary when the vehicle is turned
off. This may result in unnecessary
battery drain.
• Do not operate two or more seats at
the same time. This may result in an
electrical malfunction.
Page 185 of 638

05
5-41
Tilt / Telescopic steering
When adjusting the steering wheel to a
comfortable position, adjust the steering
wheel so that it points toward your chest,
not toward your face. Make sure you can
see the instrument cluster warning lights
and gauges. After adjusting, push the
steering wheel both up and down to be
certain it is locked in position.
Always adjust the position of the steering
wheel before driving.
WARNING
NEVER adjust the steering wheel while
driving. This may cause loss of vehicle
control resulting in an accident.
ONX4050070
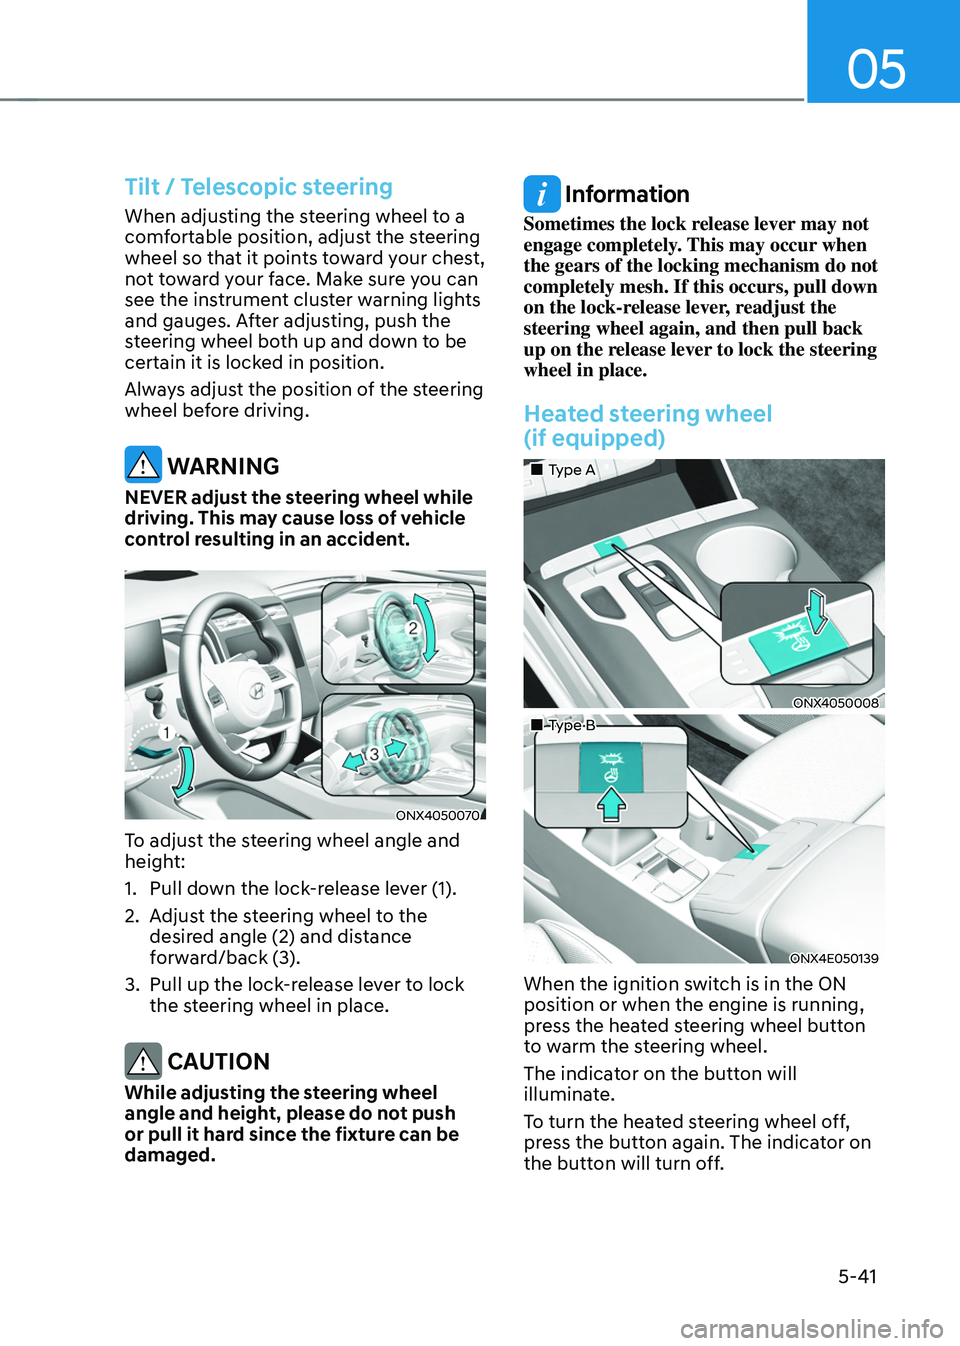
To adjust the steering wheel angle and
height:
1. Pull down the lock-release lever (1).
2. Adjust the steering wheel to the
desired angle (2) and distance
forward/back (3).
3. Pull up the lock-release lever to lock
the steering wheel in place.
CAUTION
While adjusting the steering wheel
angle and height, please do not push
or pull it hard since the fixture can be
damaged.
Information
Sometimes the lock release lever may not
engage completely. This may occur when
the gears of the locking mechanism do not
completely mesh. If this occurs, pull down
on the lock-release lever, readjust the
steering wheel again, and then pull back
up on the release lever to lock the steering
wheel in place.
Heated steering wheel
(if equipped)
„„Type A
ONX4050008
„„Type B
ONX4E050139
When the ignition switch is in the ON
position or when the engine is running,
press the heated steering wheel button
to warm the steering wheel.
The indicator on the button will
illuminate.
To turn the heated steering wheel off,
press the button again. The indicator on
the button will turn off.
Page 290 of 638

06
6-5
WARNING
To reduce the risk of SERIOUS INJURY or
DEATH, take the following precautions:
• NEVER allow children or any person
who is unfamiliar with the vehicle to
touch the ignition switch or related
parts. Unexpected and sudden
vehicle movement can occur.
• NEVER reach through the steering
wheel for the ignition switch, or any
other control, while the vehicle is in
motion. The presence of your hand
or arm in this area may cause a loss
of vehicle control resulting in an
accident.
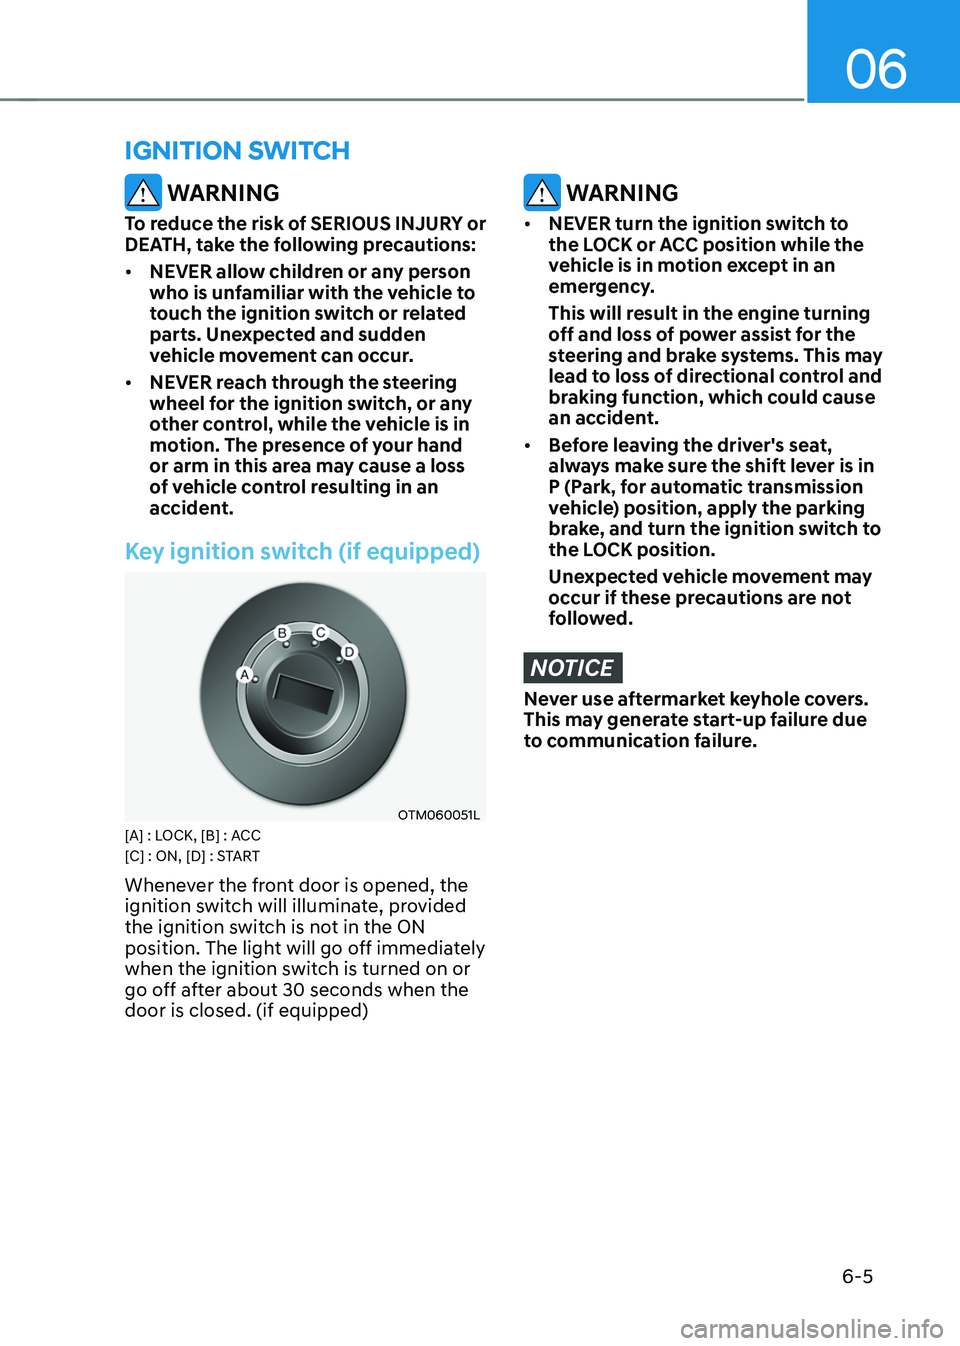
Key ignition switch (if equipped)
OTM060051L[A] : LOCK, [B] : ACC
[C] : ON, [D] : START
Whenever the front door is opened, the
ignition switch will illuminate, provided
the ignition switch is not in the ON
position. The light will go off immediately
when the ignition switch is turned on or
go off after about 30 seconds when the
door is closed. (if equipped)
WARNING
• NEVER turn the ignition switch to
the LOCK or ACC position while the
vehicle is in motion except in an
emergency.
This will result in the engine turning
off and loss of power assist for the
steering and brake systems. This may
lead to loss of directional control and
braking function, which could cause
an accident.
• Before leaving the driver's seat,
always make sure the shift lever is in
P (Park, for automatic transmission
vehicle) position, apply the parking
brake, and turn the ignition switch to
the LOCK position.
Unexpected vehicle movement may
occur if these precautions are not
followed.
NOTICE
Never use aftermarket keyhole covers.
This may generate start-up failure due
to communication failure.
IGNITION SWITCH
Page 302 of 638

06
6-17
4. Press and hold the OK button on
the steering wheel for more than 1
second.
5. When the message ‘Vehicle will stay in
(N). Change gear to cancel’ (or ‘N will
stay engaged when the vehicle is Off’)
will appear on the cluster LCD display,
press the Engine Start/Stop button
while depressing the brake pedal.
However, if you open the driver's
door, the gear will automatically
shift to P (Park) and the Engine Start/
Stop button will change to the OFF
position.
NOTICE
With the gear in N (Neutral) the Engine
Start/Stop button will be in the ACC
position. Note that the doors cannot be
locked in the ACC position. The battery
may discharge if left in the ACC position
for a long period.
D (Drive)
This is the normal driving position. The
transmission will automatically shift
through an 8-gear sequence, providing
the best fuel economy and power.
To start the vehicle forward, push the D
(Drive) button by depressing the brake
pedal with the engine ON. (button type)
Then depress the accelerator pedal
smoothly.
For extra power when passing another
vehicle or driving uphill, depress the
accelerator fully. The transmission will
automatically downshift to the next
lower gear (or gears, as appropriate).
When the vehicle is stopped in D (Drive)
position, if you open the driver’s door
with the seat belt unfastened, the gear is
shifted to P (Park) position automatically.
(button type)
However while the vehicle is moving in D
(Drive) position, if you open the driver’s
door with the seat belt unfastened, the
gear may not shift to P (Park) position
automatically to protect the automatic
transmission.
The DRIVE MODE switch, located on the
shift lever console, allows the driver to
switch from NORMAL/COMFORT mode
to SPORT. (if equipped)
For more Details, refer to "Drive Mode
Integrated Control System" later in this
chapter.