2022 HYUNDAI TUCSON brake
[x] Cancel search: brakePage 163 of 638
05
5-19
Start-up with Digital Key
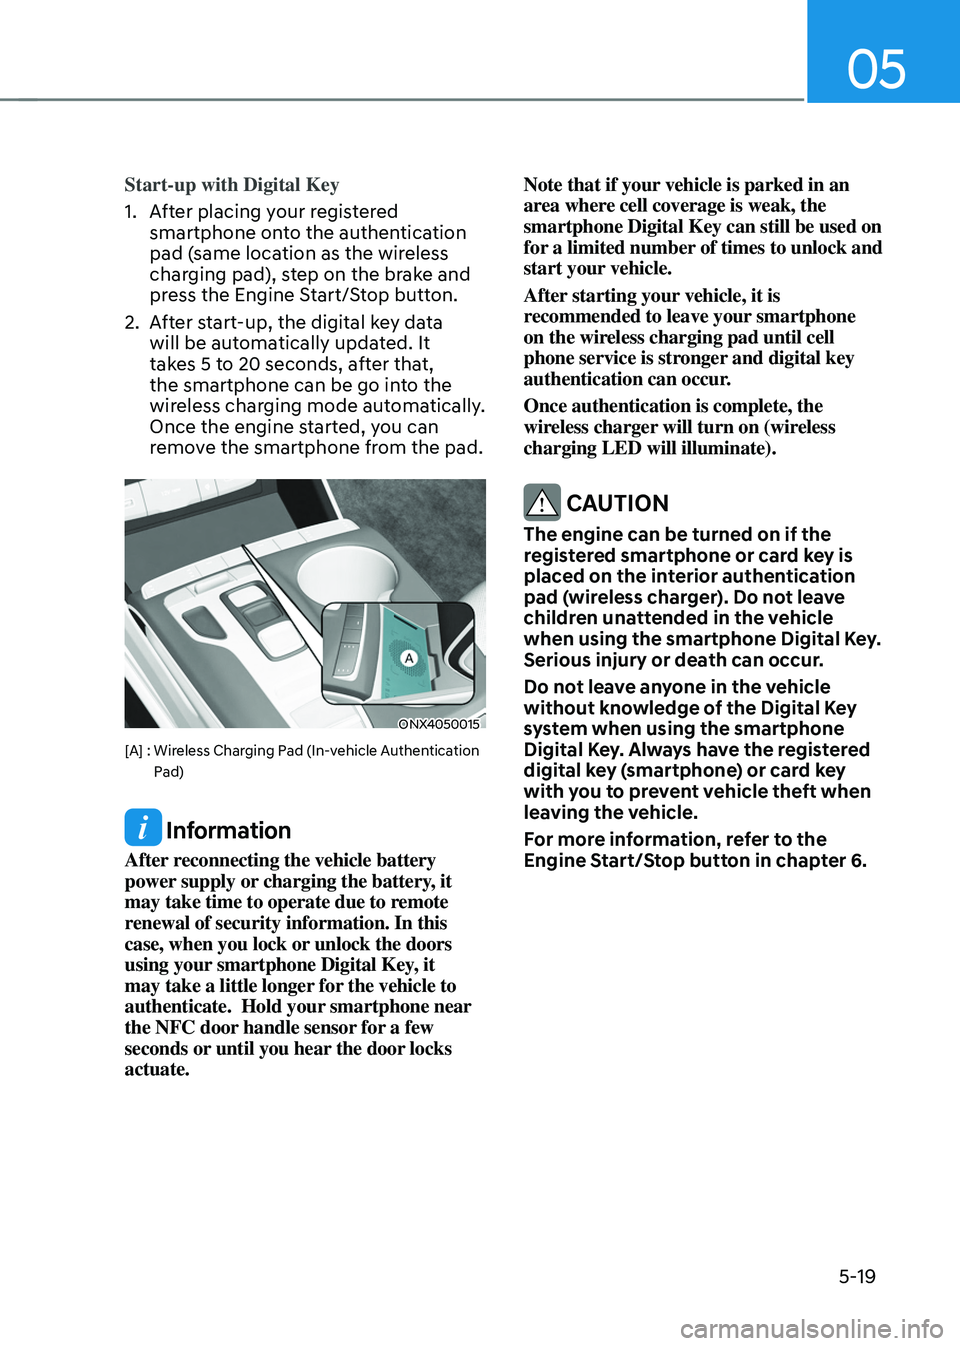
1. After placing your registered
smartphone onto the authentication
pad (same location as the wireless
charging pad), step on the brake and
press the Engine Start/Stop button.
2. After start-up, the digital key data
will be automatically updated. It
takes 5 to 20 seconds, after that,
the smartphone can be go into the
wireless charging mode automatically.
Once the engine started, you can
remove the smartphone from the pad.
ONX4050015
[A] : Wireless Charging Pad (In-vehicle Authentication Pad)
Information
After reconnecting the vehicle battery
power supply or charging the battery, it
may take time to operate due to remote
renewal of security information. In this
case, when you lock or unlock the doors
using your smartphone Digital Key, it
may take a little longer for the vehicle to
authenticate. Hold your smartphone near
the NFC door handle sensor for a few
seconds or until you hear the door locks
actuate. Note that if your vehicle is parked in an
area where cell coverage is weak, the
smartphone Digital Key can still be used on
for a limited number of times to unlock and
start your vehicle.
After starting your vehicle, it is
recommended to leave your smartphone
on the wireless charging pad until cell
phone service is stronger and digital key
authentication can occur.
Once authentication is complete, the
wireless charger will turn on (wireless
charging LED will illuminate).
CAUTION
The engine can be turned on if the
registered smartphone or card key is
placed on the interior authentication
pad (wireless charger). Do not leave
children unattended in the vehicle
when using the smartphone Digital Key.
Serious injury or death can occur.
Do not leave anyone in the vehicle
without knowledge of the Digital Key
system when using the smartphone
Digital Key. Always have the registered
digital key (smartphone) or card key
with you to prevent vehicle theft when
leaving the vehicle.
For more information, refer to the
Engine Start/Stop button in chapter 6.
Page 171 of 638
05
5-27
Start-up with Card key
After placing your registered card key
onto the interior authentication pad
(wireless charger), step on the brake and
press the Engine Start/Stop button.
WARNING
• If you do not place the digital key
(card key) onto the center of the
interior authentication pad (wireless
charger) exactly, the card key may
not be recognized. If the engine is
not turned on, adjust and place the
key again.
• If you overlap and use the key
with NFC-enabled cards such as
transportation card or credit card,
the card key may not be recognized.
• If the digital key (card key) does not
work, please detach the key around
4 inches (0.1 m) from the handle
authentication pad and retry to
contact.
• The card key may be damaged due to
impact. It would not work properly if
the key is damaged. You should buy a
new card and register again.
For more information, refer to the
Engine Start/Stop button in chapter 6.
„„Type A
ODN8A059133
„„Type B
ODN8A059247
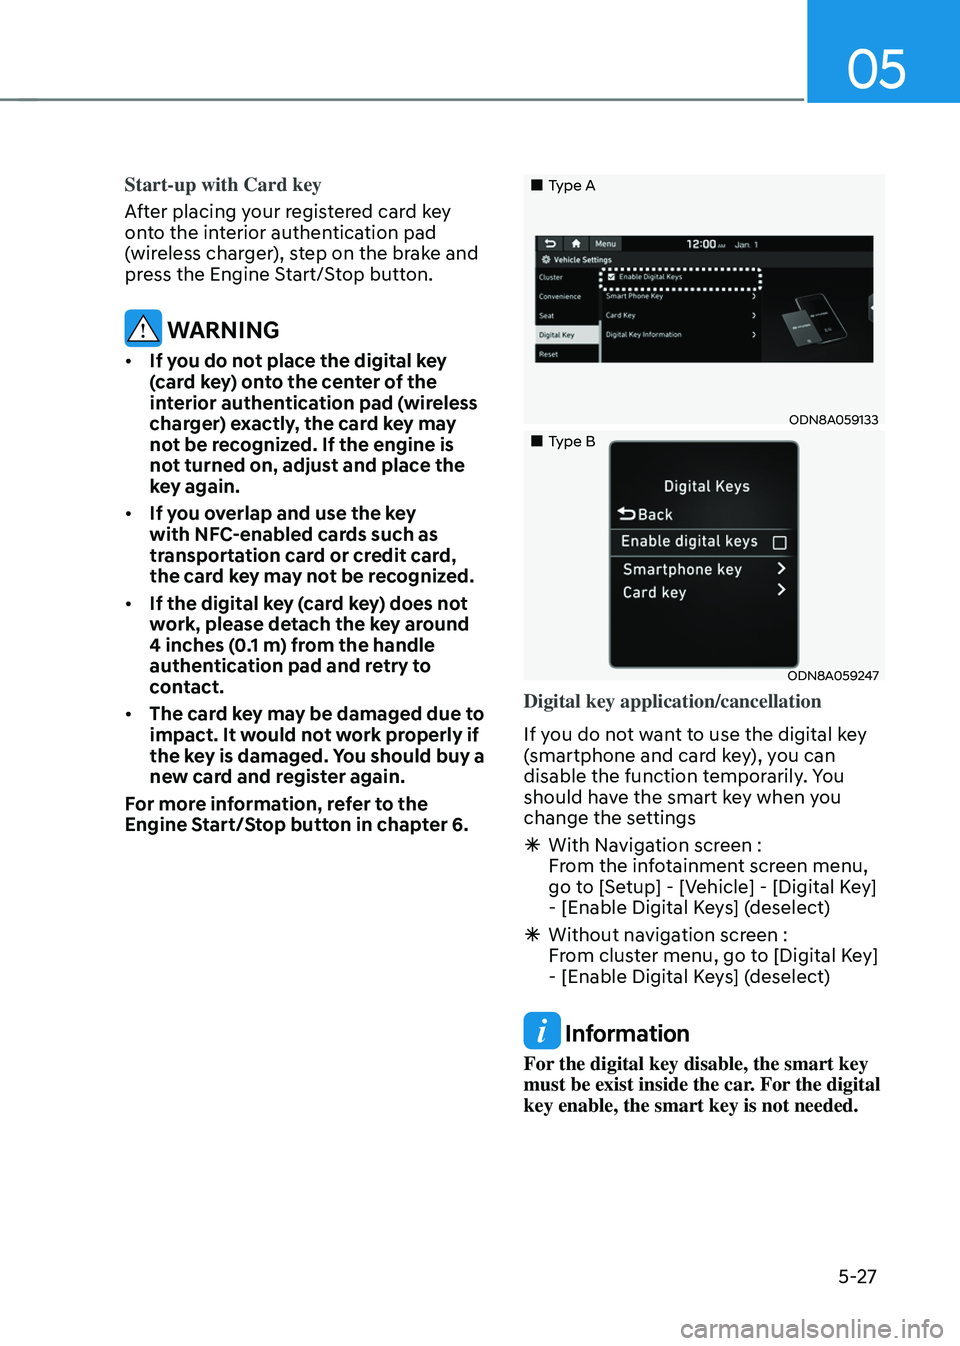
Digital key application/cancellation
If you do not want to use the digital key
(smartphone and card key), you can
disable the function temporarily. You
should have the smart key when you
change the settings
à With Navigation screen :
From the infotainment screen menu,
go to [Setup] - [Vehicle] - [Digital Key]
- [Enable Digital Keys] (deselect)
ÃWithout navigation screen :
From cluster menu, go to [Digital Key]
- [Enable Digital Keys] (deselect)
Information
For the digital key disable, the smart key
must be exist inside the car. For the digital
key enable, the smart key is not needed.
Page 178 of 638
Convenient features
5-34
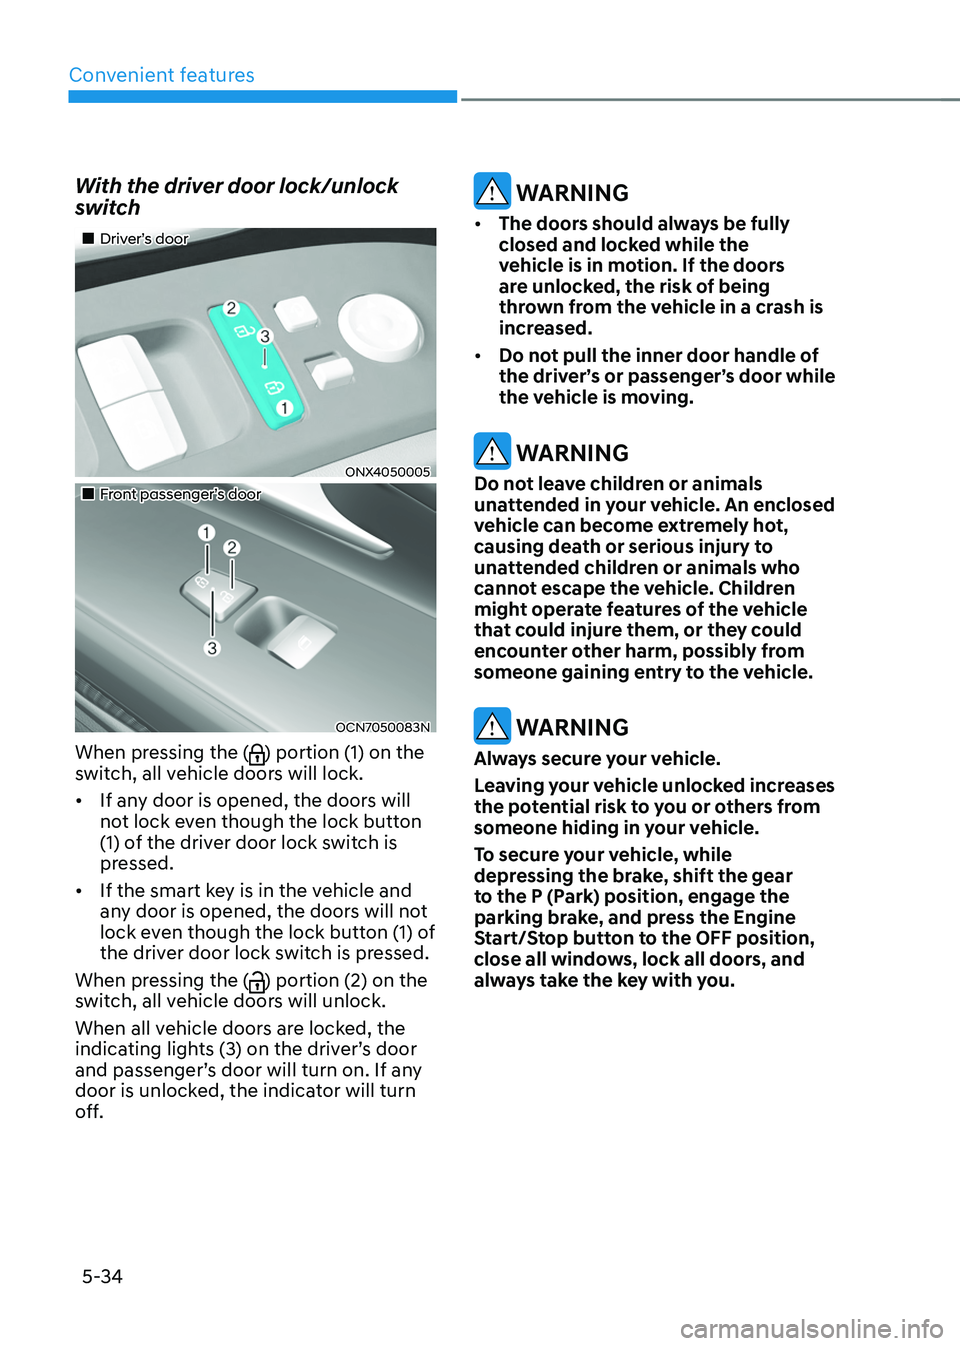
With the driver door lock/unlock
switch
„„Driver’s door
ONX4050005
„„Front passenger’s door
OCN7050083N
When pressing the () portion (1) on the
switch, all vehicle doors will lock.
• If any door is opened, the doors will
not lock even though the lock button
(1) of the driver door lock switch is
pressed.
• If the smart key is in the vehicle and
any door is opened, the doors will not
lock even though the lock button (1) of
the driver door lock switch is pressed.
When pressing the (
) portion (2) on the
switch, all vehicle doors will unlock.
When all vehicle doors are locked, the
indicating lights (3) on the driver’s door
and passenger’s door will turn on. If any
door is unlocked, the indicator will turn
off.
WARNING
• The doors should always be fully
closed and locked while the
vehicle is in motion. If the doors
are unlocked, the risk of being
thrown from the vehicle in a crash is
increased.
• Do not pull the inner door handle of
the driver’s or passenger’s door while
the vehicle is moving.
WARNING
Do not leave children or animals
unattended in your vehicle. An enclosed
vehicle can become extremely hot,
causing death or serious injury to
unattended children or animals who
cannot escape the vehicle. Children
might operate features of the vehicle
that could injure them, or they could
encounter other harm, possibly from
someone gaining entry to the vehicle.
WARNING
Always secure your vehicle.
Leaving your vehicle unlocked increases
the potential risk to you or others from
someone hiding in your vehicle.
To secure your vehicle, while
depressing the brake, shift the gear
to the P (Park) position, engage the
parking brake, and press the Engine
Start/Stop button to the OFF position,
close all windows, lock all doors, and
always take the key with you.
Page 209 of 638
05
5-65
Hood
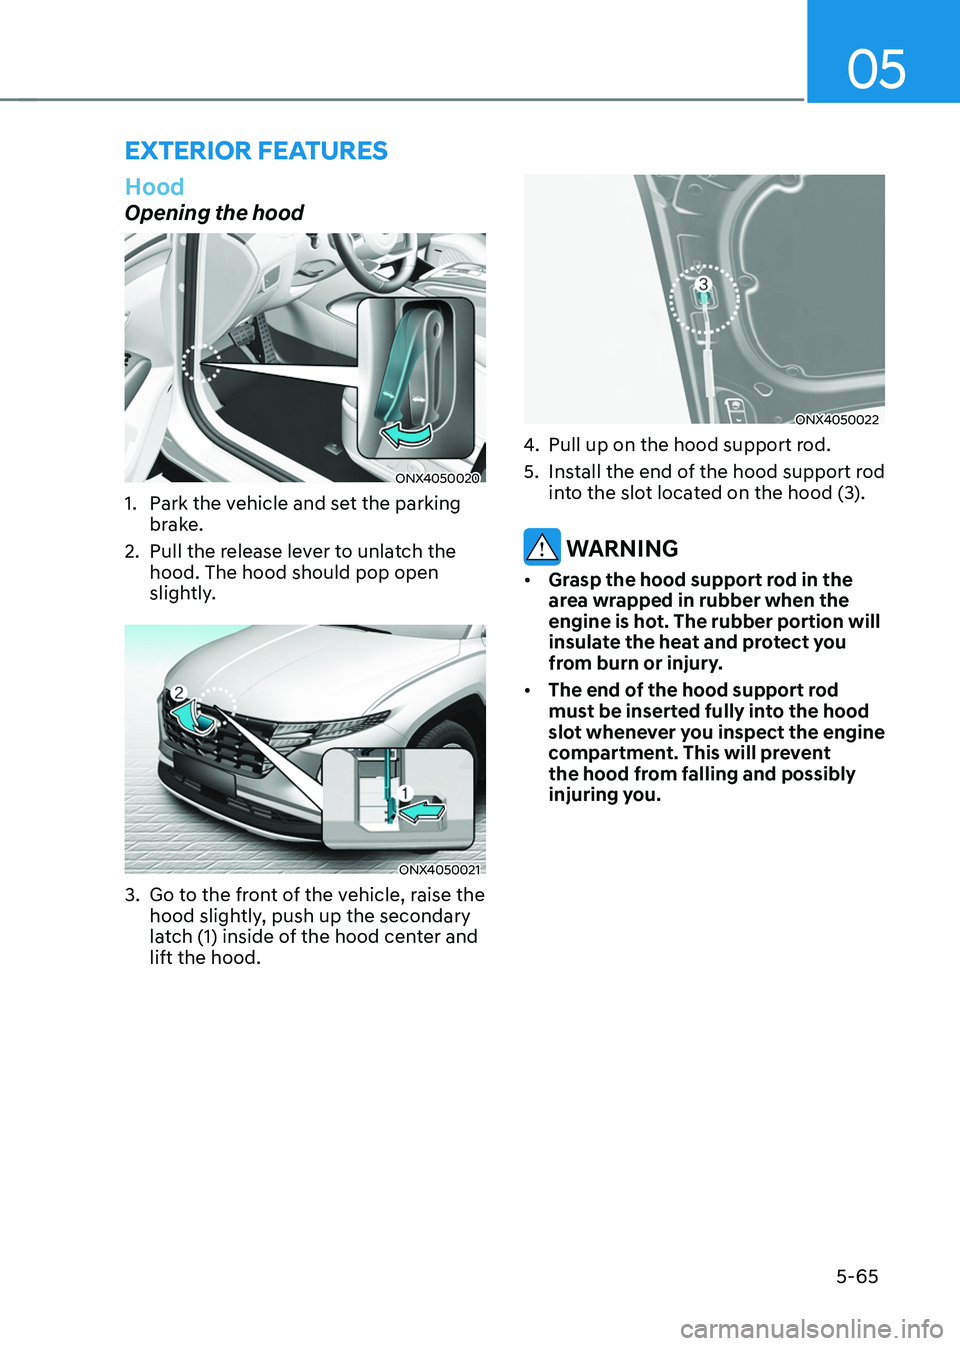
Opening the hood
ONX4050020
1. Park the vehicle and set the parking
brake.
2. Pull the release lever to unlatch the
hood. The hood should pop open
slightly.
ONX4050021
3. Go to the front of the vehicle, raise the
hood slightly, push up the secondary
latch (1) inside of the hood center and
lift the hood.
ONX4050022
4. Pull up on the hood support rod.
5. Install the end of the hood support rod
into the slot located on the hood (3).
WARNING
• Grasp the hood support rod in the
area wrapped in rubber when the
engine is hot. The rubber portion will
insulate the heat and protect you
from burn or injury.
• The end of the hood support rod
must be inserted fully into the hood
slot whenever you inspect the engine
compartment. This will prevent
the hood from falling and possibly
injuring you.
EXTERIOR FEATURES
Page 210 of 638
Convenient features
5-66
Closing the hood
1. Before closing the hood, check in and
around the engine compartment to
ensure the following:
-Any tools or other loose objects
are removed from the engine room
area or hood opening area
-All glove, rags, or other
combustible material is removed
from the engine compartment
-All filler caps are tightly and
correctly installed
2. Return the hood support rod to its clip
to prevent it from rattling.
3. Lower the hood until it is about 30 cm
(12in.) above the closed position and
let it drop. Make sure that it locks into
place.
4. Check that the hood has engaged
properly. If the hood can be raised
slightly, it is not properly engaged.
Open it again and close it with a little
more force.
WARNING
• Before closing the hood, ensure
all obstructions are removed from
around the hood opening.
• Always double check to be sure that
the hood is firmly latched before
driving away. Check there is no
hood open warning light or message
displayed on the instrument cluster.
Driving with the hood opened may
cause a total loss of visibility, which
might result in an accident.
• Do not move the vehicle with the
hood in the raised position, as vision
is obstructed, which might result in
an accident, and the hood could fall
or be damaged.
Liftgate
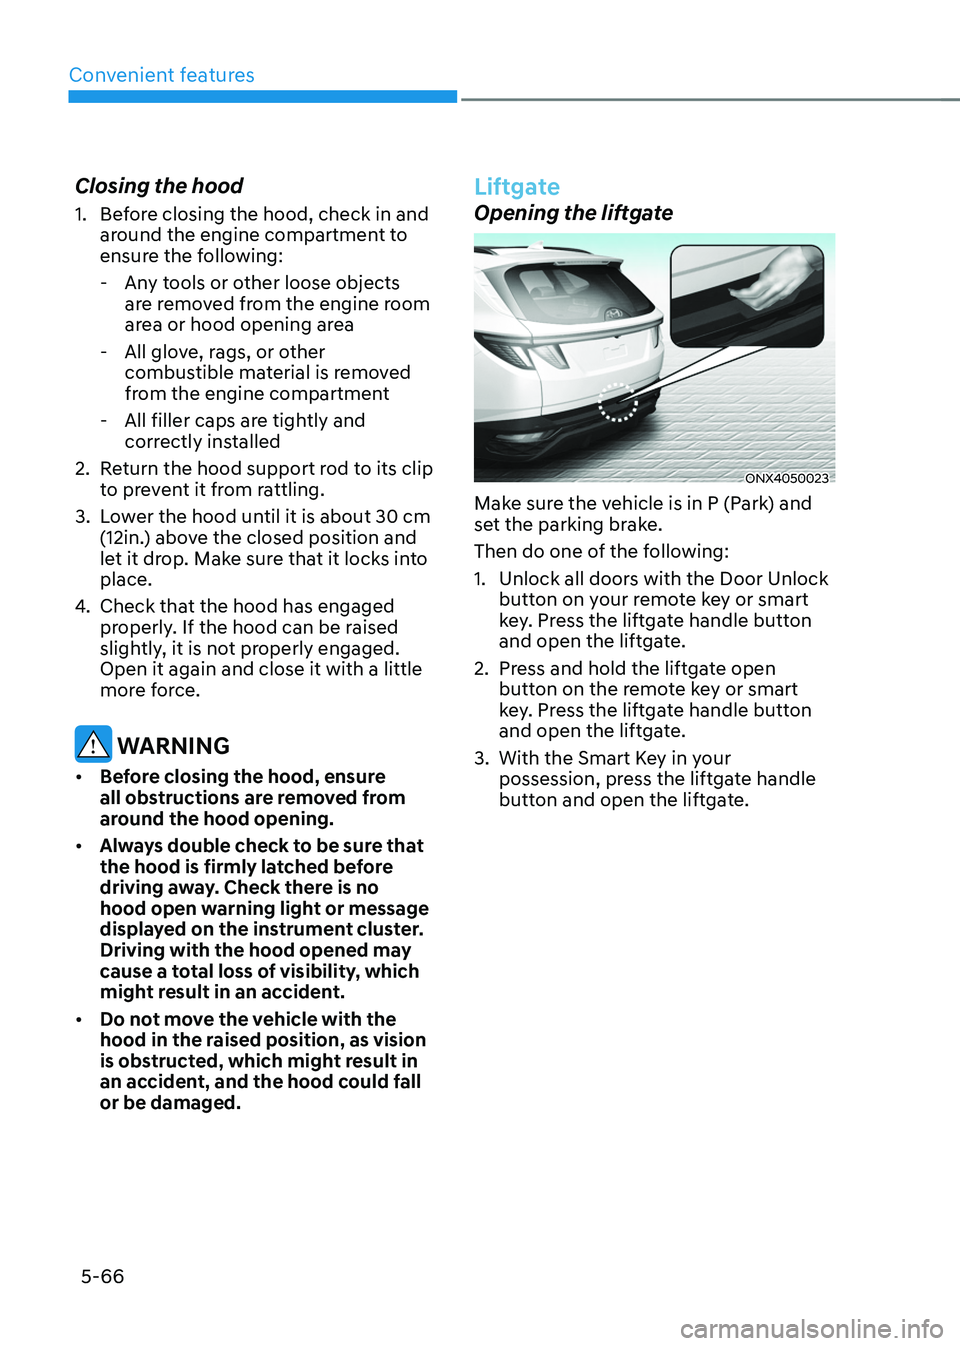
Opening the liftgate
ONX4050023
Make sure the vehicle is in P (Park) and
set the parking brake.
Then do one of the following:
1. Unlock all doors with the Door Unlock
button on your remote key or smart
key. Press the liftgate handle button
and open the liftgate.
2. Press and hold the liftgate open
button on the remote key or smart
key. Press the liftgate handle button
and open the liftgate.
3. With the Smart Key in your
possession, press the liftgate handle
button and open the liftgate.
Page 221 of 638
05
5-77
Closing the fuel filler door
1. To install the fuel tank cap, turn it
clockwise until it “clicks” one time.
2. Close the fuel filler door until it is
latched securely.
Information
To lock the fuel filler door, make sure the
fuel filler door is completely closed. Press
the LOCK button on the remote key or
smart key to lock your vehicle. The fuel
filler door will also lock.
Note that if the fuel filler door is not
completely closed when the vehicle is
locked, the fuel filler door will not be
locked.
CAUTION
Make sure the fuel filler door is
completely closed before driving
through a car wash or operating a high
pressure spray washer.
WARNING
Automotive fuel is highly flammable
and explosive. Failure to follow these
guidelines may result in SERIOUS
INJURY or DEATH:
• Read and follow all warnings posted
at the gas station.
• Before refueling, note the location
of the Emergency Fuel Shut-Off, if
available, at the gas station.
• Before touching the fuel nozzle, you
should eliminate the potential build-
up of static electricity by touching
a metal part of the vehicle, a safe
distance away from the fuel filler
neck, nozzle, or other gas source,
with your bare hand.
• Do not use mobile phones while
refueling. Electric current and/or
electronic interference from cellular
phones can potentially ignite fuel
vapors and cause a fire. •
Do not get back into a vehicle
once you have begun refueling.
You can generate a buildup of
static electricity by touching,
rubbing or sliding against any item
or fabric capable of producing
static electricity. Static electricity
discharge can ignite fuel vapors
causing a fire. If you must re-enter
the vehicle, you should once again
eliminate potentially dangerous
static electricity discharge by
touching a metal part of the vehicle,
away from the fuel filler neck, nozzle
or other fuel source, with your bare
hand.
• When using an approved portable
fuel container, be sure to place the
container on the ground prior to
refueling. Static electricity discharge
from the container can ignite fuel
vapors causing a fire.
Once refueling has begun, contact
between your bare hand and the
vehicle should be maintained until
the filling is complete.
• Use only approved portable plastic
fuel containers designed to carry and
store fuel.
• When refueling, always shift the
gear to the P (Park) position, set
the parking brake, and press the
Engine Start/Stop button to the
OFF position. Sparks produced by
electrical components related to the
engine can ignite fuel vapors causing
a fire.
• Do not use matches or a lighter and
do not smoke or leave a lit cigarette
in your vehicle while at a gas station,
especially during refueling.
Page 223 of 638
05
5-79
Exterior lights
Lighting control
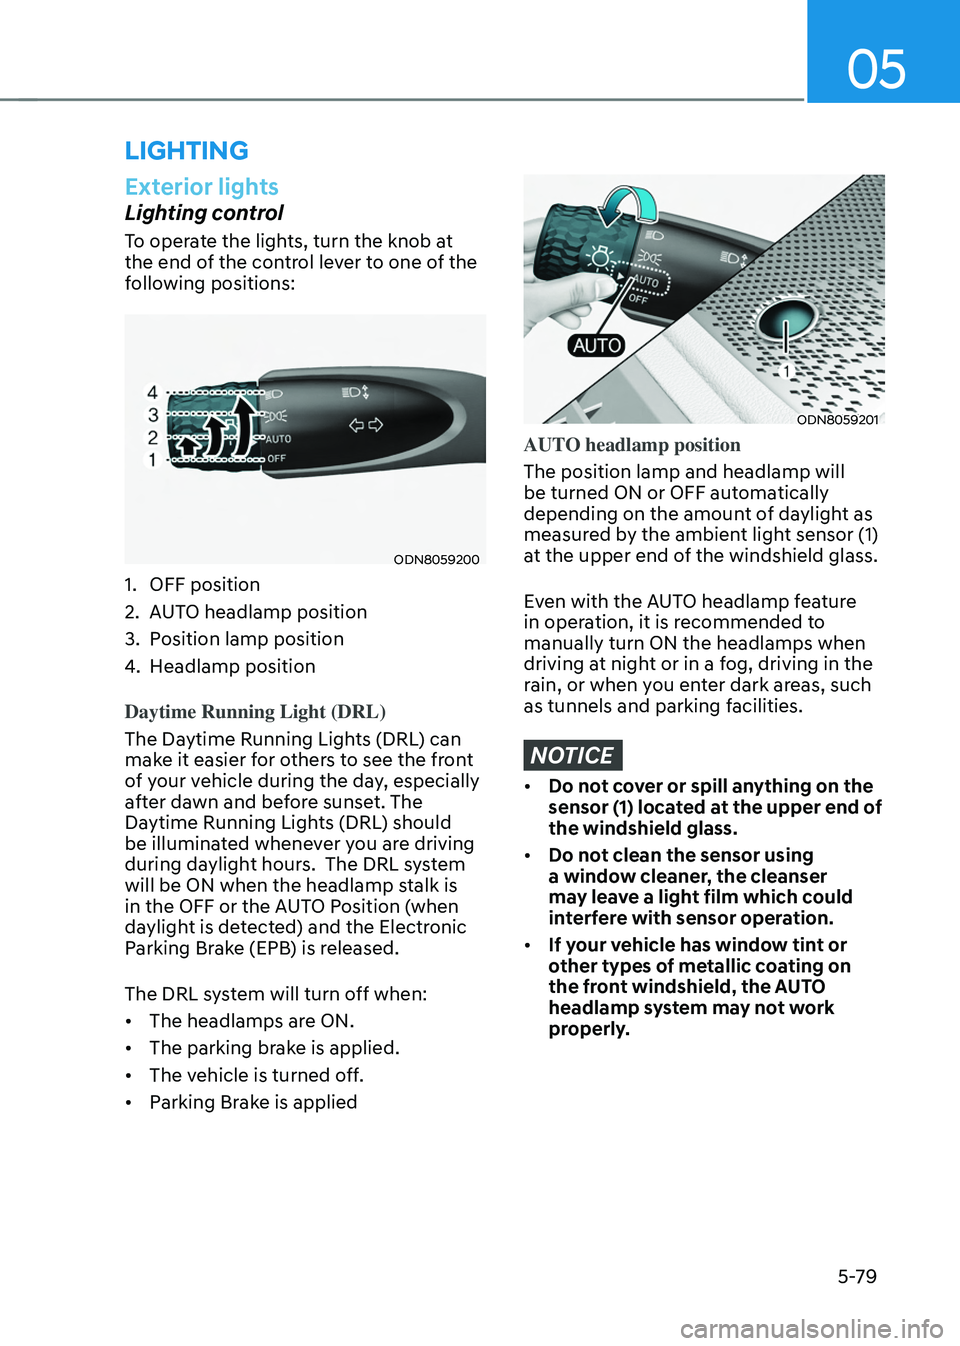
To operate the lights, turn the knob at
the end of the control lever to one of the
following positions:
ODN8059200
1. OFF position
2. AUTO headlamp position
3. Position lamp position
4. Headlamp position
Daytime Running Light (DRL)
The Daytime Running Lights (DRL) can
make it easier for others to see the front
of your vehicle during the day, especially
after dawn and before sunset. The
Daytime Running Lights (DRL) should
be illuminated whenever you are driving
during daylight hours. The DRL system
will be ON when the headlamp stalk is
in the OFF or the AUTO Position (when
daylight is detected) and the Electronic
Parking Brake (EPB) is released.
The DRL system will turn off when:
• The headlamps are ON.
• The parking brake is applied.
• The vehicle is turned off.
• Parking Brake is applied
ODN8059201
AUTO headlamp position
The position lamp and headlamp will
be turned ON or OFF automatically
depending on the amount of daylight as
measured by the ambient light sensor (1)
at the upper end of the windshield glass.
Even with the AUTO headlamp feature
in operation, it is recommended to
manually turn ON the headlamps when
driving at night or in a fog, driving in the
rain, or when you enter dark areas, such
as tunnels and parking facilities.
NOTICE
• Do not cover or spill anything on the
sensor (1) located at the upper end of
the windshield glass.
• Do not clean the sensor using
a window cleaner, the cleanser
may leave a light film which could
interfere with sensor operation.
• If your vehicle has window tint or
other types of metallic coating on
the front windshield, the AUTO
headlamp system may not work
properly.
LIGHTING
Page 286 of 638
Before driving ........................................................................\
............................6-4Before entering the vehicle ........................................................................\
................6-4
Before starting ........................................................................\
.....................................6-4
Ignition switch ........................................................................\
...........................6-5Key ignition switch ........................................................................\
...............................6-5
Key ignition switch positions ........................................................................\
..............6-6
Starting the engine ........................................................................\
...............................6 -7
Engine Start/Stop button ........................................................................\
.........6-8Engine Stop/Start button positions ........................................................................\
...6-9
Starting the engine ........................................................................\
.............................6-10
Turning off the engine ........................................................................\
.........................6-11
Remote start ........................................................................\
.......................................6-12
Automatic transmission ........................................................................\
..........6-14Automatic transmission operation ........................................................................\
....6-14
LCD display message (button type) ........................................................................\
..6-21
Paddle shifter (Manual shift mode) ........................................................................\
...6-22
Good driving practices ........................................................................\
.......................6-23
Braking system ........................................................................\
........................6-25Power-assist brakes ........................................................................\
...........................6-25
Disc brakes wear indicator ........................................................................\
................6-25
Electronic Parking Brake (EPB) ........................................................................\
.........6-26
Auto Hold ........................................................................\
...........................................6-30
Anti-lock Brake System (ABS) ........................................................................\
............6-34
Electronic Stability Control (ESC) ........................................................................\
.....6-35
Vehicle Stability Management (VSM) .....................................................................6-38
Trailer stability assist (TSA) ........................................................................\
...............6-39
Hill-Start Assist Control (HAC) ........................................................................\
.........6-40
Downhill Brake Control (DBC) ........................................................................\
.........6-40
Good braking practices ........................................................................\
.....................6-43
Idle Stop and Go (ISG) ........................................................................\
...........6-44ISG system operation ........................................................................\
........................6-44
ISG system off ........................................................................\
.....................................6-47
Forced to restart engine
........................................................................\
...................6-48
ISG malfunction ........................................................................\
.................................6-48
Drive mode integrated control system .........................................................6-49
All Wheel Drive (AWD)
........................................................................\
...........6-52AWD operation ........................................................................\
...................................6-53
Emergency precautions
........................................................................\
....................6-56
6. Driving your v ehicle
Driving your vehicle
6