2022 HYUNDAI TUCSON transmission
[x] Cancel search: transmissionPage 190 of 638
Convenient features
5-46
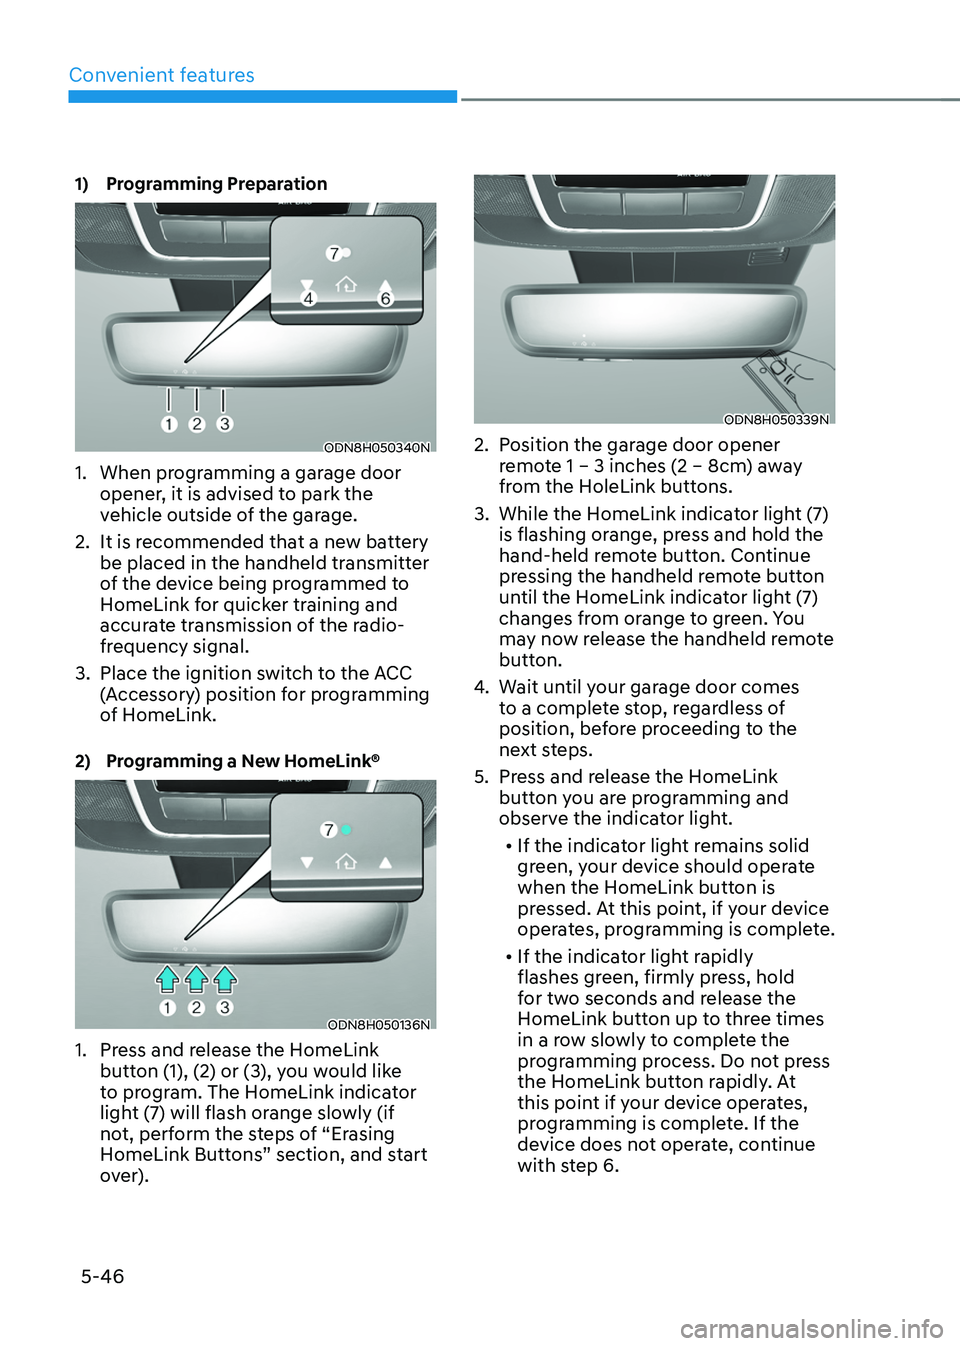
1) Programming Preparation
ODN8H050340N
1. When programming a garage door
opener, it is advised to park the
vehicle outside of the garage.
2. It is recommended that a new battery
be placed in the handheld transmitter
of the device being programmed to
HomeLink for quicker training and
accurate transmission of the radio-
frequency signal.
3. Place the ignition switch to the ACC
(Accessory) position for programming
of HomeLink.
2) Programming a New HomeLink®
ODN8H050136N
1. Press and release the HomeLink
button (1), (2) or (3), you would like
to program. The HomeLink indicator
light (7) will flash orange slowly (if
not, perform the steps of “Erasing
HomeLink Buttons” section, and start
over).
ODN8H050339N
2. Position the garage door opener
remote 1 – 3 inches (2 – 8cm) away
from the HoleLink buttons.
3. While the HomeLink indicator light (7)
is flashing orange, press and hold the
hand-held remote button. Continue
pressing the handheld remote button
until the HomeLink indicator light (7)
changes from orange to green. You
may now release the handheld remote
button.
4. Wait until your garage door comes
to a complete stop, regardless of
position, before proceeding to the
next steps.
5. Press and release the HomeLink
button you are programming and
observe the indicator light.• If the indicator light remains solid
green, your device should operate
when the HomeLink button is
pressed. At this point, if your device
operates, programming is complete.
• If the indicator light rapidly
flashes green, firmly press, hold
for two seconds and release the
HomeLink button up to three times
in a row slowly to complete the
programming process. Do not press
the HomeLink button rapidly. At
this point if your device operates,
programming is complete. If the
device does not operate, continue
with step 6.
Page 192 of 638
Convenient features
5-48
2. On your garage door opener in your
garage, locate the “Learn” button
(usually near where the hanging
antenna wire is attached to the garage
door opener). If there is difficulty
locating this button, reference the
device’s owner’s manual.
3. Press and release the “Learn” button.
4. A light on your garage door opener
may flash, and your Two-Way
Communication indicators (4), (6) in
your vehicle may flash, confirming
completion of the process.
5. Return to the vehicle and firmly
press and release the programmed
HomeLink button to activate
your garage door. The Two-Way
Communication indicators (4), (6)
flash in orange when the door is
moving. Do not make any additional
button presses until AFTER the garage
door has come to a complete stop.
6. Your Two-Way Communication
programming is now complete.
Information
If your garage door opener has Two-
Way Communication functionality,
it is possible for HomeLink to stop
functioning the garage door shortly
after initial programming, IF the Two-
Way Communication Programming
wasn’t properly completed. This
usually happens after the first 10 times
a programmed HomeLink button is
pressed. If you experience this, completing
the “Programming a New HomeLink
Button” and “Two-Way Communication
Programming” will restore door
operation.
4) Canadian Programming
Canadian radio-frequency laws require
transmitter remote signals to “time-
out” (or quit) after a couple seconds of
transmission, which may not be long
enough for HomeLink to pick up the signal
during programming.
If you live in Canada or you are having
difficulties programming a gate operator
or garage door opener by using the
programming procedures, replace
“Programming a New HomeLink Button”
step 3 with the following:
While the HomeLink indicator light (7) is
flashing orange, press and release (“cycle”)
your device’s handheld remote every two
seconds until the HomeLink indicator light
(7) changes from orange to green. You may
now release the hand-held remote button.
Then proceed with “Programming a New
HomeLink Button” step 4.
Page 286 of 638
Before driving ........................................................................\
............................6-4Before entering the vehicle ........................................................................\
................6-4
Before starting ........................................................................\
.....................................6-4
Ignition switch ........................................................................\
...........................6-5Key ignition switch ........................................................................\
...............................6-5
Key ignition switch positions ........................................................................\
..............6-6
Starting the engine ........................................................................\
...............................6 -7
Engine Start/Stop button ........................................................................\
.........6-8Engine Stop/Start button positions ........................................................................\
...6-9
Starting the engine ........................................................................\
.............................6-10
Turning off the engine ........................................................................\
.........................6-11
Remote start ........................................................................\
.......................................6-12
Automatic transmission ........................................................................\
..........6-14Automatic transmission operation ........................................................................\
....6-14
LCD display message (button type) ........................................................................\
..6-21
Paddle shifter (Manual shift mode) ........................................................................\
...6-22
Good driving practices ........................................................................\
.......................6-23
Braking system ........................................................................\
........................6-25Power-assist brakes ........................................................................\
...........................6-25
Disc brakes wear indicator ........................................................................\
................6-25
Electronic Parking Brake (EPB) ........................................................................\
.........6-26
Auto Hold ........................................................................\
...........................................6-30
Anti-lock Brake System (ABS) ........................................................................\
............6-34
Electronic Stability Control (ESC) ........................................................................\
.....6-35
Vehicle Stability Management (VSM) .....................................................................6-38
Trailer stability assist (TSA) ........................................................................\
...............6-39
Hill-Start Assist Control (HAC) ........................................................................\
.........6-40
Downhill Brake Control (DBC) ........................................................................\
.........6-40
Good braking practices ........................................................................\
.....................6-43
Idle Stop and Go (ISG) ........................................................................\
...........6-44ISG system operation ........................................................................\
........................6-44
ISG system off ........................................................................\
.....................................6-47
Forced to restart engine
........................................................................\
...................6-48
ISG malfunction ........................................................................\
.................................6-48
Drive mode integrated control system .........................................................6-49
All Wheel Drive (AWD)
........................................................................\
...........6-52AWD operation ........................................................................\
...................................6-53
Emergency precautions
........................................................................\
....................6-56
6. Driving your v ehicle
Driving your vehicle
6
Page 290 of 638
06
6-5
WARNING
To reduce the risk of SERIOUS INJURY or
DEATH, take the following precautions:
• NEVER allow children or any person
who is unfamiliar with the vehicle to
touch the ignition switch or related
parts. Unexpected and sudden
vehicle movement can occur.
• NEVER reach through the steering
wheel for the ignition switch, or any
other control, while the vehicle is in
motion. The presence of your hand
or arm in this area may cause a loss
of vehicle control resulting in an
accident.
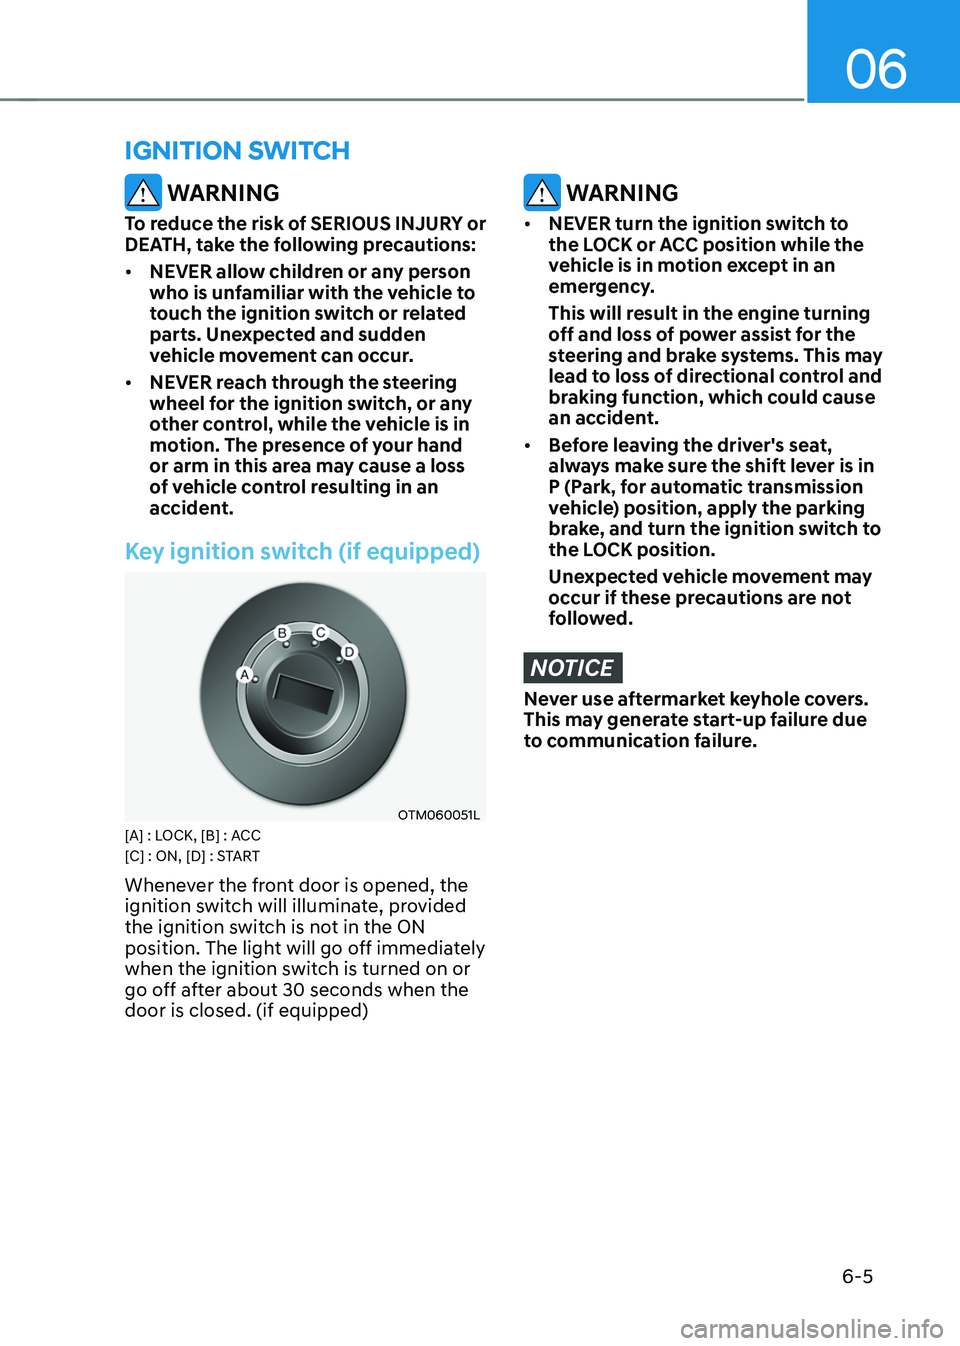
Key ignition switch (if equipped)
OTM060051L[A] : LOCK, [B] : ACC
[C] : ON, [D] : START
Whenever the front door is opened, the
ignition switch will illuminate, provided
the ignition switch is not in the ON
position. The light will go off immediately
when the ignition switch is turned on or
go off after about 30 seconds when the
door is closed. (if equipped)
WARNING
• NEVER turn the ignition switch to
the LOCK or ACC position while the
vehicle is in motion except in an
emergency.
This will result in the engine turning
off and loss of power assist for the
steering and brake systems. This may
lead to loss of directional control and
braking function, which could cause
an accident.
• Before leaving the driver's seat,
always make sure the shift lever is in
P (Park, for automatic transmission
vehicle) position, apply the parking
brake, and turn the ignition switch to
the LOCK position.
Unexpected vehicle movement may
occur if these precautions are not
followed.
NOTICE
Never use aftermarket keyhole covers.
This may generate start-up failure due
to communication failure.
IGNITION SWITCH
Page 299 of 638
![HYUNDAI TUCSON 2022 Owners Manual Driving your vehicle6-14
„„Lever type„„Button type
ONX4E060039ONX4060003
[A] : Shift lever, [B] : Shift release button, [C] : Manual shift mode
Depress the brake pedal and press th HYUNDAI TUCSON 2022 Owners Manual Driving your vehicle6-14
„„Lever type„„Button type
ONX4E060039ONX4060003
[A] : Shift lever, [B] : Shift release button, [C] : Manual shift mode
Depress the brake pedal and press th](/manual-img/35/41173/w960_41173-298.png)
Driving your vehicle6-14
„„Lever type„„Button type
ONX4E060039ONX4060003
[A] : Shift lever, [B] : Shift release button, [C] : Manual shift mode
Depress the brake pedal and press the Shift release button while moving the shift lever.
Press the Shift release button while moving the shift lever.
The shift lever can freely operate.
Automatic transmission operation
The automatic transmission has six forward speeds (eight forward speeds, if equipped)
and one reverse speed.
The individual speeds are selected automatically in the D (Drive) position.
AUTOMATIC TRANSMISSION
Page 300 of 638
06
6-15
The indicator in the instrument cluster
displays the shift lever/button position
when the ignition switch is in the ON
position.
WARNING
To reduce the risk of serious injury or
death:
• ALWAYS check the surrounding
areas near your vehicle for people,
especially children, before shifting a
vehicle into D (Drive) or R (Reverse).
• Before leaving the driver’s seat,
always make sure the shift lever
is in the P (Park) position, then set
the parking brake, and place the
ignition switch in the LOCK/OFF
position. Unexpected and sudden
vehicle movement can occur if these
precautions are not followed.
• When using the paddle shifter
(manual shift mode), do not use
engine braking (shifting from a
high gear to lower gear) rapidly on
slippery roads. The vehicle may slip
causing an accident.
P (Park)
Always come to a complete stop before
shifting into P (Park).
To shift from P (Park), you must depress
firmly on the brake pedal and make sure
your foot is off the accelerator pedal.
If you have done all of the above and
still cannot shift the lever out of P
(Park), see "Shift-Lock Release" in this
chapter. (shift lever type)
The shift lever/button must be in P (Park)
before turning the engine off.
WARNING
• Shifting into P (Park) while the
vehicle is in motion may cause you to
lose control of the vehicle.
• After the vehicle has stopped, always
make sure the shift lever is in P
(Park), apply the parking brake, and
turn the engine off.
• When parking on an incline, shift
the gear to P (Park) and apply the
parking brake to prevent the vehicle
from rolling downhill.
• Do not use the P (Park) position in
place of the parking brake.
R (Reverse)
Use this position to drive the vehicle
backward.
NOTICE
Always come to a complete stop before
shifting into or out of R (Reverse); you
may damage the transmission if you
shift into R (Reverse) while the vehicle is
in motion.
When the vehicle is stopped in R
(Reverse) or D (Drive) position, if you
open the driver’s door with the seat
belt unfastened, the gear is shifted to P
(Park) position automatically.
However when the vehicle moves in R
(Reverse) or D (Drive) position, if you
open the driver’s door with the seat belt
unfastened, the gear may be not shifted
to P (Park) position automatically for
protecting the automatic transmission.
Page 301 of 638
Driving your vehicle
6-16
N (Neutral)
The wheels and transmission are not
engaged.
Use N (Neutral) if you need to restart a
stalled engine, or if it is necessary to stop
with the engine ON. Shift into P (Park)
if you need to leave your vehicle for any
reason.
Always depress the brake pedal when
you are shifting from N (Neutral) to
another gear.
WARNING
Do not shift into gear unless your foot is
firmly on the brake pedal. Shifting into
gear when the engine is running at high
speed can cause the vehicle to move
very rapidly. You could lose control of
the vehicle and hit people or objects.To stay in N (Neutral) when vehicle is
OFF (button type)
ONX4060004
ONX4E060021
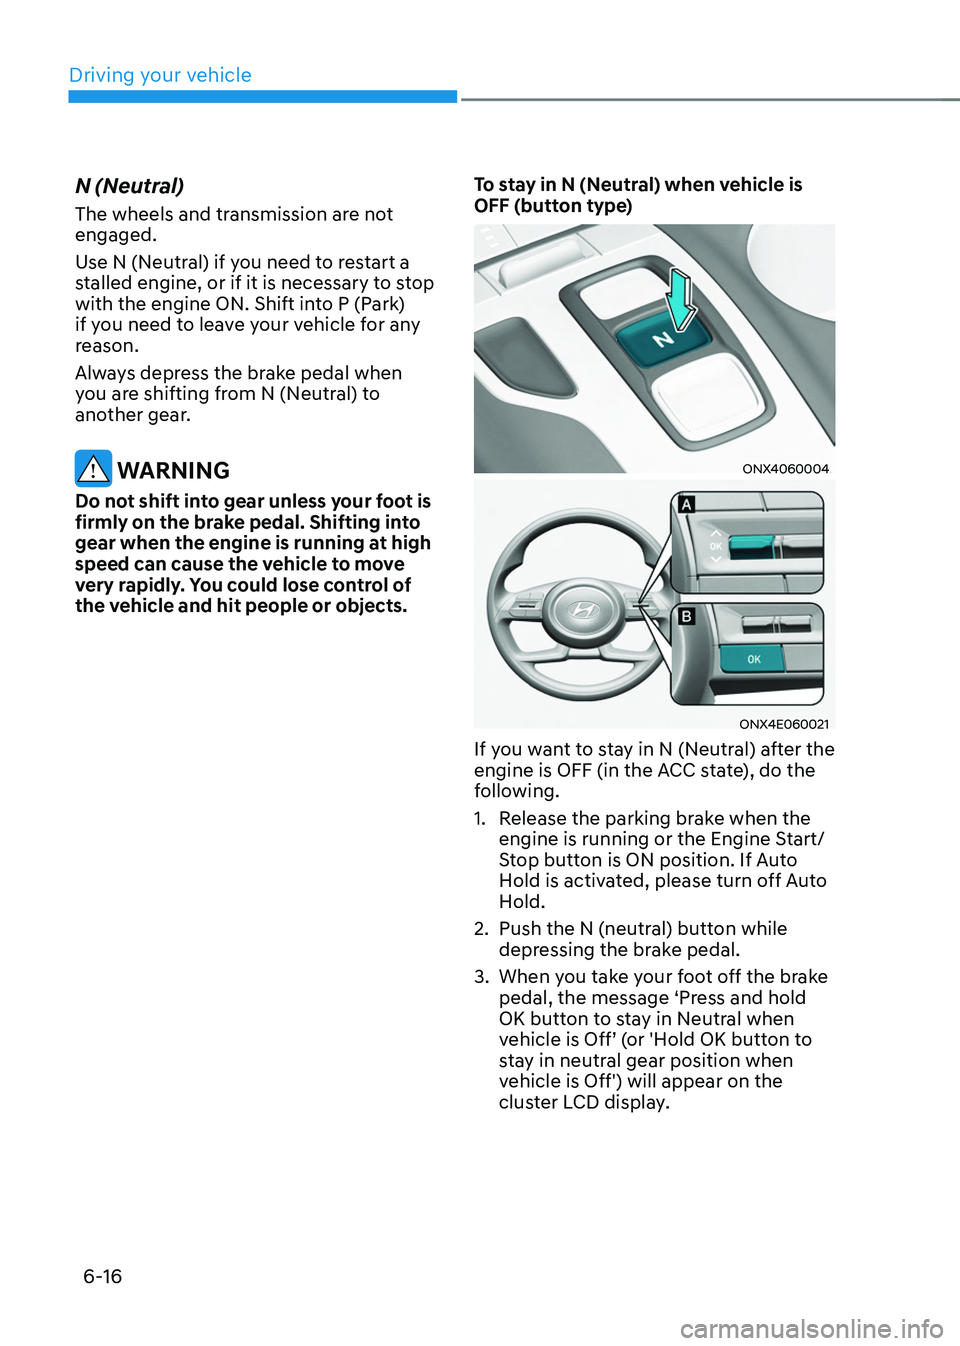
If you want to stay in N (Neutral) after the
engine is OFF (in the ACC state), do the
following.
1. Release the parking brake when the
engine is running or the Engine Start/
Stop button is ON position. If Auto
Hold is activated, please turn off Auto
Hold.
2. Push the N (neutral) button while
depressing the brake pedal.
3. When you take your foot off the brake
pedal, the message ‘Press and hold
OK button to stay in Neutral when
vehicle is Off’ (or 'Hold OK button to
stay in neutral gear position when
vehicle is Off') will appear on the
cluster LCD display.
Page 302 of 638
06
6-17
4. Press and hold the OK button on
the steering wheel for more than 1
second.
5. When the message ‘Vehicle will stay in
(N). Change gear to cancel’ (or ‘N will
stay engaged when the vehicle is Off’)
will appear on the cluster LCD display,
press the Engine Start/Stop button
while depressing the brake pedal.
However, if you open the driver's
door, the gear will automatically
shift to P (Park) and the Engine Start/
Stop button will change to the OFF
position.
NOTICE
With the gear in N (Neutral) the Engine
Start/Stop button will be in the ACC
position. Note that the doors cannot be
locked in the ACC position. The battery
may discharge if left in the ACC position
for a long period.
D (Drive)
This is the normal driving position. The
transmission will automatically shift
through an 8-gear sequence, providing
the best fuel economy and power.
To start the vehicle forward, push the D
(Drive) button by depressing the brake
pedal with the engine ON. (button type)
Then depress the accelerator pedal
smoothly.
For extra power when passing another
vehicle or driving uphill, depress the
accelerator fully. The transmission will
automatically downshift to the next
lower gear (or gears, as appropriate).
When the vehicle is stopped in D (Drive)
position, if you open the driver’s door
with the seat belt unfastened, the gear is
shifted to P (Park) position automatically.
(button type)
However while the vehicle is moving in D
(Drive) position, if you open the driver’s
door with the seat belt unfastened, the
gear may not shift to P (Park) position
automatically to protect the automatic
transmission.
The DRIVE MODE switch, located on the
shift lever console, allows the driver to
switch from NORMAL/COMFORT mode
to SPORT. (if equipped)
For more Details, refer to "Drive Mode
Integrated Control System" later in this
chapter.