2022 HYUNDAI TUCSON tow
[x] Cancel search: towPage 104 of 638
Instrument cluster
4-6
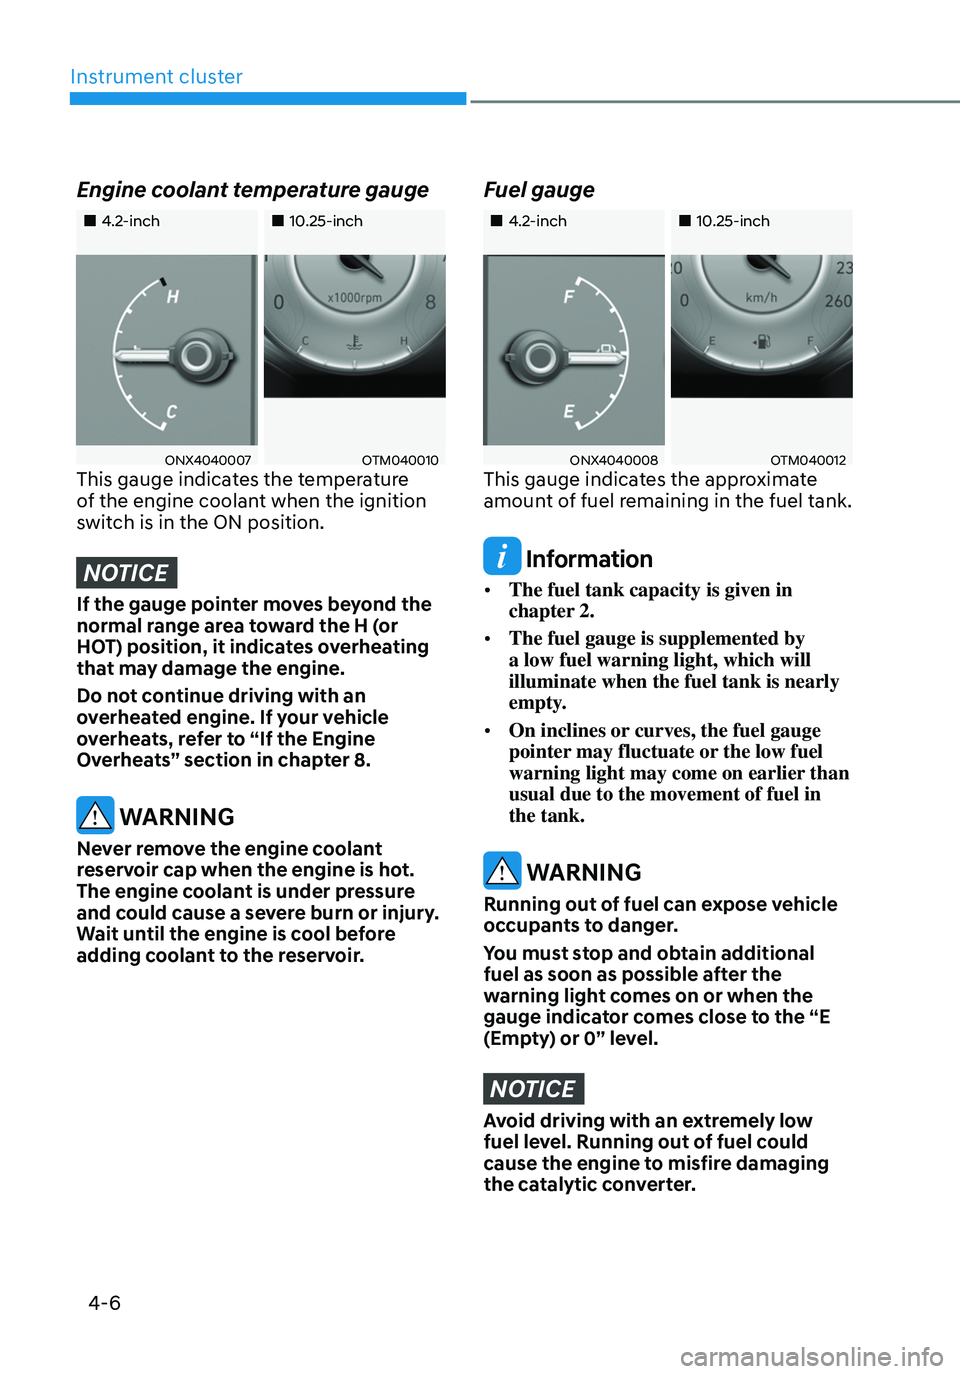
Engine coolant temperature gauge
„„4.2-inch„„10.25-inch
ONX4040007OTM040010This gauge indicates the temperature
of the engine coolant when the ignition
switch is in the ON position.
NOTICE
If the gauge pointer moves beyond the
normal range area toward the H (or
HOT) position, it indicates overheating
that may damage the engine.
Do not continue driving with an
overheated engine. If your vehicle
overheats, refer to “If the Engine
Overheats” section in chapter 8.
WARNING
Never remove the engine coolant
reservoir cap when the engine is hot.
The engine coolant is under pressure
and could cause a severe burn or injury.
Wait until the engine is cool before
adding coolant to the reservoir.
Fuel gauge
„„4.2-inch„„10.25-inch
ONX4040008 OTM040012This gauge indicates the approximate
amount of fuel remaining in the fuel tank.
Information
• The fuel tank capacity is given in
chapter 2.
• The fuel gauge is supplemented by
a low fuel warning light, which will
illuminate when the fuel tank is nearly
empty.
• On inclines or curves, the fuel gauge
pointer may fluctuate or the low fuel
warning light may come on earlier than
usual due to the movement of fuel in
the tank.
WARNING
Running out of fuel can expose vehicle
occupants to danger.
You must stop and obtain additional
fuel as soon as possible after the
warning light comes on or when the
gauge indicator comes close to the “E
(Empty) or 0” level.
NOTICE
Avoid driving with an extremely low
fuel level. Running out of fuel could
cause the engine to misfire damaging
the catalytic converter.
Page 156 of 638
Convenient features
5-12
Mechanical key
If the Smart Key does not operate
normally, you can lock or unlock the
driver’s door by using the mechanical
key.
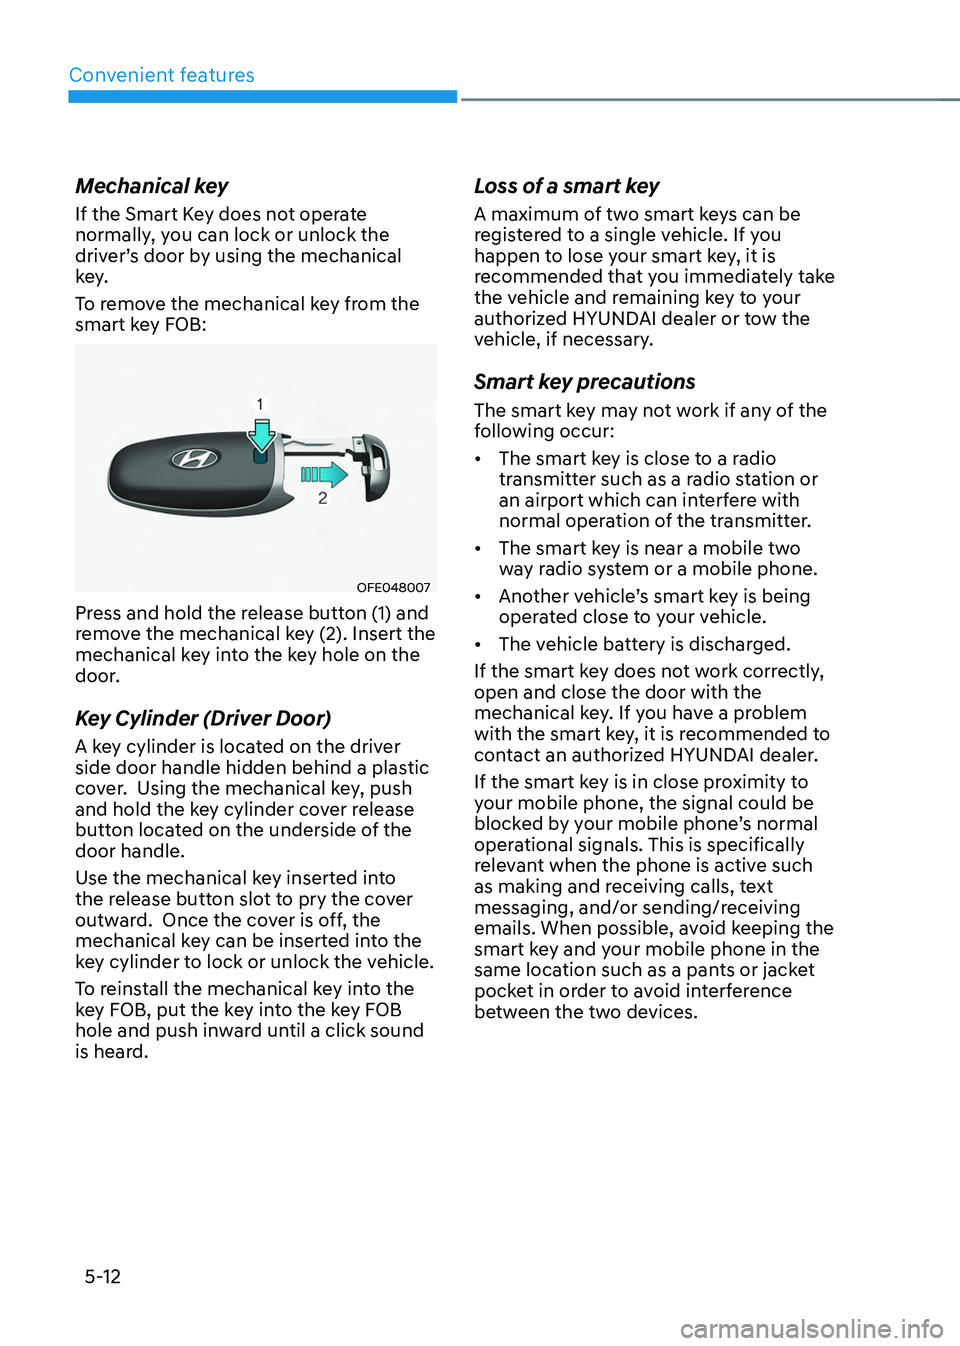
To remove the mechanical key from the
smart key FOB:
OFE048007
Press and hold the release button (1) and
remove the mechanical key (2). Insert the
mechanical key into the key hole on the
door.
Key Cylinder (Driver Door)
A key cylinder is located on the driver
side door handle hidden behind a plastic
cover. Using the mechanical key, push
and hold the key cylinder cover release
button located on the underside of the
door handle.
Use the mechanical key inserted into
the release button slot to pry the cover
outward. Once the cover is off, the
mechanical key can be inserted into the
key cylinder to lock or unlock the vehicle.
To reinstall the mechanical key into the
key FOB, put the key into the key FOB
hole and push inward until a click sound
is heard.
Loss of a smart key
A maximum of two smart keys can be
registered to a single vehicle. If you
happen to lose your smart key, it is
recommended that you immediately take
the vehicle and remaining key to your
authorized HYUNDAI dealer or tow the
vehicle, if necessary.
Smart key precautions
The smart key may not work if any of the
following occur:
• The smart key is close to a radio
transmitter such as a radio station or
an airport which can interfere with
normal operation of the transmitter.
• The smart key is near a mobile two
way radio system or a mobile phone.
• Another vehicle’s smart key is being
operated close to your vehicle.
• The vehicle battery is discharged.
If the smart key does not work correctly,
open and close the door with the
mechanical key. If you have a problem
with the smart key, it is recommended to
contact an authorized HYUNDAI dealer.
If the smart key is in close proximity to
your mobile phone, the signal could be
blocked by your mobile phone’s normal
operational signals. This is specifically
relevant when the phone is active such
as making and receiving calls, text
messaging, and/or sending/receiving
emails. When possible, avoid keeping the
smart key and your mobile phone in the
same location such as a pants or jacket
pocket in order to avoid interference
between the two devices.
Page 185 of 638
05
5-41
Tilt / Telescopic steering
When adjusting the steering wheel to a
comfortable position, adjust the steering
wheel so that it points toward your chest,
not toward your face. Make sure you can
see the instrument cluster warning lights
and gauges. After adjusting, push the
steering wheel both up and down to be
certain it is locked in position.
Always adjust the position of the steering
wheel before driving.
WARNING
NEVER adjust the steering wheel while
driving. This may cause loss of vehicle
control resulting in an accident.
ONX4050070
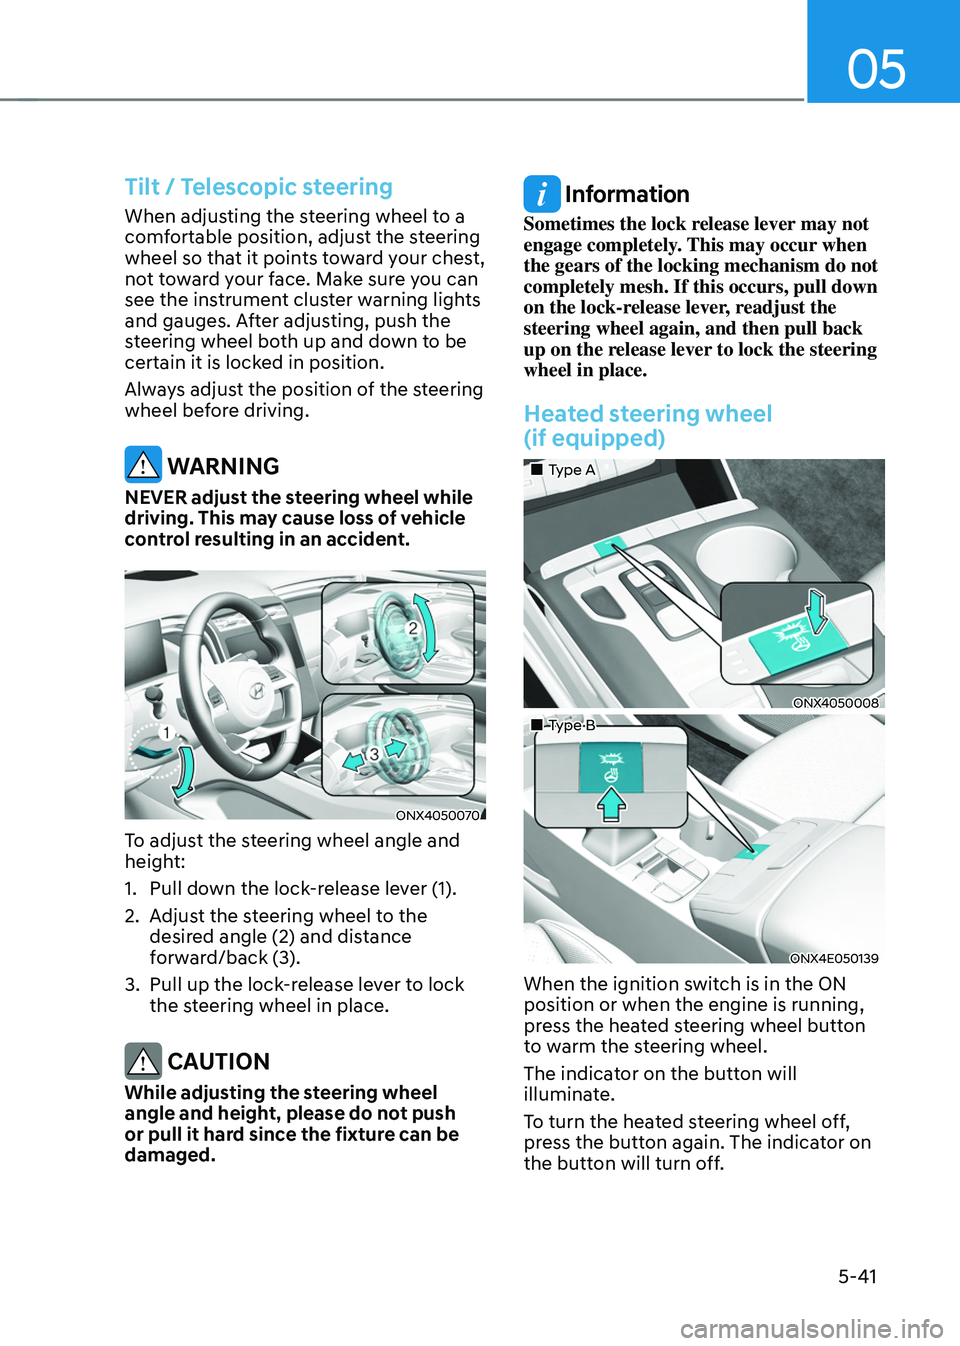
To adjust the steering wheel angle and
height:
1. Pull down the lock-release lever (1).
2. Adjust the steering wheel to the
desired angle (2) and distance
forward/back (3).
3. Pull up the lock-release lever to lock
the steering wheel in place.
CAUTION
While adjusting the steering wheel
angle and height, please do not push
or pull it hard since the fixture can be
damaged.
Information
Sometimes the lock release lever may not
engage completely. This may occur when
the gears of the locking mechanism do not
completely mesh. If this occurs, pull down
on the lock-release lever, readjust the
steering wheel again, and then pull back
up on the release lever to lock the steering
wheel in place.
Heated steering wheel
(if equipped)
„„Type A
ONX4050008
„„Type B
ONX4E050139
When the ignition switch is in the ON
position or when the engine is running,
press the heated steering wheel button
to warm the steering wheel.
The indicator on the button will
illuminate.
To turn the heated steering wheel off,
press the button again. The indicator on
the button will turn off.
Page 187 of 638
05
5-43
Inside rearview mirror
Before driving your vehicle, check to
see that your inside rearview mirror is
properly positioned. Adjust the rearview
mirror so that the view through the rear
window is properly centered.
WARNING
Make sure your line of sight is not
obstructed. Do not place objects in the
rear seat, cargo area, or behind the rear
headrests which could interfere with
your vision through the rear window.
WARNING
To prevent serious injury during an
accident or deployment of the air bag,
do not modify the rearview mirror and
do not install a wide mirror.
WARNING
NEVER adjust the mirror while driving.
This may cause loss of vehicle control
resulting in an accident.
NOTICE
When cleaning the mirror, use a paper
towel or similar material dampened
with glass cleaner. Do not spray glass
cleaner directly on the mirror as this
may cause the liquid cleaner to enter
the mirror housing.
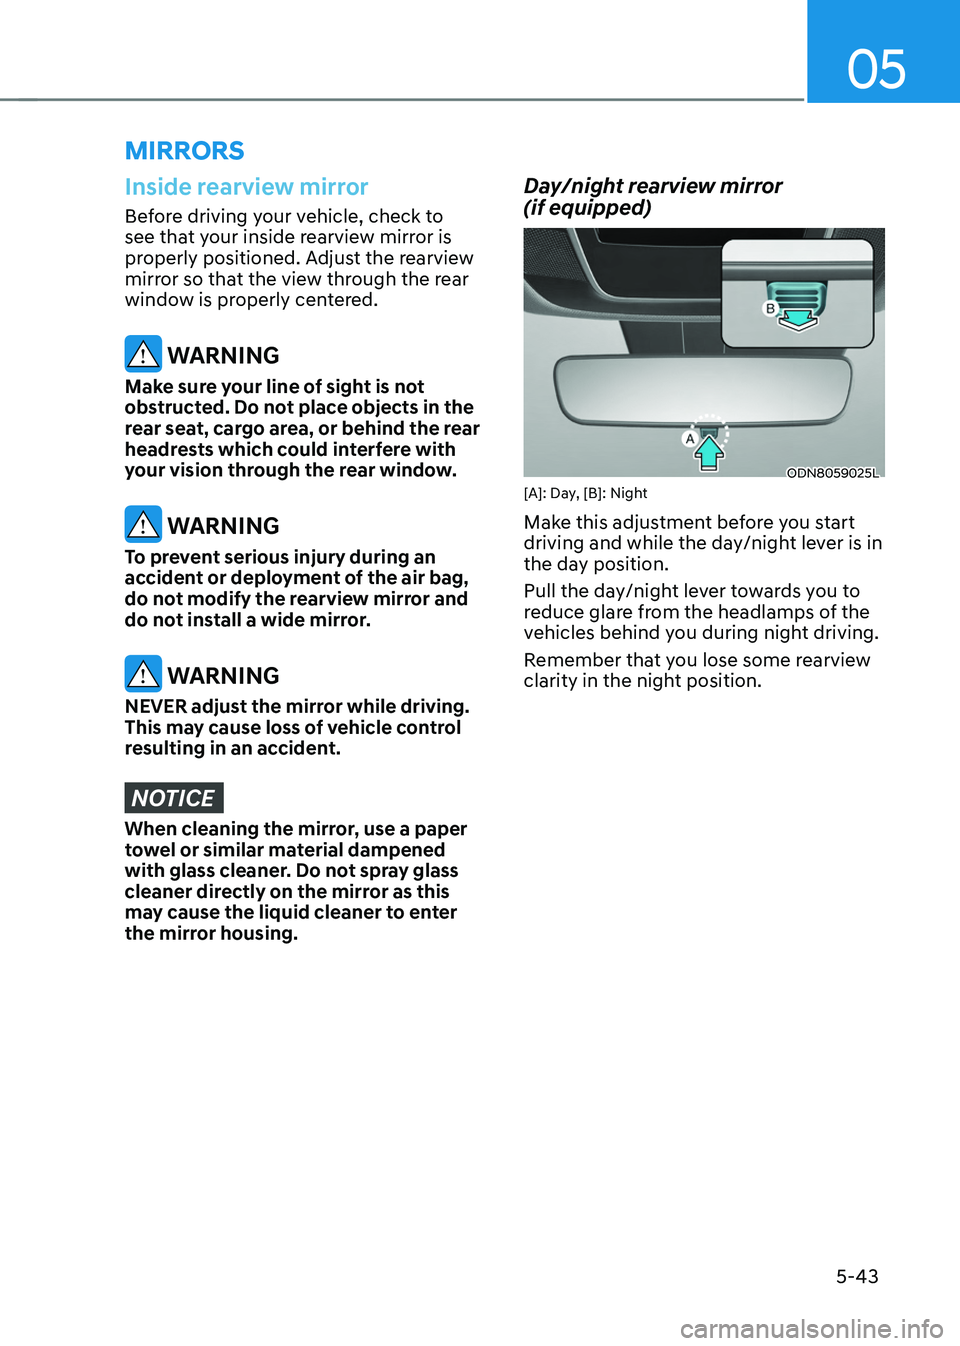
Day/night rearview mirror
(if equipped)
ODN8059025L[A]: Day, [B]: Night
Make this adjustment before you start
driving and while the day/night lever is in
the day position.
Pull the day/night lever towards you to
reduce glare from the headlamps of the
vehicles behind you during night driving.
Remember that you lose some rearview
clarity in the night position.
MIRRORS
Page 198 of 638
Convenient features
5-54
Adjusting the side view mirrors
ONX4050010N
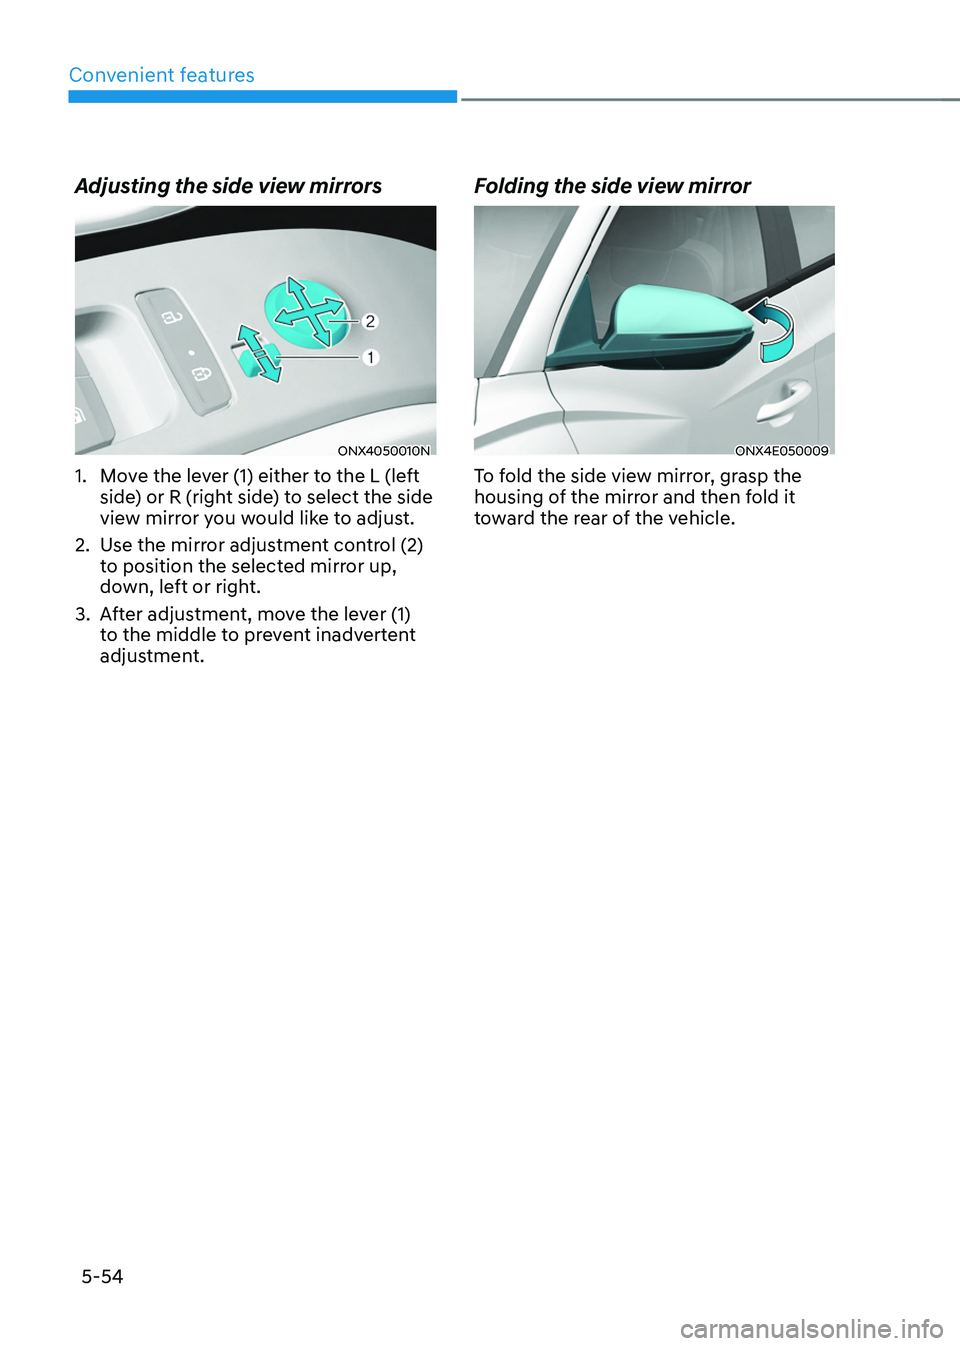
1. Move the lever (1) either to the L (left
side) or R (right side) to select the side
view mirror you would like to adjust.
2. Use the mirror adjustment control (2)
to position the selected mirror up,
down, left or right.
3. After adjustment, move the lever (1)
to the middle to prevent inadvertent
adjustment.
Folding the side view mirror
ONX4E050009
To fold the side view mirror, grasp the
housing of the mirror and then fold it
toward the rear of the vehicle.
Page 224 of 638
Convenient features
5-80
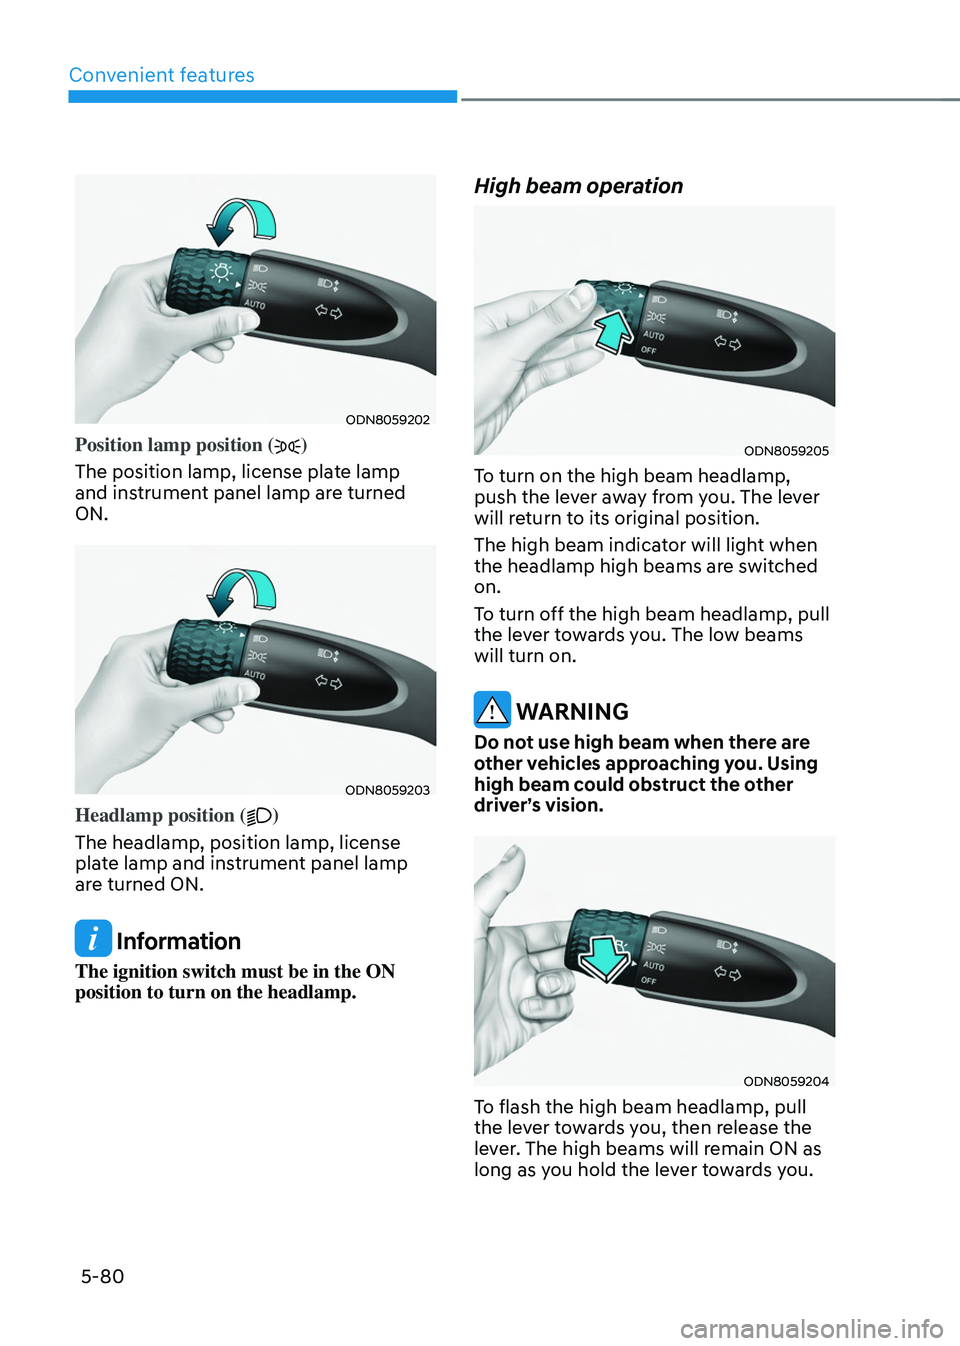
ODN8059202
Position lamp position ()
The position lamp, license plate lamp
and instrument panel lamp are turned
ON.
ODN8059203
Headlamp position ()
The headlamp, position lamp, license
plate lamp and instrument panel lamp
are turned ON.
Information
The ignition switch must be in the ON
position to turn on the headlamp.
High beam operation
ODN8059205
To turn on the high beam headlamp,
push the lever away from you. The lever
will return to its original position.
The high beam indicator will light when
the headlamp high beams are switched
on.
To turn off the high beam headlamp, pull
the lever towards you. The low beams
will turn on.
WARNING
Do not use high beam when there are
other vehicles approaching you. Using
high beam could obstruct the other
driver’s vision.
ODN8059204
To flash the high beam headlamp, pull
the lever towards you, then release the
lever. The high beams will remain ON as
long as you hold the lever towards you.
Page 228 of 638
Convenient features
5-84
System operation
Display and control
• After selecting ‘High Beam Assist’
in the Settings menu, High Beam
Assist will operate by following the
procedure below.
-Place the headlamp switch in
the AUTO position and push
the headlamp lever towards the
instrument cluster. The High Beam
Assist (
) indicator light will
illuminate on the cluster and the
system will be enabled.
- When the system is enabled, high
beam will turn on when vehicle
speed is above 25mph (40km/h).
When vehicle speed is below 15mph
(25km/h), high beam will not turn
on.
-The High Beam () indicator light
will illuminate on the cluster when
high beam is on.
• When High Beam Assist is operating, if
the headlamp lever or switch is used,
the system operates as follow:
-If the headlamp lever is pulled
towards you when the high beam
is off, the high beam will turn on
without High Beam Assist canceled.
When you let go of the headlamp
lever, the lever will move to the
middle and the high beam will turn
off.
-If the headlamp lever is pulled
towards you when the high beam is
on by High Beam Assist, low beam
will be on and the system will turn
off.
-If the headlamp switch is placed
from AUTO to another position
(headlamp/position/off), High
Beam Assist will turn off and the
corresponding lamp will turn on. •
When High Beam Assist is operating,
high beam switches to low beam if
any of the following conditions occur:
-When the headlamp of an
oncoming vehicle is detected.
-When the tail lamp of a vehicle in
front is detected.
-When the headlamp or tail lamp of a
motorcycle or a bicycle is detected.
-When the surrounding ambient light
is bright enough that high beams
are not required.
-When streetlights or other lights are
detected.
System malfunction and
limitations
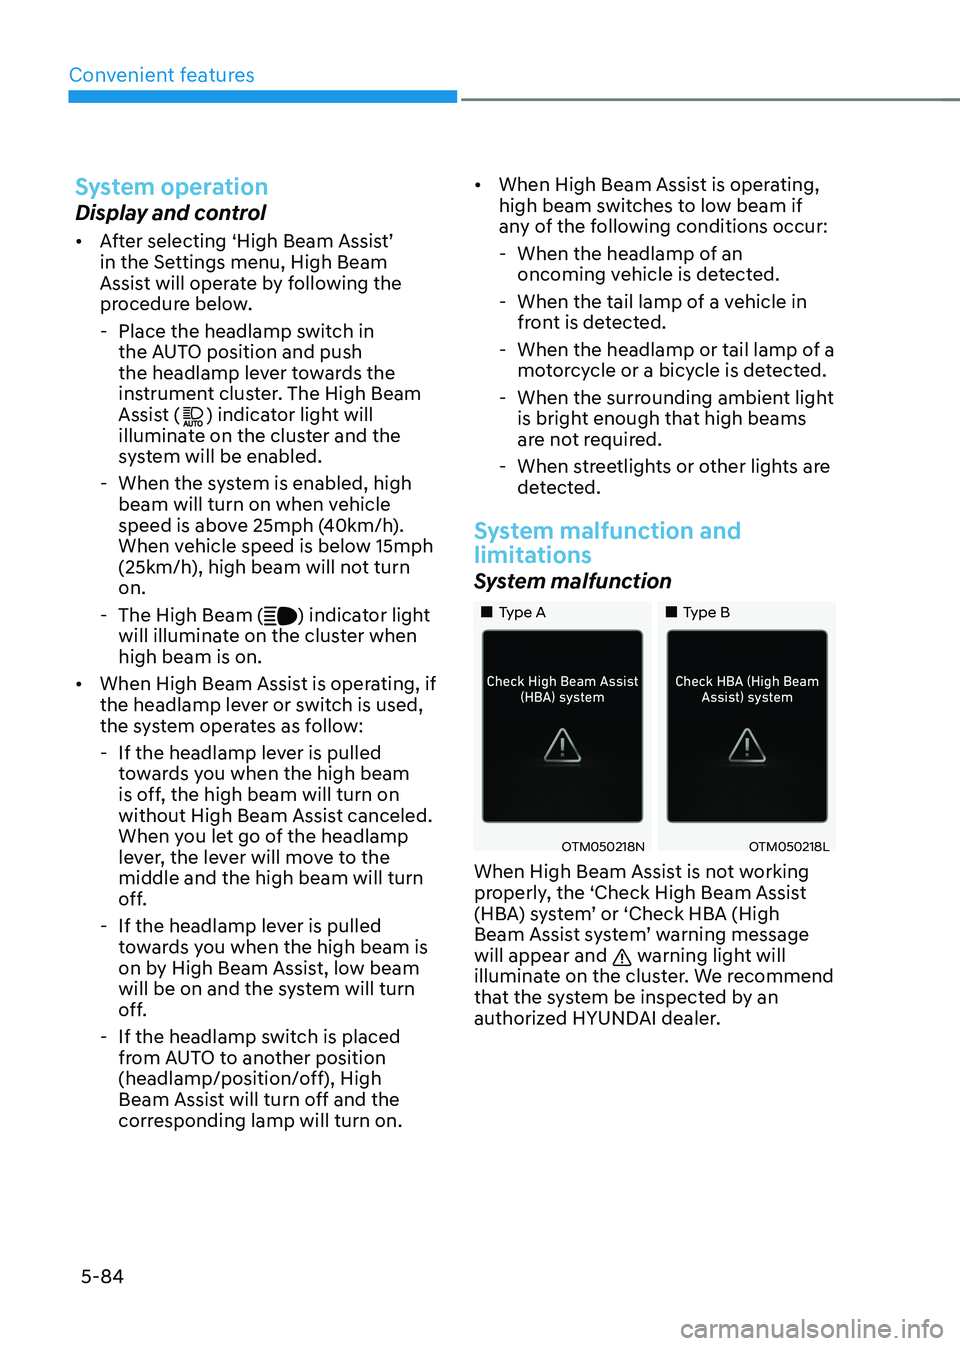
System malfunction
„„Type A„„Type B
OTM050218NOTM050218L
When High Beam Assist is not working
properly, the ‘Check High Beam Assist
(HBA) system’ or ‘Check HBA (High
Beam Assist system’ warning message
will appear and
warning light will
illuminate on the cluster. We recommend
that the system be inspected by an
authorized HYUNDAI dealer.
Page 229 of 638
05
5-85
Limitations of the system
High Beam Assist may not work properly
in the following situations:
• Light from a vehicle is not detected
because of lamp damage, or because
it is hidden from sight, etc.
• Headlamp of a vehicle is covered with
dust, snow or water.
• A vehicle’s headlamps are off but the
fog lamps are on and etc.
• There is a lamp that has a similar
shape as a vehicle’s lamp.
• Headlamps have been damaged or
not repaired properly.
• Headlamps are not aimed properly.
• Driving on a narrow curved road,
rough road, uphill or downhill.
• Vehicle in front is partially visible on a
crossroad or curved road.
• There is a traffic light, reflecting sign,
flashing sign or mirror ahead.
• There is a temporary reflector or flash
ahead (construction area).
• The road conditions are bad such as
being wet, iced or covered with snow.
• A vehicle suddenly appears from a
curve.
• The vehicle is tilted from a flat tire or
is being towed.
• Light from a vehicle is not detected
because of exhaust fume, smoke, fog,
snow, etc.
For more details on the limitations
of the front view camera, refer to
“Forward Collision-Avoidance Assist
(FCA)” section in chapter 7. WARNING
• At times, High Beam Assist may not
work properly. It is the responsibility
of the driver for safe driving
practices and always check the road
conditions for your safety.
• When High Beam Assist does
not operate normally, change
the headlamp position manually
between high beam and low beam.