2022 HYUNDAI TUCSON fuel cap
[x] Cancel search: fuel capPage 363 of 638

Driving your vehicle
6-78
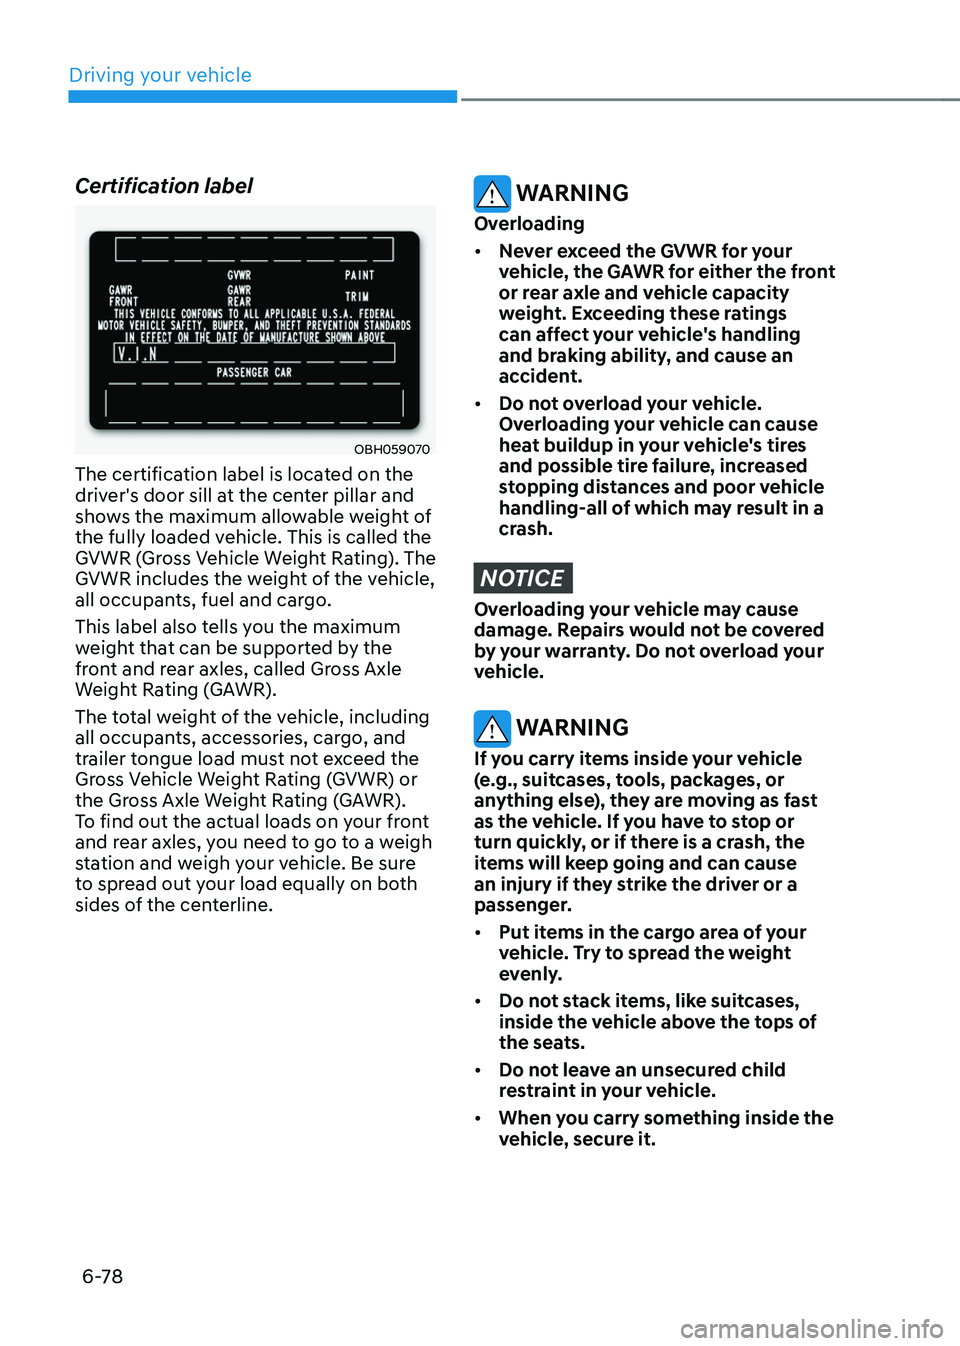
Certification label
OBH059070
The certification label is located on the
driver's door sill at the center pillar and
shows the maximum allowable weight of
the fully loaded vehicle. This is called the
GVWR (Gross Vehicle Weight Rating). The
GVWR includes the weight of the vehicle,
all occupants, fuel and cargo.
This label also tells you the maximum
weight that can be supported by the
front and rear axles, called Gross Axle
Weight Rating (GAWR).
The total weight of the vehicle, including
all occupants, accessories, cargo, and
trailer tongue load must not exceed the
Gross Vehicle Weight Rating (GVWR) or
the Gross Axle Weight Rating (GAWR).
To find out the actual loads on your front
and rear axles, you need to go to a weigh
station and weigh your vehicle. Be sure
to spread out your load equally on both
sides of the centerline.
WARNING
Overloading
• Never exceed the GVWR for your
vehicle, the GAWR for either the front
or rear axle and vehicle capacity
weight. Exceeding these ratings
can affect your vehicle's handling
and braking ability, and cause an
accident.
• Do not overload your vehicle.
Overloading your vehicle can cause
heat buildup in your vehicle's tires
and possible tire failure, increased
stopping distances and poor vehicle
handling-all of which may result in a
crash.
NOTICE
Overloading your vehicle may cause
damage. Repairs would not be covered
by your warranty. Do not overload your
vehicle.
WARNING
If you carry items inside your vehicle
(e.g., suitcases, tools, packages, or
anything else), they are moving as fast
as the vehicle. If you have to stop or
turn quickly, or if there is a crash, the
items will keep going and can cause
an injury if they strike the driver or a
passenger.
• Put items in the cargo area of your
vehicle. Try to spread the weight
evenly.
• Do not stack items, like suitcases,
inside the vehicle above the tops of
the seats.
• Do not leave an unsecured child
restraint in your vehicle.
• When you carry something inside the
vehicle, secure it.
Page 559 of 638

09
9-9
Normal maintenance schedule
MAINTENANCE
INTERVALS
MAINTENANCE
ITEM Number of months or driving distance, whichever comes first
Months 1224 3648 60 7284 96108 120 132144 156
Miles×1,000 816 24 3240 48 5664 7280 8896104
Km×1,000 1326 39 5265 78 91104 117130 143156169
Air cleaner filter IIR IIR IIR IIR I
Spark plugs
*4
Replace every 96,000 miles (156,000 km)
Vapor hose, fuel filler cap and fuel tank IIIIII
Fuel tank air filter IIIIII
Fuel lines, hoses and connections IIIIII
I : Inspect and if necessary, adjust, correct, clean or replace.
R : Replace or change.*4 : For your convenience, it can be replaced prior to it’s interval when you do maintenance of other items.
Fuel filter :
The fuel filter is consider
ed to be maintenance free but periodic inspection is recommended for this maintenance schedule
depends on fuel quality. If there are some important matters like fuel flow restriction, surging, loss of power, hard starting
problem etc, replace the fuel filter immediately regardless of maintenance schedule. We recommend that you consult an
authorized HYUNDAI dealer for details.
Page 564 of 638

Maintenance
9-14
Engine oil and filter
The engine oil and filter should be
changed at the intervals specified in the
maintenance schedule. If the vehicle
is being driven in severe conditions,
more frequent oil and filter changes are
required.
Drive belts
Inspect all drive belts for evidence
of cuts, cracks, excessive wear or oil
saturation and replace if necessary.
Drive belts should be checked
periodically for proper tension and
adjusted as necessary.
Information
When you are inspecting the belt, turn the
engine off.
Fuel lines, fuel hoses and
connections
Check the fuel lines, fuel hoses and
connections for leakage and damage.
We recommend an authorized HYUNDAI
dealer replace any damaged or leaking
parts immediately.
Fuel filter
The fuel filter is considered to be
maintenance free but periodic inspection
is recommended for this maintenance
depends on fuel quality. If there are
some important matters like fuel flow
restriction, surging, loss of power, hard
starting problem etc., replace the fuel
filter immediately. We recommend that
you consult an authorized HYUNDAI
dealer for details.
Vapor hose and fuel filler cap
The vapor hose and fuel filler cap should
be inspected at those intervals specified
in the maintenance schedule. Your
HYUNDAI dealer will help to determine if
replacement is needed.
Vacuum crankcase ventilation
hoses
Inspect the surface of hoses for evidence
of heat and/or mechanical damage.
Hard and brittle rubber, cracking,
tears, cuts, abrasions, and excessive
swelling indicate deterioration. Particular
attention should be paid to examine
those hose surfaces nearest to high heat
sources, such as the exhaust manifold.
Inspect the hose routing to ensure that
the hoses do not come in contact with
any heat source, sharp edges or moving
component which might cause heat
damage or mechanical wear. Inspect
all hose connections, such as clamps
and couplings, to make sure they are
secure, and that no leaks are present.
Hoses should be replaced immediately if
there is any evidence of deterioration or
damage.
EXPLANATION OF SCHEDULED MAINTENANCE ITEMS
Page 587 of 638

09
9-37
WARNING
Recommended pressures must be
maintained for the best ride, vehicle
handling, and minimum tire wear.
Over-inflation or under-inflation
can reduce tire life, adversely
affect vehicle handling, and lead to
sudden tire failure that could result
in loss of vehicle control resulting in
an accident.
Severe under-inflation can lead
to severe heat build-up, causing
blowouts, tread separation and
other tire failures that can result in
the loss of vehicle control resulting
in an accident. This risk is much
higher on hot days and when
driving for long periods at high
speeds.
CAUTION
• Under-inflation results in
excessive wear, poor handling
and reduced fuel economy.
Wheel deformation is also
possible. Keep your tire pressures
at the proper levels. If a tire
frequently needs refilling, we
recommend it be checked by an
authorized HYUNDAI dealer.
• Over-inflation produces a harsh
ride, excessive wear at the center
of the tire tread, and a greater
possibility of damage from road
hazards.
Check tire inflation pressure
Check your tires, including the spare
tire, once a month or more.
How to check
Use a good quality tire pressure
gauge to check tire pressure. You
can not tell if your tires are properly
inflated simply by looking at them.
Radial tires may look properly
inflated when they are under-
inflated.
Remove the valve cap from the tire
valve stem. Press the tire gauge
firmly onto the valve to get a
pressure measurement. If the cold
tire inflation pressure matches the
recommended pressure on the tire
and loading information label, no
further adjustment is necessary. If
the pressure is low, add air until you
reach the recommended pressure.
Make sure to put the valve caps
back on the valve stems. Without
the valve cap, dirt or moisture could
get into the valve core and cause
air leakage. If a valve cap is missing,
install a new one as soon as possible.
If you overfill the tire, release air by
pushing on the metal stem in the
center of the tire valve. Recheck the
tire pressure with the tire gauge. Be
sure to put the valve caps back on
the valve stems. Without the valve
cap, dirt or moisture could get into
the valve core and cause air leakage.
If a valve cap is missing, install a new
one as soon as possible.
Page 621 of 638

09
9-71
The emission control system of your
vehicle is covered by a written limited
warranty. Please see the warranty
information contained in the Service
Passport in your vehicle.
Your vehicle is equipped with an
emission control system to meet all
applicable emission regulations. There
are three emission control systems, as
follows.
(1) Crankcase emission control system
(2) Evaporative emission control system
(3) Exhaust emission control system
In order to ensure the proper function
of the emission control systems, it
is recommended that you have your
vehicle inspected and maintained
by an authorized HYUNDAI dealer in
accordance with the maintenance
schedule in this manual.
NOTICE
For the Inspection and Maintenance
Test (with Electronic Stability Control
(ESC) system)
• To prevent the vehicle from misfiring
during dynamometer testing, turn
the Electronic Stability Control
(ESC) system off by pressing the ESC
switch (ESC OFF light illuminated).
• After dynamometer testing is
completed, turn the ESC system back
on by pressing the ESC switch again.
1. Crankcase emission control
system
The positive crankcase ventilation system
is employed to prevent air pollution
caused by blow-by gases being emitted
from the crankcase. This system supplies
fresh filtered air to the crankcase through
the air intake hose. Inside the crankcase,
the fresh air mixes with blow-by gases,
which then pass through the PCV valve
into the induction system.
2. Evaporative emission control
system
The Evaporative Emission Control System
is designed to prevent fuel vapors from
escaping into the atmosphere.
Canister
Fuel vapors generated inside the fuel
tank are absorbed and stored in the
onboard canister. When the engine is
running, the fuel vapors absorbed in the
canister are drawn into the surge tank
through the purge control solenoid valve.
Purge Control Solenoid Valve (PCSV)
The purge control solenoid valve
is controlled by the Engine Control
Module (ECM); when the engine coolant
temperature is low during idling, the
PCSV closes so that evaporated fuel
is not taken into the engine. After the
engine warms-up during ordinary
driving, the PCSV opens to introduce
evaporated fuel to the engine.
EMISSION CONTROL SYSTEM