Page 533 of 638

08
8 -7
If your temperature gauge indicates
overheating, you experience a loss of
power, or hear loud pinging or knocking,
the engine may be overheating. If this
happens, you should:
1. Pull off the road and stop as soon as it
is safe to do so.
2. Shift the gear to P (Park) and set the
parking brake. If the air conditioning is
ON, turn it OFF.
3. If engine coolant is running out under
the vehicle or steam is coming out
from the hood, stop the engine. Do
not open the hood until the coolant
has stopped running or the steaming
has stopped. If there is no visible
loss of engine coolant and no steam,
leave the engine running and check
to be sure the engine cooling fan is
operating. If the fan is not running,
turn the engine off.
WARNING
While the engine is running, keep hands, clothing and tools
away from the moving parts
such as the cooling fan and
drive belt to prevent serious
injury.
4. Check for coolant leaking from the
radiator, hoses or under the vehicle. (If
the air conditioning had been in use, it
is normal for cold water to be draining
from it when you stop.)
5. If engine coolant is leaking out, stop
the engine immediately and call the
nearest authorized HYUNDAI dealer
for assistance.
WARNING
Never remove the engine coolant cap and/or water-
cooled intercooler coolant
cap or the drain plug while the
engine and radiator are hot.
Hot coolant and steam may blow out
under pressure, causing serious injury.
Turn the engine off and wait until the
engine cools down. Use extreme care
when removing the coolant cap. Wrap
a thick towel around it, and turn it
counterclockwise slowly to the first
stop. Step back while the pressure is
released from the cooling system. When
you are sure all the pressure has been
released, press down on the cap, using
a thick towel, and continue turning
counterclockwise to remove it.
IF THE ENGINE OVERHEATS
Page 540 of 638

Emergency situations
8-14
IF YOU HAVE A FLAT TIRE
WARNING
Changing a tire can be dangerous.
Follow the instructions in this section
when changing a tire to reduce the risk
of serious injury or death.
CAUTION
Be careful as you use the jack handle to
stay clear of the flat end. The flat end
has sharp edges that could cause cuts.
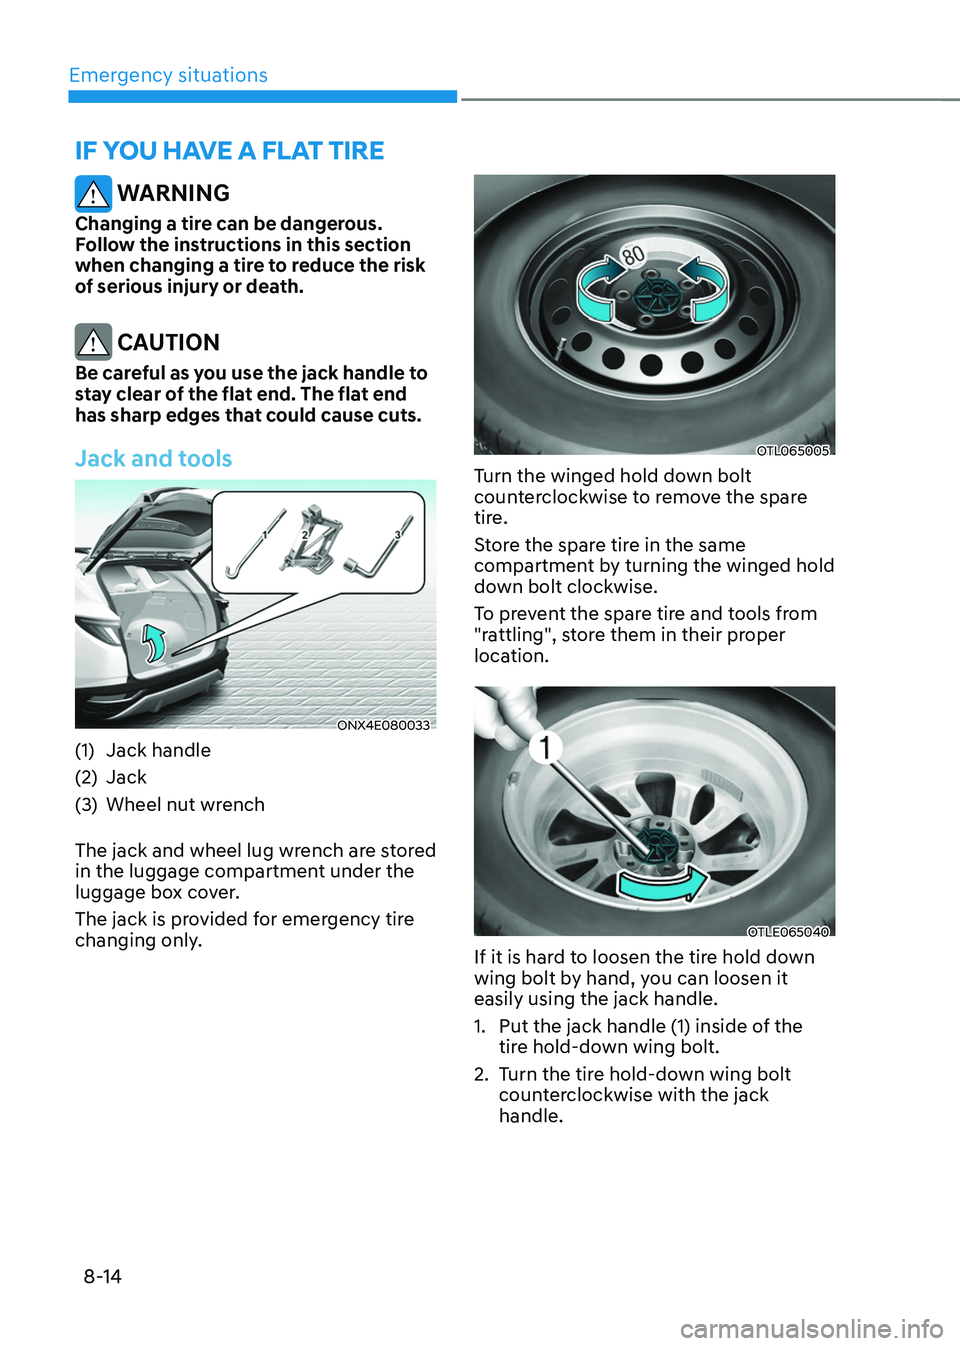
Jack and tools
ONX4E080033
(1) Jack handle
(2) Jack
(3) Wheel nut wrench
The jack and wheel lug wrench are stored
in the luggage compartment under the
luggage box cover.
The jack is provided for emergency tire
changing only.
OTL065005
Turn the winged hold down bolt
counterclockwise to remove the spare
tire.
Store the spare tire in the same
compartment by turning the winged hold
down bolt clockwise.
To prevent the spare tire and tools from
"rattling", store them in their proper
location.
OTLE065040
If it is hard to loosen the tire hold down
wing bolt by hand, you can loosen it
easily using the jack handle.
1. Put the jack handle (1) inside of the
tire hold-down wing bolt.
2. Turn the tire hold-down wing bolt
counterclockwise with the jack
handle.
Page 542 of 638
Emergency situations
8-16
ONX4080024L
6. Loosen the wheel bolts
counterclockwise one turn each in
the order shown above, but do not
remove any wheel bolts until the tire
has been raised off of the ground.
ONX4080026L
7. Place the jack at the designated
jacking position under the frame
closest to the tire you are changing.
The jacking positions are plates
welded to the frame with two
notches. Never jack at any other
position or part of the vehicle. Doing
so may damage the side seal molding
or other parts of the vehicle.
ONX4080027L
8. Insert the jack handle into the jack
and turn it clockwise, raising the
vehicle until the tire clears the ground.
Make sure the vehicle is stable on the
jack.
9. Loosen the lug nuts with the wheel
lug nut wrench and remove them with
your fingers. Remove the wheel from
the studs and lay it flat on the ground
out of the way. Remove any dirt or
debris from the studs, mounting
surfaces, and wheel.
Page 543 of 638

08
8-17
WARNING
Wheels may have sharp edges. Handle
them carefully to avoid possible severe
injury. Before putting the wheel into
place, be sure that there is nothing on
the hub or wheel (such as mud, tar,
gravel, etc.) that interferes with the
wheel from fitting solidly against the
hub.
If there is, remove it. If there is not
good contact on the mounting surface
between the wheel and hub, the wheel
nuts could come loose and cause the
loss of a wheel. Loss of a wheel may
result in loss of control of the vehicle.
This may cause serious injury or death.
10. Install the spare tire onto the studs of
the hub.
11. Tighten the lug nuts with your fingers
onto the studs with the smaller end of
the lug nuts closest to the wheel.
12. Lower the vehicle to the ground
by turning the jack handle
counterclockwise.
OTL065007
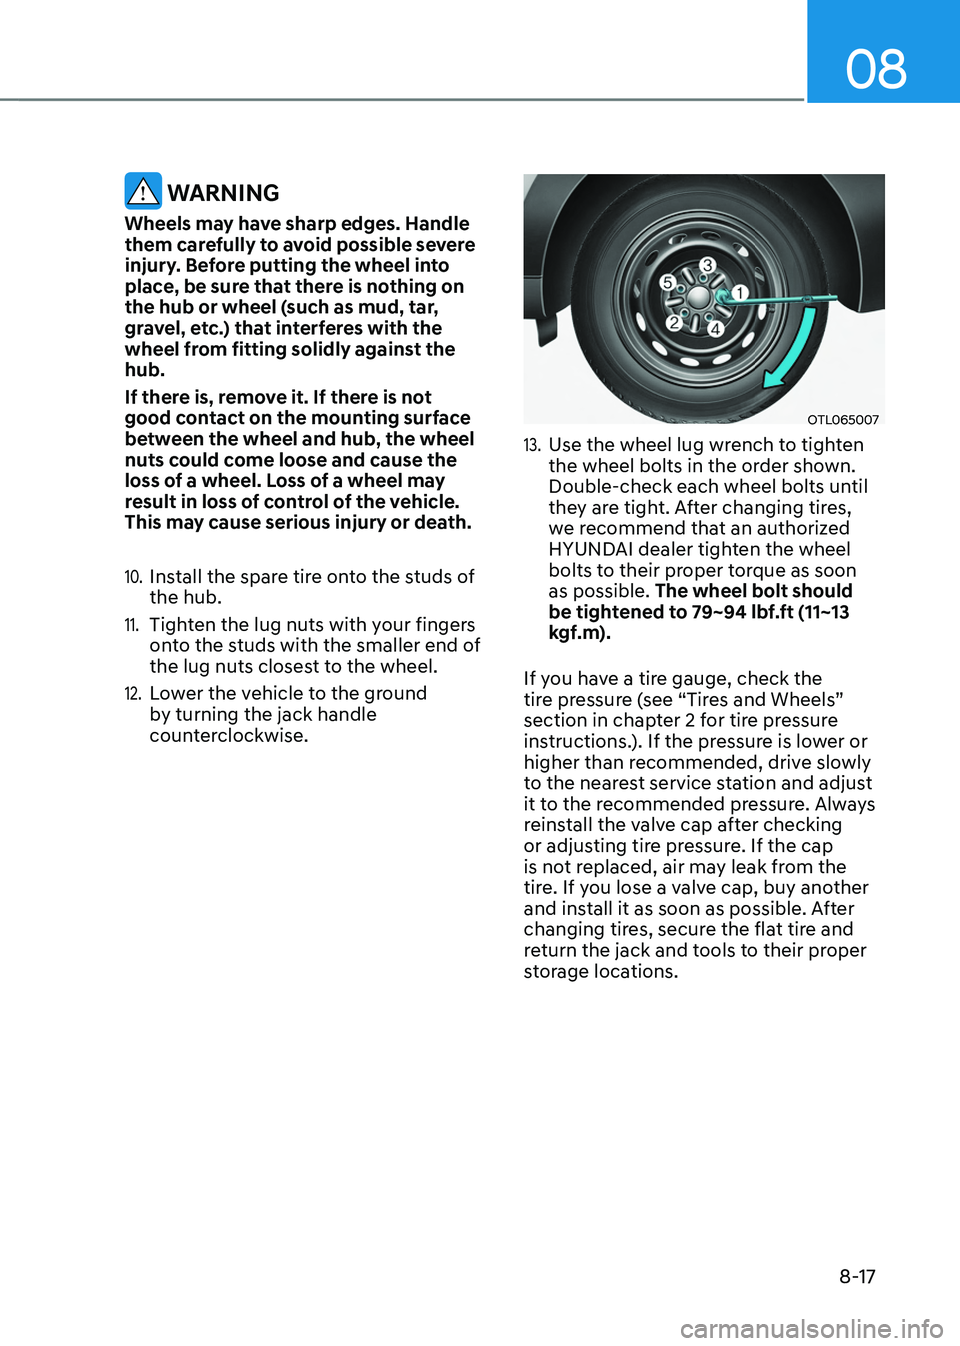
13. Use the wheel lug wrench to tighten
the wheel bolts in the order shown.
Double-check each wheel bolts until
they are tight. After changing tires,
we recommend that an authorized
HYUNDAI dealer tighten the wheel
bolts to their proper torque as soon
as possible. The wheel bolt should
be tightened to 79~94 lbf.ft (11~13
kgf.m).
If you have a tire gauge, check the
tire pressure (see “Tires and Wheels”
section in chapter 2 for tire pressure
instructions.). If the pressure is lower or
higher than recommended, drive slowly
to the nearest service station and adjust
it to the recommended pressure. Always
reinstall the valve cap after checking
or adjusting tire pressure. If the cap
is not replaced, air may leak from the
tire. If you lose a valve cap, buy another
and install it as soon as possible. After
changing tires, secure the flat tire and
return the jack and tools to their proper
storage locations.
Page 548 of 638
Emergency situations
8-22
When towing your vehicle in an
emergency without wheel dollies:
1. Release EPB before turning off the
engine.
2. Place the ignition switch to the OFF
position.
3. Change the gear to N (Neutral) while
pressing the brake pedal.
4. Place the ignition switch to the ACC
position.
CAUTION
Failure to shift the gear to N (Neutral)
may cause internal damage to the
transmission.
Removable towing hook
1. Open the tailgate, and remove the
towing hook from the tool case.
„„Front
ONX4080018
„„Rear
ONX4E080041
2. Remove the hole cover by pressing
the lower part of the cover on the
bumper.
3. Install the towing hook by turning it
clockwise into the hole until it is fully
secured.
4. Remove the towing hook and install
the cover after use.
Page 570 of 638

Maintenance
9-20
ENGINE COOLANT
The high-pressure cooling system has a
reservoir filled with year-round antifreeze
coolant. The reservoir is filled at the
factory.
Check the antifreeze protection and
coolant level at least once a year, at
the beginning of the winter season and
before traveling to a colder climate.
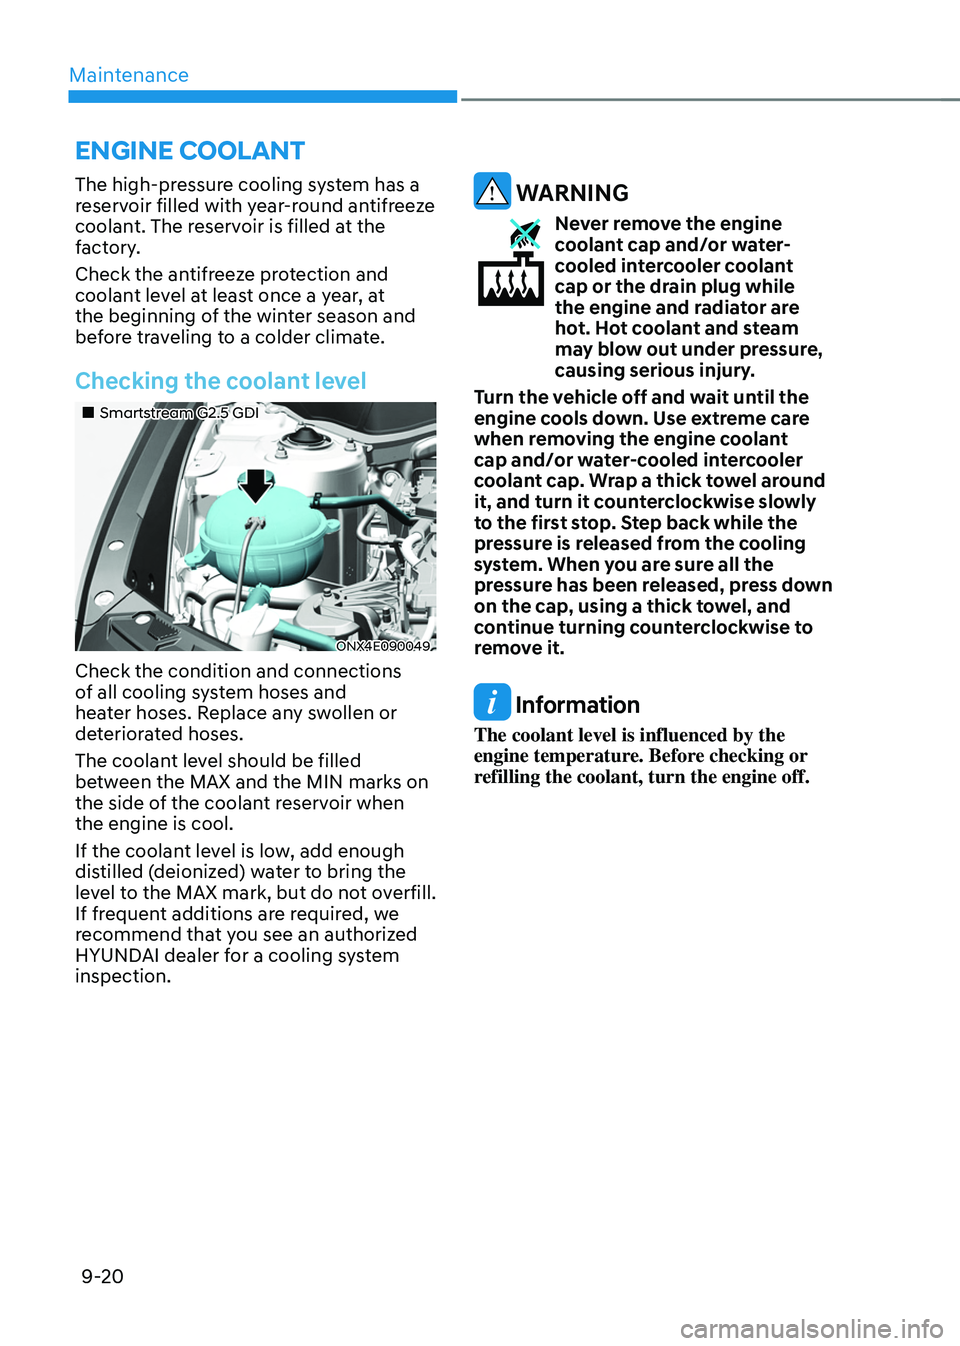
Checking the coolant level
„„Smartstream G2.5 GDI
ONX4E090049
Check the condition and connections
of all cooling system hoses and
heater hoses. Replace any swollen or
deteriorated hoses.
The coolant level should be filled
between the MAX and the MIN marks on
the side of the coolant reservoir when
the engine is cool.
If the coolant level is low, add enough
distilled (deionized) water to bring the
level to the MAX mark, but do not overfill.
If frequent additions are required, we
recommend that you see an authorized
HYUNDAI dealer for a cooling system
inspection.
WARNING
Never remove the engine coolant cap and/or water-
cooled intercooler coolant
cap or the drain plug while
the engine and radiator are
hot. Hot coolant and steam
may blow out under pressure,
causing serious injury.
Turn the vehicle off and wait until the
engine cools down. Use extreme care
when removing the engine coolant
cap and/or water-cooled intercooler
coolant cap. Wrap a thick towel around
it, and turn it counterclockwise slowly
to the first stop. Step back while the
pressure is released from the cooling
system. When you are sure all the
pressure has been released, press down
on the cap, using a thick towel, and
continue turning counterclockwise to
remove it.
Information
The coolant level is influenced by the
engine temperature. Before checking or
refilling the coolant, turn the engine off.
Page 585 of 638
09
9-35
By jump starting
After a jump start from a good battery,
drive the vehicle for 20-30 minutes
before it is shutoff. The vehicle may
not restart if you shut it off before the
battery had a chance to adequately
recharge. See “Jump Starting” in chapter
8 for more information on jump starting
procedures.
Information
An inappropriately disposed battery can be harmful to the
environment and human health.
Dispose of the battery according
to your local law(s) or regulation.
Reset items
The following items may need to be reset
after the battery has been discharged or
the battery has been disconnected.
• Auto up/down window (see chapter 5)
• Sunroof (see chapter 5)
• Trip computer (see chapter 5)
• Climate control system (see chapter 5)
• Driver position memory system (see
chapter 5)
• Clock (see chapter 5)
• Infotainment system (see
infotainment system manual)
Page 607 of 638
09
9-57
ONX4090026
Stop/Tail lamp (Outside)
1. Turn off the engine.
2. Open the liftgate.
3. Loosen the lamp assembly retaining
screws with a cross-tip screwdriver.
4. Remove the rear combination lamp
assembly from the body of the
vehicle.
5. Remove the socket from the
assembly by turning the socket
counterclockwise until the tabs on
the socket align with the slots on the
assembly.
ONX4090045
6. Remove the bulb from the socket
by pressing it in and rotating it
counterclockwise until the tabs on the
bulb align with the slots in the socket.
Pull the bulb out of the socket.
7. Insert a new bulb by inserting it into
the socket and rotating it until it locks
into place.
8. Install the socket into the assembly by
aligning the tabs on the socket with
the slots in the assembly. Push the
socket into the assembly and turn the
socket clockwise.
9. Reinstall the lamp assembly to the
body of the vehicle.