2022 HYUNDAI TUCSON HYBRID warning lights
[x] Cancel search: warning lightsPage 145 of 630

04
4-33
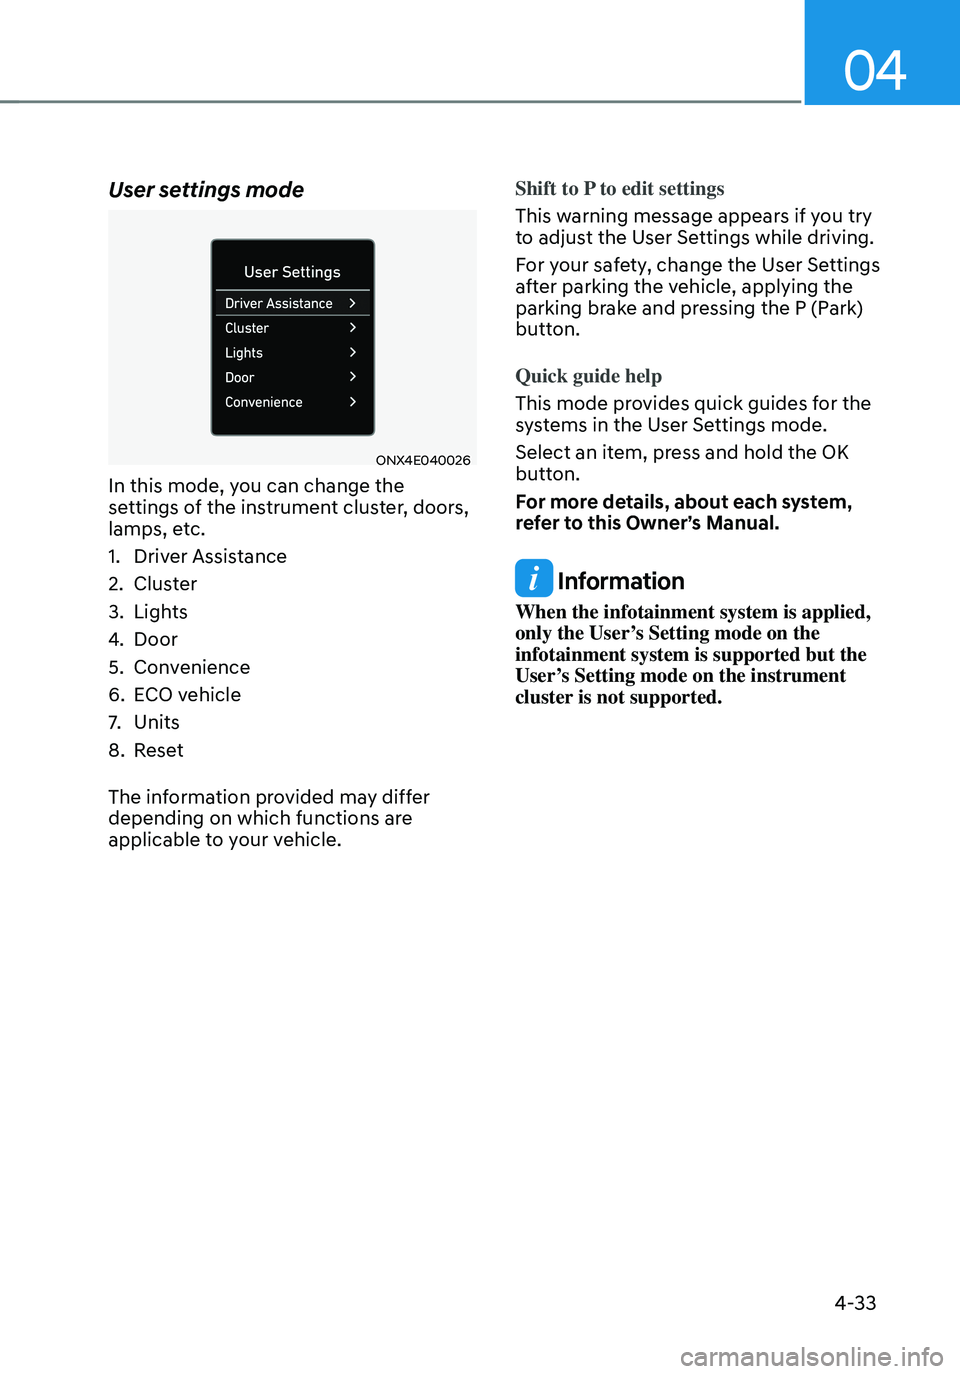
User settings mode
ONX4E040026
In this mode, you can change the
settings of the instrument cluster, doors,
lamps, etc.
1. Driver Assistance
2. Cluster
3. Lights
4. Door
5. Convenience
6. ECO vehicle
7. Units
8. Reset
The information provided may differ
depending on which functions are
applicable to your vehicle. Shift to P to edit settings
This warning message appears if you try
to adjust the User Settings while driving.
For your safety, change the User Settings
after parking the vehicle, applying the
parking brake and pressing the P (Park)
button.
Quick guide help
This mode provides quick guides for the
systems in the User Settings mode.
Select an item, press and hold the OK
button.
For more details, about each system,
refer to this Owner’s Manual.
Information
When the infotainment system is applied,
only the User’s Setting mode on the
infotainment system is supported but the
User’s Setting mode on the instrument
cluster is not supported.
Page 148 of 630

Instrument cluster
4-36
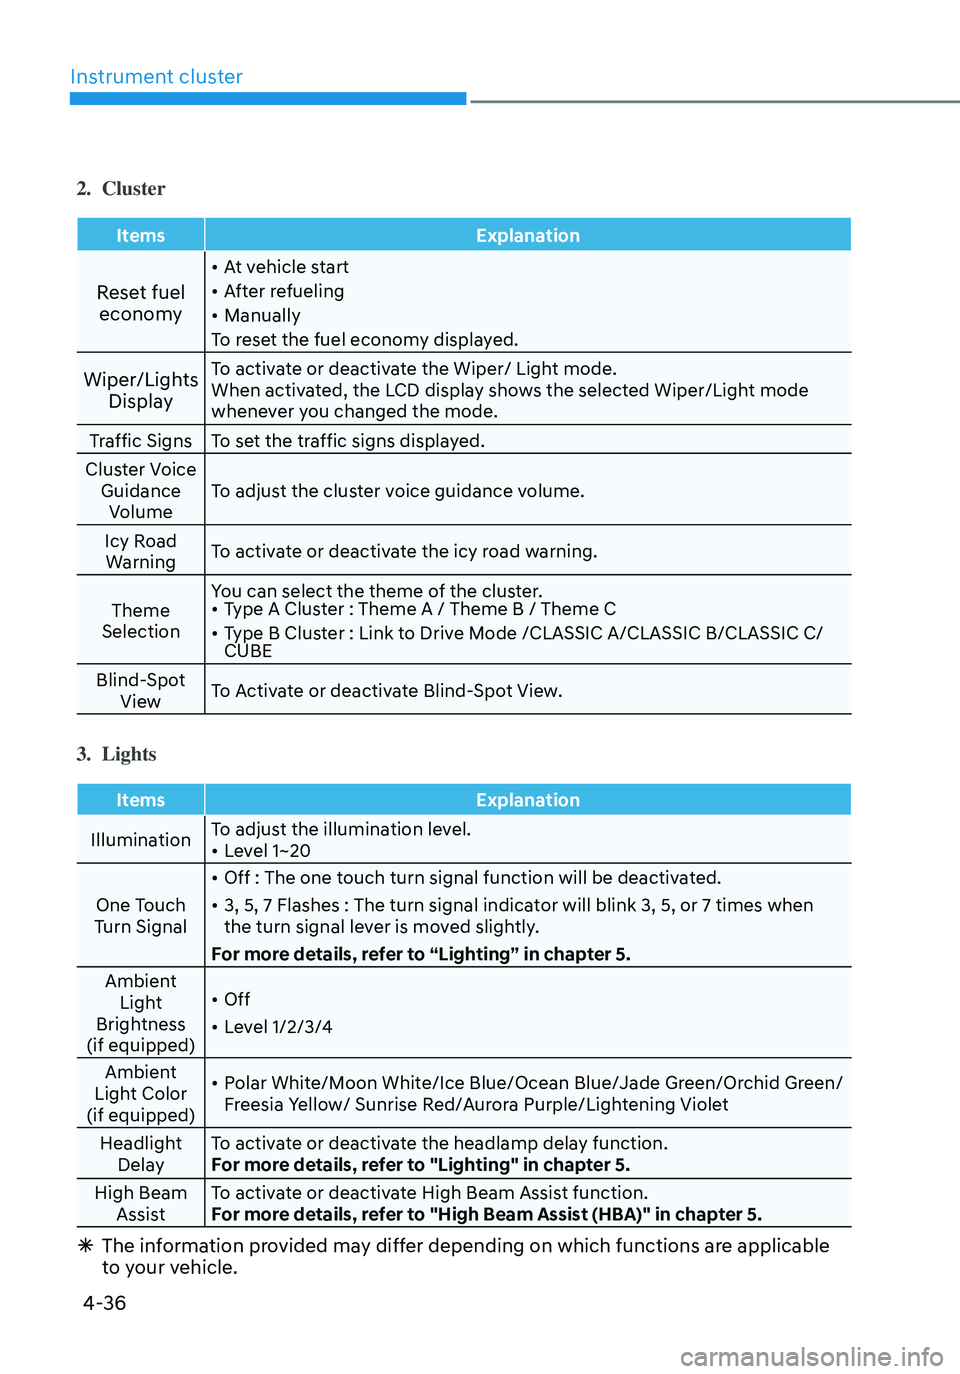
2. Cluster
ItemsExplanation
Reset fuel
economy
• At vehicle start
• After refueling
• Manually
To reset the fuel economy displayed.
Wiper/Lights DisplayTo activate or deactivate the Wiper/ Light mode.
When activated, the LCD display shows the selected Wiper/Light mode
whenever you changed the mode.
Traffic Signs To set the traffic signs displayed.
Cluster Voice Guidance Volume To adjust the cluster voice guidance volume.
Icy Road Warning To activate or deactivate the icy road warning.
Theme
Selection You can select the theme of the cluster.
• Type A Cluster : Theme A / Theme B / Theme C
• Type B Cluster : Link to Drive Mode /CLASSIC A/CLASSIC B/CLASSIC C/
CUBE
Blind-Spot View To Activate or deactivate Blind-Spot View.
3. Lights
Items
Explanation
Illumination To adjust the illumination level.
• Level 1~20
One Touch
Turn Signal
• Off : The one touch turn signal function will be deactivated.
• 3, 5, 7 Flashes : The turn signal indicator will blink 3, 5, or 7 times when
the turn signal lever is moved slightly.
For more details, refer to “Lighting” in chapter 5.
Ambient Light
Brightness
(if equipped)
• Off
• Level 1/2/3/4
Ambient
Light Color
(if equipped)
• Polar White/Moon White/Ice Blue/Ocean Blue/Jade Green/Orchid Green/
Freesia Yellow/ Sunrise Red/Aurora Purple/Lightening Violet
Headlight Delay To activate or deactivate the headlamp delay function.
For more details, refer to "Lighting" in chapter 5.
High Beam Assist To activate or deactivate High Beam Assist function.
For more details, refer to "High Beam Assist (HBA)" in chapter 5.
Ã
The information provided may differ depending on which functions are applicable
to your vehicle.
Page 161 of 630

Convenient features
5-4
Remote key (if equipped)
OIG046001
Your HYUNDAI uses a remote key, which
you can use to lock or unlock the driver
and passenger doors or the liftgate.
1.
Door Lock
2.
Door Unlock
3.
Liftga
te Unlock
4.
Panic
Locking
To lock :
1.
Close all doors, engine hood and
tailga
te.
2.
Press the Door L
ock button (1) on the
remote key.
3.
The doors will lock. The hazar
d
warning lights will blink.
4.
Make sur
e the doors are locked by
checking the indicator light on the
driver side door lock button.
WARNING
Do not leave the Smart Key in
your vehicle with children that are
unattended or unsupervised.
Children could inadvertently press
the Engine Start/Stop button or could
operate the power windows or other
vehicle controls or even cause the
vehicle to move. This could result in
serious injury or death.
Unlocking
To unlock:
1.
Press the Door Unlock butt
on (2) on
the remote key.
2.
The doors will unlock. The hazar
d
warning lights will blink two times.
Information
After unlocking the doors, the doors will
lock automatically after 30 seconds unless
a door is opened.
Accessing your vehicle
Page 162 of 630

05
5-5
Liftgate unlocking
To unlock:
1.
Press the Lift
gate Unlock button (3)
on the remote key for more than one
second.
2.
The hazard w
arning liftgate will blink
two times. Once the liftgate is opened
and then closed, the liftgate will lock
automatically.
Information
• After unlocking the liftgate, the liftgate
will lock automatically.
• The word “HOLD” is written on the
button to inform you that you must
press and hold the button for more
than one second.
Panic alarm
The horn sounds and the hazard warning
lights blink for about 30 seconds if this
button is pressed for more than 1 second.
To stop the horn and lights, press any
button on the transmitter.
Start-up
For detailed information refer to “Key
Ignition Switch” in chapter 6.
NOTICE
To prevent damaging the remote key:
• Keep the remote key away from
liquids or any type of extreme heat.
If water or liquid gets inside of the
remote or if the remote is subjected
to extreme heat, damage to the
internal circuit may result. This
would void the vehicle warranty.
• Avoid dropping or throwing the
remote key.
• Protect the remote key from extreme
temperatures.
Mechanical key (if equipped)
OIG046004
If the remote key does not operate
normally, you can lock or unlock the door
by using the mechanical key.
To unfold the key, press the release
button then the key will unfold
automatically.
To fold the key, fold the key manually
while pressing the release button.
NOTICE
Do not fold the key without pressing the
release button. This may damage the
key.
Remote key precautions
The remote key will not work if any of the
following occur:
• The key is in the ignition switch.
• You exceed the operating distance
limit (about 30 feet [10 m]).
• The remote key battery is weak.
• Other vehicles or objects may be
blocking the signal.
• The weather is extremely cold.
• The remote key is close to a radio
transmitter such as a radio station or
an airport which can interfere with
normal operation of the remote key.
Page 165 of 630

Convenient features
5-8
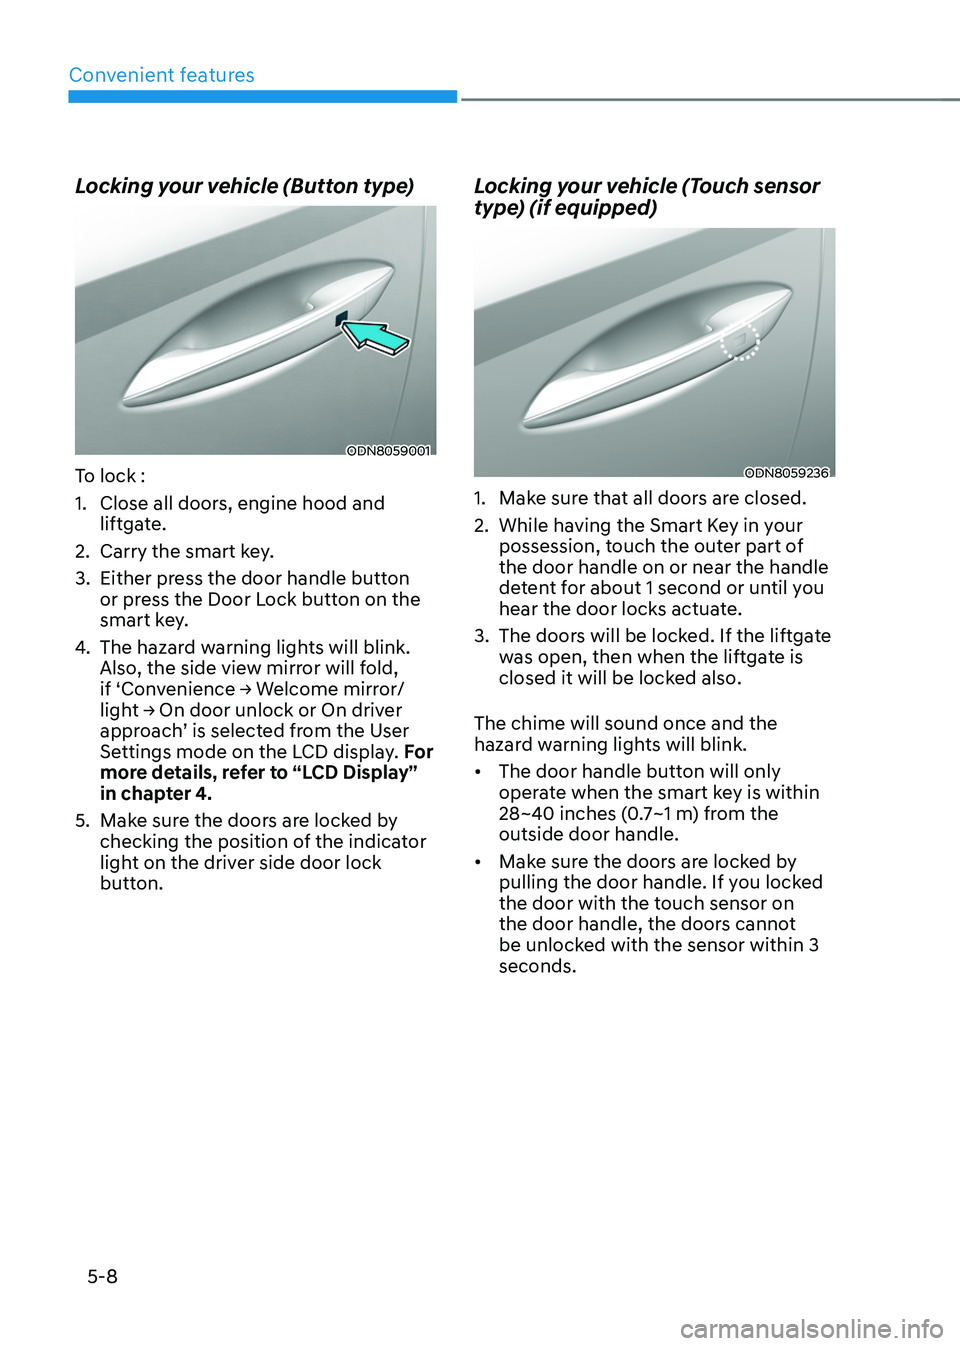
Locking your vehicle (Button type)
ODN8059001
To lock :
1.
Close all doors, engine hood and
lift
gate.
2.
Carry the smart ke
y.
3.
Either press the door handle butt
on
or press the Door Lock button on the
smart key.
4.
The hazard w
arning lights will blink.
Also, the side view mirror will fold,
if
‘Con
venience
→ W
elcome
mirr
or/
light
→ On door unlock or On driv
er
approach
’ is selected from the User
Settings mode on the LCD display. For
more details, refer to “LCD Display”
in chapter 4.
5.
Make sur
e the doors are locked by
checking the position of the indicator
light on the driver side door lock
button.
Locking your vehicle (Touch sensor
type) (if equipped)
ODN8059236
1. Make sure that all doors are closed.
2.
While having the Smart K
ey in your
possession, touch the outer part of
the door handle on or near the handle
detent for about 1 second or until you
hear the door locks actuate.
3.
The doors will be lock
ed. If the liftgate
was open, then when the liftgate is
closed it will be locked also.
The chime will sound once and the
hazard warning lights will blink.
• The door handle button will only
operate when the smart key is within
28~40 inches (0.7~1 m) from the
outside door handle.
• Make sure the doors are locked by
pulling the door handle. If you locked
the door with the touch sensor on
the door handle, the doors cannot
be unlocked with the sensor within 3
seconds.
Page 167 of 630

Convenient features
5-10
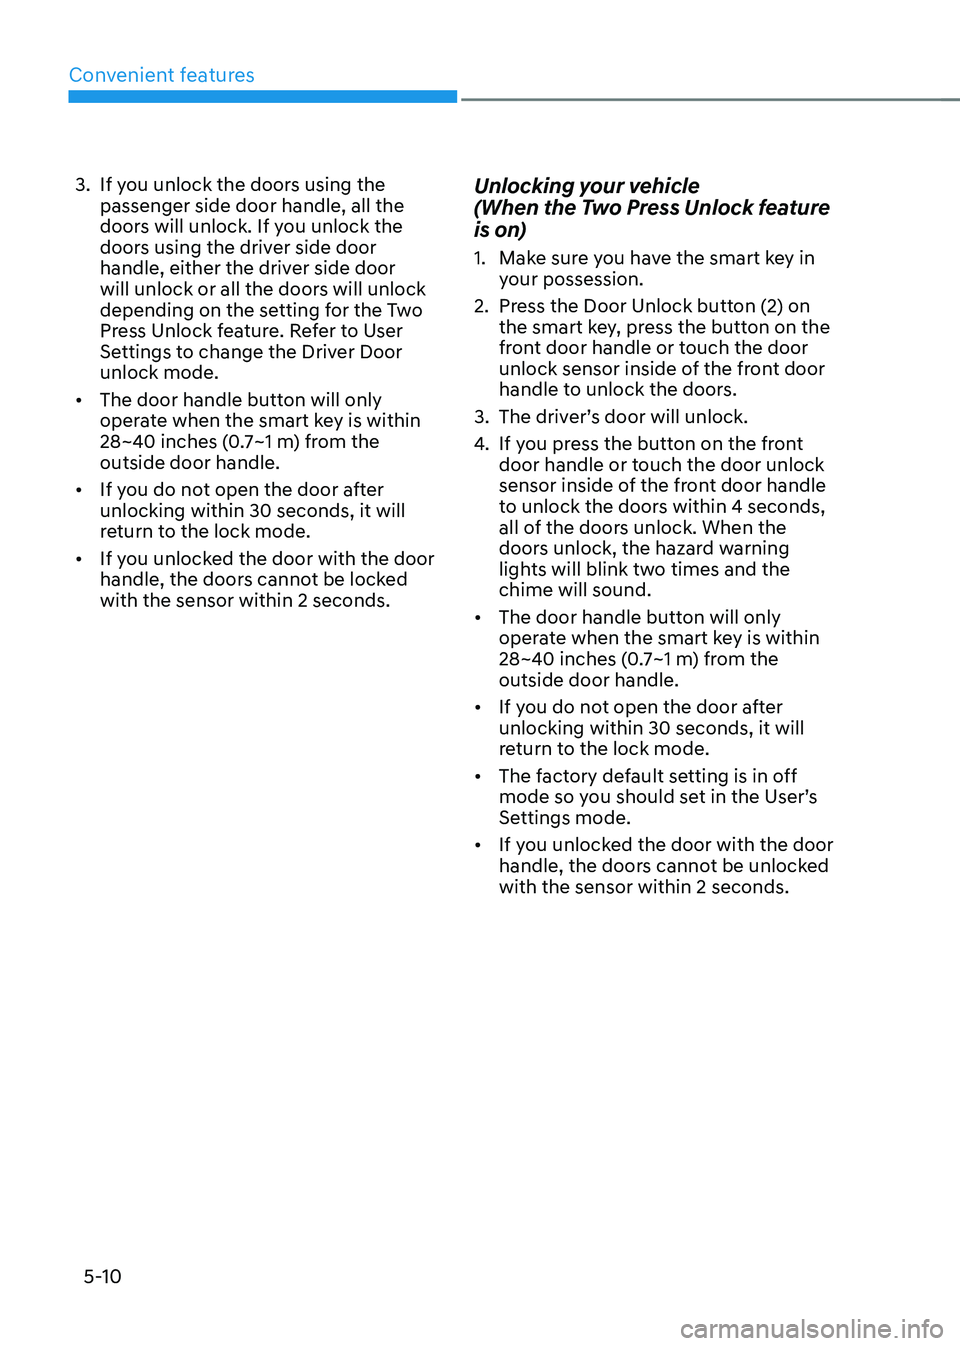
3. If you unlock the doors using the
passenger side door handle, all the
doors will unlock. If you unlock the
doors using the driver side door
handle, either the driver side door
will unlock or all the doors will unlock
depending on the setting for the Two
Press Unlock feature. Refer to User
Settings to change the Driver Door
unlock mode.
• The door handle button will only
operate when the smart key is within
28~40 inches (0.7~1 m) from the
outside door handle.
• If you do not open the door after
unlocking within 30 seconds, it will
return to the lock mode.
• If you unlocked the door with the door
handle, the doors cannot be locked
with the sensor within 2 seconds.Unlocking your vehicle
(When the Two Press Unlock feature
is on)
1. Make sure you have the smart key in
y
our possession.
2.
Press the Door Unlock butt
on (2) on
the smart key, press the button on the
front door handle or touch the door
unlock sensor inside of the front door
handle to unlock the doors.
3.
The driver’
s door will unlock.
4.
If you pr
ess the button on the front
door handle or touch the door unlock
sensor inside of the front door handle
to unlock the doors within 4 seconds,
all of the doors unlock. When the
doors unlock, the hazard warning
lights will blink two times and the
chime will sound.
• The door handle button will only
operate when the smart key is within
28~40 inches (0.7~1 m) from the
outside door handle.
• If you do not open the door after
unlocking within 30 seconds, it will
return to the lock mode.
• The factory default setting is in off
mode so you should set in the User’s
Settings mode.
• If you unlocked the door with the door
handle, the doors cannot be unlocked
with the sensor within 2 seconds.
Page 168 of 630

05
5-11
Two Press Unlock Feature
The priority for unlocking the driver door
only, or unlocking all the doors with
one press may be adjusted in the User
Settings mode in the cluster LCD display.
The Two Press Unlock feature, when
enabled, will require the user to press
the door unlock button once for driver
door only and twice for unlocking all the
doors.
Select or Deselect the Two Press Unlock
feature in the User Settings mode in the
cluster LCD display. The option can be
found under the following menu:
User
Se
ttings
→ Door → T
wo
Pr
ess
Unlock
The T
wo Press Unlock feature can also be
enabled or disabled by pressing the door
lock and unlock buttons simultaneously
on the Key FOB:
Press and hold both the Door Lock
button and the Door Unlock button
simultaneously until the hazard warning
lights blink.
This will enable or disable the Two Press
Unlock feature. Repeat this procedure to
enable/disable the mode again.
Information
If you press the front passenger outside
door handle with the smart key in your
possession, all the doors will unlock.
Opening or Unlocking the Liftgate
To open the liftgate:
1.
If your v
ehicle has a Smart Key, make
sure you have the Smart Key in your
possession.
2.
Press either the lift
gate open/close
button on the vehicle or press and
hold the liftgate open button on
the smart key for more than one
second. The hazard warning lights
will blink twice and the liftgate will be
unlocked. Pull up on the liftgate to
open. If your vehicle is equipped with
power liftgate then the liftgate will
automatically open.
Page 169 of 630

Convenient features
5-12
Remotely starting vehicle (if
equipped)
You can start the vehicle using the
Remote Start button on the smart key.
To start the vehicle remotely:
1.
Bef
ore you can use remote start your
vehicle, the door lock button must be
pressed. Press the door lock button
on the Smart Key. You must be within
about 32 feet (10m) from your vehicle.
2.
Press and hold the r
emote start
button on your Smart Key. You must
press the button within 4 seconds
from when you pressed the door lock
button to activate the remote start.
3.
The hazard w
arning lights will blink
and the engine will start.
4.
To turn o
ff the remote start function,
press the Remote Start button once.
Information
• The vehicle must be in P (Park) for the
remote start function to start.
• The engine turns off if you get on the
vehicle without a registered smart key.
• The engine turns off if you do not get
on the vehicle within 10 minutes after
remotely starting the vehicle.
• The Remote Start button may not
operate if the smart key is not within 32
feet (10 m).
• The vehicle will not remotely start if the
engine hood or liftgate is opened.
• Do not idle the engine for a long period.
Remote Smart Parking Assist
Feature (if equipped)
Some models are equipped with Remote
Smart Parking Assist Feature. With the
Smart Key, the vehicle can be moved
forward or backward remotely to enter or
exit a tight parking space.
For more details, refer to “Remote
Smart Parking Assist (RSPA)” section in
chapter 7.
Panic alarm
The horn sounds and the hazard warning
lights blink for about 30 seconds if
this button is pressed for more than 1
seconds. To stop the horn and lights,
press any button on the transmitter.
Push Button Start/Stop (if equipped)
Some models are equipped with a push
button start instead of a key cylinder.
You can leave your Smart Key in your
pocket or purse when you start your
vehicle.
For more details, refer to the “Engine
Start/Stop Button” section in chapter 6.
Information
If the smart key is not moved for some
time, the detection function for smart key
operation will pause. Lift the smart key to
activate the detection again.
NOTICE
To prevent damaging the smart key:
• Keep the smart key in a cool,
dry place to avoid damage or
malfunction. Exposure to moisture
or high temperature may cause
the internal circuit of the smart key
to malfunction which may not be
covered under warranty.
• Avoid dropping or throwing the
smart key.
• Protect the smart key from extreme
temperatures.