2022 HYUNDAI SONATA ignition
[x] Cancel search: ignitionPage 205 of 546
05
5-75
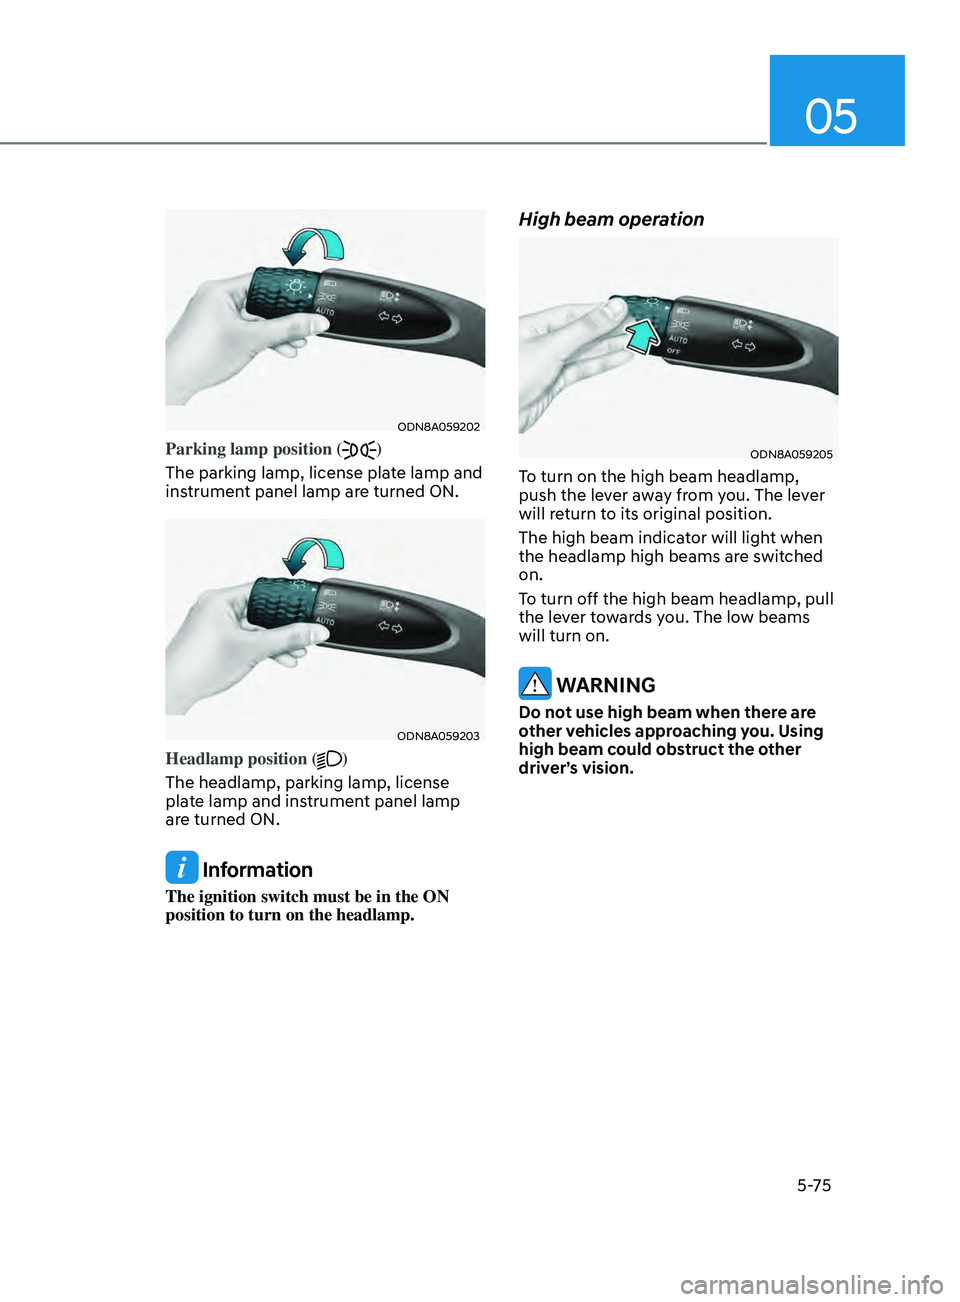
ODN8A059202
Parking lamp position ()
The parking lamp, license plate lamp and
instrument panel lamp are turned ON.
ODN8A059203
Headlamp position ()
The headlamp, parking lamp, license
plate lamp and instrument panel lamp
are turned ON.
Information
The ignition switch must be in the ON
position to turn on the headlamp.
High beam operation
ODN8A059205
To turn on the high beam headlamp,
push the lever away from you. The lever
will return to its original position.
The high beam indicator will light when
the headlamp high beams are switched
on.
To turn off the high beam headlamp, pull
the lever towards you. The low beams
will turn on.
WARNING
Do not use high beam when there are
other vehicles approaching you. Using
high beam could obstruct the other
driver’s vision.
Page 206 of 546
Convenient Features
5 -76
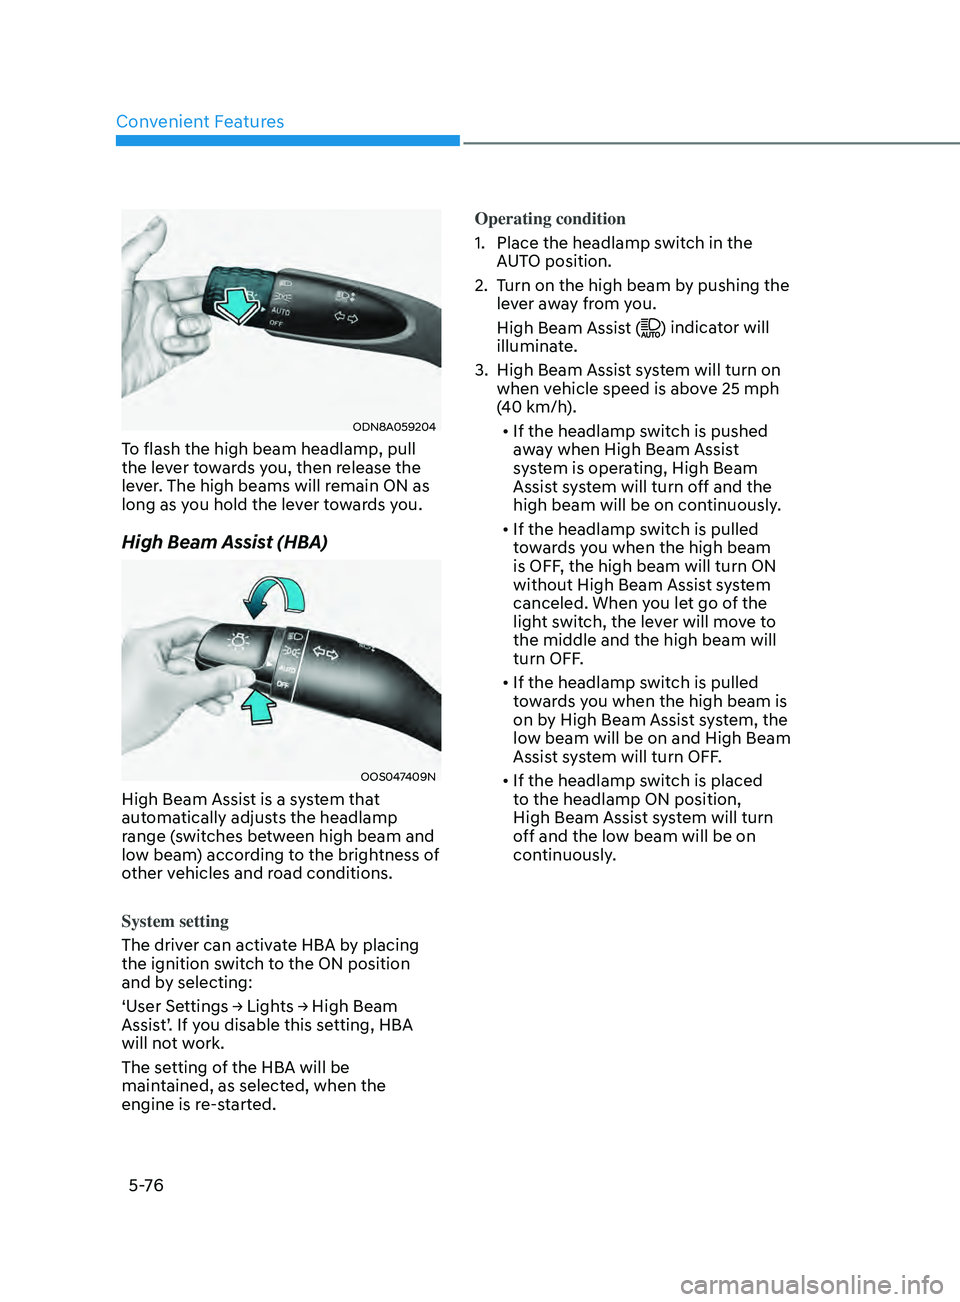
ODN8A059204
To flash the high beam headlamp, pull
the lever towards you, then release the
lever. The high beams will remain ON as
long as you hold the lever towards you.
High Beam Assist (HBA)
OOS047409N
High Beam Assist is a system that
automatically adjusts the headlamp
range (switches between high beam and
low beam) according to the brightness of
other vehicles and road conditions.
System setting
The driver can activate HBA by placing
the ignition switch to the ON position
and by selecting:
‘User Settings → Lights → High Beam
Assis
t’. If you disable this setting, HBA
will not work.
The setting of the HBA will be
maintained, as selected, when the
engine is re-started. Operating condition
1.
Place the headlamp s
witch in the
AUTO position.
2.
T
urn on the high beam by pushing the
lever away from you.
High Beam Assist (
) indicator will
illuminate.
3.
High Beam Assis
t system will turn on
when vehicle speed is above 25 mph
(40 km/h).
• If the headlamp switch is pushed
away when High Beam Assist
system is operating, High Beam
Assist system will turn off and the
high beam will be on continuously.
• If the headlamp switch is pulled
towards you when the high beam
is OFF, the high beam will turn ON
without High Beam Assist system
canceled. When you let go of the
light switch, the lever will move to
the middle and the high beam will
turn OFF.
• If the headlamp switch is pulled
towards you when the high beam is
on by High Beam Assist system, the
low beam will be on and High Beam
Assist system will turn OFF.
• If the headlamp switch is placed
to the headlamp ON position,
High Beam Assist system will turn
off and the low beam will be on
continuously.
Page 209 of 546
05
5-79
Turn signals and lane change signals
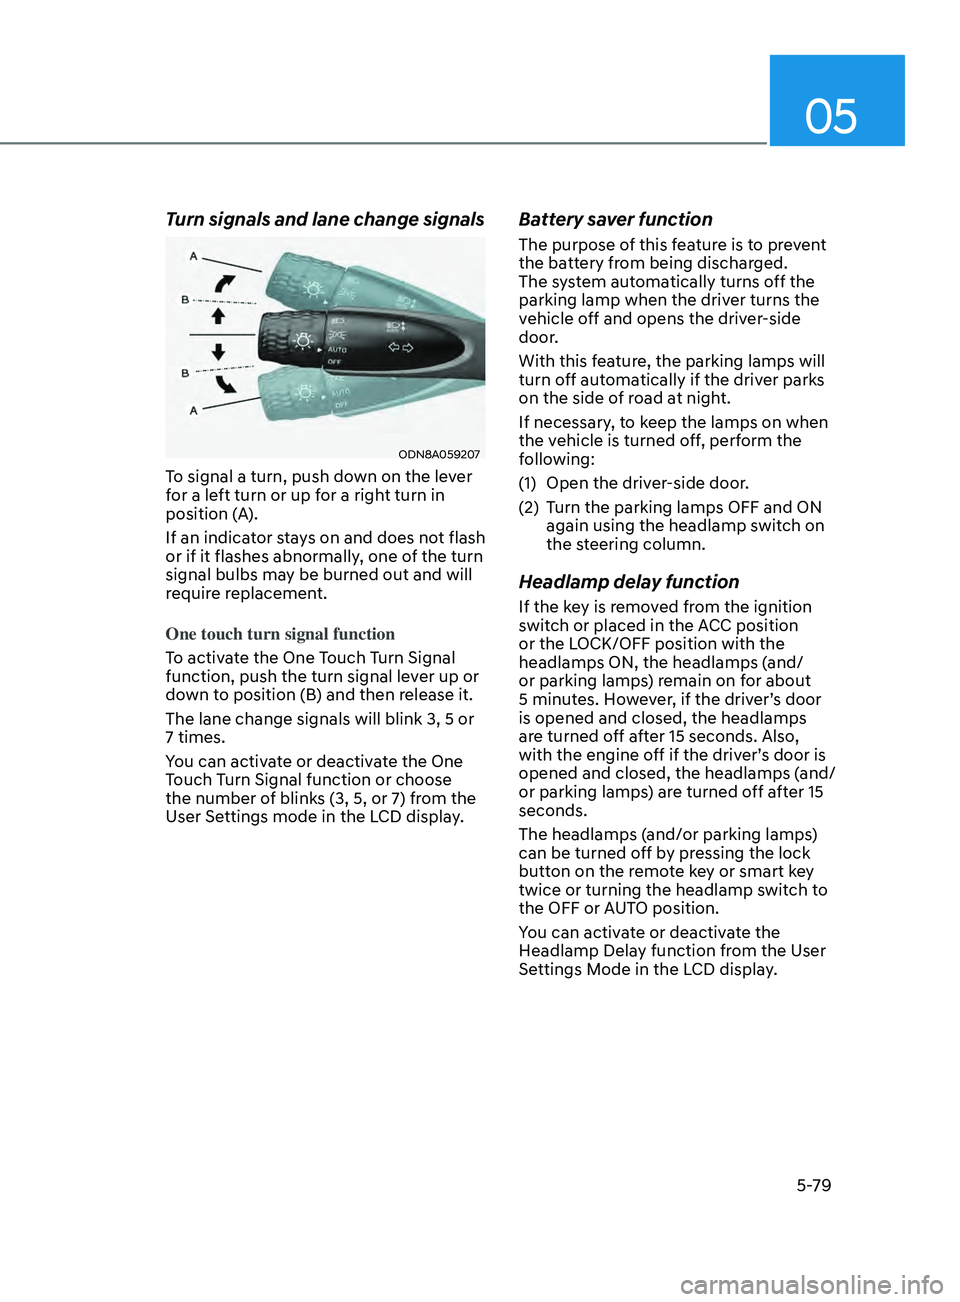
ODN8A059207
To signal a turn, push down on the lever
for a left turn or up for a right turn in
position (A).
If an indicator stays on and does not flash
or if it flashes abnormally, one of the turn
signal bulbs may be burned out and will
require replacement.
One touch turn signal function
To activate the One Touch Turn Signal
function, push the turn signal lever up or
down to position (B) and then release it.
The lane change signals will blink 3, 5 or
7 times.
You can activate or deactivate the One
Touch Turn Signal function or choose
the number of blinks (3, 5, or 7) from the
User Settings mode in the LCD display.
Battery saver function
The purpose of this feature is to prevent
the battery from being discharged.
The system automatically turns off the
parking lamp when the driver turns the
vehicle off and opens the driver-side
door.
With this feature, the parking lamps will
turn off automatically if the driver parks
on the side of road at night.
If necessary, to keep the lamps on when
the vehicle is turned off, perform the
following:
(1)
Open the driv
er-side door.
(2)
T
urn the parking lamps OFF and ON
again using the headlamp switch on
the steering column.
Headlamp delay function
If the key is removed from the ignition
switch or placed in the ACC position
or the LOCK/OFF position with the
headlamps ON, the headlamps (and/
or parking lamps) remain on for about
5 minutes. However, if the driver’s door
is opened and closed, the headlamps
are turned off after 15 seconds. Also,
with the engine off if the driver’s door is
opened and closed, the headlamps (and/
or parking lamps) are turned off after 15
seconds.
The headlamps (and/or parking lamps)
can be turned off by pressing the lock
button on the remote key or smart key
twice or turning the headlamp switch to
the OFF or AUTO position.
You can activate or deactivate the
Headlamp Delay function from the User
Settings Mode in the LCD display.
Page 211 of 546
05
5-81
Front lamps
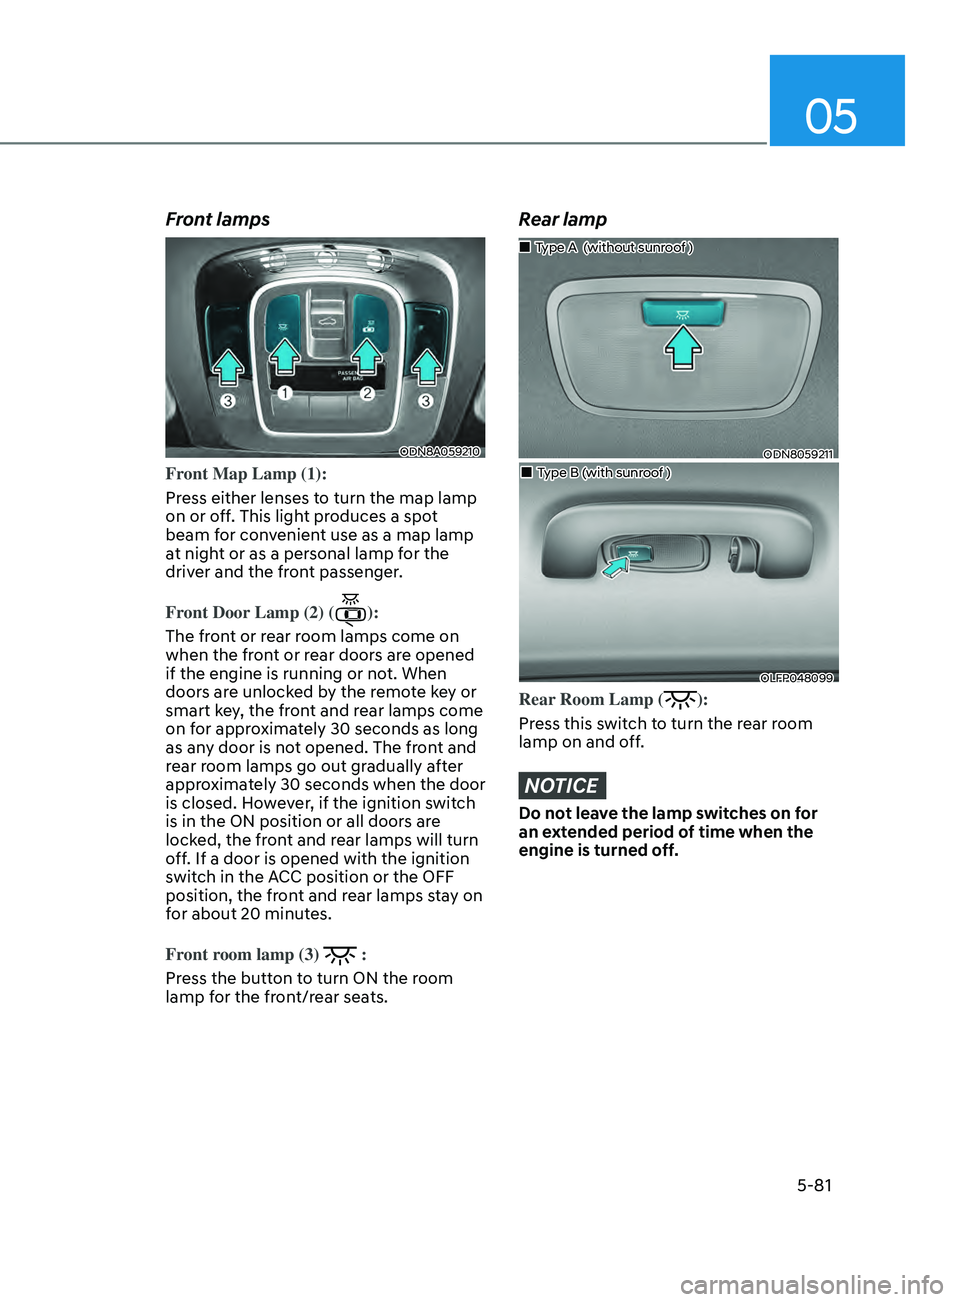
ODN8A059210
Front Map Lamp (1):
Press either lenses to turn the map lamp
on or off. This light produces a spot
beam for convenient use as a map lamp
at night or as a personal lamp for the
driver and the front passenger.
Front Door Lamp (2) (
):
The front or rear room lamps come on
when the front or rear doors are opened
if the engine is running or not. When
doors are unlocked by the remote key or
smart key, the front and rear lamps come
on for approximately 30 seconds as long
as any door is not opened. The front and
rear room lamps go out gradually after
approximately 30 seconds when the door
is closed. However, if the ignition switch
is in the ON position or all doors are
locked, the front and rear lamps will turn
off. If a door is opened with the ignition
switch in the ACC position or the OFF
position, the front and rear lamps stay on
for about 20 minutes.
Front room lamp (3)
:
Press the button to turn ON the room
lamp for the front/rear seats.
Rear lamp
ODN8059211
„„Type A (without sunroof )
„„Type B (with sunroof )
OLFP048099
Rear Room Lamp ():
Press this switch to turn the rear room
lamp on and off.
NOTICE
Do not leave the lamp switches on for
an extended period of time when the
engine is turned off.
Page 214 of 546
Convenient Features5-84
Wipers AnD WAsher s
ODN8059208L
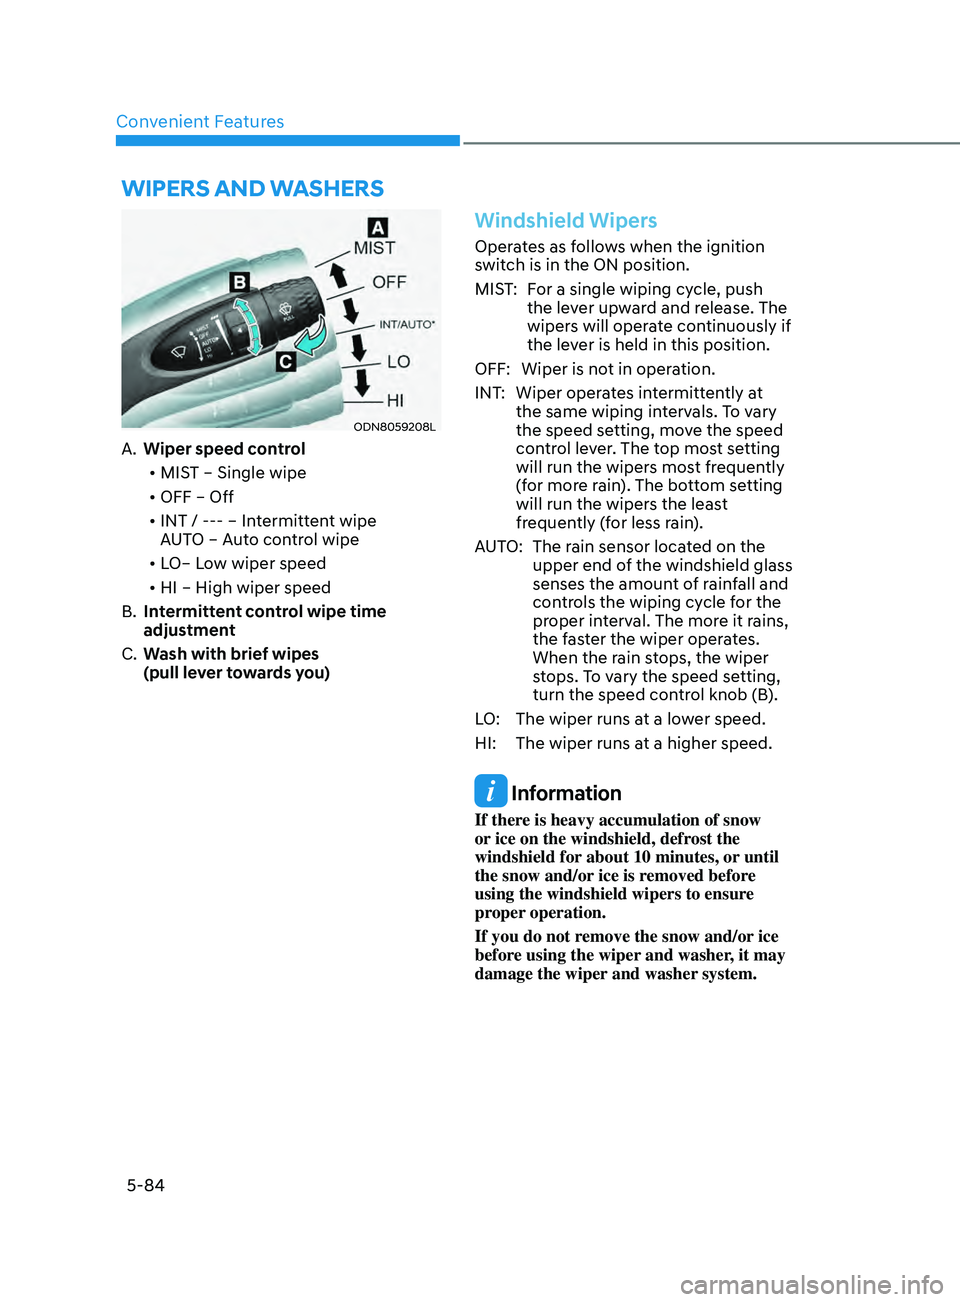
A. Wiper speed control
• MIST – Single wipe
• OFF – Off
• INT / --- – Intermittent wipe
AUTO – Auto control wipe
• LO– Low wiper speed
• HI – High wiper speed
B.
In
termittent control wipe time
adjustment
C.
W
ash with brief wipes
(pull lever towards you)
Windshield Wipers
Operates as follows when the ignition
switch is in the ON position.
MIST: For a single wiping cycle, push the lever upward and release. The
wipers will operate continuously if
the lever is held in this position.
OFF: Wiper is not in operation.
INT: Wiper operates intermittently at the same wiping intervals. To vary
the speed setting, move the speed
control lever. The top most setting
will run the wipers most frequently
(for more rain). The bottom setting
will run the wipers the least
frequently (for less rain).
AUTO: The rain sensor located on the upper end of the windshield glass
senses the amount of rainfall and
controls the wiping cycle for the
proper interval. The more it rains,
the faster the wiper operates.
When the rain stops, the wiper
stops. To vary the speed setting,
turn the speed control knob (B).
LO: The wiper runs at a lower speed.
HI: The wiper runs at a higher speed.
Information
If there is heavy accumulation of snow
or ice on the windshield, defrost the
windshield for about 10 minutes, or until
the snow and/or ice is removed before
using the windshield wipers to ensure
proper operation.
If you do not remove the snow and/or ice
before using the wiper and washer, it may
damage the wiper and washer system.
Page 225 of 546
![HYUNDAI SONATA 2022 Owners Manual 05
5-95
(if eQUippe D )
ODN8A059056[A] : Rear Sensor
Reverse Parking Distance Warning
system assists the driver during reverse
movement of the vehicle by chiming if an
object is sensed within the d HYUNDAI SONATA 2022 Owners Manual 05
5-95
(if eQUippe D )
ODN8A059056[A] : Rear Sensor
Reverse Parking Distance Warning
system assists the driver during reverse
movement of the vehicle by chiming if an
object is sensed within the d](/manual-img/35/56194/w960_56194-224.png)
05
5-95
(if eQUippe D )
ODN8A059056[A] : Rear Sensor
Reverse Parking Distance Warning
system assists the driver during reverse
movement of the vehicle by chiming if an
object is sensed within the distance of 48
in (120 cm) behind the vehicle.
This system is a supplemental system
that senses objects within the range and
location of the sensors, it cannot detect
objects in other areas where sensors are
not installed.
WARNING
• ALWAYS look around your vehicle to
make sure there are not any objects
or obstacles before moving the
vehicle in any direction to prevent a
collision.
• Always pay close attention when the
vehicle is driven close to objects,
particularly pedestrians, and
especially children.
• Be aware that some objects may
not be visible on the screen or be
detected by the sensors, due to the
objects distance, size or material, all
of which can limit the effectiveness
of the sensor.
Operation of Reverse Parking
Distance Warning System
Operating condition
• This system will activate when
backing up with the ignition switch in
the ON position. However, if vehicle
speed exceeds 3 mph (5 km/h), the
system may not detect objects.
• If vehicle speed exceeds 6 mph (10
km/h), the system will not warn you
even though objects are detected.
• When more than two objects are
sensed at the same time, the closest
one will be recognized first.
reverS e pA r K in G Di STA nce wA rnin G ( p Dw )
Page 253 of 546
05
5-123
Information
Using the system primarily in Fresh mode
and Recirculation mode only when needed
is recommended for best results.
Prolonged operation of the heater in
Recirculation mode and without the A/C
ON can cause fogging of the windshield.
In addition, prolonged use of the A/C
ON in Recirculation mode may result in
excessively dry, dehumidified air in the
cabin.
WARNING
• Continued use of the climate control
system operation in Recirculation
mode for a prolonged period of
time may cause drowsiness to the
occupants in the cabin. This may lead
to loss of vehicle control which may
lead to an accident.
• Continued use of the climate control
system operation in Recirculation
mode with the A/C OFF may allow
humidity to increase inside the
cabin. This may cause condensation
to accumulate on the windshield and
obscure visibility.
• Do not sleep in your vehicle or
remain parked in your vehicle with
the windows up and either the
heater or the air conditioning ON for
prolonged periods of time. Doing so
may increase the levels of carbon
dioxide in the cabin which may lead
to serious injury or death.
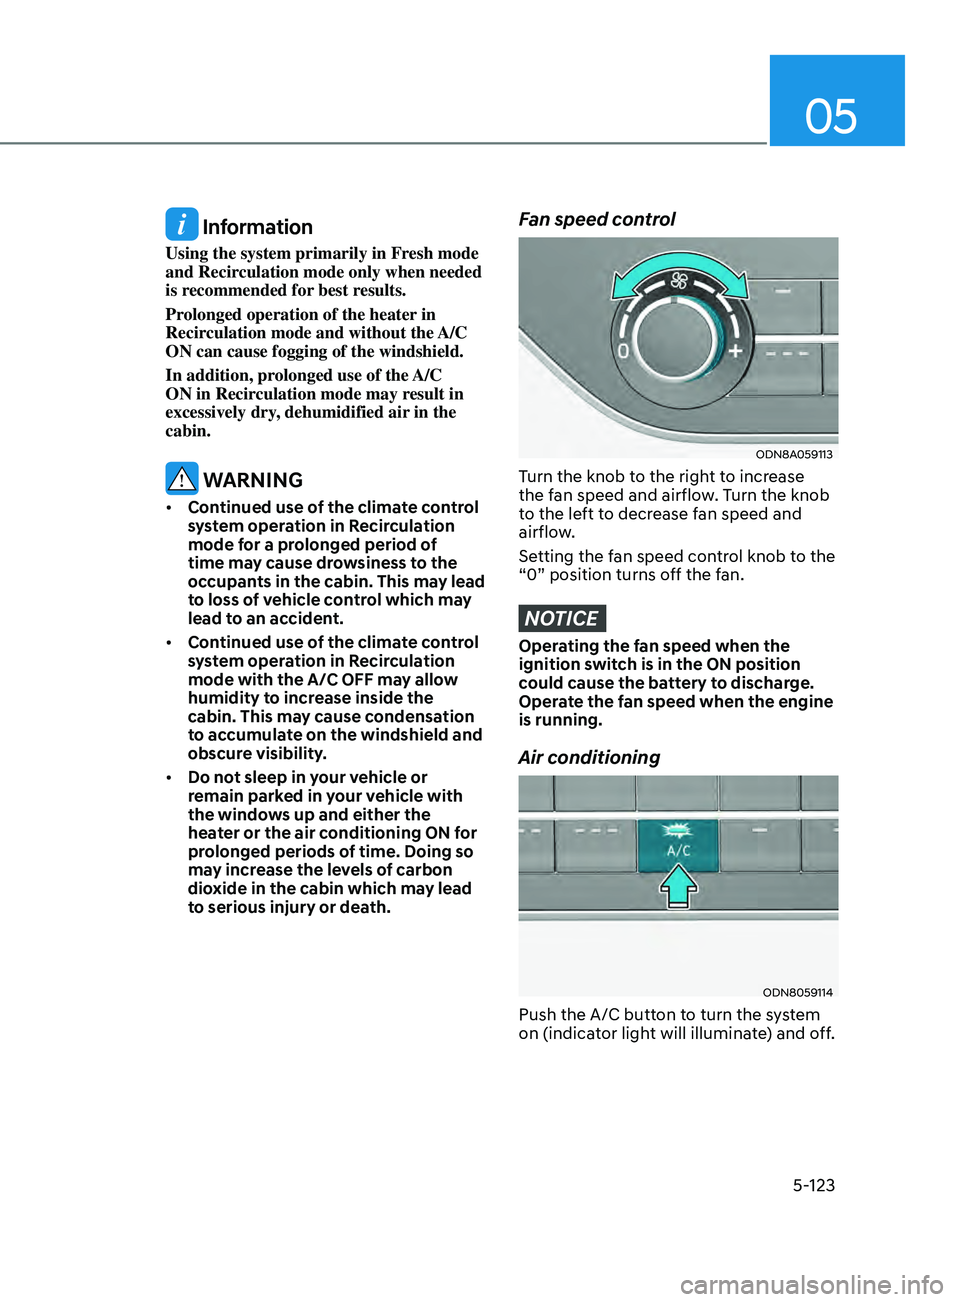
Fan speed control
ODN8A059113
Turn the knob to the right to increase
the fan speed and airflow. Turn the knob
to the left to decrease fan speed and
airflow.
Setting the fan speed control knob to the
“0” position turns off the fan.
NOTICE
Operating the fan speed when the
ignition switch is in the ON position
could cause the battery to discharge.
Operate the fan speed when the engine
is running.
Air conditioning
ODN8059114
Push the A/C button to turn the system
on (indicator light will illuminate) and off.
Page 264 of 546
Convenient Features
5-134
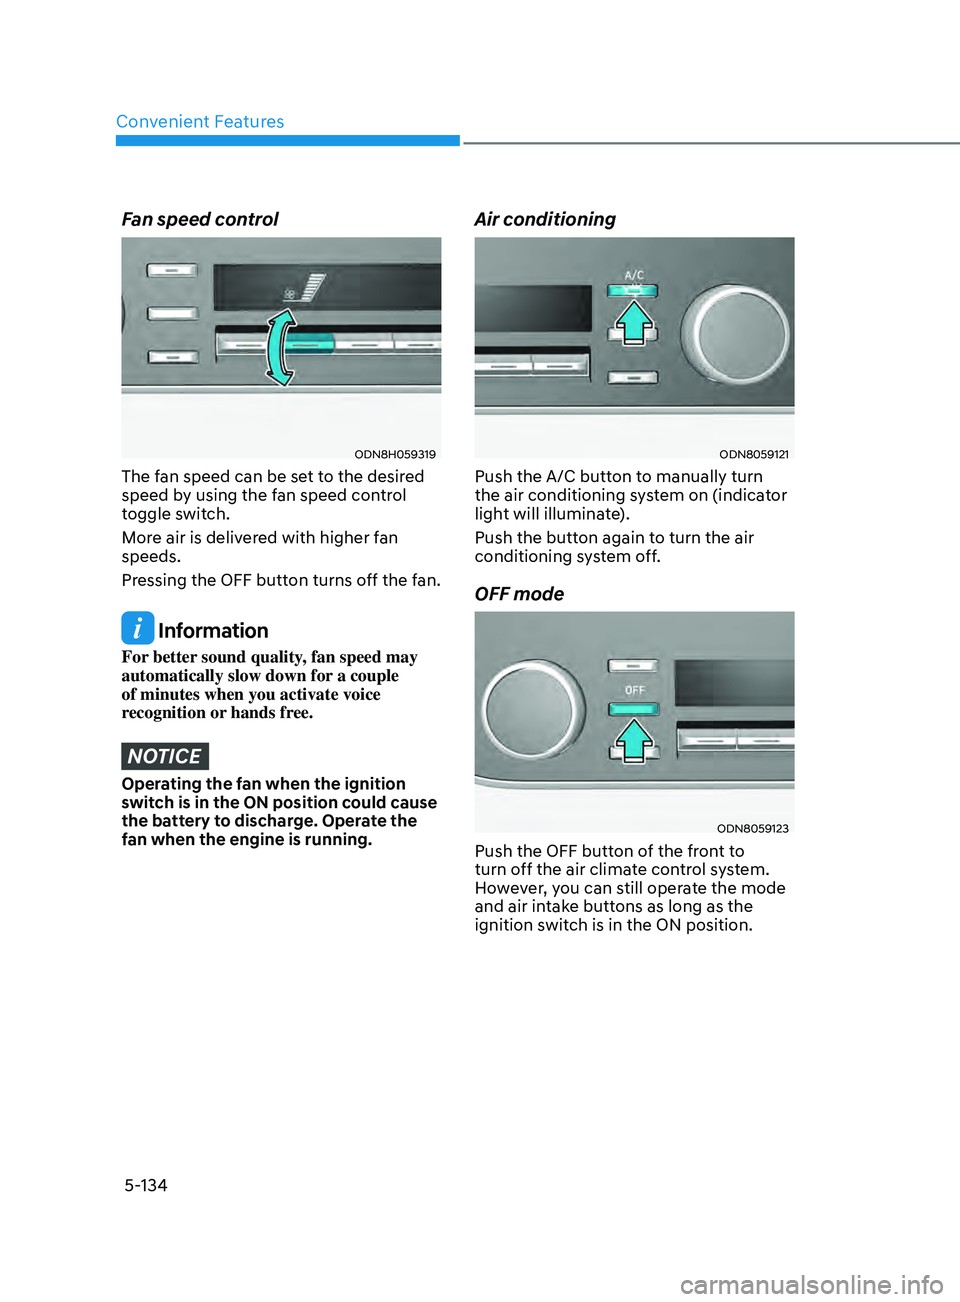
Fan speed control
ODN8H059319
The fan speed can be set to the desired
speed by using the fan speed control
toggle switch.
More air is delivered with higher fan
speeds.
Pressing the OFF button turns off the fan.
Information
For better sound quality, fan speed may
automatically slow down for a couple
of minutes when you activate voice
recognition or hands free.
NOTICE
Operating the fan when the ignition
switch is in the ON position could cause
the battery to discharge. Operate the
fan when the engine is running.
Air conditioning
ODN8059121
Push the A/C button to manually turn
the air conditioning system on (indicator
light will illuminate).
Push the button again to turn the air
conditioning system off.
OFF mode
ODN8059123
Push the OFF button of the front to
turn off the air climate control system.
However, you can still operate the mode
and air intake buttons as long as the
ignition switch is in the ON position.