2022 HYUNDAI SONATA light
[x] Cancel search: lightPage 497 of 546
08
8-43
Curb Weight
This means the weight of a motor
vehicle with standard and optional
equipment including the maximum
capacity of fuel, oil and coolant, but
without passengers and cargo.
DOT Markings
A code molded into the sidewall
of a tire signifying that the tire
is in compliance with the U.S.
Department of Transportation motor
vehicle safety standards. The DOT
code includes the Tire Identification
Number (TIN), an alphanumeric
designator which can also identify
the tire manufacturer, production
plant, brand and date of production.
GVWR
Gross Vehicle Weight Rating
GAWR FRT
Gross Axle Weight Rating for the
Front Axle.
GAWR RR
Gross Axle Weight Rating for the
Rear axle.
Intended Outboard Sidewall
The side of an asymmetrical tire,
that must always face outward when
mounted on a vehicle.
Kilopascal (kPa)
The metric unit for air pressure.
Light truck (LT) tire
A tire designated by its manufacturer
as primarily intended for use on
lightweight trucks or multipurpose
passenger vehicles.Tire Terminology and Definitions
Air Pressure
The amount of air inside the tire
pressing outward on the tire. Air
pressure is expressed in pounds per
square inch (psi) or kilopascal (kPa).
Accessory Weight
This means the combined weight
of optional accessories. Some
examples of optional accessories
are automatic transmission, power
seats, and air conditioning
.
Aspect Ratio
The relationship of a tire’s height to
its width.
Belt
A rubber coated layer of cords that
is located between the plies and the
tread. Cords may be made from steel
or other reinforcing materials.
Bead
The tire bead contains steel wires
wrapped by steel cords that hold the
tire onto the rim.
Bias Ply Tire
A pneumatic tire in which the plies
are laid at alternate angles less than
90 degrees to the centerline of the
tread.
Cold Tire Pressure
The amount of air pressure in a tire,
measured in pounds per square inch
(psi) or kilopascals (kPa) before a tire
has built up heat from driving.
Page 498 of 546
Maintenance
8-44
Load ratings
The maximum load that a tire is rated
to carry for a given inflation pressure.
Load Index
An assigned number ranging from 1
to 279 that corresponds to the load
carrying capacity of a tire.
Maximum Inflation Pressure
The maximum air pressure to which
a cold tire may be inflated. The
maximum air pressure is molded
onto the sidewall.
Maximum Load Rating
The load rating for a tire at the
maximum permissible inflation
pressure for that tire.
Maximum Loaded Vehicle Weight
The sum of curb weight; accessory
weight; vehicle capacity weight; and
production options weight.
Normal Occupant Weight
The number of occupants a vehicle
is designed to seat multiplied by 150
pounds (68 kg).
Occupant Distribution
Designated seating positions.
Outward Facing Sidewall
An asymmetrical tire has a particular
side that faces outward when
mounted on a vehicle. The outward
facing sidewall bears white lettering
or bears manufacturer, brand, and/or
model name molding that is higher
or deeper than the same moldings on
the inner facing sidewall.Passenger (P-Metric) tire
A tire used on passenger cars
and some light duty trucks and
multipurpose vehicles.
Ply
A layer of rubber-coated parallel
cords.
Pneumatic tire
A mechanical device made of rubber,
chemicals, fabric and steel or other
materials, that, when mounted on
an automotive wheel provides the
traction and contains the gas or fluid
that sustains the load.
Pneumatic options weight
The combined weight of installed
regular production options weighing
over 5 lb. (2.3 kg) in excess of the
standard items which they replace,
not previously considered in
curb weight or accessory weight,
including heavy duty breaks, ride
levelers, roof rack, heavy duty
battery, and special trim.
Recommended Inflation Pressure
Vehicle manufacturer’s
recommended tire inflation pressure
as shown on the tire placard.
Radial Ply Tire
A pneumatic tire in which the ply
cords that extend to the beads are
laid at 90 degrees to the centerline of
the tread.
Rim
A metal support for a tire and upon
which the tire beads are seated.
Page 501 of 546
08
8-47
Low Aspect Ratio Tires
The aspect ratio is lower than 50 on
low aspect ratio tires.
Because low aspect ratio tires are
optimized for handling and braking,
their sidewall is a little stiffer than
a standard tire. Also low aspect
ratio tires tend to be wider and
consequently have a greater contact
patch with the road surface. In some
instances they may generate more
road noise compared with standard
tires.
CAUTION
Because the sidewall of a low
aspect ratio tire is shorter than
a standard tire, the rim of the
wheel and the tire itself is more
easily susceptible to damage. Use
caution when driving and follow the
guidelines below to help minimize
damage to the wheel and tire:
• When driving on a rough road
or off road, drive cautiously
because tires and wheels may
be damaged. And after driving,
inspect tires and wheels.
• When passing over a pothole,
speed bump, manhole, or curb
stone, drive slowly so that the
tires and wheels are not damaged.
• If the tire is subjected to a severe
impact, have the tire and wheel
inspected by an authorized
HYUNDAI dealer.
• Inspect the tire condition and
pressure every 1,800 miles
(3,000km).
CAUTION
• It is not easy to recognize tire
damage with your own eyes. But
if there is the slightest hint of tire
damage, have the tire checked or
replaced because the tire damage
may cause air leakage from the
tire.
• If the tire is damaged by driving
on a rough road, off road, pothole,
manhole, or curb stone, it will not
be covered by the warranty.
Page 502 of 546
Maintenance8-48
■ Cartridge type
■ Blade type
■ Multi fuse Normal
Blown
Normal Blown
Normal Blown
OTM078035
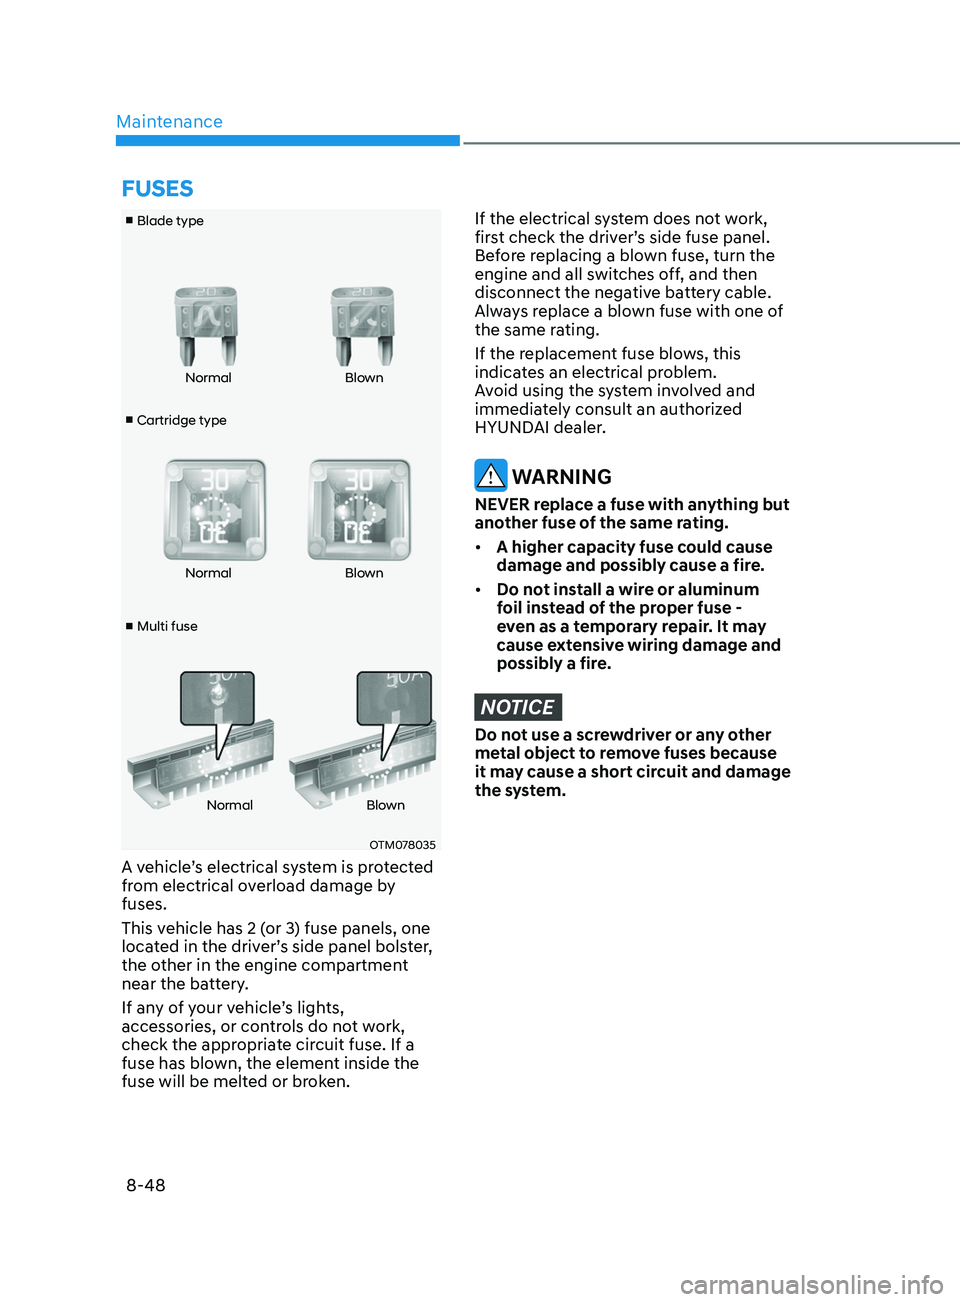
A vehicle’s electrical system is protected
from electrical overload damage by
fuses.
This vehicle has 2 (or 3) fuse panels, one
located in the driver’s side panel bolster,
the other in the engine compartment
near the battery.
If any of your vehicle’s lights,
accessories, or controls do not work,
check the appropriate circuit fuse. If a
fuse has blown, the element inside the
fuse will be melted or broken.
If the electrical system does not work,
first check the driver’s side fuse panel.
Before replacing a blown fuse, turn the
engine and all switches off, and then
disconnect the negative battery cable.
Always replace a blown fuse with one of
the same rating.
If the replacement fuse blows, this
indicates an electrical problem.
Avoid using the system involved and
immediately consult an authorized
HYUNDAI dealer.
WARNING
NEVER replace a fuse with anything but
another fuse of the same rating.
• A higher capacity fuse could cause
damage and possibly cause a fire.
• Do not install a wire or aluminum
foil instead of the proper fuse -
even as a temporary repair. It may
cause extensive wiring damage and
possibly a fire.
NOTICE
Do not use a screwdriver or any other
metal object to remove fuses because
it may cause a short circuit and damage
the system.
fuSES
Page 511 of 546
08
8-57
Consult an authorized HYUNDAI dealer
to replace most vehicle light bulbs. It is
difficult to replace vehicle light bulbs
because other parts of the vehicle must
be removed before you can get to the
bulb. This is especially true for removing
the headlamp assembly to get to the
bulb(s).
Removing/installing the headlamp
assembly can result in damage to the
vehicle.
Information
The headlamp and tail lamp lenses could
appear frosty if the vehicle is washed after
driving or the vehicle is driven at night
in wet weather. This condition is caused
by temperature difference between the
lamp inside and outside and, it does not
indicate a problem with your vehicle.
When moisture condenses in the lamp,
it will be removed after driving with the
headlamp on. The removable level may
differ depending on lamp size, lamp
position and environmental condition.
However, if moisture is not removed, we
recommend that your vehicle is inspected
by an authorized HYUNDAI dealer.
WARNING
• Prior to replacing a lamp, depress
the foot brake, move the shift button
into P (Park) apply the parking brake,
place the ignition switch to the
LOCK/OFF position, and take the key
with you when leaving the vehicle
to avoid sudden movement of the
vehicle and to prevent possible
electric shock.
• Be aware the bulbs may be hot and
may burn your fingers.
Headlamp, Parking Lamp,
Daytime Running Light, Turn
Signal Lamp, Cornering Lamp
and Side Marker
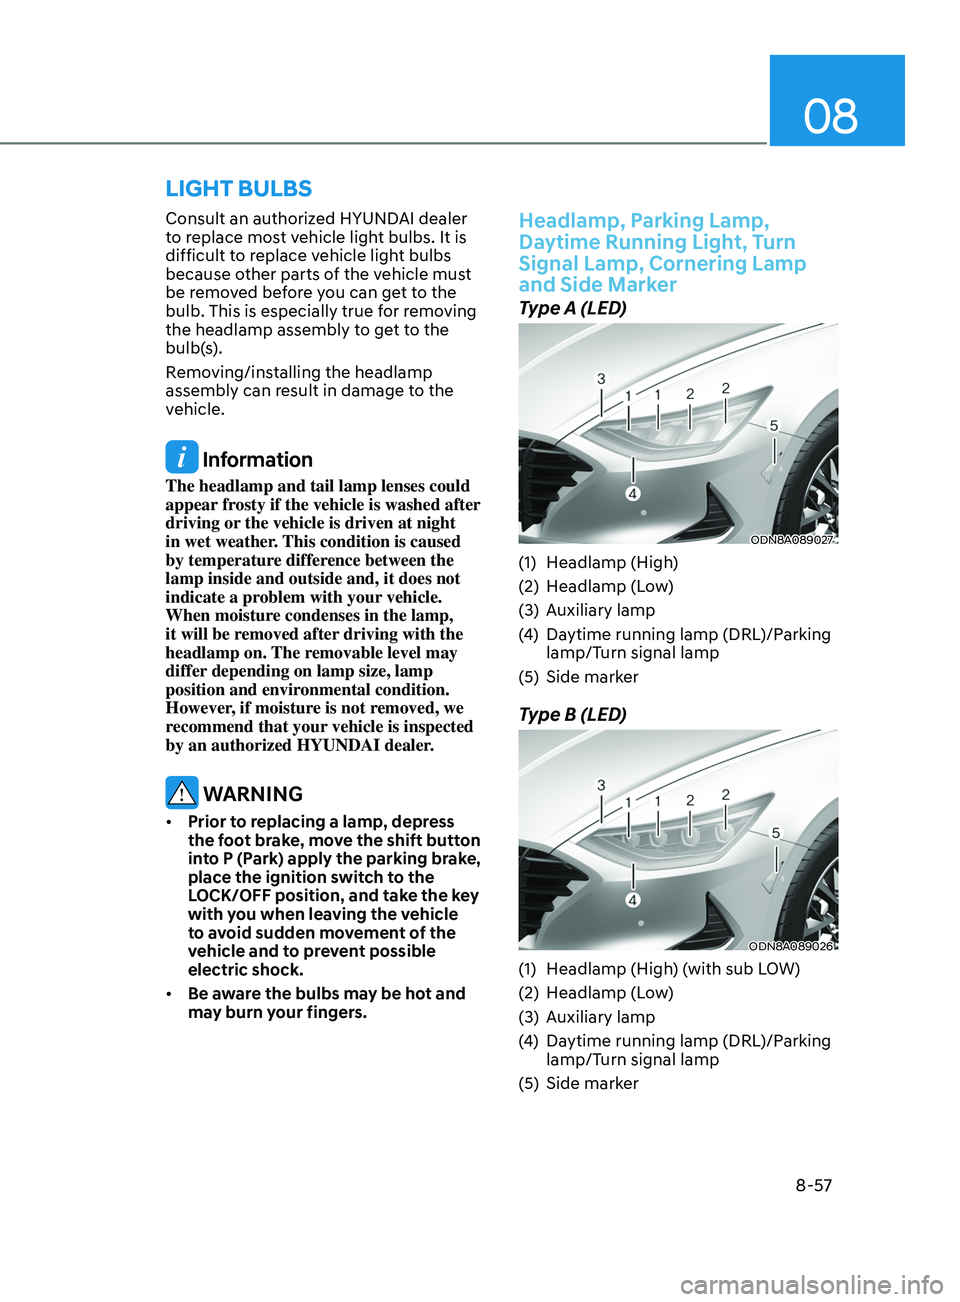
Type A (LED)
ODN8A089027
(1) Headlamp (High)
(2)
H
eadlamp (Low)
(3)
A
uxiliary lamp
(4)
Da
ytime running lamp (DRL)/Parking
lamp/Turn signal lamp
(5)
Side mark
er
Type B (LED)
ODN8A089026
(1) Headlamp (High) (with sub LOW)
(2)
H
eadlamp (Low)
(3)
A
uxiliary lamp
(4)
Da
ytime running lamp (DRL)/Parking
lamp/Turn signal lamp
(5)
Side mark
er
light BulBS
Page 512 of 546
Maintenance
8-58
Lamps
If the LED lamp does not operate, have
the system checked by an authorized
HYUNDAI dealer.
The LED lamps cannot be replaced as
a single unit because it is an integrated
unit. The LED lamps has to be replaced
with the unit.
A skilled technician should check or
repair the LED lamp, for it may damage
related parts of the vehicle.
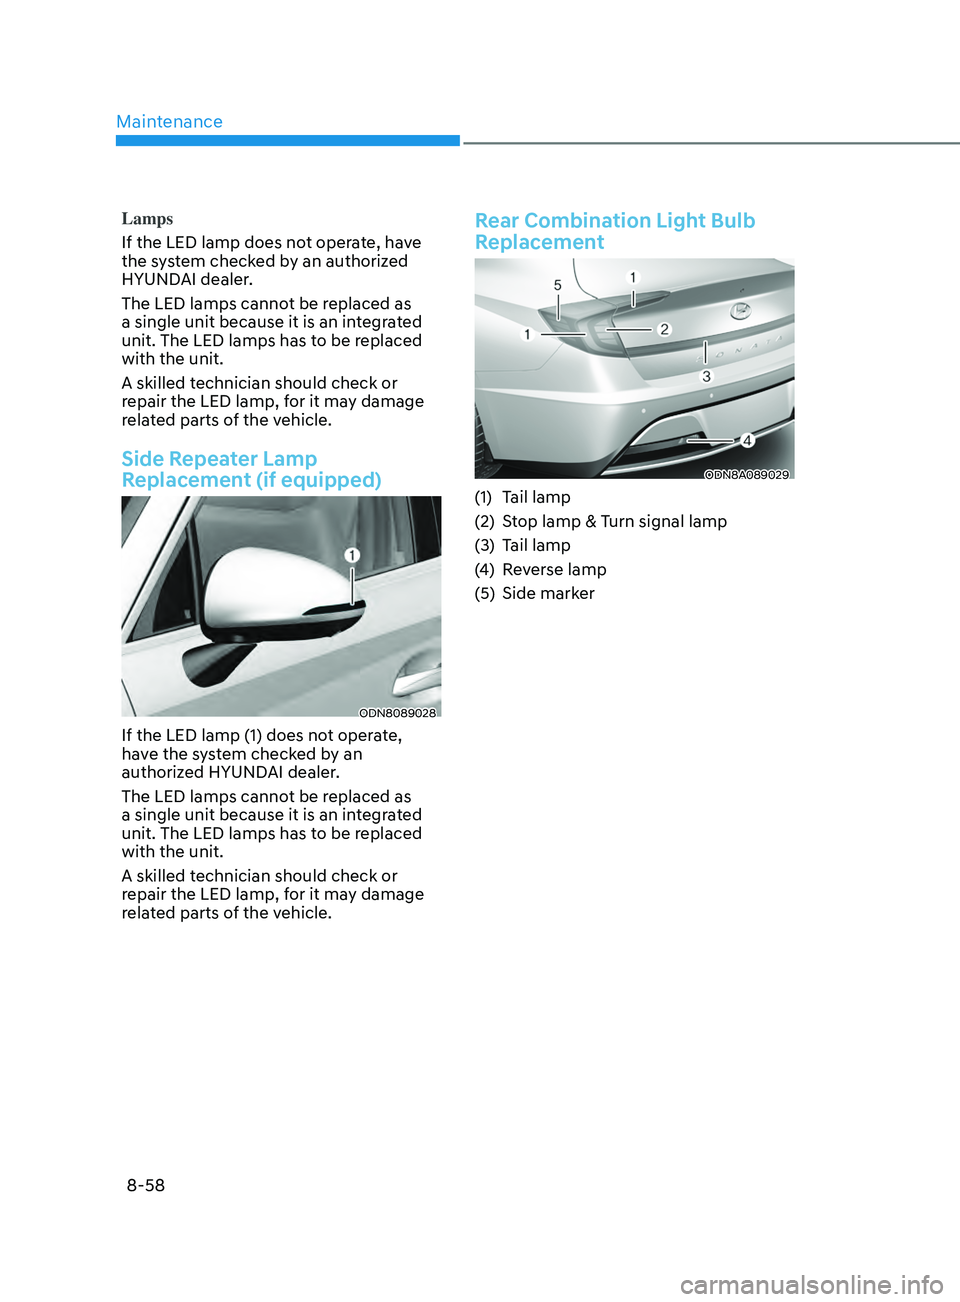
Side Repeater Lamp
Replacement (if equipped)
ODN8089028
If the LED lamp (1) does not operate,
have the system checked by an
authorized HYUNDAI dealer.
The LED lamps cannot be replaced as
a single unit because it is an integrated
unit. The LED lamps has to be replaced
with the unit.
A skilled technician should check or
repair the LED lamp, for it may damage
related parts of the vehicle.
Rear Combination Light Bulb
Replacement
ODN8A089029
(1) Tail lamp
(2)
St
op lamp & Turn signal lamp
(3)
Tail lamp
(4
)
Re
verse lamp
(5)
Side marker
Page 514 of 546
Maintenance
8-60
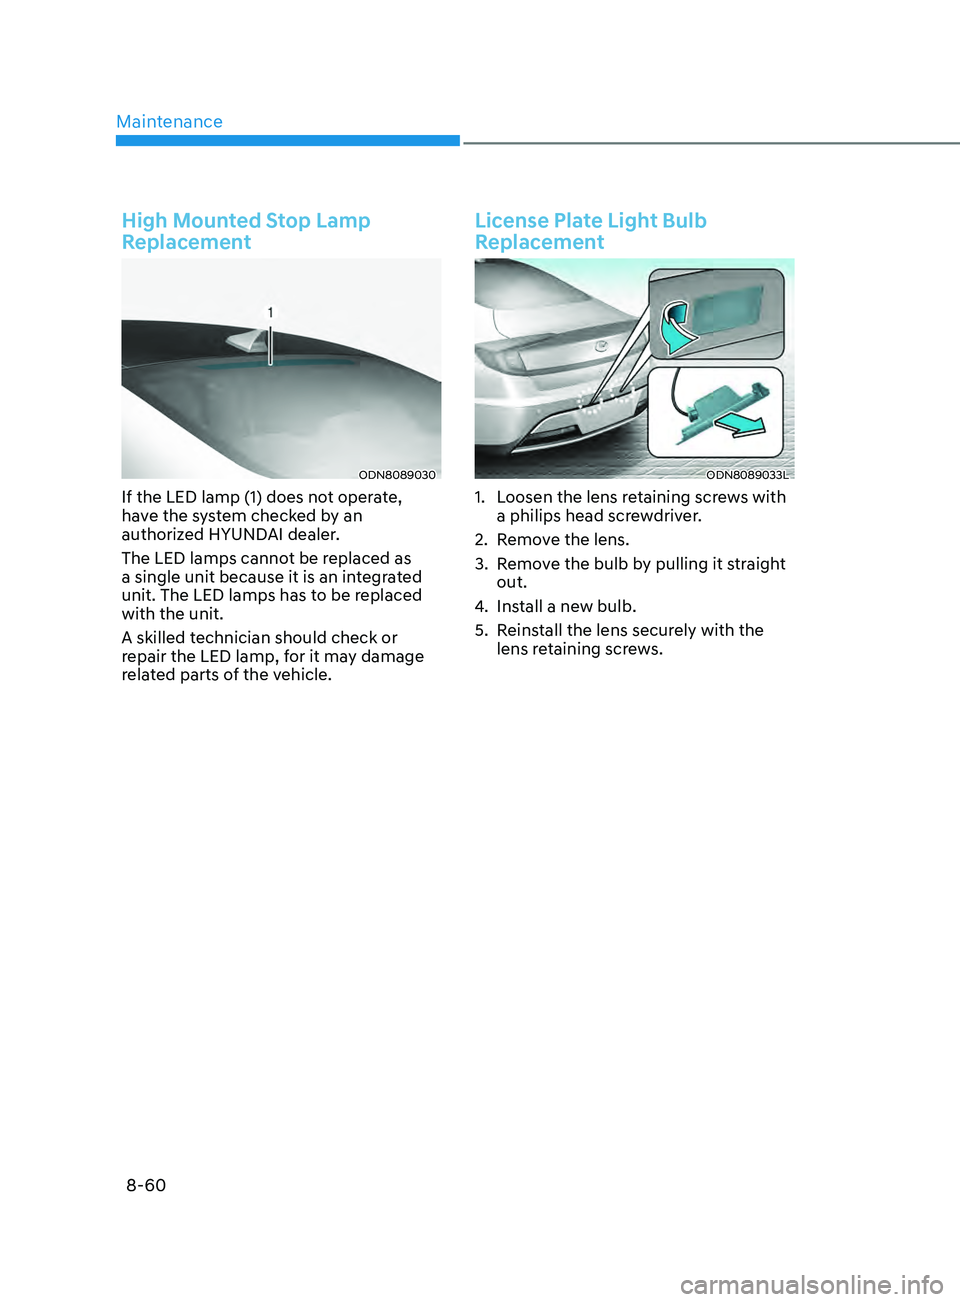
High Mounted Stop Lamp
Replacement
ODN8089030
If the LED lamp (1) does not operate,
have the system checked by an
authorized HYUNDAI dealer.
The LED lamps cannot be replaced as
a single unit because it is an integrated
unit. The LED lamps has to be replaced
with the unit.
A skilled technician should check or
repair the LED lamp, for it may damage
related parts of the vehicle.
License Plate Light Bulb
Replacement
ODN8089033L
1. Loosen the lens retaining screws with a philips head screwdriver.
2.
R
emove the lens.
3.
R
emove the bulb by pulling it straight
out.
4.
Ins
tall a new bulb.
5.
R
einstall the lens securely with the
lens retaining screws.
Page 515 of 546
08
8-61
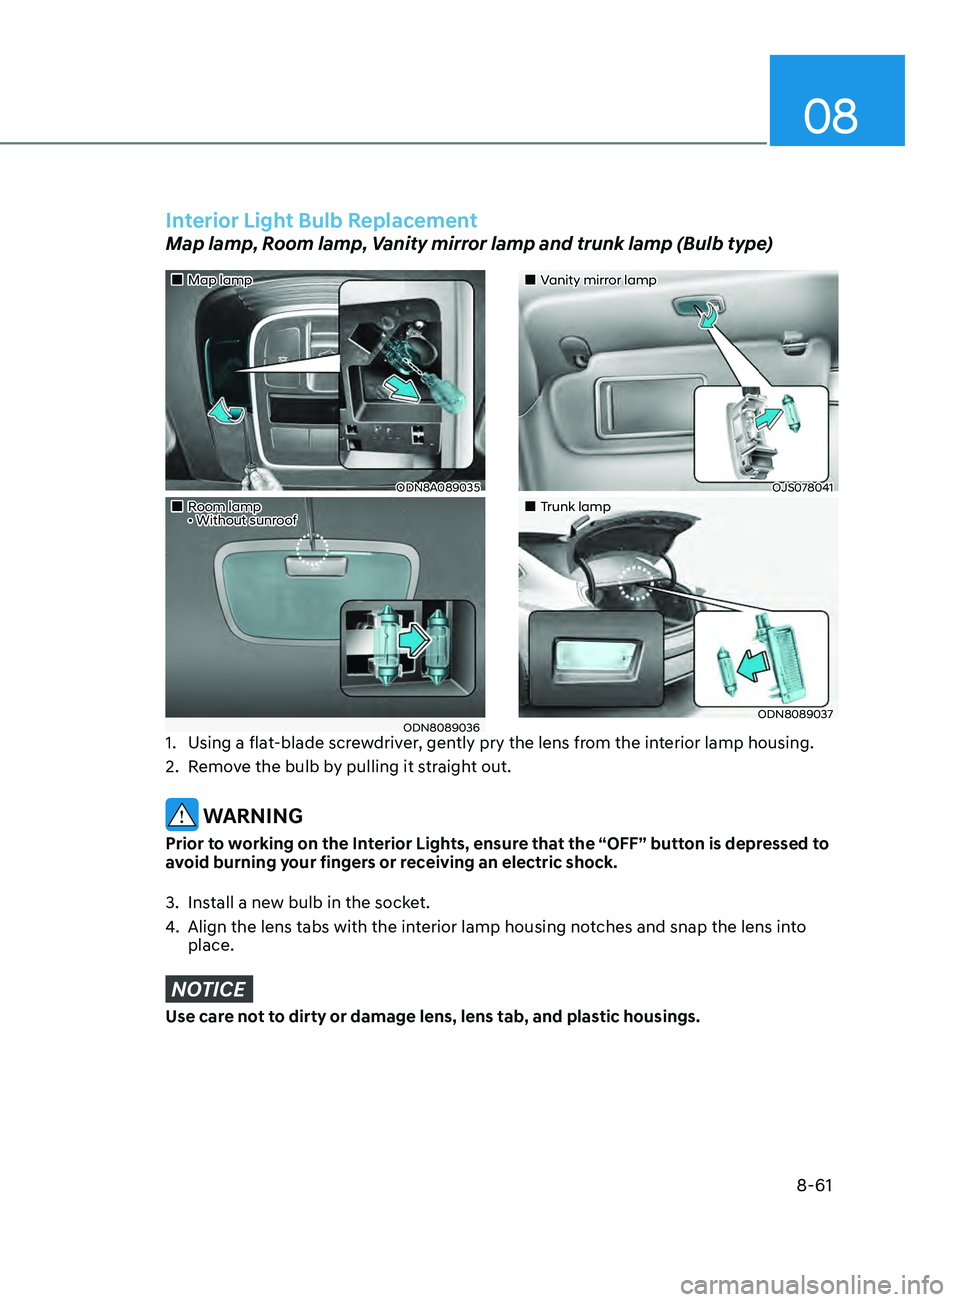
„„Map lamp
ODN8A089035
„„Room lamp • Without sunroof
ODN8089036
„„Vanity mirror lamp
OJS078041
„„Trunk lamp
ODN8089037
Interior Light Bulb Replacement
Map lamp, Room lamp, Vanity mirror lamp and trunk lamp (Bulb type)
1. Using a flat-blade screwdriver, gently pry the lens from the interior lamp housing.
2.
R
emove the bulb by pulling it straight out.
WARNING
Prior to working on the Interior Lights, ensure that the “OFF” button is depressed to
avoid burning your fingers or receiving an electric shock.
3.
Ins
tall a new bulb in the socket.
4.
Align the lens tabs with the in
terior lamp housing notches and snap the lens into
place.
NOTICE
Use care not to dirty or damage lens, lens tab, and plastic housings.